HANDLEIDING Xemio-653 Mediaspeler Voor meer informatie en ondersteuning, www.lenco.
Waarschuwingen: GEBRUIK ALTIJD DE STYLUS BIJ HET BEDIENEN VAN DIT APPARAAT Niet doen • • Plaats geen naakte vlam, zoals kaarsen, op of in de buurt van het product. Plaats geen voorwerpen gevuld met vloeistof, zoals vazen, op of in de buurt van het product. • Gebruik of bewaar het product niet op een plaats waar het onderworpen is aan direct zonlicht, hitte, overmatig stof of trillingen. • Gebruik dit product niet met natte handen. • • • • Reinig dit product niet met water of andere vloeistoffen.
Waarschuwing: Langdurige blootstelling aan harde geluiden van persoonlijke muziekspelers kan leiden tot tijdelijk of permanent gehoorverlies. Luisteren naar een persoonlijke muziekspeler bij deelname aan het verkeer kan de luisteraar minder bewust maken van mogelijke gevaren, zoals naderende auto’s.
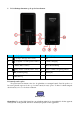
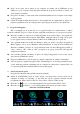
1. De bedieningselementen op de speler leren kennen Item Omschrijving Item Omschrijving 7 Mic 1 (Vorige / Terugspoelen / VOL-) 2 (Volgende / Vooruitspoelen / VOL+) 8 3 4 M (Menu / Enter / Select) (Play / Pause / Standby AAN - UIT) 5 VOL (Volumeregeling) 6 AAN/UIT-knop Oortelefoonuitgang 9 Mini USB aansluiting 10 Sleuf voor Micro SD geheugenkaart 11 TFT-display De batterij van de speler De speler heeft een interne, niet door de gebruiker te vervangen batterij.
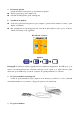
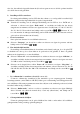
a. b. De batterij opladen U kunt de batterij van de speler op twee manieren opladen: Sluit de speler aan op uw computer. Of, Gebruik de USB-oplader. (apart verkrijgbaar) Aansluiten en opladen: Zodra u de speler heeft aangesloten op de computer / oplader, zal het scherm “Connect” op het display verschijnen, Het oplaadniveau wordt aangegeven met een balk in het batterij-icoontje op het “Connect” scherm. De batterij wordt opgeladen.
Steek, om de speler aan te sluiten op uw computer, de stekker van de USB-kabel in een USB-poort op uw computer. Steek het andere uiteinde in de speler, het scherm “Connect” zal op het display verschijnen. De speler is nu klaar voor het uitwisselen van mediabestanden met de computer en de batterij wordt opgeladen. U kunt de mediabestanden uitwisselen door de bestanden met de computermuis te slepen of te kopiëren en plakken, tussen de computer en de speler. Koppel de speler los als u klaar bent. b.
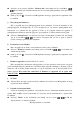
4. (Muziek) (Films) (Opnemen) (Foto’s) (Tekst) (Spellen) (Opnamen afspelen) (Instellingen) Gebruik van het menu Setup U kunt voordat u begint met het gebruik van de speler de datum & tijd of andere standaardinstellingen naar wens instellen in het setupmenu. Open het setupmenu vanuit het hoofdmenu door “Setup” te selecteren met behulp van de / en druk vervolgens op de toets M, het menu “Setting” verschijnt.
niet doet, dan zullen de ingestelde datum & tijd verloren gaan en moet u de klok opnieuw instellen als u de klok weer wilt gebruiken. b. Instellingen LCD veranderen De achtergrondverlichting van het LCD kan het scherm voor een bepaalde hoeveelheid tijd verlichten of altijd worden ingeschakeld als de speler is ingeschakeld.
Selecteer, om de status te bekijken, “Memory info” met behulp van de toetsen M en / . Er verschijnt een informatiescherm met de resterende geheugenruimte en het percentage gebruikt geheugen. Druk op de toets hoofdmenu. of houd de toets M ingedrukt om terug te gaan naar het setupmenu of het g. Het geheugen formatteren Het is mogelijk dat u het geheugenapparaat moet formatteren.
a. Muziek afspelen Druk op het afspeelscherm op de toets om het afspelen te starten. Druk op de toets om het afspelen te pauzeren. Druk nogmaals om het afspelen te hervatten. b. Afspelen van vorige of volgende nummer Druk op de toets om het volgende nummer af te spelen. Druk op de toets c. Vooruitspoelen of terugspoelen Houd de toets ingedrukt om vooruit te spoelen Houd de toets ingedrukt om terug te spoelen. d.
a. Lokale map Druk op het afspeelscherm op de toets muziek afspeelt), druk vervolgens op de toets M om het submenu Music te openen. Selecteer in het submenu Music de optie “Local folder” en selecteer de map en/of het muziekbestand in de lijst met behulp van de toetsen / en M. Het apparaat zal als er een muziekbestand is geselecteerd terugkeren naar het afspeelscherm. Druk vervolgens op de toets b. om het afspelen van muziek te stoppen (indien er om het afspelen te starten.
Stel A-B herhalen in: Druk onder het afspelen van muziek op de toets M, het submenu Music verschijnt, selecteer vervolgens “Repeat”, de letter “A” knippert op het afspeelscherm, druk vervolgens op de toets om het startpunt “A” te selecteren. Nadat “A” is geselecteerd zal “B” knipperen, gebruik de toets nogmaals om het eindpunt “B” te selecteren met behulp van de toetsen . Nu wordt het gedeelte tussen A en B (A-B) herhaald.
Druk op de toets c. Vooruitspoelen of terugspoelen Houd de toets ingedrukt om vooruit te spoelen. Houd de toets ingedrukt om terug te spoelen. d. Het volumeniveau instellen Druk onder het afspelen van een film op de toets VOL en druk vervolgens op de toetsen / om het volumeniveau te verhogen of verlagen. Druk om het volumeniveau vooraf in te stellen in stopmodus op het afspeelscherm voor films om het vorige filmbestand af te spelen. op de toets VOL, de volume regeling verschijnt.
Selecteer “Repeat” in het submenu Movie, selecteer vervolgens naar wens “Normal / Repeat one / Folder / Repeat folder / Repeat all / Random / Intro” met behulp van de toetsen e. / en M. Menu verlaten Selecteer Exit om terug te gaan naar het afspeelscherm. 10. Videobestanden converteren naar AMV Deze tool kan op de computer worden gebruikt om videobestanden te converteren naar AMV bestanden voordat u ze upload naar uw speler.
Stel “pixels of AMV” in op “160x120” en “Frames per second” op “middle”, klik vervolgens op OK om te bevestigen. Klik op Na het converteren zullen de AMV bestanden automatisch afspelen als preview. Als het geconverteerde AMV bestand klaar is voor overdacht, dat kunt u de geconverteerde AMV bestanden kopiëren en verplaatsen naar de mediaspeler. om het converteren te starten. Opmerking: Alleen resoluties tot 160x120 kunnen worden ondersteund. 11.
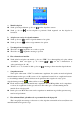
Selecteer “Record” in het hoofdmenu met behulp van de toetsen opnamescherm verschijnt. en M, het / Het opnamescherm 2. Het opnemen starten/pauzeren Druk op de toets om het opnemen te starten, de opnametijd begint te lopen. Druk op de toets om het opnemen te pauzeren, de opnametijd zal stoppen en knipperen. Druk nogmaals op de knop om de opname te hervatten, de opnametijd zal weer gaan lopen. 3.
Het afspeelscherm voor voice memo’s a. Afspelen en pauzeren van opgenomen voice memo’s Druk op het afspeelscherm voor voice memo’s op de toets opgenomen bestand af te spelen. Druk op de toets om het afspelen te pauzeren. b. Afspelen vorige of volgende bestand Druk op de toets om het volgende bestand af te spelen. Druk op de toets om het vorige bestand af te spelen. om het afspelen van het c. Vooruitspoelen of terugspoelen Houd de toets ingedrukt om vooruit te spoelen.
Druk vervolgens op de toets om het afspelen te starten. b. Bestand verwijderen Selecteer “Delete file” in het submenu Voice en selecteer vervolgens het stembestand dat u wilt verwijderen met behulp van de toetsen / en M. Druk, zodra het bestand is geselecteerd op de toets M en selecteer Yes om te bevestigen of No om te annuleren. c. Alle bestanden verwijderen Selecteer “Delete all” in het submenu Voice en selecteer vervolgens “Yes / No” met behulp van de toetsen / .
Druk op de toets M om de functie A – B herhalen te annuleren. Of druk op de toets pauzeren. om te Het aantal herhalingen instellen: Druk onder het afspelen van stembestanden op de toets M, het submenu Music verschijnt, selecteer vervolgens “Replay times”, kies vervolgens naar wens “1 / 2 / 3 / 4 / 5 / 6 / 7 / 8 / 9 / 10” met behulp van de toetsen / en M. De speler zal de gekozen muziekbestanden zo vaak herhalen als het gekozen nummer.
Druk als een fotobestand is geselecteerd op de toets b. Afspelen instellen Selecteer “Playback set” in het submenu Photo en selecteer vervolgens “Manual play”. U moet als de optie “Manual play” is geselecteerd gebruik maken van de toetsen / om naar de vorige / volgende foto te gaan in afspeelmodus. Selecteer “Auto play”, en kies in het volgende menu naar wens “2 / 3 / 4 / 5 / 5 / 6 / 7 / 8 / 9 / om het afspelen te starten. 10 seconden” met behulp van de toetsen / en M.
19. Gebruik van het submenu eBook in de lijst Het is mogelijk om bepaalde instellingen te veranderen voor het lezen van eBooks. De instellingen die veranderd kunnen worden zijn: a. Lokale map Druk op de toets M in de lijst met eBooks om het submenu eBook te openen. Selecteer “Local folder” in het submenu eBook, selecteer vervolgens een map en bestand in de lijst met behulp van de toetsen / . Druk, zodra het bestand is geselecteerd, op de toets M en vervolgens op de toets lezen. b.
doet u als volgt: a. Bladwijzer selecteren Selecteer onder het lezen van een eBook “Bookmark select” met behulp van de toetsen en M. Selecteer een opgeslagen bladwijzer die u wilt oproepen en druk vervolgens op de toets M. / b. Bladwijzer verwijderen Selecteer tijdens het lezen van een eBook “Bookmark delete”, selecteer vervolgens in de lijst welke opgeslagen bladwijzer u wilt verwijderen met behulp van de toetsen / . Druk zodra de bladwijzer is geselecteerd op de toets M om te bevestigen.
de slang zal bij het eten van voedsel telkens langer worden. Zorg ervoor dat de kop van de slang niet de muren of het lichaam van de slang raakt. Selecteer, om het spel te spelen, “Game” in het hoofdmenu, en selecteer vervolgens het gewenste spel. Gebruik de toetsen: : links, : rechts, VOL: omhoog, M : omhoog, Houd de toets M ingedrukt om het spel te verlaten. : Pauze. 23. Problemen oplossen Kan apparaat niet AANZETTEN. * Controleer of de AAN/UIT-knop naar de stand AAN is geschoven.
oortelefoon R = 275mV(rms) op 32 Ohm Frequentierespons 20Hz tot 20000Hz SNR > 60dB Muziekformaat MP3 / WMA 32Kbps – 320kbps Filmformaat AMV Codering recorder WAV Fotoformaat JPEG / BMP / GIF eBook-formaat Bedrijfstemperatuur TXT 0 tot 40℃ Besturingssysteem Window 2000/XP/Vista, Mac 9.2 of hoger 32 / 64 / 128 / 256kbps 25. Disclaimer Er worden regelmatig updates voor firmware en/of hardwarecomponenten gemaakt.