USER’S MANUAL Xemio-656 Media Player For information and support: www.lenco.
Warnings Don’ts • • Do not place naked flames, such as lighted candles on or near the product. Do not place objects filled with liquids, such as vases on or near the product. • Do not use or store this product in a place where it is subject to direct sunlight, heat, excessive dust or vibration. • Do not use this product with wet hands. • • • • Do not clean this product with water or other liquids. Do not block or cover the slots and holes in the product.
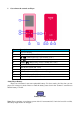
1. Get to know the controls on Player Item Description 1 TFT LCD Display 2 M Button (Menu / Enter / Select) 3 ( ) Button (Previous / Fast-Rewind / VOL-) 4 ( ) Button (Next / Fast-Forward / VOL+) 5 Center ( 6 V (VOL) Button (Volume Control) 7 Main Power Switch (ON - OFF) 8 Microphone (Mono) 9 USB Mini Connector (PC Connection / Charge) 10 Micro SD Memory Card Slot 11 Earphone Output Jack (3.
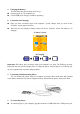
a. b. Charging the Battery: You can charge the player battery in two ways: Connect player to your computer. Or, Use the USB power charger. (available separately) Connection and Charging: Once you have connected player with computer / power charger, then you will see the “Connect” screen appear on screen, The level bars are running in battery status icon at the “Connect” screen. The battery is in charging.
computer, and connect the other end to player, then the “Connect” screen appear for view. Now the player is ready for media files transfer with your computer and the battery is charging. You can transfer the media files by using the computer mouse use drag and place, or copy and paste, in between the player and your computer. Disconnect it when you’re done. b. To Disconnecting Player It’s important not to disconnect player while it’s syncing or transferring files.
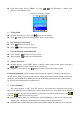
(If Picture chooses) (If Text chooses) (If Game chooses) (If Setting chooses) 4. Use Setup Menu You might need to set date & time or change some default setting as you desired in setup sub menu before you start to use the player. To go into setup menu, from main menu, choose “Setup” by use / button and then press M button, a “Setting” menu appears to use. You can go back to previous menu by press the button during in setup menu. Or, press and hold the M button to return to main menu.
b. To change “LCD set” You can set the backlight to illuminate the screen for a certain amount of time as you desired or make the backlight to always ON when every time you turn ON the player. To change LCD backlight, choose “LCD set” > choose “Dark mode”, a level bar with number appear then chose “0 (always On) / 5 / 10 / 15 / 20 / 25 / 30 / 35 / 40 / 45 / 50 seconds” as you desired by using M and / buttons. Choose “0” to prevent the LCD backlight from turning to off.
From main menu, choose “Music” by using / and M button, a “Music Now Playing” screen appears to use. “Music Now Playing” Screen a. To Play Music In Music Now Playing screen, press button to start the play. Press button to pause the playing music. Press it again to play. b. Play Previous or Next Music Press button to play next music. Press button to play previous music. c.
6. Use Music Submenu in Music Stop Mode You might need to selecting folders for music play and delete music files. To do this: a. Local Folder In Music Now Playing screen, press b. button to stop the playing music if player is in playing, then press M button to call up the Music Submenu. In Music Submenu screen, choose “Local folder” a list menu appear, and then select folder and / or choose a music file by using / and M button.
Select Exit to back to music now playing screen. 8. Use Movie Menu a. To Play Movie From Main Menu, choose “Movie” by using / and M button, a “Movie Now Playing” screen appears to use. In Movie Now Playing” screen, press key to start the play. Press button to pause and to back to Movie Now Playing screen. Press it again, the video will play continue. b. To Play Previous or Next Video Press button to play next movie file. Press button to play previous movie file. c.
b. Delete File In movie submenu screen, choose “Delete file” a file list menu appear, and then choose which movie file that you want to delete by using / buttons. Once file is selected, press M button and choose “Yes” to confirm or “No” to cancel. c. Delete All In movie submenu screen, choose “Delete all” then selects “Yes / No” by using button. One “YES” or “NO” appear then press M button to confirm.
Noted: This program is used to convert video files into AMV format, currently only AMV format is supported. Run “AMV Convert Tools”, click to choose the folder where to save the AMV files, and then click to select the folder where the original files are. The original file will show in the file window once selected. Select with highlight the unprocessed AMV files in the file window, the highlighted into . And then click icon will be icon and a dialog box will be shown.
After conversion, the AMV files will play automatically for preview. And now the converted AMV file is ready to transfer, you can simply copy and place those converted AMV files to the media player. Note: Only pixels in 160x128 can be supported. 11. Use Record Menu You can use the player as a Voice Recorder and recording voice memos using the built-in microphone. 1. To Start Recording Voice Memo From main menu, choose “Record” by using screen appear to use.
Press and hold M button, the recorded file will save into memory. 12. Use Record Submenu (in Stop Mode) You might need to change the folder locations which want to store the record file and / or change record quality to better compression values. In Now Recording screen at stop mode, press M button, a “Record Sub-menu appear to use. a. Local folder In record submenu, choose “Local folder” and then choose the folder name which you want to save the record file by using / and M buttons.
c. To Fast-Forward or Fast-Backward Press and hold buttons to use fast-forward Press and hold button to use fast-backward. d. Adjust volume level In music playing , press “VOL” button, a change volume control screen appears, then press / buttons to adjust volume levels to down / up. Wait for 6 – 8 seconds or press button to return to music now playing screen. 14.
files… etc. To change setting: a. Repeat In voice playing mode, press M button, a Music Sub-menu appear, then choose “Repeat”, then choose “Normal / Repeat one / Folder / Repeat folder / Repeat all / Random / Intro” as you desired by using b. / and M buttons. Exit Select Exit to back to music now playing screen. Note: Press and hold the M button will go back to Main Menu directly. 16.
Once file is selected, press M button and choose Yes to confirm or No to cancel. d. Delete All In photo submenu, choose “Delete all” then selects “Yes / No” by using One “YES” or “NO” appear then press M button to confirm. All photo files will be deleted once YES is selected and confirmed, a “Deleting” screen appear / button. for a while and deleting process is in progress, then “Empty disk!” message will shown on screen for few seconds. e.
activated as your selected time gap to playing. c. Delete file In eBook Submenu, choose “Delete file” a list menu appear, and then choose which eBook file that you want to delete by using / button. Once file is selected, press M button and choose Yes to confirm or No to cancel. d. Delete All In eBook Submenu, choose “Delete all” then selects “Yes / No” by using / button. One “YES” or “NO” appear then press M button to confirm.
will increase the mobile hard disk memory capacity of the player if you use this option. a. To Play From Memory Card: Turn Off the player. Now insert your Micro SD memory card into the memory card slot on side of player. Turn On the player and now the Micro SD memory card, T-Flash, is ready to use. The “Card folder” item will be existed to use when you enter into those music, movie, photo, , Record, Voice and eBook submenu.
24. Specification Dimension 90 mm (H) x 43 mm (W) x 7.8mm (D) Weight 27g LCD 1.8 inches, Resolution (RGB)128 x 160 PC connection USB 2.0 Earphone Impedance 32 Ohm Internal Memory See carton or giftbox Li-ion 3.7V, 150mAh Battery Max. Play Time: > 7 - 9 Hours (MP3 music with power saving mode) Max.
The helpdesk is accessible from Monday till Friday from 9 AM till 6 PM. When contacting Lenco, you will always be asked for the model and serial number of your product. The serial number can be found on the back of the device.