
User's Manual


5
Connecting and disconnecting the player to a computer
Connect the player to your computer to download media files onto your player; or to upload recorded voice
memos and media files onto your computer.
Connecting the player
Plug the USB connector of the Player into a USB port on your computer, then the computer will detect
and install the driver automatically. Once the installation is complete the player will be displayed in “My
Computer” or for MAC users on the desktop.
Now the player is ready for music files upload / download with your computer.
Disconnecting the player
Do not disconnect the player while it’s uploading or downloading files with your computer.
Windows system PC, disconnect the player by clicking the “Safely Remove Hardware” icon in the
Windows system tray.
Mac system PC, disconnect the player by dragging the player icon on the desktop to the Trash.
Now it is safe to unplug the USB cable.
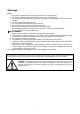
Note: If you do not “Safely remove hardware” before disconnecting data can be lost!
Getting Started
This player is equipped with a touch screen so you can choose the items or functions by tapping the related
icons or files.
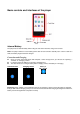
Touch Screen Actions
Operate the touch screen with your finger or fingernail.
Important: Never use a pen or pencil or other sharp objects to write on the touch screen.
Turning the player ON and OFF
Slide power switch into “ON” position.
Press and hold “EXIT” for 3 seconds, first the opening screen and then desktop menu will appear.
Press and hold “EXIT” for 3 seconds again to turn OFF the player (stand-by off).
Slide the ON/OFF switch to OFF when you’re not use the player for a longer period.
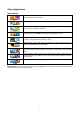
Desktop Menu
Every time you turn on the player, you will see the opening screen followed by the desktop menu which
contains applications of your player. Tap one of the application icons to open it.
Desktop Menu Screen