
Gas Heater User Manual


TROUBLESHOOTING Qualified Technicians Only
PAGE 24
(MODEL L20 BF-2 ONLY)
SPILL SWITCH
This appliance is equipped with a “Spill Switch” which is a
safety device that will shut off gas to the burner in case of sus-
tained back draft or flue gas spillage from the draft hood. The
purpose of this safety device is to prevent potentially harmful
gases from entering your home in the event of a blockage in the
vent system. Once the switch has been activated, the burner
cannot be relit until the switch is reset manually (see Accessing
and Resetting Spill Switch on this page). Repeated tripping of
the switch may indicate there is an obstruction in the venting
system. Other possible causes for the spill switch tripping are
listed below (ordered from most likely to least likely). Note: En-
sure that appliance is cold before performing any checks.
Troubleshooting Check List (Qualified Technicians Only)
Flue Blockage - Check venting system for blockage (e.g. bird
nest, damage, etc.).
Down draft (Is a high wind termination cap installed?).
Examine entire venting system for faults such as discon-
nected joints or damaged vent sections.
Check the vent sizing according to specifications, and vent
configurations (correct venting system, if necessary).
Inadequate make-up air supply in the dwelling, resulting in
negative pressure, inhibiting exhaust flow of the appliance.
(evaluate and determine ways to increase make-up air, if nec-
essary, within the area of the installation).
Defective spill switch (very rare) - Disconnect wires from Spill
Switch. Set Multimeter on ohms and do an ohm check between
terminals on switch. A “O” ohms reading indicates a good switch.
An infinite ohms of “1” reading indicates a defective (or open)
switch.
If spillage is suspected, a simple spillage test can be conducted
to confirm or out rule a spillage condition (see Spillage Test on
this page).
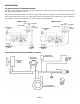
ACCESSING AND RESETTING SPILL SWITCH
1. UNPLUG BLOWER POWER CORD.
2. Using a ¼” nut driver, remove Rear Access Panel (see Fig. 1).
3. Locate Spill Switch and press the red button in the center of
the switch (press in firmly until button stays depressed). See
Fig. 2, 3 & 4.
4. Perform Spillage Test prior to reinstalling Rear Access Panel
(see Spillage Test Procedure on this page).
SPILLAGE TEST PROCEDURE
A flue spillage test is recommended as part of the installation
and periodically afterwards.
1. Remove Rear Access Panel, if necessary (Fig. 1).
2. Close all the doors and windows in the room. Turn ON all
exhaust fans in the home.
3. Light the appliance. Adjust burner flame to highest setting
and operate for approximately 10 minutes before checking
for spillage.
4. Use an open flame (preferably a wooden match) or smoke
(cigarette, burning rope) to determine if spillage is present.
To test for spillage, move the flame or smoke device across
the opening at the bottom of the draft hood as shown be-
low. If the flame or smoke is drawn into the opening, there
is no spillage. If the flame or smoke is blown out or away
from the opening, spillage is present and corrective action
should be taken before operating the appliance (see bullets
under Spill Switch on this page).
5. Reinstall Rear Access Panel (see Fig. 1).
Spill Switch
Flame drawn
in, indicates
no spillage
Fig. 3
Press In This
Red Reset Button
Draft Hood
Stove Back
Fig. 4
Spill Switch
Draft Hood
Remove screws
indicated by arrows
Stove Back
Rear Access
Panel
Fig. 1
Spill Switch
Fig. 2
Reset Button