
Air Conditioner User Manual

Page 5
CBX25UH SERIES
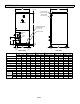
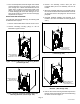
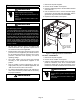
5. If the unit is suspended, the entire length of the cabinet
must be supported. If you use a chain or strap, use a
piece of angle iron or sheet metal attached to the unit
(either above or below) to support the length of the
cabinet. Use securing screws no longer than 1/2 inch
to avoid damaging the coil or filter. See figure 2. Use
sheet metal screws to connect the return and supply
air plenums as required.
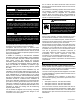
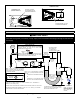
RIGHT-HAND AIR DISCHARGE
For horizontal right-hand air discharge, the following field
modifications are required.
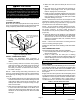
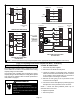
1. Remove and set aside blower and coil access covers.
2. Remove bracket(s) securing pan(s) to unit as
illustrated in figures 4 and 5.
REMOVE BRACKET
SECURING MAIN
DRAIN PAN TO UNIT.
Figure 4. Remove Main Drain Pan Mounting Bracket
(-018 through -036)
REMOVE BRACKETS
SECURING BOTH
DRAIN PANS TO UNIT.
Figure 5. Remove Horizontal and Main Drain Pan
Mounting Brackets (-042 through -060)
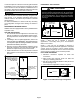
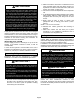
3. Remove coil assembly, bottom drain pan and
horizontal drain pan as one assembly from the air
handler.
4. Move the horizontal drain pan to the opposite side of
the coil. Be sure drain holes toward the back of the unit
are plugged. Remove the plugs from the front drain
pan ports.
5. Re-install modified coil/drain pan assembly in air
handler in the same orientation as before (figures 6
and 7).
INSTALL BRACKET
SECURING MAIN
DRAIN PAN TO UNIT.
Figure 6. Install Main Drain Pan Mounting Bracket
(-018 through -036)
REMOVE BRACKETS
SECURING BOTH
DRAIN PANS TO UNIT.
Figure 7. Install both Horizontal and Main Drain Pan
Brackets (-042 through -060)
6. Remove two screws securing the blow-off prevention
bracket. Rotate the brackets 180º and reinstall using
the same screws. See figure 8.