
User Manual

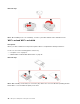
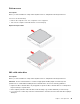
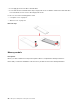
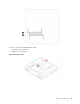
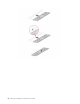
Table Of Contents
- Discover your Lenovo computer
- Chapter 1. Meet your computer
- Chapter 2. Get started with your computer
- Chapter 3. Explore your computer
- Chapter 4. Secure your computer and information
- Chapter 5. UEFI BIOS
- What is UEFI BIOS
- Enter the BIOS menu
- Navigate in the BIOS interface
- Change the display language of UEFI BIOS
- Change the display mode of UEFI BIOS (for selected models)
- Set the system date and time
- Change the boot priority order
- Enable or disable the configuration change detection feature
- Enable or disable the automatic power-on feature
- Enable or disable the smart power-on feature (for selected models)
- Enable or disable the ErP LPS compliance mode
- Change the ITS performance mode
- Change BIOS settings before installing a new operating system
- Update UEFI BIOS
- Recover from a BIOS update failure
- Clear CMOS
- Chapter 6. Diagnostics
- Chapter 7. CRU replacement
- CRU list
- Remove or replace a CRU
- Power adapter and power cord
- Power adapter bracket
- VESA mount bracket
- Vertical stand
- External Wi-Fi antenna
- External optical drive box and external optical drive
- Dust shield
- Computer cover
- Hard disk drive and hard disk drive bracket
- Internal speaker
- System fan
- Coin-cell battery
- Wi-Fi card and Wi-Fi card shield
- Bottom cover
- M.2 solid-state drive
- Memory module
- Chapter 8. Help and support
- Appendix A. Compliance information
- Appendix B. Notices and trademarks

Removal steps
• Type-1
• Type-2
System fan
Prerequisite
Before you start, read Generic Safety and Compliance Notices, and print the following instructions.
For access, do the following:
1. Remove the computer cover. See “Computer cover” on page 41.
2. Remove the internal speaker. See “Internal speaker” on page 44.
3. Remove the ThinkCentre LED bracket with the LED.
Chapter 7. CRU replacement 45