ThinkPad T460s User Guide
Note: Before using this information and the product it supports, be sure to read and understand the following: • Safety, Warranty, and Setup Guide • Regulatory Notice • “Important safety information” on page vi • Appendix F “Notices” on page 151 The latest Safety, Warranty, and Setup Guide and the Regulatory Notice are available on the Lenovo Support Web site at: http://www.lenovo.com/UserManuals First Edition (October 2015) © Copyright Lenovo 2015.
Contents Read this first . . . . . . . . . . . . . . v Important safety information . . . . . . . . . . vi Conditions that require immediate action . . vii Safety guidelines . . . . . . . . . . . . vii Chapter 1. Product overview . . . . . . 1 Locating computer controls, connectors, and indicators. . . . . . . . . . . . . . . . Front view. . . . . . . . . . . . . . Right-side view. . . . . . . . . . . . Left-side view . . . . . . . . . . . . Bottom view . . . . . . . . . . . . . Status indicators . . . . .
Setting management features . . . . . . . 79 Chapter 7. Preventing problems . . . 81 General tips for preventing problems . . Making sure device drivers are current . Taking care of your computer . . . . . Cleaning the cover of your computer . . . . . . . . . . . . . . . . Chapter 8. Troubleshooting computer problems . . . . . . . . . . . . . . . Diagnosing problems . . . . . . . . . . . . Troubleshooting . . . . . . . . . . . . . . Computer stops responding . . . . . . . Spills on the keyboard . .
Battery recycling information for the European Union . . . . . . . . . . . . . . . . . . Battery recycling information for the United States and Canada . . . . . . . . . . . . . . . . 145 145 Appendix D. Restriction of Hazardous Substances Directive (RoHS) . . . . 147 European Union RoHS . . . . . . . . . . . Turkish RoHS . . . . . . . . . . . . . . . Ukraine RoHS . . . . . . . . . . . . . . . © Copyright Lenovo 2015 147 147 147 India RoHS . . . . . . . . . . . . . . . . China RoHS. . . . . . . . . . .
iv ThinkPad T460s User Guide
Read this first Be sure to follow the important tips given here to get the most use and enjoyment out of your computer. Failure to do so might lead to discomfort or injury, or cause your computer to fail. Protect yourself from the heat that your computer generates. When your computer is turned on or the battery is charging, the base, the palm rest, and some other parts may become hot. The temperature they reach depends on the amount of system activity and the level of charge in the battery.
Protect your computer and data when moving it. Before moving a computer equipped with a hard disk drive, do one of the following, and make sure that the power button is off or is blinking: • Turn it off. • Put it in sleep mode. • Put it in hibernation mode. This will help to prevent damage to the computer, and possible loss of data. Handle your computer gently. Do not drop, bump, scratch, twist, hit, vibrate, push, or place heavy objects on your computer, display, or external devices.
Conditions that require immediate action Products can become damaged due to misuse or neglect. Some product damage is serious enough that the product should not be used again until it has been inspected and, if necessary, repaired by an authorized servicer. As with any electronic device, pay close attention to the product when it is turned on. On very rare occasions, you might notice an odor or see a puff of smoke or sparks vent from your product. Or you might hear sounds like popping, cracking or hissing.
product are zero. Before you remove the covers from a product equipped with a power cord, always make sure that the power is turned off and that the product is unplugged from any power source. If you have any questions or concerns, contact the Customer Support Center. Although there are no moving parts in your computer after the power cord has been disconnected, the following warnings are required for your safety. CAUTION: Hazardous moving parts. Keep fingers and other body parts away.
To prevent possible overheating, do not cover the power adapter with clothing or other objects when the power adapter is plugged into an electrical outlet. Extension cords and related devices Ensure that extension cords, surge protectors, uninterruptible power supplies, and power strips that you use are rated to handle the electrical requirements of the product. Never overload these devices. If power strips are used, the load should not exceed the power strip input rating.
Hazardous voltage, current, and energy levels are present inside any component that has this label attached. There are no serviceable parts inside these components. If you suspect a problem with one of these parts, contact a service technician. External devices CAUTION: Do not connect or disconnect any external device cables other than USB cables while the computer power is on; otherwise, you might damage your computer.
Notice for non-rechargeable coin-cell battery DANGER If the coin-cell battery is incorrectly replaced, there is danger of an explosion. The battery contains a small amount of harmful substance. Do not heat to more than 100°C (212°F). The following statement applies to users in the state of California, U.S.A. California Perchlorate Information: Products containing manganese dioxide lithium coin-cell batteries may contain perchlorate. Perchlorate Material - special handling may apply, See www.dtsc.ca.
• Airflow temperatures into the computer should not exceed 35°C (95°F). Electrical current safety information DANGER Electric current from power, telephone, and communication cables is hazardous. To avoid a shock hazard: • Do not use your computer during a lightning storm. • Do not connect or disconnect any cables or perform installation, maintenance, or reconfiguration of this product during an electrical storm. • Connect all power cords to a properly wired and grounded electrical outlet.
hands, immediately wash the affected areas with water for at least 15 minutes; if any symptoms are present after washing, get medical care. Note: For products with mercury-containing fluorescent lamps (for example, non-LED), the fluorescent lamp in the liquid crystal display (LCD) contains mercury; dispose of according to local, state, or federal laws. Using headphones or earphones CAUTION: Excessive sound pressure from earphones and headphones can cause hearing loss.
xiv ThinkPad T460s User Guide
Chapter 1.
3 Power button Press the power button to turn on the computer or put the computer into sleep mode. For information about how to turn off the computer, see “Frequently asked questions” on page 17. If your computer is completely unresponsive, you can turn off the computer by pressing and holding the power button for four or more seconds. If the computer cannot be turned off, see “Computer stops responding” on page 87 for more information. You also can define what the power button does.
Attention: When you attach a USB cable to the USB 3.0 connector, ensure that the USB mark is facing upward. Otherwise the connector might get damaged. 3 Mini DisplayPort connector Use the mini DisplayPort connector to connect your computer to a compatible projector, external monitor, or high-definition digital television (HDTV).
or region of delivery, the micro SIM card might be already installed in the Micro-SIM-card tray. For more information, see “Installing or replacing the micro SIM card” on page 114. 8 Security-lock slot To protect your computer from theft, you can purchase a security cable lock that fits the security-lock slot to lock the computer to a stationary object. Note: You are responsible for evaluating, selecting, and implementing the locking device and security feature.
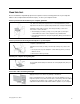
Left-side view 1 Power connector 2 USB 3.0 connector 3 Fan louvers 4 Audio connector 5 Media-card slot 1 Power connector Connect the ac power adapter to the power connector to provide ac power to the computer and charge the battery. 2 USB 3.0 connector The USB 3.0 connector is used for connecting USB-compatible devices, such as a USB keyboard, a USB mouse, a USB storage device, or a USB printer. Attention: When you attach a USB cable to the USB 3.
Bottom view Note: Depending on the model, your computer might look slightly different from the above illustration. 1 1 Docking station connector 2 Keyboard lock 3 Speakers 4 Emergency-reset hole Docking station connector Depending on the model, the computer might have a docking station connector. You can use the connector to connect the computer to a supported docking station to extend the computer capabilities when you are at the office or at home.
Status indicators This topic helps you locate and identify the various status indicators on your computer. Note: Your computer might have slight variations from the following illustrations. 1 Fn Lock indicator The Fn Lock indicator shows the status of Fn Lock function. For more information, see “Special keys” on page 19. 2 Speaker-mute indicator When the speaker-mute indicator is on, the speakers are muted.
4 Camera-status indicator When the camera-status indicator is on, the camera is in use. 5 7 System-status indicators The indicator in the ThinkPad logo on the lid and the indicator in the center of the power button show the system-status of the computer. • Blinks for three times: The computer is initially connected to power. • Solid on: The computer is on (in normal mode). • Blinks fast: The computer is entering sleep or hibernation mode. • Blinks slowly: The computer is in sleep mode.
FCC ID and IC Certification information The FCC and IC Certification information is identified by a label located on the computer as shown in the following figure. The content of this label differs depending on the wireless modules that come with your computer: • For a preinstalled wireless module, this label identifies the actual FCC ID and IC certification number for the wireless module installed by Lenovo. Note: Do not remove or replace a preinstalled wireless module by yourself.
Note: For the user-replaceable wireless module, ensure that you use only Lenovo-authorized wireless modules for the computer. Otherwise, an error message will be displayed and the computer will beep when you turn on the computer. Labels for the Windows operating systems Windows 7 Certificate of Authenticity: Computer models preinstalled with the Windows 7 operating system have a Certificate of Authenticity label affixed to the computer cover or inside the battery compartment.
Features The computer features introduced in this section cover a variety of models. For your specific computer model, some features might vary or not apply. Microprocessor To view the system properties of your computer, do the following: • For Windows 7: Open the Start menu, right-click Computer, and then click Properties. • For Windows 10: Do either of the following: – Open the Start menu, and then click Settings.
GNSS and wireless features • Integrated Bluetooth • Integrated wireless LAN • Integrated wireless WAN (available on some models) • Global Navigation Satellite System (GNSS) satellite receiver (available on models with wireless WAN) Security feature • Fingerprint reader (available on some models) Specifications Size • Width: 331 mm (13 inches) • Depth: 226.8 mm (8.9 inches) • Height: 16.9 mm (0.67 inch) to 18.8 mm (0.
Do not place any beverages on top of or beside the computer or other attached devices. If liquid is spilled on or in the computer or an attached device, a short circuit or other damage might occur. Do not eat or smoke over your keyboard. Particles that fall into your keyboard can cause damage. Lenovo programs Your computer comes with Lenovo programs to help you work easily and securely. Note: The available programs are subject to change without notice.
Communications Utility The Communications Utility program enables you to configure settings for the integrated camera and audio devices.
Password Manager The Password Manager program automatically captures and fills in authentication information for Windows programs and Web sites. (Windows 7) Power Manager (Windows 7) REACHit (Windows 7 and Windows 10) Recovery Media The Power Manager program provides convenient, flexible, and complete power management for the computer. It enables you to adjust your computer power settings to achieve the best balance between performance and power saving.
16 ThinkPad T460s User Guide
Chapter 2.
• For Windows 10: Right-click the Start button and click Control Panel. How do I use battery power more effectively when I am on the go? • To conserve power, or to suspend operation without exiting programs or saving files, see “Power-saving modes” on page 26. • To achieve the best balance between performance and power saving, change power plan settings. See “Managing the battery power” on page 26.
Special keys Your computer has several special keys to help you work easily and effectively. 1 Windows key Press the Windows key to open the Start menu. For information about using the Windows key with other keys, refer to the help information system of the Windows operating system. 2 Fn key 3 Function keys You can configure the Fn key and function keys in the Keyboard Properties window by doing the following: 1.
If you mute the sound and turn off your computer, the sound will remain muted when you turn on your computer again. To turn on the sound, press the volume-down key • Decreases the speaker volume. • Increases the speaker volume. • or volume-up key . Mutes or unmutes the microphones. When the microphones are muted, the indicator on the key is on. • Darkens the computer display. • Brightens the computer display. • Manages external displays.
The ThinkPad pointing device consists of the following two devices: 1 2 TrackPoint pointing device Trackpad By default, both the TrackPoint pointing device and the trackpad are active with the touch gestures enabled. To change the settings, see “Customizing the ThinkPad pointing device” on page 23. TrackPoint pointing device The TrackPoint pointing device enables you to perform all the functions of a traditional mouse, such as pointing, clicking, and scrolling.
• Point Use the pointing stick 1 to move the pointer on the screen. To use the pointing stick, apply pressure to the pointing-stick nonslip cap in any direction parallel to the keyboard. The pointer moves accordingly but the pointing stick itself does not move. The speed at which the pointer moves depends on the amount of pressure you apply to the pointing stick. • Left-click Press the left-click button 2 to select or open an item. • Right-click Press the right-click button 3 to display a shortcut menu.
With the trackpad, you also can perform various touch gestures. For information about using the touch gestures, see “Trackpad touch gestures” on page 23. Trackpad touch gestures The following section introduces some frequently used touch gestures such as tapping, dragging, and scrolling. For more gestures, see the help information system of the ThinkPad pointing device. Notes: • When using two or more fingers, ensure that you position your fingers slightly apart.
Replacing the cap of the pointing stick The cap 1 on the end of the pointing stick is removable. After you use the cap for a period of time, you might consider replacing the cap with a new one. To get a new cap, contact Lenovo. For information about contacting Lenovo, see Chapter 11 “Getting support” on page 129. Note: Ensure that you use a cap with grooves a as shown in the following illustration. Power management The power to run your computer can come either from ac power or from the battery.
• You can charge the battery when the ac power adapter is connected to the computer.
• Use the battery until the charge is depleted. • Recharge the battery completely before using it. You can see whether the battery is fully charged from the battery-status icon in the Windows notification area. • Always use power management features such as power-saving modes when you are away from your computer. Managing the battery power To achieve the best balance between performance and power saving, adjust your power plan settings. To adjust power plan settings, do the following: 1.
4. From the left pane, select the task folder for which you want to enable the wake-up function. The scheduled tasks are displayed. 5. Click a scheduled task, and then click the Conditions tab. 6. Under Power, select the check box for Wake the computer to run this task. • Wireless off When you are not using the wireless features, such as Bluetooth or wireless LAN, turn them off. This helps conserve power. To turn off the wireless features, press the wireless-radios control key .
Your computer comes with a built-in wireless network card and a configuration utility to help you establish wireless connections and monitor the connection status. This enables you to stay connected to your network while you are at the office, in a meeting room, or at home, with no need for a wired connection. To establish a wireless-LAN connection, do the following: 1. Click the wireless-network-connection-status icon in the Windows notification area. A list of available wireless networks is displayed. 2.
• Power to the wireless radio is on. No signal. • Power to the wireless radio is on. The signal strength of the wireless connection is excellent. • Power to the wireless radio is on. The signal strength of the wireless connection is marginal. • Power to the wireless radio is on. The signal strength of the wireless connection is poor. To improve signal strength, move your computer closer to the wireless access point.
Access Connections wireless status icon: • Power to the WAN radio is off • No association • No signal • Weak signal • Medium signal • Strong signal Using the Bluetooth connection Bluetooth can connect devices a short distance from one another, and is commonly used for connecting peripheral devices to a computer, transferring data between hand-held devices and a personal computer, or remotely controlling and communicating with devices such as mobile phones.
Connecting an external display You can use either a wired display or a wireless display. The wired display can be connected to the HDMI, or mini DisplayPort connector by a cable. The wireless display can be added through the Wi-Di or Miracast function. • Connecting a wired display Note: When you connect an external monitor, a video interface cable with a ferrite core is required. 1.
Changing display settings You can change the settings for both the computer display and the external display. For example, you can define which one is the main display and which one is the secondary display. You also can change the resolution and orientation. To change display settings, do the following: 1. Right-click on the desktop and select Screen Resolution (Windows 7) or Display settings (Windows 10). 2. Select the display that you want to configure. 3. Change display settings as desired.
When the camera is started, the green camera-in-use indicator turns on. You also can use the integrated camera with other programs that provide features such as photographing, video capturing, and video conferencing. To use the integrated camera with other programs, open one of the programs and start the photographing, video capturing, or video conferencing function. Then, the camera will start automatically and the green camera-in-use indicator will turn on.
Attention: While transferring data to or from a flash media card, or a smart card, do not put your computer into sleep or hibernation mode before the data transfer is completed; otherwise, your data could get damaged. Installing a flash media card or a smart card Attention: Before you start installing a card, touch a metal table or a grounded metal object. This action reduces any static electricity from your body. The static electricity could damage the card. To install a card, do the following: 1.
Chapter 3. Enhancing your computer This chapter provides instructions on how to use hardware devices to expand your computer capabilities. It includes the following topics: • “Finding ThinkPad options” on page 35 • “ThinkPad docking stations” on page 35 Finding ThinkPad options If you want to expand the capabilities of your computer, Lenovo has a number of hardware accessories and upgrades to meet your needs.
ThinkPad Basic Dock Front view 1 Power button: Press the power button to turn on or turn off the computer . 2 Eject button: Press the eject button to release the computer from the docking station. 3 Sliding adjuster: Use the sliding adjuster as a guide to align the docking station connector on your computer when you attach the docking station. 4 Docking station connector: Used to attach your computer. Rear view 1 Always On USB connector: Used to connect devices that are compatible with USB 2.
4 Ethernet connector: Used to connect the docking station to an Ethernet LAN. Note: If you need to use an Ethernet connector or an external monitor connector when your computer is attached to a docking station, use the Ethernet connector or the external monitor connector on the docking station, instead of the one on the computer. 5 ac power connector: Used to connect the ac power adapter. 6 VGA connector: Used to connect the computer to a VGA-compatible video device, such as a VGA monitor.
Rear view 1 Always On USB connector: Used to connect devices that are compatible with USB 2.0 or charge some mobile digital devices and smartphones when your computer is in sleep or hibernation mode. 2 USB 2.0 connectors: Used to connect devices that are compatible with USB 2.0. 3 USB 3.0 connectors: Used to connect devices that are compatible with USB 3.0. 4 Ethernet connector: Used to connect the docking station to an Ethernet LAN.
10 Security-lock slot: To protect your docking station from theft, you can use a security cable lock, such as a Kensington-style cable lock, that fits this security-lock slot to lock your docking station to a desk, table, or other non-permanent fixture. ThinkPad Ultra Dock Front view 1 Power button: Press the power button to turn on or turn off the computer. 2 Key lock indicator: This indicator turns on when the system lock key is in the locked position.
Rear view 1 Always On USB connector: Used to connect devices that are compatible with USB 2.0 or charge some mobile digital devices and smartphones when your computer is in sleep or hibernation mode. 2 USB 2.0 connectors: Used to connect devices that are compatible with USB 2.0. 3 USB 3.0 connectors: Used to connect devices that are compatible with USB 3.0. 4 Ethernet connector: Used to connect the docking station to an Ethernet LAN.
11 Security-lock slot: To protect your docking station from theft, you can use a security cable lock, such as a Kensington-style cable lock, that fits this security-lock slot to lock your docking station to a desk, table, or other non-permanent fixture. Attaching a ThinkPad docking station To attach your computer to a supported ThinkPad docking station, do the following: Note: The ThinkPad Basic Dock does not have the system lock. 1. Disconnect all cables and devices from the computer. 2.
Detaching a ThinkPad docking station To detach your computer from a ThinkPad docking station, do the following: Note: The ThinkPad Basic Dock does not have the system lock. 1. Disconnect all cables and devices from the computer. 2. Ensure that the system lock key is turned to the unlocked position (horizontal). 3. Press the eject button until the computer moves up. Then, grasp both sides of the computer to remove it.
– ThinkPad Pro Dock – ThinkPad Ultra Dock • For the ThinkPad Ultra Dock, a maximum of three displays (including your computer display) can work at the same time. As a result, if you connect three external displays to the ThinkPad Ultra Dock, the display connected to the VGA connector will not work when your computer display is on. – When the computer display is off: – When the computer display is on: Chapter 3.
Security features The system lock key has two positions as shown in the drawing. The security feature is different when the key is in different positions: • When the key is in position 1, the eject button of the docking station is locked, and you cannot remove your computer. The key lock indicator is on when the eject button is locked. The security cable is locked. • When the key is in position 2, the eject button of the docking station is unlocked, and you can remove your computer.
Chapter 4. You and your computer This chapter provides information about accessibility, comfort, and traveling with your computer. • “Accessibility and comfort” on page 45 • “Traveling with your computer” on page 49 Accessibility and comfort Good ergonomic practice is important to get the most from your personal computer and to avoid discomfort. Arrange your workplace and the equipment you use to suit your individual needs and the kind of work that you perform.
Arm and hand position:Keep your forearms, wrists, and hands in a relaxed and neutral (horizontal) position. Type with a soft touch without pounding the keys. Leg position: Keep your thighs parallel to the floor and your feet flat on the floor or on a footrest. What if you are traveling? It might not be possible to observe the best ergonomic practices when you are using your computer while on the move or in a casual setting. Regardless of the setting, try to observe as many of these tips as possible.
Keyboard shortcut Function Num Lock for five seconds Turn on or turn off Toggle Keys Left Alt+Left Shift+Num Lock Turn on or turn off Mouse Keys Left Alt+Left Shift+PrtScn (or PrtSc) Turn on or turn off High Contrast For more information, go to http://windows.microsoft.com/, and then perform a search using any of the following keywords: keyboard shortcuts, key combinations, shortcut keys.
1. Go to Control Panel, and ensure that you view Control Panel using Category. 2. Click Ease of Access ➙ Speech Recognition. 3. Follow the instructions on the screen. Screen-reader technologies Screen-reader technologies are primarily focused on software program interfaces, help information systems, and various online documents. For additional information about screen readers, see the following: • Using PDFs with screen readers: http://www.adobe.com/accessibility.
Documentation in accessible formats Lenovo provides electronic documentation in accessible formats, such as properly tagged PDF files or HyperText Markup Language (HTML) files. Lenovo electronic documentation is developed to ensure that visually impaired users can read the documentation through a screen reader. Each image in the documentation also includes adequate alternative text so that visually impaired users can understand the image when they use a screen reader.
50 ThinkPad T460s User Guide
Chapter 5. Security This chapter provides information about how to protect your computer from theft and unauthorized use.
3. Depending on your need, do one of the following: • To set a password, do the following: a. In the Enter New Password field, type a desired password and press Enter. b. In the Confirm New Password field, retype the password and press Enter. • To change a password, do the following: a. In the Enter Current Password field, type the current power-on password and press Enter. b.
– Boot Order Lock – Flash BIOS Updating by End-Users – Secure RollBack Prevention – Execution Prevention – Security mode – Fingerprint reader priority Notes: • The system administrator can set the same supervisor password on many ThinkPad notebook computers to make administration easier. • When Lock UEFI BIOS Settings option is enabled, all BIOS settings cannot be changed. To change the settings, a supervisor password is required.
If a user hard disk password has been set, but no master hard disk password has been, the user must enter the user hard disk password to access files and applications on the solid-state drive. • Master hard disk password The master hard disk password also requires a user hard disk password. The master hard disk password is usually set and used by a system administrator. It enables the administrator to access any solid-state drive in a system like a master key.
3. A Setup Notice window is displayed. Press Enter again to continue. The user hard disk password is changed. Note: The hard disk password cannot be removed in User HDP mode. – If you select Master HDP mode, follow the following steps to change the master hard disk password: 1. Type the current master hard disk password in the Enter Current Password field and press Enter. 2.
• To provide reliable security for the UEFI BIOS, use the security chip and a security application with a Trusted Platform Module management feature. Refer to “Setting the security chip” on page 56. • If a Disk Encryption storage drive is installed in your computer, be sure to protect the contents of your computer memory from unauthorized accesses by use of drive encryption software, such as Microsoft Windows BitLocker® Drive Encryption. See “Using Windows BitLocker Drive Encryption” on page 56.
Before you start, print these instructions. To set an item on the Security Chip submenu, do the following: 1. Restart the computer. When the logo screen is displayed, press F1 to start the ThinkPad Setup program. 2. Select Security ➙ Security Chip by using the directional keys. 3. Press Enter. The Security Chip submenu opens. 4. Move to an item you want to set by using the directional keys. When the item is highlighted, press Enter. 5. Set other items that you want to set. 6. Press F10.
• For Windows 10: 1. Open the Start menu and then click Settings. If Settings is not displayed, click All apps to display all programs, and then click Settings ➙ Accounts ➙ Sign-in options. 2. Follow the instructions on the screen to finish the enrollment. Scanning your finger To scan your finger, tap the fingerprint reader with the top joint of your finger and hold your finger there for one or two seconds with a little pressure. Then lift the finger to complete one scan.
Associating your fingerprints with your power-on password and hard disk password To associate your fingerprints with your power-on password and hard disk password, do the following: 1. Turn off and then turn on the computer. 2. When prompted, scan your finger on the fingerprint reader. 3. Enter your power-on password, hard disk password, or both as required. The connection is created.
• Your finger is stained with dirt, mud, or oil. • The surface of your finger is different from when you enrolled your fingerprint. • Your finger is wet. • Your finger that you are currently using has not been enrolled before. To improve the situation, try the following: • Clean or wipe your hands to remove any excess dirt or moisture from the fingers. • Enroll and use a different finger for authentication.
For more information about how to use the firewall program, refer to the help information system that comes with the program. Protecting data against viruses Your computer is preinstalled with an antivirus program so you can detect and eliminate viruses. The antivirus program is designed to help you detect and eliminate viruses. Lenovo provides a full version of antivirus software on your computer with a free 30-day subscription.
62 ThinkPad T460s User Guide
Chapter 6. Advanced configuration This chapter provides the following information to help you configure the computer: • “Installing a new operating system” on page 63 • “Installing device drivers” on page 65 • “Using the ThinkPad Setup program” on page 65 • “Using system management” on page 78 Installing a new operating system In some situations, you might need to install a new operating system. This topic provides instructions on how to install a new operating system.
Note: After installing the operating system, do not change the initial UEFI/Legacy Boot setting in the ThinkPad Setup program. Otherwise the operating system will not start correctly.
Italy IT Japan JP United States US Installing device drivers Device driver is the program that operates a particular hardware device of the computer. If a device does not perform well or you install a new device, you need to install or update the corresponding device driver. For example, if you use the Windows 7 operating system, to use the USB 3.0 connector, you need to download and install the USB 3.0 driver. To download the latest device drivers, do the following: 1. Go to http://www.lenovo.
Main menu When you enter the ThinkPad Setup program, you will first see the Main menu as follows: • UEFI BIOS Version • UEFI BIOS Date • Embedded Controller Version • ME Firmware Version • Machine Type Model • System-unit serial number • System board serial number • Asset Tag • CPU Type • CPU Speed • Installed memory • UUID • MAC Address (Internal LAN) • Preinstalled operating system license • UEFI Secure Boot • OA3 ID • OA2 Config menu To change the configuration of your computer, select the Config tab fr
Table 2. Config menu items (continued) Menu item Submenu item Value Comments • The magic packet type Wake on LAN requires ac power. • The Wake on LAN function does not work when a hard disk password is set.
Table 2. Config menu items (continued) Menu item Submenu item Value Comments Keyboard/Mouse TrackPoint • Disabled Enable or disable the built-in TrackPoint pointing device. • Enabled Note: If you want to use an external mouse, select Disabled. Trackpad • Disabled • Enabled Enable or disable the built-in trackpad. Note: If you want to use an external mouse, select Disabled. Fn and Ctrl Key swap • Disabled • Enabled Enable exchanges of Fn and Ctrl key action at the bottom-left of the keyboard.
Table 2. Config menu items (continued) Menu item Submenu item Value Comments Display Boot Display Device • ThinkPad LCD Select a display device for boot. • DisplayPort • HDMI • Display on dock DisplayPort is the mini DisplayPort connector on your computer. HDMI is the HDMI connector on your computer. Display on dock is DisplayPort, DVI or VGA connectors on a docking station. Boot screen is cloned to all displays on dock.
Table 2. Config menu items (continued) Menu item Power Submenu item SpeedStep® Intel technology Value Comments • Disabled Select the mode of Intel SpeedStep technology at runtime. • Enabled Mode for AC • Maximum Performance • Battery Optimized Mode for Battery • Maximum Performance • Battery Optimized Adaptive Thermal Management Scheme for AC • Maximize Performance Maximum Performance: Always the highest speed. Battery Optimized: Always the lowest speed.
Table 2. Config menu items (continued) Menu item Submenu item Value Comments System will be powered down if you select Yes. Do you want to proceed? servicing the computer. After selecting this item, the computer will be automatically powered off. • Yes Note: The battery will be automatically re-enabled when the ac power adapter is reconnected to the computer.
Table 2. Config menu items (continued) Menu item Value Submenu item Comments If you select 255, the waiting time for establishing a connection is unlimited. Console Type • PC ANSI • VT100+ • PC-ANSI • VT-UTF8 Select the console type for AMT. Note: This console type should match the Intel AMT remote console. Date and Time menu To change the date or time of your computer, select the Date/Time tab from the ThinkPad Setup menu. Then do the following: 1.
Table 3. Security menu items (continued) Menu item Submenu item Value Comments password prompt is displayed; the computer goes ahead and loads the operating system. To prevent unauthorized access, set the user authentication on the operating system.
Table 3. Security menu items (continued) Menu item Submenu item Value Comments able to work until they are re-enabled in the fingerprint software. Security Chip Security Chip Selection • Discrete TPM • Intel PTT If you select Discrete TPM, you can use a discrete TPM chip with TPM 1.2 mode. If you select Intel PTT, you can use Intel Platform Trusted technology (PTT) with TPM 2.0 mode. Note: Intel PTT can be used with Windows 8 or later operating system.
Table 3. Security menu items (continued) Menu item Submenu item Value Comments Virtualization Intel Virtualization Technology • Disabled If you select Enabled, a Virtual Machine Monitor (VMM) can utilize the additional hardware capabilities provided by Intel Virtualization Technology.
Table 3. Security menu items (continued) Menu item Submenu item Value Comments Secure Boot Secure Boot • Disabled Enable or disable the UEFI Secure Boot feature. Select Enable to prevent unauthorized operating systems from running at boot time. Select Disabled to allow any operating systems to run at boot time. • Enabled Platform Mode • Setup Mode Specify the system operating mode. • User Mode Secure Boot Mode • Standard Mode Specify the Secure Boot mode.
3. Select the device that you want the computer to start from. Note: The Boot menu will be displayed if the computer cannot start from any devices, or the operating system cannot be found. The following table lists the Startup menu items. Default values are in boldface. Note: Some items are displayed on the menu only if the computer supports the corresponding features. Table 4.
Table 4. Startup menu items (continued) Menu item Value Comments Boot Device List F12 Option • Disabled If you select Enabled, F12 is recognized and the Boot Menu window is displayed. • Enabled Boot Order Lock • Disabled • Enabled If you select Enabled, the boot priority order is locked for your future use. Restart menu To exit the ThinkPad Setup program and restart the computer, select Restart from the ThinkPad Setup menu.
It is the responsibility of the UEFI BIOS to provide information about itself and the devices on the system board. This specification documents the standards for getting access to this BIOS information. Preboot eXecution Environment The Preboot eXecution Environment (PXE) technology makes the computer more manageable by enabling the computer to start from a server. Your computer supports the personal computer functions that PXE requires.
Defining a Network Boot sequence When the computer wakes on LAN, the computer boots from the device as specified on the Network Boot menu, and then follow the boot order list on the Boot menu. To define a Network Boot sequence, do the following: 1. Start the ThinkPad Setup program. See “Using the ThinkPad Setup program” on page 65. 2. Select Startup ➙ Network Boot. The boot device list is displayed. 3. Select a boot device to make it as the top boot priority. 4. Press F10.
Chapter 7. Preventing problems An important part of owning a ThinkPad notebook computer is maintenance. With proper care, you can avoid common problems. This chapter provides information that can help you keep your computer running smoothly.
• For suspected solid-state drive issues, refer to “Diagnosing problems” on page 87 and run a diagnostic test for the drive before you call the Customer Support Center. If your computer does not start up, download the files to create a bootable self-test medium from http://www.lenovo.com/hddtest. Run the test and record any messages or error codes. If the test returns any failing error codes or messages, call the Customer Support Center with the codes or messages and the computer in front of you.
Taking care of your computer Although your computer is designed to function reliably in normal work environments, you need to use common sense in handling it. By following the important tips in this topic, you will get the most use and enjoyment out of your computer. Be careful about where and how you work • Store packing materials safely out of the reach of children to prevent the risk of suffocation from plastic bags.
• Before you install a memory card such as an SD card, SDHC card, SDXC card, and a MultiMediaCard, touch a metal table or a grounded metal object. This action reduces any static electricity from your body. The static electricity could damage the device. • While transferring data to or from a flash media card, such as an SD card, do not put your computer into sleep or hibernation mode before the data transfer is complete; otherwise, your data could become damaged.
1. Apply some isopropyl rubbing alcohol to a soft, dust-free cloth. Note: Avoid spraying cleaner directly onto the keyboard. 2. Wipe each keytop surface with the cloth. Wipe the keys one by one; if you wipe several keys at a time, the cloth might hook onto an adjacent key and possibly damage it. Make sure that no liquid drips onto or between the keys. 3. Allow to dry. 4. To remove any crumbs or dust from beneath the keys, you can use a camera blower with a brush or cool air from a hair dryer.
86 ThinkPad T460s User Guide
Chapter 8. Troubleshooting computer problems This chapter provides information about what to do if you experience a problem with your computer. • “Diagnosing problems” on page 87 • “Troubleshooting” on page 87 Diagnosing problems If you experience problems with your computer, use the Lenovo Solution Center program as a starting point for solving them. The Lenovo Solution Center program enables you to troubleshoot and resolve computer problems.
• If you cannot turn off your computer by pressing and holding the power button, remove all sources of power from the computer and reset the system by inserting a straightened paper clip into the emergency-reset hole. To locate the reset hole, refer to “Bottom view” on page 6. After the computer is off, restart the computer by pressing the power button. If the computer does not turn on, continue with step 3. 2.
Solution: The EEPROM checksum is not correct (block # 4 and 5). The system board must be replaced, and the UUID must be reinstalled. Have the computer serviced. • Message: 0190: Critical low-battery error Solution: The computer turned off, because the battery is low. Connect the ac power adapter to the computer and charge the battery. • Message: 0191: System Security - Invalid remote change requested Solution: The system configuration change has failed. Confirm the operation and try again.
Interface Specification. If the user selects No, all data is kept, but the operating system or applications will not be able to create, modify, or delete data in the storage. If this error happens at a service center, Lenovo-authorized service personnel will clean up the non-volatile system UEFI variable storage using the above solution. Errors without messages • Problem: My screen keeps blanking when I do not want it to.
Beep errors Table 5. Beep errors Beeps Solution One short beep, pause, three short beeps, pause, three more short beeps, pause, and one short beep (1-3-3-1 beeps) Memory problem. Shut down the computer immediately and have the computer serviced. One long and two short beeps Video problem. Shut down the computer immediately and have the computer serviced. Three short beeps, pause, one short beep, pause, one short beep, pause, and three more short beeps (3-1-1-3 beeps) PCI resource problem.
100 meters. If the cable is connected and the distance is within acceptable limits but the problem persists, try a different cable. – You are using the correct device driver. To install the correct driver, do the following: 1. Open Control Panel and click Hardware and Sound ➙ Device Manager. If you are prompted for an administrator password or confirmation, type the password or provide confirmation. 2.
Note: If you are using the Windows 7 operating system, click Show hidden icons on the taskbar. The Access Connections icon is displayed. For more information about the icon, refer to the Access Connections help information system. For the Windows 7 operating system, check the Network Name (SSID) and your encryption information. Use the Access Connections program to verify this case-sensitive information.
Keyboard problems • Problem: All or some keys on the keyboard do not work. Solution: If an external numeric keypad is connected: 1. Turn off the computer. 2. Remove the external numeric keypad. 3. Turn on the computer and try using the keyboard again. If the keyboard problem is resolved, carefully reconnect the external numeric keypad and the external keyboard. Make sure that you have seated the connectors correctly.
• Problem: When I turn on the computer, only a white cursor is displayed on a blank screen. Solution: If you have modified a partition on your storage drive by using partition software, information about that partition, or the master boot record might have been destroyed. Do the following to try to solve the problem: 1. Turn off the computer, and then turn it on again. 2.
1. If more than two monitor types are displayed, select Generic PnP Monitor or Generic Non-PnP Monitor. 2. Click Properties. If you are prompted for an administrator password or confirmation, type the password or provide confirmation. 3. Click the Driver tab. 4. Click Update Driver. 5. Click Browse my computer for driver software, and then click Let me pick from a list of device drivers on my computer. 6. Clear the Show compatible hardware check box. 7.
• Problem: When I turn on the computer, only a white pointer is displayed on a blank screen. Solution: If you have modified a partition on your solid-state drive by using partition software, information about that partition, or the master boot record might have been destroyed. Do the following to try to solve the problem: 1. Turn off the computer, and then turn it on again. 2.
– For Windows 10: Click Display adapter properties. 6. Click the Monitor tab. Check the monitor information window to make sure that the monitor type is correct. If it is, click OK to close the window; otherwise do the following. 7. If more than one monitor type is displayed, select Generic PnP Monitor or Generic Non-PnP Monitor. Note: If the problem still is not solved, continue the following steps to update the monitor driver. 8. Click Properties.
Solution: Change the resolution and the color depth to lower settings for the primary display. • Problem: Display switching does not work. Solution: If you use the Extend desktop function, disable it, and change the display output location. If a DVD movie or a video clip is playing, stop the playback, close the program, and then change the display output location. • Problem: The screen position on the external display is incorrect when that display is set for a high resolution.
4. Select Microphone, and click the Properties button. 5. Click the Levels tab, and move the Microphone Boost slider upwards. 6. Click OK. Note: For more information about controlling volume, see the Windows online help. • Problem: A volume or balance slider cannot be moved. Solution: The slider might be grayed out. This means that its position is fixed by the hardware and cannot be changed. • Problem: The volume sliders do not stay in place when some audio programs are used.
• Problem: Your computer shuts down before the battery-status icon shows empty, or your computer operates after the battery-status icon shows empty. Solution: Discharge and recharge the batteries. • Problem: The operating time for fully charged batteries is short. Solution: Discharge and recharge the batteries. If your battery operating time is still short, call Lenovo Customer Service Center to have it serviced. • Problem: The computer does not operate with fully charged batteries.
Solution: Turn off the computer by pressing and holding the power button for four seconds or more. If the system is still not reset, remove the ac power adapter and reset the system by inserting one end of a needle or a straightened paper clip into the emergency-reset hole. To locate the emergency-reset hole, refer to “Bottom view” on page 6. Boot problems Print these instructions now and keep them with your computer for reference later.
If the system still does not return from sleep mode, your system might stop responding and you might not be able to turn off the computer. In this case, you need to reset the computer. If you have not saved your data, it might be lost. To reset the computer, press and hold the power button for four seconds or more. If the system is still not reset, remove the ac power adapter and reset the system by inserting a straightened paper clip into the emergency-reset hole.
Solution: Open the Device Manager window. Make sure that the USB device setup is correct, and that the assignment of computer resource and the installation of the device driver are correct. To open the Device Manager window, go to Control Panel and click Hardware and Sound ➙ Device Manager. If you are prompted for an administrator password or confirmation, type the password or provide confirmation. Refer to “Diagnosing problems” on page 87 and run a diagnostic test of the USB connector.
Chapter 9. Recovery overview This chapter provides information about the recovery solutions. • “Recovery overview for the Windows 7 operating system” on page 105 • “Recovery overview for the Windows 10 operating system” on page 110 Recovery overview for the Windows 7 operating system This section provides information about the recovery solutions provided by Lenovo on the Windows 7 operating system.
To create recovery media, click Start ➙ All Programs ➙ Lenovo PC Experience ➙ Lenovo Tools ➙ Factory Recovery Disks. Then, follow the instructions on the screen. Using recovery media This section provides instructions on how to use recovery media on different operating systems. You can use recovery media to restore the computer to the factory default settings only. You can use recovery media to put the computer in an operational state after all other methods of recovery have failed.
Performing a recovery operation To perform a recovery operation using the Rescue and Recovery program on the Windows 7 operating system, do the following: 1. From the Windows desktop, click Start ➙ All Programs ➙ Lenovo PC Experience ➙ Lenovo Tools ➙ Enhanced Backup and Restore. The Rescue and Recovery program opens. 2. In the Rescue and Recovery main window, click the Launch advanced Rescue and Recovery arrow. 3. Click the Restore your system from a backup icon. 4.
4. Do one of the following: • To rescue files from your storage drive, or from a backup, click Rescue files and follow the instructions on the screen. • To restore your storage drive from a Rescue and Recovery backup or to restore your storage drive to the factory default settings, click Restore your system and follow the instructions on the screen. For more information about the features of the Rescue and Recovery workspace, click Help.
2. Repeatedly press and release the F12 key when turning on the computer. When the Boot Menu window opens, release the F12 key. 3. In the Boot Menu window, select the USB hard disk drive as the first boot device and press Enter. The rescue medium starts. When the rescue medium starts, the Rescue and Recovery workspace opens. The help information for each feature is available from the Rescue and Recovery workspace. Follow the instructions to complete the recovery process.
Solving recovery problems If you are unable to access the Rescue and Recovery workspace or the Windows environment, do one of the following: • Use a rescue medium to start the Rescue and Recovery workspace. See “Creating and using a rescue medium” on page 108. • Use recovery media if all other methods of recovery have failed and you need to restore the storage devices to the factory default settings.
3. Select a desired startup option, then follow the instructions on the screen. Recovering your operating system if Windows 10 fails to start The Windows recovery environment on your computer is capable of operating independently from the Windows 10 operating system. This enables you to recover or repair the operating system even if the Windows 10 operating system fails to start. After two consecutive failed boot attempts, the Windows recovery environment starts automatically.
112 ThinkPad T460s User Guide
Chapter 10. Replacing devices This chapter contains the following topics: • “Static electricity prevention” on page 113 • “Disabling the built-in batteries” on page 113 • “Installing or replacing the micro SIM card” on page 114 • “Replacing the bottom cover” on page 114 • “Replacing the M.
5. Click Yes in the Setup Confirmation window. The built-in batteries are disabled and the computer turns off. Wait for a few minutes to let the computer cool. The built-in batteries will be automatically enabled again when the computer is connected to an ac power adapter. Installing or replacing the micro SIM card Before you start, print these instructions. Read the important safety information first. See “Important safety information” on page vi.
3. Loosen the screws, and then remove the bottom cover. 4. Install the new bottom cover and tighten the screws. 5. Turn the computer over. Connect the ac power adapter and all cables. Replacing the M.2 solid-state drive Before you start, print these instructions. Read the important safety information first. See “Important safety information” on page vi. Attention: The M.2 solid-state drive is very sensitive. Incorrect handling can cause damage and permanent loss of data.
• Before removing the M.2 solid-state drive, make a backup copy of all the information on it, and then turn off the computer . • Never remove the M.2 solid-state drive while the computer is operating, in sleep mode, or in hibernation mode. To replace the M.2 solid-state drive, do the following: 1. Disable the built-in batteries. See “Disabling the built-in batteries” on page 113. 2. Close the computer display, and turn the computer over. 3. Remove the bottom cover.
7. Install the screw to secure the M.2 solid-state drive. 8. Install the bottom cover. 9. Turn the computer over. Connect the ac power adapter and all cables. Replacing a memory module Before you start, print these instructions. Read the important safety information first. See “Important safety information” on page vi. Increasing memory capacity is an effective way to make programs run faster. You can increase memory capacity by replacing or adding a memory module.
3. Remove the bottom cover. See “Replacing the bottom cover” on page 114. 4. Open the latches on both sides of the slot at the same time 1 , and then remove the memory module 2 . Save the removed memory module for future use. 5. Place the notched end of the new memory module toward the contact edge side of the memory slot. Insert the memory module 1 into the slot at an angle of about 20 degrees. Pivot the memory module downward until it snaps into place 2 .
DANGER During electrical storms, do not perform any replacement and do not connect the telephone cable to or disconnect it from the telephone outlet on the wall. Attention: Before you start installing the wireless WAN card, touch a metal table or a grounded metal object. This action reduces any static electricity from your body. Static electricity could damage the card. Some computers might come with a wireless WAN card. To replace the wireless WAN card, do the following: 1. Disable the built-in batteries.
6. Carefully remove the wireless WAN card out of the slot. 7. Align the notched edge of the new wireless WAN card with the key in the slot. Then carefully insert the card into the slot. 8. Pivot the new wireless WAN card downward 1 and then install the screw to secure the card in place 2 .
9. Connect the antenna cables to the new wireless WAN card. Ensure that you connect the orange cable to the main connector on the card, and the blue cable to the auxiliary connector on the card. 10. Install the bottom cover. 11. Turn the computer over. Connect the ac power adapter and all cables. Replacing the keyboard Before you start, print these instructions. Read the important safety information first. See “Important safety information” on page vi. To remove the keyboard, do the following: 1.
5. Turn the computer over. 6. To reveal the screw heads beneath the keyboard frame, use the flat end of the multi-tool in the shipping package of the new keyboard to slide the keyboard forward by 2.5 mm (0.1 inch). Note: Do not press and hold the keys while sliding the keyboard frame, otherwise the keyboard frame cannot be moved.
7. Use the cross end of the multi-tool to loosen the screws. 8. Pivot the keyboard slightly upward as shown by arrow 1 until you can see the connectors on the bottom side of the keyboard. Then turn the keyboard over as shown by arrow 2 . Chapter 10.
9. Put the keyboard on the palm rest and detach the connectors. Then remove the keyboard. To install the new keyboard, do the following: 1. Attach the connectors, and then turn the keyboard over.
2. Insert the keyboard into the keyboard bezel as shown. Ensure that the front edge of the keyboard (the edge that is close to the display) is under the frame of the keyboard bezel. 3. Ensure that the screw heads are exposed completely. Otherwise, reveal the screw heads by sliding the keyboard frame forward with the flat end of the keyboard multi-tool. Chapter 10.
4. Tighten the screws with the cross end of the keyboard multi-tool to secure the keyboard in place. 5. Slide the keyboard frame backward by 2.5 mm (0.1 inch) with the flat end of the keyboard multi-tool to hide the latches of the keyboard frame under the keyboard bezel. Note: Do not press and hold the keys while sliding the keyboard frame, otherwise the keyboard frame cannot be moved. 6.
7. Turn the computer over and tighten the screw to the lock position to lock the keyboard frame. 8. Connect the ac power adapter and all cables. Chapter 10.
128 ThinkPad T460s User Guide
Chapter 11. Getting support This chapter provides information about getting help and support from Lenovo. • “Before you contact Lenovo” on page 129 • “Getting help and service” on page 129 • “Purchasing additional services” on page 131 Before you contact Lenovo Often, you can solve your computer problems by referring to the information in the explanations of error codes, running diagnostic programs, or by consulting the Lenovo Web site. Registering your computer Register your computer with Lenovo.
Information about your computer and preinstalled software, if any, is available in the documentation that comes with your computer. That documentation includes printed books, online books, readme files, and help files. In addition, information about Lenovo products is available on the World Wide Web. Microsoft Service Packs are the latest software source for Windows product updates. They are available through Web download (connection charges might apply) or through disc.
• • • • • • Replacement or use of parts not manufactured for or by Lenovo or nonwarranted parts Identification of software problem sources Configuration of the UEFI BIOS as part of an installation or upgrade Changes, modifications, or upgrades to device drivers Installation and maintenance of network operating systems (NOS) Installation and maintenance of application programs For the terms and conditions of the Lenovo Limited Warranty that applies to your Lenovo hardware product, see “Warranty information
132 ThinkPad T460s User Guide
Appendix A. Supplemental information about the Ubuntu operating system In limited countries or regions, Lenovo offers customers an option to order computers with the preinstalled Ubuntu® operating system. If the Ubuntu operating system is available on your computer, read the following information before you use the computer. Ignore any information related to Windows-based programs, utilities, and Lenovo preinstalled applications in this documentation.
– Legacy BIOS – Unified Extensible Firmware Interface (UEFI) BIOS with non-secure boot • Storage device – M.2 solid-state drive • Display – Color display – Integrated camera – Built-in microphones • Interface – Audio connector – Ethernet connector – Ethernet extension connector – External monitor connectors – HDMI connector – Mini DisplayPort connector – HDMI audio 2 channel – Media card reader – Secure Digital (SD) – Secure Digital High-Capacity (SDHC) – MultiMediaCard (MMC) – USB 3.
– Horizontal scrolling – Vertical scrolling • Micro SIM card The following list provides information about components and features that are not supported by Lenovo. Note: Depending on the model, some of the components and features might not be available on your computer. • Accelerometer • Fingerprint reader • HDMI 5.1 channel • Hybrid Graphic card • Integrated wireless Wide Area Network (WAN) • Modems • Surround audio • Smart-card reader • Docking station connector Appendix A.
136 ThinkPad T460s User Guide
Appendix B. Regulatory Information The latest compliance information is available at http://www.lenovo.com/compliance. Locating the UltraConnect™ wireless antennas ThinkPad models feature a diversified antenna system built into the display for optimal reception, which enables wireless communication wherever you are.
Note: Depending on the Bluetooth card and the operating system you use, some profiles might not be available.
Wireless-radio compliance information Computer models equipped with wireless communications comply with the radio frequency and safety standards of any country or region in which it has been approved for wireless use. Brazil wireless-radio compliance information Este equipamento opera em caráter secundário, isto é, não tem direito a proteção contra interferência prejudicial, mesmo de estações do mesmo tipo, e não pode causar interferência a sistemas operando em caráter primário.
determined by turning the equipment off and on, the user is encouraged to try to correct the interference by one or more of the following measures: • Reorient or relocate the receiving antenna. • Increase the separation between the equipment and receiver. • Connect the equipment into an outlet on a circuit different from that to which the receiver is connected. • Consult an authorized dealer or service representative for help.
Um dieses sicherzustellen, sind die Geräte wie in den Handbüchern beschrieben zu installieren und zu betreiben. Des Weiteren dürfen auch nur von der Lenovo empfohlene Kabel angeschlossen werden. Lenovo übernimmt keine Verantwortung für die Einhaltung der Schutzanforderungen, wenn das Produkt ohne Zustimmung der Lenovo verändert bzw. wenn Erweiterungskomponenten von Fremdherstellern ohne Empfehlung der Lenovo gesteckt/eingebaut werden.
Lenovo product service information for Taiwan Eurasian compliance mark Brazil audio notice Ouvir sons com mais de 85 decibéis por longos períodos pode provocar danos ao sistema auditivo.
Appendix C. WEEE and recycling statements Lenovo encourages owners of information technology (IT) equipment to responsibly recycle their equipment when it is no longer needed. Lenovo offers a variety of programs and services to assist equipment owners in recycling their IT products. The latest environmental information is available at http://www.lenovo.com/ecodeclaration.
for Promotion of Effective Utilization of Resources, Lenovo Japan provides, through its PC Collecting and Recycling Services, for the collecting, reuse, and recycling of disused computers and monitors. For details, visit the Lenovo Web site at http://www.lenovo.com/recycling/japan. Pursuant to the Law for Promotion of Effective Utilization of Resources, the collecting and recycling of home-used computers and monitors by the manufacturer was begun on October 1, 2003.
Battery recycling information for Taiwan Battery recycling information for the European Union Notice: This mark applies only to countries within the European Union (EU). Batteries or packaging for batteries are labeled in accordance with European Directive 2006/66/EC concerning batteries and accumulators and waste batteries and accumulators. The Directive determines the framework for the return and recycling of used batteries and accumulators as applicable throughout the European Union.
146 ThinkPad T460s User Guide
Appendix D. Restriction of Hazardous Substances Directive (RoHS) The latest environmental information is available at http://www.lenovo.com/ecodeclaration. European Union RoHS This Lenovo product, with included parts (cables, cords, and so on) meets the requirements of Directive 2011/65/EU on the restriction of the use of certain hazardous substances in electrical and electronic equipment (“RoHS recast” or “RoHS 2”). For more information about Lenovo worldwide compliance on RoHS, go to: http://www.lenovo.
China RoHS 148 ThinkPad T460s User Guide
Appendix E. ENERGY STAR model information ENERGY STAR® is a joint program of the U.S. Environmental Protection Agency and the U.S. Department of Energy aimed at saving money and protecting the environment through energy efficient products and practices. Lenovo is proud to offer our customers products with the ENERGY STAR qualified designation. You might find an ENERGY STAR mark affixed on the computer or displayed on the power settings interface.
5. Clear the Allow this device to wake the computer check box. 6. Click OK.
Appendix F. Notices Lenovo may not offer the products, services, or features discussed in this document in all countries. Consult your local Lenovo representative for information about the products and services currently available in your area. Any reference to a Lenovo product, program, or service is not intended to state or imply that only that Lenovo product, program, or service may be used.
Trademarks The following terms are trademarks of Lenovo in the United States, other countries, or both: Lenovo Access Connections Active Protection System Rescue and Recovery Secure Data Disposal the ThinkPad logo ThinkPad TrackPoint UltraConnect Mini DisplayPort (mDP) is a Trademark of the Video Electronics Standards Association. The terms HDMI and HDMI High-Definition Multimedia Interface are trademarks or registered trademarks of HDMI Licensing LLC in the United States and other countries.