
User Manual


To charge these devices when the computer is off or in hibernation mode, and the computer is not
connected to ac power, do the following:
1. Open the Start menu and start the Lenovo Companion program.
2. Click Hardware Settings ➙ Always On USB.
3. Locate the Always On USB section and follow the instructions on the screen to make your preferred
setting.
Note: The USB device connected to the Always On USB 3.0 connector might influence the wireless WAN
and GPS functions of your computer. If your computer cannot establish wireless WAN communications, or if
your location cannot be pinpointed through the GPS function of your computer, detach the device from the
Always On USB 3.0 connector.
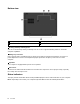
4 Mini security-lock slot
To protect your computer from theft, lock your computer to a desk, table, or other fixtures through a security
cable lock designed to fit the mini security-lock slot on your computer.
Note: The slot supports cable locks that conform to the Kensington MiniSaver
®
lock standards using
Cleat™ locking technology. Do not attempt to use other types of cable locks that use a rotating T-bar™
locking mechanism. You are responsible for evaluating, selecting, and implementing the locking device and
security feature. Lenovo makes no comments, judgments, or warranties about the function, quality, or
performance of the locking device and security feature. Cable locks for your product are available from
Lenovo at
https://www.lenovoquickpick.com/.
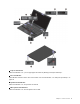
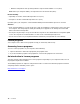
Rear view
1 Nano-SIM-card slot 2 microSD card slot
1 Nano-SIM-card slot
If your computer supports the wireless WAN feature, a nano Subscriber Identification Module (SIM) card
might be required to establish wireless-WAN connections.
For information about replacing the nano SIM card, see “Replacing the nano SIM card” on page 96.
2 microSD card slot
You can insert a microSD card into the microSD card slot for data access or storage.
Attention: While transferring data to or from a microSD card, do not put your computer into sleep or
hibernation mode before the data transfer is completed. Otherwise, your data could get damaged.
For information about replacing the microSD card, see “Replacing the microSD card” on page 97.
Chapter 1. Product overview 5