
User Manual
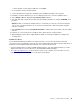

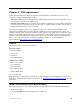

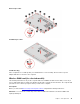
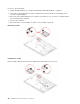
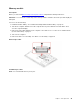
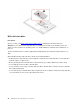
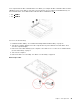
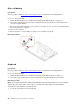
Table Of Contents
- Discover your Lenovo notebook
- Chapter 1. Meet your computer
- Chapter 2. Get started with your computer
- Chapter 3. Explore your computer
- Chapter 4. Secure your computer and information
- Chapter 5. Configure advanced settings
- Chapter 6. CRU replacement
- Chapter 7. Help and support
- Appendix A. Compliance information
- Appendix B. Notices and trademarks

2. Click Power Options, and then click Choose what the power buttons do on the left pane.
3. Click Change settings that are currently unavailable at the top.
4. If prompted by User Account Control (UAC), click Yes.
5. Clear the Turn on fast startup check box, and then click Save changes.
To disable the built-in battery:
1. Restart your computer. When the logo screen is displayed, immediately press F1 to enter the UEFI BIOS
menu.
2. Select Config ➙ Power. The Power submenu is displayed.
3. Select Disable Built-in Battery and press Enter.
4. Select Yes in the Setup Confirmation window. The built-in battery is disabled and the computer turns off
automatically. Wait three to five minutes to let the computer cool.
Replace a CRU
Follow the replacement procedure to replace a CRU.
Base cover assembly
Prerequisite
Before you start, read
Generic Safety and Compliance Notices and print the following instructions.
Note: Do not remove the base cover assembly when your computer is connected to ac power. Otherwise,
there might be a risk of short circuits.
For access, do the following:
1. Disable the built-in battery. See “Disable Fast Startup and the built-in battery” on page 37.
2. Turn off the computer and disconnect the computer from ac power and all connected cables. Then,
close the computer display.
3. Remove the nano-SIM-card tray if your computer comes with one. See “Connect to a cellular network
(for selected models)” on page 9.
4. Turn over the computer.
38
ThinkPad P15v Gen 2 and T15p Gen 2 User Guide