
Server User Manual
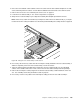


8.Carefullypositionthenewfrontpanelboardonthechassissothatthefrontcontrols,connectors,
andLEDsarethroughthecorrespondingholesinthefrontbezelandthetwoscrewholesinthenew
frontpanelboardarealignedwiththecorrespondingmountingstudsonthechassis.Then,installthe
screwstosecurethefrontpanelboardinplace.
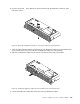
Figure110.Installingthefrontpanelboardforservermodelswith3.5-inchharddiskdrives
9.ConnectthefrontpanelcableandthefrontpanelUSBcabletotherearofthenewfrontpanelboard.
10.Ifyouareinstructedtoreturntheoldfrontpanelboard,followallpackaginginstructionsanduseany
packagingmaterialsthataresuppliedtoyouforshipping.
Whattodonext:
•Toworkwithanotherpieceofhardware,gototheappropriatesection.
•Tocompletethereplacement,goto“Completingthepartsreplacement”onpage153
.
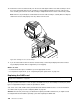
Replacingthefrontpanelboardforservermodelswith2.5-inchharddiskdrives
Attention:Donotopenyourserverorattemptanyrepairbeforereadingandunderstanding“Safetyinformation”
onpageiiiand“Guidelines”onpage69.
Toreplacethefrontpanelboardforservermodelswith2.5-inchharddiskdrives,dothefollowing:
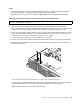
1.Removeallmediafromthedrivesandturnoffallattacheddevicesandtheserver.Then,disconnectall
powercordsfromelectricaloutletsanddisconnectallcablesthatareconnectedtotheserver.
2.Iftheserverisinstalledinarackcabinet,removetheserverfromtherackcabinetandplaceitonaat,
clean,andstatic-protectivesurface.SeetheRackInstallationInstructionsthatcomeswiththeserver.
3.Removetheservercover.See“Removingtheservercover”onpage71.
4.Removethefrontbezel.See“Removingandreinstallingthefrontbezel”onpage73.
5.Removethecoolingshroud.See“Removingandreinstallingthecoolingshroud”onpage76.
6.Locatethefrontpanelboard.See“Servercomponents”onpage29.
7.Removetheleftcage.See“Removingandreinstallingtheleftcage”onpage78.
144ThinkServerUserGuide