P350 Tiny User Guide
Read this first Before using this documentation and the product it supports, ensure that you read and understand the following: • Safety and Warranty Guide • Generic Safety and Compliance Notices • Setup Guide First Edition (June 2021) © Copyright Lenovo 2021. LIMITED AND RESTRICTED RIGHTS NOTICE: If data or software is delivered pursuant to a General Services Administration “GSA” contract, use, reproduction, or disclosure is subject to restrictions set forth in Contract No. GS35F-05925.
Contents Discover your Lenovo computer . . . . iii Chapter 1. Meet your computer . . . . . 1 Front . . . . . . . . . Rear . . . . . . . . . Features and specifications USB specifications . . . . . . . . . . . . . . . . . . . . . . . . . . . . . . . . . . . . . . . . . . . . . . . 1 2 3 3 Chapter 2. Get started with your computer . . . . . . . . . . . . . . . . . 5 Get started with Ubuntu Desktop . . . . . Access networks . . . . . . . . . . . Connect to the wired Ethernet . . . .
8 48 49 Appendix C. Supplemental information about the Ubuntu operating system . . . . . . . . . . . . . . . . . 55 Appendix A. System memory speed. . . . . . . . . . . . . . . . . . 51 Appendix D. Compliance information . . . . . . . . . . . . . . . 57 Appendix B. Accessibility and ergonomic information . . . . . . . . 53 Appendix E. Notices and trademarks . . . . . . . . . . . . . . . 59 Before you contact Lenovo . . . . . . . . Lenovo Customer Support Center . . . . . .
Discover your Lenovo computer Thank you for choosing a Lenovo computer! We are dedicated to delivering the best solution to you. Before starting your tour, please read the following information: • Illustrations in this documentation might look different from your product. • Depending on the model, some optional accessories, features, software programs, and user interface instructions might not be applicable to your computer. • Documentation content is subject to change without notice.
iv P350 Tiny User Guide
Chapter 1. Meet your computer Front 1. ThinkStation® LED 2. Power indicator 3. Power button 4. Storage drive activity indicator 5. USB-C® (3.2 Gen 2) connector 6. Always On USB 3.2 connector Gen 2 7. Headset connector Power indicator Show the system status of your computer. • On: The computer is starting up or working. • Off: The computer is off or in hibernation mode. • Breathing: The computer is in sleep mode. Always On USB 3.
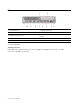
Rear 1. Security-lock slot 2. Optional connectors* 3. Wi-Fi® antenna slot* 4. Ethernet connector 5. USB 3.2 connectors Gen 2 6. USB 3.2 connector Gen 1 (with smart power-on feature) 7. HDMI™ out connector 8. USB 3.2 connector Gen 1 9. DisplayPort™ out connector 10. Power cord connector * for selected models Optional connectors Depending on the computer model, the connector might be a DisplayPort out connector, a USB-C connector, or an HDMI out connector.
Features and specifications For detailed specifications of your computer, go to https://psref.lenovo.com. • Width: 37 mm (1.5 inches) Dimensions • Height: 179 mm (7 inches) • Depth: 182.9 mm (7.2 inches) Weight (without packaging) Hardware configuration Maximum configuration as shipped: 1.4 kg (3 lb) 1. Open the system menu from the top-right corner and click Settings. 2. Click About.
Connector name Description Connect USB-compatible devices, such as a USB keyboard, USB mouse, USB storage device, or USB printer. • USB 3.2 connector Gen 1 • USB 3.2 connector Gen 2 • Charge USB-C compatible devices with the output voltage and current of 5 V and 0.9 A. • Connect to USB-C accessories to help expand your computer functionality. To purchase USB-C accessories, go to https://www.lenovo.com/accessories. • USB-C (3.
Chapter 2. Get started with your computer Get started with Ubuntu Desktop Learn the basics of Ubuntu and start working with it right away. For more information about Ubuntu, see the Ubuntu documentation site at: https://help.ubuntu.com/lts/ubuntu-help/index.html. The Gnome desktop is installed by default and is designed to be simple and easy to use. Details on using Gnome are available by launching the Help application or online at https://help.gnome.org/users/.
1. Open the system menu from the top-right corner and expand the Wi-Fi section of the menu. 2. Click Select Network. A list of available wireless networks is displayed. 3. Select a network available for connection. Provide required information, if needed. Connect an external display Connect a projector or a monitor to your computer to give presentations or expand your workspace. Change display settings Right-click a blank area on the desktop and select Display settings.
Chapter 3. Explore your computer Set the power plan For ENERGY STAR® compliant computers, the following power plan takes effect when your computers have been idle for a specified duration: • turn off the display: After 5 minutes • put the computer to sleep: After 20 minutes To awaken the computer from Sleep mode, press any key on your keyboard. To reset the power plan to achieve the best balance between performance and power saving: 1. Open the system menu from the top-right corner and click Settings. 2.
Purchase accessories Lenovo has a number of hardware accessories and upgrades to help expand the capabilities of your computer. Options include memory modules, storage devices, network cards, power adapters, keyboards, mice, and more. To shop at Lenovo, go to https://www.lenovo.com/accessories.
Chapter 4. Secure your computer and information Lock the computer Note: Lenovo makes no comments, judgments, or warranties about the function, quality, or performance of the locking device and security feature. You can purchase computer locks from Lenovo. Kensington-style cable lock Lock your computer to a desk, table, or other fixtures through a Kensington-style cable lock.
If both the power-on password and supervisor password are set, you can enter either password. However, you must use your supervisor password to change any configuration settings. • Hard disk password Setting a hard disk password prevents unauthorized access to the data on the storage drive. When a hard disk password is set, you are prompted to enter a valid password each time you try to access the storage drive.
To wipe the storage drive data: 1. Restart the computer. When the logo screen is displayed, press F1 or Fn+F1. 2. Select Security ➙ secure wipe ➙ Enabled. 3. Press F10 or Fn+F10 to save the changes and exit. 4. Restart the computer. When the logo screen is displayed, press F12 or Fn+F12. 5. Select App Menu ➙ secure wipe and press Enter. 6. Select the storage drive you will wipe and click NEXT. 7. Select the entire storage drive or partition to wipe as desired. 8. Select the method as desired and click NEXT.
• No Access: You cannot access the USB storage devices from the computer. To configure the Smart USB Protection function: 1. Restart the computer. When the logo screen is displayed, press F1 or Fn+F1. 2. Select Security ➙ Smart USB Protection and press Enter. 3. Select the desired setting and press Enter. 4. Press F10 or Fn+F10 to save the changes and exit.
Chapter 5. UEFI BIOS This chapter provides information about configuring and updating UEFI BIOS, and clearing CMOS. What is UEFI BIOS Note: The operating system settings might override any similar settings in UEFI BIOS. UEFI BIOS is the first program that the computer runs when the computer is turned on. UEFI BIOS initializes the hardware components and loads the operating system and other programs. Your computer comes with a setup program with which you can change UEFI BIOS settings.
Change the display mode of UEFI BIOS (for selected models) You can use UEFI BIOS in the graphic mode or the text mode according to your needs. The keys on the keyboard used to perform various tasks are displayed at the bottom of the screen. In addition to the keyboard, you also can use the mouse to make selections. To change the display mode of UEFI BIOS: 1. Restart the computer. When the logo screen is displayed, press F1 or Fn+F1. 2. Select Main ➙ Setup Mode Select and press Enter. 3.
2. Restart the computer. When the logo screen is displayed, press F12 or Fn+F12. 3. Select the storage device as desired and press Enter. If you want to change the boot priority order permanently, select Enter Setup on Startup Device Menu and press Enter to enter the BIOS menu.
• Best Performance (default setting): The computer works at the best system performance with normal acoustic level. • Best Experience: The computer works at the best experience with balanced noise and better performance. • Full Speed: All fans in the computer will run at full speed. To change the ITS performance mode: 1. Restart the computer. When the logo screen is displayed, press F1 or Fn+F1. 2. Select Power ➙ Intelligent Cooling and press Enter. 3. Select Performance Mode and press Enter. 4.
3. Disconnect all power cords from electrical outlets. Then, remove any parts that impede access to the Clear CMOS /Recovery jumper. 4. Move the jumper from the standard position to the maintenance position. 5. Reconnect the power cords for the computer and the monitor to electrical outlets. 6. Turn on the computer and the monitor. When the computer beeps, the recovery process begins. 7. After the recovery process is completed, the computer will be turned off automatically.
18 P350 Tiny User Guide
Chapter 6. Troubleshooting, diagnostics, and recovery This chapter provides solutions to resolve computer problems. Use the basic procedure as a starting point for resolving computer problems. Basic procedure for resolving computer problems Prerequisite Before you start, read Generic Safety and Compliance Notices, and print the following instructions. 1. Check that: a. The cables for all connected devices are connected correctly and securely. b. All components have been reassembled correctly. c.
Audio problems Problem The sound comes from one of the external speakers. Solution • Ensure that the speaker cable is inserted completely into the connector on the computer. • Ensure that the cable that connects the left speaker to the right speaker is securely connected. • Ensure that the balance settings are set correctly. Network problems Note: The Wi-Fi® and Bluetooth features are optional. Problem Solution • Connect the cable from the Ethernet connector to the RJ45 connector of the hub.
Problem Solution • Enable the Bluetooth feature in UEFI BIOS. • Enable all Bluetooth devices. The Bluetooth feature does not work. 1. Launch Settings and choose Bluetooth. 2. Make sure that Bluetooth is enabled by the toggle at the top. 3. Click on each device to enable and start pairing. • Update or reinstall the Bluetooth driver. Sound does not come from the Bluetooth headset or headphones. Select the Bluetooth headset or headphones as the default audio output device in advanced sound settings.
CD or DVD problems Problem Solution • Ensure that the optical drive supports the CD or DVD. • Ensure that the disc is inserted correctly, with its label up. • Ensure that the disc you are using is clean. To remove dust or fingerprints, wipe the disc clean with a soft cloth from the center to the outside. Wiping a disc in a circular motion might cause loss of data. A CD or DVD does not work. • Ensure that the power cable and signal cable are securely connected to the drive.
Serial connector problems Problem Solution • Connect the serial cable from the serial connector on the computer to the serial device. If the serial device has its own power cord, connect the power cord to a grounded electrical outlet. • Turn on the serial device and keep the device online. The serial connector cannot be accessed. • Install any programs supplied with the serial device. Refer to the documentation that comes with the serial device for more information.
https://pcsupport.lenovo.
Chapter 7. CRU replacement Customer Replaceable Units (CRUs) are parts that can be upgraded or replaced by the customer. Lenovo computers contain the following types of CRUs: • Self-service CRUs: Refer to parts that can be installed or replaced easily by customer themselves or by trained service technicians at an additional cost. • Optional-service CRUs: Refer to parts that can be installed or replaced by customers with a greater skill level.
• System fan • Wi-Fi card* • Wi-Fi card shield* * for selected models Remove or replace a CRU This section provides instructions on how to remove or replace a CRU. Power adapter and power cord Prerequisite Before you start, read Generic Safety and Compliance Notices, and print the following instructions. For access, do the following: 1. Turn off the computer and remove all connected devices and cables. 2. Disconnect the computer from ac power and all connected cables.
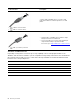
External Wi-Fi antenna Prerequisite Before you start, read Generic Safety and Compliance Notices, and print the following instructions. For access, do the following: 1. Turn off the computer and remove all connected devices and cables. 2. Disconnect the computer from ac power and all connected cables. Removal steps Vertical stand Prerequisite Before you start, read Generic Safety and Compliance Notices, and print the following instructions. Chapter 7.
For access, do the following: 1. Turn off the computer and remove all connected devices and cables. 2. Disconnect the computer from ac power and all connected cables. Removal step VESA mount bracket Prerequisite Before you start, read Generic Safety and Compliance Notices, and print the following instructions. For access, do the following: 1. Turn off the computer and remove all connected devices and cables. 2. Disconnect the computer from ac power and all connected cables.
Removal steps External optical drive box and external optical drive Prerequisite Before you start, read Generic Safety and Compliance Notices, and print the following instructions. For access, do the following: 1. Turn off the computer and remove all connected devices and cables. 2. Disconnect the computer from ac power and all connected cables. Replacement procedure Chapter 7.
30 P350 Tiny User Guide
Dust shield Prerequisite Before you start, read Generic Safety and Compliance Notices, and print the following instructions. For access, do the following: 1. Turn off the computer and remove all connected devices and cables. 2. Disconnect the computer from ac power and all connected cables. Chapter 7.
Replacement procedure Computer cover Prerequisite Before you start, read Generic Safety and Compliance Notices, and print the following instructions.
Before you open the computer cover, turn off the computer and wait several minutes until the computer is cool. For access, do the following: 1. Turn off the computer and remove all connected devices and cables. 2. Disconnect the computer from ac power and all connected cables. 3. Unlock any locking device that secures the computer cover. 4.
Removal steps System fan Prerequisite Before you start, read Generic Safety and Compliance Notices, and print the following instructions. For access, do the following: 1. Remove the computer cover.See “Computer cover” on page 32. 2. Remove the internal speaker. See “Internal speaker” on page 33. 3. Disconnect the system fan cable from the system fan connector on the system board.
Coin-cell battery Prerequisite Before you start, read Generic Safety and Compliance Notices, and print the following instructions. Your computer has a special type of memory that maintains the date, time, and settings for built-in features, such as parallel connector assignments (configurations). A coin-cell battery keeps this information active when you turn off the computer. The coin-cell battery normally requires no charging or maintenance throughout its life; however, no coin-cell battery lasts forever.
Removal steps Note: After installing a new coin-cell battery, reset the system date and time in the UEFI BIOS menu. PCIe card and PCIe converter Prerequisite Before you start, read Generic Safety and Compliance Notices, and print the following instructions. Replacement procedure • Type 1 1. For access, remove the computer cover, see “Computer Cover” on page 32. 2. Replace the PCIe card and PCIe converter.
• Type 2 1. For access, remove the following parts in order: – “Computer Cover” on page 32. – “System fan” on page 34 2. Replace the PCIe card and PCIe converter. Chapter 7.
38 P350 Tiny User Guide
Wi-Fi card and Wi-Fi card shield Prerequisite Before you start, read Generic Safety and Compliance Notices, and print the following instructions. For access, remove the following parts in order: • “Computer cover” on page 32. • “PCIe card and PCIe converter” on page 36 Chapter 7.
Replacement procedure 40 P350 Tiny User Guide
Bottom cover Prerequisite Before you start, read Generic Safety and Compliance Notices, and print the following instructions. For access, do the following: • Remove the computer cover.See “Computer cover” on page 32. • Turn over the computer so that the bottom cover is facing up. Chapter 7.
Replacement procedure M.2 solid-state drive Prerequisite Before you start, read Generic Safety and Compliance Notices, and print the following instructions. Attention: The M.2 solid-state drive is sensitive. Inappropriate handling might cause damage and permanent loss of data. When handling the M.2 solid-state drive, observe the following guidelines: • Replace the M.2 solid-state drive only for upgrade or repair. The M.2 solid-state drive is not designed for frequent changes or replacement.
Replacement procedure Chapter 7.
Memory module Prerequisite Before you start, read Generic Safety and Compliance Notices, and print the following instructions. Ensure that you follow the installation order for memory modules shown in the following illustration. For access, remove the following parts in order: • “Computer cover” on page 32. • “Bottom cover” on page 41.
Replacement procedure Chapter 7.
46 P350 Tiny User Guide
Chapter 8. Help and support Self-help resources Use the following self-help resources to learn more about the computer and troubleshoot problems. Resources How to access? Product documentation: • Safety and Warranty Guide • Generic Safety and Compliance Notices • Setup Guide Go to https://pcsupport.lenovo.com. Then, follow the onscreen instructions to filter out the documentation you want.
Call Lenovo If you have tried to correct the problem yourself and still need help, you can call Lenovo Customer Support Center. Before you contact Lenovo Prepare the following before you contact Lenovo: 1. Record the problem symptoms and details: • What is the problem? Is it continuous or intermittent? • Any error message or error code? • What operating system are you using? Which version? • Which software applications were running at the time of the problem? • Can the problem be reproduced? If so, how? 2.
Services available during the warranty period • Problem determination - Trained personnel are available to assist you with determining if you have a hardware problem and deciding what action is necessary to fix the problem. • Lenovo hardware repair - If the problem is determined to be caused by Lenovo hardware under warranty, trained service personnel are available to provide the applicable level of service.
50 P350 Tiny User Guide
Appendix A. System memory speed The Intel Core™ microprocessor families compatible with this ThinkStation computer feature an integrated memory controller. The memory controller provides the microprocessor with direct access to the system memory. Therefore, the system memory speed will be determined by the memory module type, frequency, size (capacity), the number of memory modules installed, and the microprocessor model.
52 P350 Tiny User Guide
Appendix B. Accessibility and ergonomic information This chapter provides information about accessibility and ergonomics. Accessibility information Lenovo is committed to providing users who have hearing, vision, and mobility limitations with greater access to information and technology. This section provides information about the ways these users can get the most out of their computer experience. You also can get the most up-to-date accessibility information from the following Web site: https://www.
Working in the virtual office might mean adapting to frequent changes in your environment. Adapting to the surrounding light sources, active seating, and the placement of your computer hardware, can help you improve your performance and achieve greater comfort. This example shows someone in a conventional setting. Even when not in such a setting, you can follow many of these tips. Develop good habits, and they will serve you well.
Appendix C. Supplemental information about the Ubuntu operating system In limited countries or regions, Lenovo offers customers an option to order computers with the preinstalled Ubuntu® operating system. If the Ubuntu operating system is available on your computer, read the following information before you use the computer. Ignore any information related to Windows-based programs, utilities, and Lenovo preinstalled applications in this documentation.
You may send your request in writing to the address below accompanied by a check or money order for $15 to: Lenovo Legal Department Attn: Open Source Team / Source Code Requests 8001 Development Dr. Morrisville, NC 27560 Please include the version of the OS and the version of the Linux Kernel pre-shipped on this Device as part of your request. Be sure to provide a return address.
Appendix D. Compliance information For compliance information, refer to Regulatory Notice at https://pcsupport.lenovo.com and Generic Safety and Compliance Notices at https://pcsupport.lenovo.com/docs/generic_notices. Certification-related information Product name: ThinkStation P350 Tiny Machine types: 30EF, 30EG, 30EH, 30EJ, 30EK, and 30EL The latest compliance information is available at: https://www.lenovo.
Operating environment Maximum altitude (without pressurization) • Operating: From -15.2 m (-50 ft) to 3048 m (10 000 ft) • Storage: From -15.
Appendix E. Notices and trademarks Notices Lenovo may not offer the products, services, or features discussed in this document in all countries. Consult your local Lenovo representative for information on the products and services currently available in your area. Any reference to a Lenovo product, program, or service is not intended to state or imply that only that Lenovo product, program, or service may be used.
Any performance data contained herein was determined in a controlled environment. Therefore, the result obtained in other operating environments may vary significantly. Some measurements may have been made on development-level systems and there is no guarantee that these measurements will be the same on generally available systems. Furthermore, some measurements may have been estimated through extrapolation. Actual results may vary.