ThinkVision S22e-20 User Guide Machine Types: 62C6
Product numbers A21215FS0 62C6-GAR1-WW 62C6-GCR1-CB First Edition (July 2020) © Copyright Lenovo 2020. LENOVO products, data, computer software, and services have been developed exclusively at private expense and are sold to governmental entities as commercial items as defined by 48 C.F.R. 2.101 with limited and restricted rights to use, reproduction and disclosure.
Contents Safety information........................................................................................... iv General Safety guidelines...............................................................................................iv Chapter 1.Getting started................................................................................ v Shipping contents............................................................................................................v Notice for use.................
Online technical support...............................................................................................2-7 Telephone technical support .......................................................................................2-7 Appendix B.Notices..................................................................................... 2-11 Recycling information.................................................................................................2-12 Trademarks...........................
Safety information General Safety guidelines For tips to help you use your computer safely, go to: http://www.lenovo.com/safety Before installing this product, read the Safety Information.
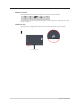
Chapter 1.Getting started This User’s Guide provides detailed operation instructions for the user. For quick instruction overview, please see the Setup Poster for brief information.
Notice for use To set up your monitor, please see the illustrations below. Note: Do not touch the monitor within the screen area. The screen area is glass and can be damaged by rough handling or excessive pressure. 1. Place your monitor with the screen face down on a soft flat surface. 2. Align the stand assembly bracket to the monitor. 3. Insert the base towards monitor until it locks in place. Note: To install a VESA mount, please see “Wall Mounting (Optional)”on page 2-9. Chapter 1.
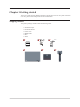
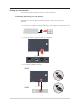
Product overview This section will provide information on adjusting monitor positions, setting user controls, and using the cable lock slot. Types of adjustments Tilt Please see the illustration below for an example of the tilt range.
Monitor controls The keypad controls on the panel frame are accesses to various functions. For information on how to utilize these keypad controls, please see “Adjusting your monitor image” on page 2-3. Cable lock slot Your monitor is equipped with a cable lock slot located on the rear of your monitor Chapter 1.
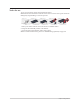
Setting up your monitor This section provides information on how to set up your monitor. Connecting and turning on your monitor Note: Be sure to read the Safety information on page iv before carrying out this procedure. 1. Power off your computer and all attached devices, and unplug the computer power cord. 2. Connect the cables according to below icon indication. VGA 3. For computer in HDMI connecting.
4. For computer in VGA connecting. 5. Connect the speaker’s audio cable and audio jack of monitor to transfer audio source from HDMI. Note: The audio output in HDMI modes. Chapter 1.
6. Insert the power cord into the monitor, then plug the monitor power cord and the computer cord into grounded electrical outlets. Note: A certified power supply cord has to be used with this equipment. The relevant national installation and or equipment regulations shall be considered. A certified power supply cord not lighter than ordinary polyvinyl chloride flexible cord according to IEC 60227 (designation H05VV-F 3G 0.75mm2 or H05VVH2-F2 3G 0.75mm2 ) shall be used.
8. Power on the monitor and the computer. 9. When you install the monitor driver, download the driver that corresponds to your monitor model from the Lenovo website https://pcsupport.lenovo.com/solutions/ s22e_20. Refer to the “Manually installing the monitor driver” on page 3-5 section to install the driver. Registering your option Thank you for purchasing this Lenovo™ product.
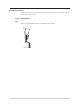
Chapter 2.Adjusting and using your monitor This section will give you information on adjusting and using your monitor. Comfort and accessibility Good ergonomic practice is important to get the most from your personal computer and to avoid discomfort. Arrange your workplace and the equipment you use to suit your individual needs and the kind of work that you perform. In addition, use healthy work habits to maximize your performance and comfort while using your computer.
The following are some other tips for comfortable viewing of your monitor: • Use adequate lighting for the type of work you are performing. • Use the monitor brightness, contrast, and image adjustment controls, if equipped, to optimize the image on your screen to meet your visual preferences. • Keep your monitor screen clean so you can focus on the screen’s contents. Any concentrated and sustained visual activity can be tiring for your eyes.
Adjusting your monitor image This section describes the user control features used to adjust your monitor image. Using the direct access controls The direct access controls can be used when the On Screen Display (OSD) is not displayed. Table 2-1. Direct access controls Icon Control Input Source 1 2 Description Switches the video input source Shift back to previous level when in OSD mode.
Using the On-Screen Display(OSD) controls To adjust the settings, the user controls can be viewed through the OSD. ® S22e-20 Monitor Controls Brightness 75 Advanced Settings Contrast 75 Port Settings Menu Settings Exit Input Signal: HDMI Resolution: 1920x1080 Refresh Rate: 60Hz Color Mode : Reddish To use the controls: 1. Press to open the main OSD menu. 2. Use or to move among the icons. Select an icon and press to access that function.
Table 2-1. OSD fncti OSD Icon on Sub menu Main Menu Brightness Monitor Controls Description Adjusts overall screen brightness. Controls and Adjustments All input ports Adjusts difference between light and dark areas. • On Dynamic Contrast • Off • Off • Normal Over Drive • Extreme Adjust intensity of red, green, and blue. Preset mode • SRGB • Neutral • Reddish • Bluish • Low Blue Light Contrast Color Mode Advanced Settings Custom • Red: Increases or decreases the saturation of ’red’ in the image.
OSD Icon on Main Menu Sub menu Language Menu time out Menu Settings Description Change languages of menu. The language chosen only affects the language of the OSD. It has no effect on any software running on the computer. Set the duration of time that the OSD will remain active when no operation is performed. Controls and Adjustments All input ports Menu Horizontal Adjust menu Horizontal location. Menu Vertical Tansparency Factory Default Adjust menu Vertical location.
Selecting a supported display mode The display mode of the monitor uses is controlled by the computer. Therefore, refer to your computer documentation on how to change display modes. The image size, position and shape might be changed when the display mode changes. This is normal and the image can be re-adjusted using automatic image setup and the image controls. Unlike CRT monitors, which require a high refresh rate to minimize flicker, LCD or Flat Panel technology is inherently flicker-free.
Understanding power management Power management is invoked when the computer recognizes that you have not using your mouse or keyboard for a user-definable period. There are several states as described in the table below. For optimal performance, switch off your monitor at the end of each working day, or whenever you expect to leave it unused for long periods during the day. Table 2-3.
Caring for your monitor Be sure to turn off the power before you perform any maintenance on the monitor. Do not: • Apply water or liquid directly to your monitor. • Use solvents or abrasives. • Use flammable cleaning materials to clean your monitor or any other electrical equipment. • Touch the screen area of your monitor with sharp or abrasive items. This type of contact may cause permanent damage to your screen. • Use any cleaner which contains an anti-static solution or similar additives.
Step 4: Attach the mounting bracket from the VESA compatible wall mounting kit. (100mm x100mm distance), the type of VESA mounting screw is M4 x 10 mm. VESA hole Step 5: Attach the LCD display to the wall, and follow the instructions in the wall-mounting kit. For use only with UL Listed Wall Mount Bracket with minimum weight/load: 8kg Note: When you use a flexible arm, do not tilt the monitor downward by more than 5 degrees. Chapter 2.
Chapter 3.Reference information This section contains monitor specifications, instructions to manually install the monitor driver, troubleshooting information. Monitor specifications Table 3-1. Monitor specifications for type-model 62C6-GAR1-WW /62C6-GCR1-CB Dimensions Depth 173.10mm (6.81 in.) Height 405.10mm (15.95 in.) Width 489.30 mm (19.26 in.) Stand Tilt Range: -5o~22o VESA mount Supported 100 mm x 100 mm (3.94 in. x 3.94 in.) Image Viewable image size 546.1 mm (21.5 in.
Communications VESA DDC/CI Supported Display Modes Horizontal frequency 54 kHz – 90 kHz Vertical frequency 49 Hz – 76 Hz Native Resolution 1920 x 1080 at 60 Hz Operating 0° to 40°C (32°F to 104° F) Storage -20° to 60°C (-4°F to 140° F) Shipping -20° to 60°C (-4° F to 140° F) Operating 10% to 80% non-condensing Storage 5% to 95% non-condensing Shipping 5% to 95% non-condensing Temperature Humidity Chapter 3.
Troubleshooting If you have a problem setting up or using your monitor, you might be able to solve it yourself. Before calling your dealer or Lenovo, try the suggested actions that are appropriate to your problem. Table 3-2. Troubleshooting Problem Possible cause The words” Out of Range” are shown on the screen, and the power indicator is flashing white.
Problem Possible cause Suggested action Reference One or more of the pixels appear discolored This is a characteristic of If there are more than five the LCD technology and pixels missing, contact the is not an LCD defect Support Center • Fuzzy lines in text or a blurryimage • Horizontal or vertical lines through the image. • Image setup has not been optimized • Your system DisplayProperties setting have not been optimized. “Appendix A.
Manually installing the monitor driver Below are steps for manually installing the monitor driver in Microsoft Windows 7, Microsoft Windows 10. Installing the monitor driver in Windows 7 To use the Plug and Play feature in Microsoft Windows 7, do the following: 1. Turn off the computer, all attached devices. 2. Ensure that the monitor is connected correctly. 3. Turn on the monitor and then the system unit. Allow your computer to start the Windows 7 operating system. 4.
Installing the monitor driver in Windows 10 To use the Plug and Play feature in Microsoft Windows 10, do the following: 1. Turn off the computer, all attached devices. 2. Ensure that the monitor is connected correctly. 3. Turn on the monitor and then the system unit. Allow your computer to start the Windows 10 operating system. 4. From the Lenovo website https://pcsupport.lenovo.
Service information Customer responsibilities The warranty does not apply to a product which has been damaged due to accident, misuse, abuse, improper installation, usage not in accordance with product specifications and instructions, natural or personal disaster, or unauthorized alterations, repairs or modifications. The following are examples of misuse or abuse and not covered by warranty: • Images burned on to the screen of a CRT monitor.
Appendix A. Service and Support The following information describes the technical support that is available for your product, during the warranty period or throughout the life of the product. Refer to your Lenovo Statement of Limited Warranty for a fully explanation of Lenovo warranty terms. Registering your option Register to receive product service and support updates, as well as free and discounted computer Accessories and content. Go to: http://www.lenovo.
Country or Region Telephone Number Brunei Darussalam Dial 800-1111 (English) Canada 1-800-565-3344 (English, French) Chile 800-361-213(Spanish ) China Technical Support Line: 400-100-6000 (Mandarin) China (Hong Kong S.A.R.) China (Macau S.A.R.
Country or Region Telephone Number Israel Givat Shmuel Service and Center: +972-3-531-3900 (Hebrew, English) Italy Warranty service and support: +39-800-820094 (Italian) Japan 0120-000-817 (Japanese, English) Kazakhstan 77-273-231-427(Standard charges Apply) (Russian , English) Korea 080-513-0880 (Collect Call) 02-3483-2829 (Toll Call) (Korean) Latvia 371-6707-360(Latvian, Russian, English) Lithuania 370 5278 6602(Italian, Russian, English ) Luxembourg Malaysia ThinkServer and ThinkStation: 3
Country or Region Telephone Number Sweden Warranty service and support: 077-117-1040 (Swedish) Switzerland Warranty service and support: 0800-55-54-54 (German, French, Italian) Taiwan 0800-000-702 (Mandarin) Thailand 001-800-4415-734 (+662) 787-3067 (Standard Charges Apply)(Thai, English) Turkey 444-04-26 (Turkish) United Kingdom Standard warranty support: 03705-500-900 ( local rate) Standard warranty support: 08705-500-900(English) United States 1-800-426-7378 (English) Uruguay 000-411-005-6
Appendix B.Notices Lenovo may not offer the products, services, or features discussed in this document in all countries. Consult your local Lenovo representative for information on the products and services currently available in your area. Any reference to a Lenovo product, program, or service is not intended to state or imply that only that Lenovo product, program, or service may be used.
Recycling information Lenovo encourages owners of information technology (IT) equipment to responsibly recycle their equipment when it is no longer needed. Lenovo offers a variety of programs and services to assist equipment owners in recycling their IT products. For information on recycling Lenovo products, go to: http://www.lenovo.com/recycling https://www.lenovo.com/jp/ja/services_warranty/recycle/pcrecycle/ https://www.lenovo.
Trademarks The following terms are trademarks of Lenovo in the United States, other countries, or both: Lenovo The Lenovo logo ThinkCentre ThinkPad ThinkVision Microsoft, Windows, and Windows NT are trademarks of the Microsoft group of companies. Other company, product, or service names may be trademarks or service marks of others.