T75 Smart Large Format Display User Guide Product model: 62F4
Product Number 62F4-KATC-WW Type/Model K21750UT0 First Edition (March 2021) © Copyright Lenovo 2021 All rights reserved. LENOVO products, data, computer software, and services have been developed exclusively at private expense and are sold to governmental entities as commercial items as defined by 47 C.F.R. 2.101 with limited and restricted rights to use, reproduction and disclosure.
Catalogue Chapter 1 .
Catalogue Appendix B . Usage Precautions……………………………………………………B-1 Appendix C . Service And Support…………………………………………………C-1 Online Technical Support…………………………………………………………………………………………………C-1 Telephone Technical Support……………………………………………………………………………………………C-1 Worldwide Telephone List…………………………………………………………………………………………………C-1 Service Information…………………………………………………………………………………………………………C-2 Appendix D .
Chapter 1. Get started withyour Smart Large Format Display (LFD) This User Guide contains detailed information about ThinkVision® TC-CB TC-WW Intelligent Interactive Large screen.
Wall Mounting 1.Installation notes ● When installing wall hanging, at least two or more professionals are required to carry out all the installation work of the machine at the same time. Users should not install themselves without authorization, so as to avoid harm caused by improper operation.
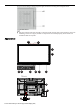
Heat Dissipation Distance from mounting surface (mm) Left and right side At the top of the At the bottom of theThe back of the 100 300 100 100 PAY ATTENTION TO In addition to meeting the above requirements, the area of ventilation holes on the bottom, side and top should not be less than 50% of the sealing area to maintain air circulation. When installing the wall mounting, the installation depth of the wall mounting bolts should be greater than 10mm. *Refer to CAS 132-2006 standard.
Step 2: Insert the fixing screws through the upper and lower mounting ears and tighten them. INSTRUCTIONS Start the computer and enter the built-in computer signal channel. If the screen is broken, the screen is blinking, or there is no signal, the built-in computer is not installed properly. Please check and reinstall the built-in computer.
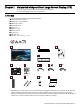
1 Infrared touch screen 8 The microphone 2 Full physical toughened protective glass 9 Usb-a external camera port 3 Power key 4 10 WIFI module Remote receiving device /light sensing device 11 Built-in computer interface 12 Rear connection panel 5 The front interface 13 The network interface 6 The speaker 14 A power outlet 7 Infrared body sensor 15 The power switch The I/O Panel Front I/O panel name USB 功能描述 Connect the USB device.
name Functional description功能描述 The microphone Microphone input port VGA audio input Audio input port, used with VGA input. VGA input VGA signal input port. Combined with "Touch USB", the PC can be operated in Touch mode. HDMI 1, 2, 3 inputs Hd signal input port 1. Combined with "Touch USB", the PC can be operated in Touch mode. Dp input DP Digital signal input port. Combined with "Touch USB", the PC can be operated in Touch mode. USB - 2.0 B touch Connect to the touch port of the PC. USB 3.
The Front Button POWER KEY BOOT Step 1: After inserting the power cord, turn on the ship AC power switch (at the back of the screen, next to the power socket) to enter the standby state, and the power indicator is red. Step 2: Press on the smart screen. Press on the smart screen to start the smart screen (the indicator is green).
Features And Specifications Parameter 75" Backlight Type LED Aspect Ratio 16:9 Viewing Angle 178° Resolution 3840 × 2160 Pixel Working Voltage 100 - 240V, 50/60Hz Stand-by Power Consumption < 0.5W Rated Power(No OPS plug in) ≤309W Max Power(OPS operating) ≤670W Rated Current Max 5.0A Speaker 15W×2 Cover Glass Tempered glass Touch Sensing Technology Infrared Touch Points 20 points Viewable image size 1649.66mm × 927.94mm The whole machine size 1982.0 x1209.
A Serial Port Control Rs232 communication cable (please use cross data cable) PIN This machine The computer 1 NC NC 2 RXD0 TXD0 3 TXD0 RXD0 4 NC NC 5 GND GND 6 NC NC 7 NC NC 8 NC NC 9 NC NC The shell GND Intelligent large SCREEN RS232 port GND Connect the RS-232 interface to the computer or central control device. After opening the RS-232 serial port connection, set the parameters as follows.
function Mute Control code Return code 7F 08 99 A2 B3 C4 02 FF 01 02 CF 7F 08 99 A2 B3 C4 02 FF 01 0A CF 7F 09 99 A2 B3 C4 02 FF 01 01 7F 08 99 A2 B3 C4 02 FF 01 0B CF 7F 09 99 A2 B3 C4 02 FF 01 0A 01 CF 7F 09 99 A2 B3 C4 02 FF 01 0B 01 CF 7F 08 99 A2 B3 C4 02 FF 01 0C CF 7F 08 99 A2 B3 Computer VGA C4 02 FF 01 0D CF 7F 08 99 A2 B3 Alone to listen C4 02 FF 01 15 CF 7F 08 99 A2 B3 Return (exit) C4 02 FF 01 1D CF 7F 08 99 A2 B3 The home page C4 02 FF 01 1C CF 7F 09 99 A2 B3 C4
The Remote Control Remote control buttons Key Function Functional specifications SOURCE Turn on/off the source list NUMERIC KEYS Up/down/Left/right select key OK MENU KEYS Confirm the current operation The main menu is displayed or hidden Return to the Android launcher Return to the previous menu No function HOME PAGE RETURN OPS WHITEBOARD VOLVOL + About 5 meters at a 45° Angle Enter annotation mode Enter/exit the screen rest mode Reduce the volume Mute/unmute Turn up the volume About 5 meter
Chapter 2 Explore your smart large format display This section describes the basic operation functions of the display. Teams The Meeting You can create a conference or join a conference.
The Whiteboard The whiteboard is designed to quickly and conveniently display the written content of a meeting to participants. Users can annotate, draw, insert flow charts and pictures on the whiteboard page. Users can access the writing pad in the following two ways: ●On the home screen, click Whiteboard on the toolbar to go to the writing pad. ●Click Whiteboard on the More page to go to the writing pad page.
8 9 More Hover toolbar Image insertion: PNG and JPG images can be inserted, the image can be adsorbed at 45 degrees, the image can be erased by eraser, and up to 4 images can be added.
1 Choose Click this icon to return to the current interface operation state from annotation mode. 2 The brush Click the icon to enter the writing state. Click again to set the brush color and thickness. 3 The eraser Click the icon to enter the eraser function, click the icon again to set the eraser diameter. 4 Clear the screen 5 Undo Return to the previous step. 6 Screenshots Capture the current comment page, images can be selected to import whiteboard and file sharing.
All Application The Calculator Click the calculator APP to enter,you can realize the following functions of add, subtract,multiply and divide as shown in the picture below. Screenshots You can access the screen capture screen in any of the following ways: ● Click the "Screenshot" icon of the "More" interface; ● Click the "Screenshot" icon in the task Management sidebar; ● Press the "Take a Screenshot" button on your remote control.
The Calendar Click the "Calendar" icon to enter the calendar setting interface, as shown below: The Clock Click the clock APP to enter, you can realize the following functions: "clock", "alarm clock", "timer" and countdown.
Lenovo Projection Click the "Lenovo Projection" icon to enter the screen projector pairing display interface. Users can use the screen projector to display according to the instructions, as shown below: System Settings Click the " " icon in the" More "interface to enter the setting interface, including common functions, network Settings, time and language, advanced Settings, about devices and other information.
Network The Network sub-menu is displayed, allowing you to set the wireless network, wired network, hotspot information, and Bluetooth functions. ● Wireless network: View the MAC address of the device and enable or disable Wi-Fi. ● On wired networks: View the MAC address, IP address, gateway, subnet mask, and DNS information. It can automatically obtain LAN IP or LAN IP as required. ● Hotspot: You can set items related to portable Wi-Fi hotspots.
Advanced Settings Enter the "Advanced Settings" sub-menu, you can choose "Hover menu Settings", "Sound Source Tracking", "Application Information", "Auto On/off", "Auto Sleep and Wake up Settings", "Standby", "Low Blue light mode", "Startup channel", "OPS startup", "Lock screen". Low Blue Light Enter the low Blue light mode: Click the "Settings" button in the sidebar and select "Advanced Settings" to enter the page.
No Stroboscopic: The device has no visible or invisible flicker in the range of 0-3000Hz. About The Equipment The About Device submenu is displayed.
Wired signal sources include Front HDMI 、 front Type-C 、 Type-C 、 HDMI 1 、HDMI 2 、 HDMI 3 、 DP 、VGA 、 AV. Click the icon of signal source port, and the intelligent large screen will display the signal source screen in full screen. Built-In Computer After the built-in computer is successfully installed, tap the " " icon on the floating toolbar, and then tap the" Built-in Computer "icon to enter the built-in computer interface.
Interest Rates Screen In response to the policy of energy conservation and environmental protection, the screen function is specially added in the design of intelligent large screen. You can set the screen rest state when you only answer the voice without viewing the screen. In this case, audio or video plays normally, the screen is off, and the power indicator is steady green. Users can access the screen in the following two ways: ● Press the "rest screen" button of the remote control.
Resolution VGA Display Mode No. Resolution Refresh Rate 1 640X480 60Hz 2 800 x 600 60Hz 3 1024X768 60Hz 4 1360X768 60Hz 5 1920X1080 60Hz HDMI Display Mode No. Resolution Refresh Rate 1 720X480 60Hz 2 1280X720 60Hz 3 1920X1080 50Hz 4 1920X1080 60Hz 5 3840X2160 30Hz 6 3840X2160 60Hz HDMI Out Video Output Mode No.
Chapter 3. Troubleshooting If you have a problem setting up or using your LFD, you might be able to solve it yourself. Before calling your dealer or Lenovo, try the suggested actions that are appropriate to your problem. Issue There's nothing on the screen, no sound, no light Possible Factor The power plug is loose and the power supply is not connected Solution Check whether the power cable is properly connected.
Appendix A. Important Safety Information Safety Information General Safety guidelines For tips to help you use your computer safety, go to: http://www.lenovo.com/safety Before installing this product, read the Safety Information. This equipment is not suitable for use in locations where children are likely to be present, avoid hurting your child when machine falling down.
Maintenance Important Safety Information The power cable is dedicated to the smart screen. If you want to use a different power cable, only use the power cable that matches the smart screen. To prevent the machine from being damaged, do not use any cables other than the one provided with the machine. Please do not overload the power sockets and make sure that the sockets you use are certified by the state for safety.
Appendix B.Usage Precautions Please do not disassemble or assemble this product by yourself in any way. Opening or removing the cover without authorization may expose you to dangerous voltage or other hazards. If you have any maintenance matters, please contact professional maintenance personnel for handling. If the unit is dirty, please unplug the unit and wipe it with a soft semi-dry cloth dipped in a small amount of water, do not repeatedly wipe the display to avoid scratches.
Appendix C. Service and support The following information describes the technical support that is available for your product, during the warranty period or throughout the life of the product. Refer to your Lenovo Statement of Limited Warranty for a fully Lenovo warranty termsexplanation of Online Technical Support Online technical support is available during the life of your product through the Lenovo Support Web site at http://www.lenovo.
Service Information Customer responsibilities The warranty does not apply to a product which has been damaged due to accident, misuse, abuse, improper installation, usage not in accordance with product specifications and instructions, natural or personal disaster, or unauthorized alterations, repairs or modifications. The following are examples of misuse or abuse and not covered by warranty: Images burned on to the screen of a CRT monitor.
Appendix D. Compliance information Recycling Information Lenovo encourage owners of information technology (IT) equipment to responsibly recycle their equipment when it is no longer needed. Lenovo offers a variety of programs and services to assist equipment owners in recycling their IT products. For information on recycling Lenovo products, go to: www.lenovo.
Lenovo may have patents or pending patent applications covering subject matter described in this document. The furnishing of this document does not give you any license to these patents. You can send license inquiries, in writing to: Lenovo (United States),inc. 1009 Think Place ‒ Building One Morrisville, NC 27560 U.S.A.