Lenovo D27-30, User Guide
Product Number D20270FD0 66B8-KAC6-WW First Edition (07 2020) © Copyright Lenovo 2020 All rights reserved. LENOVO products, data, computer software, and services have been developed exclusively at private expense and are sold to governmental entities as commercial items as defined by 48 C.F.R. 2.101 with limited and restricted rights to use, reproduction and disclosure.
Contents Product Number ....................................................................................................................................................................... i Contents ................................................................................................................................................................................. ii Safety information..............................................................................................................
Safety information General Safety guidelines For tips to help you use your computer safety, go to: http://www.lenovo.com/safety Before installing this product, read the Safety Information.
Safety and Maintenance Guidelines Important Safety Information The power cord is designed for use with your monitor. Don’t use a different cord, use only a power source and connection compatible with this monitor. WARNING: Always connect your monitor, the computer, and other equipment to a grounded (earthed) power outlet. To reduce the risk of electric shock or damage to your equipment, do not disable the power cord grounding feature. The grounding plug is an important safety feature.
Getting started This User’s Guide provides detailed operation instructions for the user. For quick instruction overview, please see the Setup Poster for brief information. Shipping contents The product package should include the following items: Information Flyer Flat Panel Monitor Power Cord Monitor Stand Monitor base Cable clip Notice for use To setup your monitor, please see the illustrations below. Note: Do not touch the monitor within the screen area.
Product overview This section will provide information on adjusting monitor positions, setting user controls, and using the cable lock slot. Types of adjustments Tilt Please see the illustration below for an example of the tilt range. User controls Your monitor has controls on the front which are used to adjust the display. For information on how to use these controls, please see “Adjusting your monitor image ” on page 2-6.
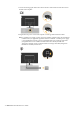
Setting up your monitor This section provides information to help you set up your monitor. Connecting and turning on your monitor Note: Be sure to read the Safety information on page iv before carrying out this procedure. 1. Power off your computer and all attached devices, and unplug the computer power cord. 2. Connect one end of the HDMI cable to the HDMI connector on the back of the computer, and the other end to the HDMI connector on the monitor.
3. Connect the analog signal cable to the D-SUB connector of the monitor and the other end on the back of the computer. 4. Plug the monitor power cord and the computer cord into grounded electrical outlets. Note: A certified power supply cord has to be used with this equipment. The relevant national installation and/or equipment regulations shall be considered. A certified power supply cord not lighter than ordinary polyvinyl chloride flexible cord according to IEC 60227 (designation H05VV-F 3G 0.
5. Assembled Line Cleaner as shown below. 6. Power on the monitor and the computer. 7. To install the monitor driver, you must download it from Lenovo website (http://support.lenovo.com/docs/d27_30) and follow the instructions on page 3-5. Registering your option Thank you for purchasing this Lenovo TM product. Please take a few moments to register your product and provide us with information that will help Lenovo to better serve you in the future.
Adjusting and using your monitor This section will give you information on adjusting and using your monitor. Comfort and accessibility Good ergonomic practice is important to get the most from your personal computer and to avoid discomfort. Arrange your workplace and the equipment you use to suit your individual needs and the kind of work that you perform. In addition, use healthy work habits to maximize your performance and comfort while using your computer.
Health Administration Prolong exposure to computer screens may cause temporary visual fatigue. Factors including working environment, working habit and posture, screen flicker and blue light contribute to this condition. To minimize visual fatigue certain adjustments can be made on the work stations or using suitable computer screens with features that alleviate eye strain. Environment Visual fatigue is affected by the working environment.
Exercises for the eye: 1. Alternate looking up and looking down while keeping the body and head upright. 2. Slowly roll your eyes to look to the left and right. 3. Roll eyes to look at objects on the upper right corner and then on lower right. Do same thing to look at objects on the upper left and lower left. Exercises for the neck: 1. Relax arm at the side. Bend head forward to slightly stretch the neck. Hold for 5 seconds. 2. Relax arm at the side. Turn thead to the right. Hold for 5 seconds.
● Viewing Angle Neck fatigue and pain may result from prolong turning of the head to see objects on the monitor screen. To minimize this, position the monitor directly in front so the head, neck and torso face forward to the screen. It is recommended that monitor should not be more than 35 degrees to the right or left of the head. Monitors should also not be placed too high or too low as this contributes to awkward posture which results to muscle fatigue.
Low Blue Light Concerns on blue light affecting eye health have risen over the years. Blue light have wavelength between 300 nm to 500 nm. The monitors have a factory setting that reduces blue light emissions. Users can enable low blue light mode on these monitors from the OSD settings. 1. Press to open the main OSD menu. 2. Use or to move among the icons. Select icon to access this function. (Image color setting) and press 3. Use or move among to the Low blue light item. Press Low Blue Light.
Adjusting your monitor image This section describes the user control features used to adjust your monitor image. Using the direct access controls The direct access controls can be used when the On Screen Display (OSD) is not displayed. Note: The direct access controls are coloured. Table 2-1. Direct access controls Icon Control Description Input change Switches the video input source. Image Setup Activates automatic image adjustment. Brightness Direct access to Brightness adjustment.
Table 2-2. OSD functions OSD Icon on Main Menu Controls and Adjustments Submenu Description Brightness Adjusts overall brightness Contrast Adjusts difference between light and dark areas. Enable dynamic contrast ratio. DCR ● Off ● On ● Standard All input ports ● Game Display Mode ● Web ● Movie ● Picture Basic image setting Scaling Mode ● Full Screen ● Original AR ● Off Over Drive ● Normal ● Extreme Automatic Automatically optimizes the image.
OSD Icon on Main Menu Submenu Description Controls and Adjustments ● Model Name: Information ● Refresh: ● Firmware ● Serial Number: Select OSD Language. Language Menu setting Note: The language chosen only affects the language of the OSD. It has no effect on any software running on the computer. Menu Horizontal Changes the horizontal position of the OSD. Menu Vertical Changes the vertical position of the OSD.
Selecting a supported display mode The display mode the monitor uses is controlled by the computer. Therefore, refer to your computer documentation for details on how to change display modes. The image size, position and shape might change when the display mode changes. This is normal and the image can be readjusted using automatic image setup and the image controls. Unlike CRT monitors, which require a high refresh rate to minimize flicker, LCD or Flat Panel technology is inherently flicker-free.
Caring for your monitor Be sure to turn off the power before you perform any maintenance on the monitor. Do not: ● Apply water or liquid directly to your monitor. ● Use solvents or abrasives. ● Use flammable cleaning materials to clean your monitor or any other electrical equipment. ● Touch the screen area of your monitor with sharp or abrasive items. This type of contact may cause permanent damage to your screen. ● Use any cleaner which contains an anti-static solution or similar additives.
Reference information This section contains monitor specifications, instructions to manually install the monitor driver, troubleshooting information, and service information. Monitor specifications Table 3-1. Monitor specifications Dimensions Stand VESA mount Image Height Depth Width Power consumption Video input (Analog) 231.22 mm (9.10 in.) 614.11 mm (24.17 in.) Tilt range Supported (UL & GS approved) Range: -5°/+22° Viewable image size 685.8 mm (27 in.
Troubleshooting If you have a problem setting up or using your monitor, you might be able to solve it yourself. Before calling your dealer or Lenovo, try the suggested actions that are appropriate to your problem. Table3-2.Troubleshooting Problem Possible cause Suggested action The words” Out of Range” are shown on the screen, and the power indicator is flashing White. The system is set to a display mode which is not supported by the monitor.
Table3-2.Troubleshooting (continued) Problem Possible cause Suggested action Reference Screen is blank The monitor is in and power Standby/Suspend indicator is steady mode amber or flashing White. ● Press any key on the keyboard or move the mouse to restore operation. ● Check the Power options settings on your computer. “Understanding power management” on page 2-9 The power indicator is White, but there is no image. The video signal cable is loose or disconnected from the system or monitor.
Manual image setup If automatic image setup does not establish the image that you prefer, perform manual image setup. Note: Have your monitor powered on for about 15 minutes, until the monitor warms up. 1.Press at the bottom of the monitor to open the OSD menu. 2.Use or to select and press to access. 3.Use or to select Clock and Phase adjustment. ● Clock (pixel frequency) adjusts the number of pixels scanned by one Horizontal sweep.
Manually installing the monitor driver Below are steps for manually installing the monitor driver in Microsoft Windows 7, Microsoft Windows 10. Installing the monitor driver in Windows 7 To install the device driver in Microsoft® Windows 10, do the following: 1. Turn off the computer and all attached devices. 2. Ensure that the monitor is connected correctly. 3. Turn on the monitor and then turn on the computer. Allow your computer to boot into Windows 7 operating system. 4.
Installing the monitor driver in Windows 10 To use the Plug and Play feature in Microsoft Windows 10, do the following: 1. Turn off the computer and all attached devices. 2. Ensure that the monitor is connected correctly. 3. Turn on the monitor and then turn on the computer. Allow your computer to boot into Windows 10 operating system. 4. From the Lenovo website http://support.lenovo.
Service information Customer responsibilities The warranty does not apply to a product which has been damaged due to accident, misuse, abuse, improper installation, usage not in accordance with product specifications and instructions, natural or personal disaster, or unauthorized alterations, repairs or modifications. The following are examples of misuse or abuse and not covered by warranty: ● Images burned on to the screen of a CRT monitor.
Appendix A Service and Support The following information describes the technical support that is available for your product, during the warranty period or throughout the life of your product. Refer to the Lenovo Limited Warranty for a full explanation of Lenovo warranty terms. Registering your option Register to receive product service and support updates, as well as free and discounted computer accessories and content. Go to: http://www.lenovo.
Appendix B Notices Lenovo may not offer the products, services, or features discussed in this document in all countries. Consult your local Lenovo representative for information on the products and services currently available in your area. Any reference to a Lenovo product, program, or service is not intended to state or imply that only that Lenovo product, program, or service may be used.
Recycling information Lenovo encourages owners of information technology (IT) equipment to responsibly recycle their equipment when it is no longer needed. Lenovo offers a variety of programs and services to assist equipment owners in recycling their IT products. For information on recycling Lenovo products, go to: www.lenovo.
Trademarks The following terms are trademarks of Lenovo in the United States, other countries, or both: Lenovo The Lenovo logo ThinkCenter ThinkPad ThinkVision Microsoft, Windows, and Windows NT are trademarks of the Microsoft group of companies. Other company, product, or service names may be trademarks or service marks of others. Power cords and power adapters Use only the power cords and power adapters supplied by the product manufacturer. Do not use the ac power cord for other devices.