Lenovo IdeaPad S940-14IIL User Guide
Read this first Before using this documentation and the product it supports, ensure that you read and understand the following: • Appendix A “Important safety information” on page 33 • Safety and Warranty Guide • Setup Guide First Edition (September 2019) © Copyright Lenovo 2019. LIMITED AND RESTRICTED RIGHTS NOTICE: If data or software is delivered pursuant to a General Services Administration “GSA” contract, use, reproduction, or disclosure is subject to restrictions set forth in Contract No.
Contents About this documentation . . . . . . . . iii Chapter 1. Meet your computer . . . . . 1 Front . . . . . . . . . . . . . Base . . . . . . . . . . . . . Left . . . . . . . . . . . . . Right . . . . . . . . . . . . . Bottom . . . . . . . . . . . . Features and specifications . . . . Statement on USB transfer rate . Operating environment . . . . . . . . . . . . . . . . . . . . . . . . . . . . . . . . . . . . . . . . . . . . . . . . . . . . . . . . . . . . 1 2 3 4 5 6 7 7 Chapter 2.
ii Lenovo IdeaPad S940-14IIL User Guide
About this documentation • Illustrations in this documentation might look different from your product. • Depending on the model, some optional accessories, features, and software programs might not be available on your computer. • Depending on the version of operating systems, some user interface instructions might not be applicable to your computer. • Documentation content is subject to change without notice.
iv Lenovo IdeaPad S940-14IIL User Guide
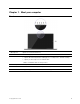
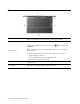
Chapter 1. Meet your computer Front 1. Microphones Capture or record sound and voice. 2. Infrared LED Emit infrared (IR) light for face authentication. 3. Camera • Capture still and moving images for taking photos, recording videos, and video chatting. • Capture your face images for user authentication. Note: Use Windows Hello to enroll your face. 4. Camera light If the light is on, the camera is in use. 5. ToF sensor Detect user behavior and adjust settings automatically. 6.
Base 1. Wireless antennas Send and receive radio waves for the wireless LAN/Bluetooth module. Note: The antennas are not visible from the outside of the computer. Press it to turn on the computer or put the computer into sleep mode. To turn off the computer, open the Start menu, select Shut down. 2. Power button Power, and then select Note: You can turn on the computer by flipping open the LCD screen if Flip to Boot is enabled. The light on the power button shows the system status of your computer.
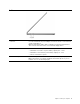
Left 1. Power connector / USB-C™ connector Connect to ac power with the included power cord and ac power adapter. When not connected with the ac power adapter, it can also be used to connect external storage or data devices. Note: An appropriate USB-C cable is required for connecting external devices. This connector cannot be used to connect external display devices. 2. Charging light Indicate whether the computer is connected to ac power.
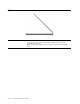
Right 1. ThunderboltTM 3 connectors 4 Connect external display, storage, or other data devices. In addition to the USB-C connector on the left, you can also plug the ac adapter into one of the two Thunderbolt 3 connectors. Note: An appropriate adapter may be needed for connecting external display devices.
Bottom 1. Novo button hole Press the Novo button to open the Novo Button menu. From the menu, you can choose to open the UEFI/BIOS setup utility, the Boot menu, or the Windows startup options screen. 2. Speakers Produce sound. Chapter 1.
Features and specifications Dimensions • Width: 319.3 mm (12.57 inches) • Depth: 197.4 mm (7.77 inches) • Thickness – Front: 12.2 mm (0.48 inch) – Rear: 15.1 mm (0.60 inch) ac power adapter • Input: 100 V – 240 V ac, 50 Hz to 60 Hz • Output – 20 V, 3.25 A – 15 V, 3 A – 9 V, 3 A – 5 V, 3 A • Power: 65 W Power connector (dc-in) 20 V, 3.25 A Battery pack 52 Wh Microprocessor To view the microprocessor information of your computer, right-click the Start button and then select System.
Note: The battery capacity is the typical or average capacity as measured in a specific test environment. Capacities measured in other environments may differ but are no lower than the rated capacity (see product label).
8 Lenovo IdeaPad S940-14IIL User Guide
Chapter 2. Get started with your computer Get started with Windows 10 Learn the basics of Windows 10 and start working with it right away. For more information about Windows 10, see the Windows help information. Windows account You must create at least one account to use the Windows operating system. It can be either a local account or a Microsoft account. Local accounts A local account is created on a particular Windows-enabled device and it can only be used on that device.
Note: By default, you are prompted to add Microsoft accounts. If you don’t know the person’s Microsoft account, select I don’t have this person’s sign-in information. Follow on-screen instructions to create a Microsoft account for the person. Alternatively, select Add a user without a Microsoft account to create a local account for the person. Set up face recognition If your computer includes a Windows Hello-compatible infrared camera, you can set up face recognition to sign in with your face. Step 1.
Windows user interface 1. Account Change account settings, lock the computer, or sign out from the current account. 2. Documents Open the Documents folder, a default folder to save your received files. 3. Pictures Open the Pictures folder, a default folder to save your received pictures. 4. Settings Launch Settings. 5. Power Shut down, restart, or put the computer into sleep. 6. Start button Open the Start menu. 7.
Launch an app • Open the Start menu and select the app you want to launch. • Use Windows Search. Lenovo Vantage and Lenovo PC Manager Lenovo Vantage and Lenovo PC Manager is software developed by Lenovo. Using the software, you can: • View product information • View warranty and support information • Run hardware scan and diagnose problems • Change hardware settings • Update Windows, drivers, and UEFI/BIOS Lenovo Vantage or PC Manager may be pre-installed on your computer.
Connect to an external display device You may connect your computer to an external display device through wired or wireless connection. Connection type Condition Wired Prepare an appropriate USB-C adapter Wireless • The external display supports Miracast, or • Purchase and use a Miracast adapter Connect a wired display device Use the Thunderbolt 3 connector and an appropriate adapter (not supplied) to connect your computer to a wired display device.
Step 1. On the external device, turn on Bluetooth and set the device discoverable. Note: Read the documentation that came with the external device for details. Step 2. Open the Start menu, and then select Settings ➙ Devices ➙ Bluetooth & other devices. Make sure the Bluetooth switch is turned on. Step 3. Select Add Bluetooth or other device ➙ Bluetooth. A list of nearby devices is displayed. Step 4. Select the device name and follow on-screen instructions to connect the device.
Hotkey Function Turn on/off airplane mode. Enable/Disable the integrated camera. Lock the screen. Switch display devices. Increase/Decrease screen brightness. Turn on/off or adjust the brightness of the keyboard backlight. Note: This hotkey must be used with the Fn key. Hotkey mode Some hotkeys share keys with functions keys (F1 to F12). The hotkey mode is a UEFI/BIOS setting that changes how hotkeys (or function keys) are used.
Tap once • From the Start menu: Open an app or item. • From the desktop: Select an app or item. • In an open app: Perform an action such as Copy, Save, and Delete, depending on the app. Tap twice quickly Open an app or item from the desktop. Tap and hold Open a shortcut menu. Slide Scroll through items, such as lists, pages, and photos. Drag an item to the location you want Move an object.
Move two fingers closer together Zoom out. Move two fingers farther apart Zoom in. Swipe in from the right edge Open the action center to see your notifications and quick actions. Swipe in from the left edge View all your open windows in task view. • Swipe downwards shortly from the top edge (for full-screened app or when your computer is in the tablet mode) Show a hidden title bar. • Swipe in from the top edge to the bottom edge (when your computer is in the tablet mode) Close the current app.
18 Lenovo IdeaPad S940-14IIL User Guide
Chapter 3. Explore your computer Intelligent features Your computer includes a ToF sensor on top of the screen. When enabled, the sensor detects your presence and head movement. Based on the detection, the computer may perform operations automatically to protect your privacy, save battery power, or just make your daily use of the computer easier. The following table provides a brief introduction to these features. Table 1.
Step 1. Enter the software name in Windows Search box. Step 2. Select the matched result. The software icon appears in the Windows notification area to indicate that the software is open. Note: On the settings page of the software, you can turn on Launch on Startup to allow the software to open automatically. Disable or enable glance detection You can temporarily disable glance detection if you are not using the snap window or smart pointer feature. Step 1.
Note: If the background color is red, the sensor cannot detect your head movement. Use smart pointer When smart pointer is enabled, you can move the pointer between screens by simply moving your head. Step 1. Connect an external display and set project mode to Extend. Note: Smart pointer does not work in duplicate mode. Step 2. Turn on Smart Pointer on the console of Glance by Mirametrix. Step 3. Move your head sideways to move the pointer between displays.
Check the battery status The battery status icon or is in the Windows notification area. You can check the battery status, view the current power plan, and access battery settings quickly. Click the battery status icon to display the percentage of battery power remaining and change the power mode. A warning message is displayed when the battery is low. Charge the battery When the battery power is low, charge your battery by connecting your computer to ac power.
Change settings in UEFI/BIOS setup utility This section introduces what is UEFI/BIOS and the operations you can perform in its setup utility. What is UEFI/BIOS setup utility UEFI/BIOS is the first program that runs when a computer starts. UEFI/BIOS initializes hardware components and loads the operating system and other programs. Your computer may include a setup program (setup utility) with which you can change certain UEFI/BIOS settings. Open the UEFI/BIOS setup utility Step 1.
Step 1. Open the UEFI/BIOS setup utility. Step 2. Select Configuration and change the setting for Flip to Boot. Set passwords in UEFI/BIOS setup utility This section introduces the types of passwords that you can set in the UEFI (Unified Extensible Firmware Interface) or BIOS (Basic Input/Output System) setup utility. Password types You can set various types of passwords in the UEFI/BIOS setup utility.
Step 3. Enter the current password. Step 4. In the Enter New Password text box, enter the new password. Step 5. In the Confirm New Password text box, enter the new password again. Note: If you want to remove the password, press Enter in both text boxes without entering any character. Step 6. Select Exit ➙ Exit Saving Changes. If you remove the administrator password, the user password is also removed. Set user password You must set the administrator password before you can set the user password.
Note: The master and user hard disk passwords must be set at the same time. Step 4. Select Exit ➙ Exit Saving Changes. If the hard disk password is set, you must provide the correct password to start the operating system. Change or remove hard disk password Step 1. Open the UEFI/BIOS setup utility. Step 2. Select Security. Step 3. Change or remove the hard disk password. To change or remove master password, select Change Master Password and press Enter.
• automatically (when it detects changes to Windows system files) • at regular intervals (if set up by the user) • at any time (if initiated manually by the user) Note: In order for System Restore to create restore points, system protection must be turned on for the system drive. Create a system restore point manually You can use Windows System Restore to create a restore point at any time. Step 1. In Windows 10 search box, enter Create a restore point and select the matched result. Step 2.
Attention: Previous files on the drive will be deleted. Back up personal files before using it to create a recovery drive. When recovery drive is created, you might see a Delete the recovery partition from your PC option. If you want to free up drive space on your computer, select it and then select Delete. Otherwise, select Finish. Use a recovery drive to restore or reset Windows If Windows cannot start, you can use a recovery drive (created in advance) to restore or reset Windows. Step 1.
Chapter 4. Help and support Frequently asked questions How do I open the Control Panel? • Open the Start menu and select Windows System ➙ Control Panel. • Use Windows Search. How should I turn off my computer? Open the Start menu and select Power ➙ Shut down. How do I partition my storage drive? Refer to https://support.lenovo.com/solutions/ht503851 What should I do if my computer stops responding. Press and hold the power button until the computer turns off. Then restart the computer. 1.
Resources How to access? Lenovo Support Web site with the latest support information of the following: • Drivers and software • Diagnostic solutions Visit https://support.lenovo.com • Product and service warranty • Product and parts details • Knowledge base and frequently asked questions • Open the Start menu and select Get Help or Tips. Windows help information • Use Windows Search or the Cortana® personal assistant. • Microsoft support Web site: https:// support.microsoft.
Call Lenovo If you have tried to correct the problem yourself and still need help, you can call Lenovo Customer Support Center. Before you contact Lenovo Record product information and problem details before you contact Lenovo.
Purchase additional services During and after the warranty period, you can purchase additional services from Lenovo at https:// www.lenovo.com/services. Service availability and service name might vary by country or region.
Appendix A. Important safety information Safety notices This information can help you safely use your computer. Follow and retain all information included with your computer. The information in this document does not alter the terms of your purchase agreement or the Limited Warranty. For more information, see "Warranty Information" in the Safety and Warranty Guide that comes with your computer. Customer safety is important. Our products are developed to be safe and effective.
Protect yourself from the heat generated by the ac power adapter. When the ac power adapter is connected to an electrical outlet and your computer, it generates heat. Extended contact with your body, even through clothing, may cause a skin burn. • Do not place the ac power adapter in contact with any part of your body while it is in use. • Never use it to warm your body. • Do not wrap the cords around the ac power adapter while in use. Prevent your computer from getting wet.
Carry your computer carefully. • Use a quality carrying case that provides adequate cushioning and protection. • Do not pack your computer in a tightly packed suitcase or bag. • Before putting your computer in a carrying case, make sure that it is off, in sleep mode, or in hibernation mode. Do not put a computer in a carrying case while it is turned on. Conditions that require immediate action Products can become damaged due to misuse or neglect.
Note: If you notice these conditions with a product (such as an extension cord) that is not manufactured for or by Lenovo, stop using that product until you can contact the product manufacturer for further instructions, or until you get a suitable replacement. Service and upgrades Do not attempt to service a product yourself unless instructed to do so by the Customer Support Center or your documentation. Only use a Service Provider who is approved to repair your particular product.
Power cords and power adapters DANGER Use only the power cords and power adapters supplied by the product manufacturer. The power cords shall be safety approved. For Germany, it shall be H03VV-F, 3G, 0.75 mm2, or better. For other countries, the suitable types shall be used accordingly. Never wrap a power cord around a power adapter or other object. Doing so can stress the cord in ways that can cause the cord to fray, crack, or crimp. This can present a safety hazard.
Plugs and outlets DANGER If a receptacle (power outlet) that you intend to use with your computer equipment appears to be damaged or corroded, do not use the outlet until it is replaced by a qualified electrician. Do not bend or modify the plug. If the plug is damaged, contact the manufacturer to obtain a replacement.
General battery notice DANGER Batteries supplied by Lenovo for use with your product have been tested for compatibility and should only be replaced with approved parts. A battery other than the one specified by Lenovo, or a disassembled or modified battery is not covered by the warranty. Battery abuse or mishandling can cause overheating, liquid leakage, or an explosion. To avoid possible injury, follow these instructions: • Do not open, disassemble, or service any battery.
The Lenovo-authorized repair facilities or technicians recycle Lenovo batteries according to local laws and regulations. When replacing the lithium coin-cell battery, use only the same type or equivalent type that is recommended by the manufacturer. The battery contains lithium and can explode if not properly used, handled, or disposed of. Swallowing the lithium coin-cell battery will cause choking or severe internal burns in just two hours and might even result in death. Keep batteries away from children.
Heat and product ventilation DANGER Computers, ac power adapters, and many accessories can generate heat when turned on and when batteries are charging. Notebook computers can generate a significant amount of heat due to their compact size. Always follow these basic precautions: • When your computer is turned on or the battery is charging, the base, the palm rest, and some other parts may become hot.
Electrical current safety information DANGER Electric current from power, telephone, and communication cables is hazardous. To avoid a shock hazard: • Do not use your computer during a lightning storm. • Do not connect or disconnect any cables or perform installation, maintenance, or reconfiguration of this product during an electrical storm. • Connect all power cords to a properly wired and grounded electrical outlet. • Connect properly wired outlets to any equipment that will be attached to this product.
Liquid crystal display (LCD) notice CAUTION: The liquid crystal display (LCD) is made of glass, and rough handling or dropping the computer can cause the LCD to break. If the LCD breaks and the internal fluid gets into your eyes or on your hands, immediately wash the affected areas with water for at least 15 minutes; if any symptoms are present after washing, get medical care.
Glass parts notice CAUTION: Some parts of your product may be made of glass. This glass could break if the product is dropped on a hard surface or receives a substantial impact. If glass breaks, do not touch or attempt to remove it. Stop using your product until the glass is replaced by trained service personnel. Static electricity prevention Static electricity, although harmless to you, can seriously damage computer components and options. Improper handling of static-sensitive parts can damage the part.
Appendix B. Accessibility and ergonomic information This chapter provides information about accessibility and ergonomics. Accessibility information Lenovo is committed to providing users who have hearing, vision, and mobility limitations with greater access to information and technology. This section provides information about the ways these users can get the most out of their computer experience. You also can get the most up-to-date accessibility information from the following Web site: https://www.
keyboard with all the standard keys. You can select keys using the mouse or another pointing device, or you can tap to select the keys if your computer supports multi-touch screen. • High Contrast High Contrast is a feature that heightens the color contrast of some text and images on your screen. As a result, those items are more distinct and easier to identify. • Personalized keyboard Adjust keyboard settings to make your keyboard easier to use.
– Change the size of all the items on your screen. 1. Right-click a blank area on the desktop and then click Display settings ➙ Display. 2. Change the item size by following the on-screen instructions. For some applications, your configuration might not take effect until you sign out and then sign in again. – Change the size of the items on a Web page. Press and hold Ctrl, and then press the plus-sign key (+) to enlarge or the minus-sign key (–) to reduce the text size.
Display: Position the display to maintain a comfortable viewing distance of 510 mm to 760 mm (20 inches to 30 inches). Avoid glare or reflections on the display from overhead lighting or outside sources of light. Keep the display screen clean and set the brightness to levels that enable you to see the screen clearly. Press the brightness control keys to adjust display brightness. Head position: Keep your head and neck in a comfortable and neutral (vertical, or upright) position.
Appendix C. Compliance information This appendix provides the various compliance statements for Lenovo products. Radio frequency compliance statements Computer models equipped with wireless communications comply with the radio frequency and safety standards of any country or region in which it has been approved for wireless use. Besides this document, ensure that you read the Regulatory Notice for your country or region before using the wireless devices contained in your computer.
Brazil Este equipamento não tem direito à proteção contra interferência prejudicial e não pode causar interferência em sistemas devidamente autorizados. This equipment is not protected against harmful interference and may not cause interference with duly authorized systems.
Environmental information by countries and regions This section provides environmental, recycling, and RoHS information about Lenovo products. Recycling and environmental information Lenovo encourages owners of information technology (IT) equipment to responsibly recycle their equipment when it is no longer needed. Lenovo offers a variety of programs and services to assist equipment owners in recycling their IT products. For information about recycling Lenovo products, go to: https://www.lenovo.
Japan recycling statements Collecting and recycling a disused Lenovo computer or monitor If you are a company employee and need to dispose of a Lenovo computer or monitor that is the property of the company, you must do so in accordance with the Law for Promotion of Effective Utilization of Resources. Computers and monitors are categorized as industrial waste and should be properly disposed of by an industrial waste disposal contractor certified by a local government.
Equipamentos elétricos e eletrônicos não devem ser descartados em lixo comum, mas enviados à pontos de coleta, autorizados pelo fabricante do produto para que sejam encaminhados e processados por empresas especializadas no manuseio de resíduos industriais, devidamente certificadas pelos orgãos ambientais, de acordo com a legislação local. A Lenovo possui um canal específico para auxiliá-lo no descarte desses produtos.
For proper collection and treatment, go to: https://www.lenovo.com/lenovo/environment Recycling information for Mainland China Battery recycling information for Taiwan Battery recycling information for the United States and Canada Restriction of Hazardous Substances (RoHS) Directive by countries and regions The latest environmental information about Lenovo products is available at: https://www.lenovo.
Ukraine RoHS India RoHS RoHS compliant as per E-Waste (Management) Rules. Mainland China RoHS The information in the following table is applicable to products manufactured on or after January 1, 2015 for sale in the People’s Republic of China. Appendix C.
56 Lenovo IdeaPad S940-14IIL User Guide
Taiwan RoHS Electromagnetic emission notices Federal Communications Commission (FCC) Supplier’s Declaration of Conformity The following information refers to Lenovo IdeaPad S940-14IIL, machine type 81R1. This equipment has been tested and found to comply with the limits for a Class B digital device, pursuant to Part 15 of the FCC Rules. These limits are designed to provide reasonable protection against harmful interference in a residential installation.
energy and, if not installed and used in accordance with the instructions, may cause harmful interference to radio communications. However, there is no guarantee that interference will not occur in a particular installation.
Dieses Produkt entspricht den Schutzanforderungen der EU-Richtlinie zur elektromagnetischen Verträglichkeit Angleichung der Rechtsvorschriften über die elektromagnetische Verträglichkeit in den EUMitgliedsstaaten und hält die Grenzwerte der Klasse B der Norm gemäß Richtlinie. Um dieses sicherzustellen, sind die Geräte wie in den Handbüchern beschrieben zu installieren und zu betreiben. Des Weiteren dürfen auch nur von der Lenovo empfohlene Kabel angeschlossen werden.
Taiwan precautionary vision statement 警語:使用過度恐傷害視力 注意事項: • 使用30分鐘請休息10分鐘。 • 未滿2歲幼兒不看螢幕,2歲以上每天看螢幕不要超過1小時。 Supplemental information for the Eurasian Union Назначение персональный компьютер для личного и служебного использования, для передачи данных, с поддержкой различных профилей подключения (Wi-Fi, Bluetooth и пр.).
Lenovo is proud to offer products with the ENERGY STAR certified designation. Lenovo computers, if carry an ENERGY STAR mark, have been designed and tested to conform to the ENERGY STAR program requirements for computers as prescribed by the U.S. Environmental Protection Agency. For certified computers, an ENERGY STAR mark may be affixed to the product, the product packaging, or displayed electronically on the E-label screen or the power settings interface.
62 Lenovo IdeaPad S940-14IIL User Guide
Appendix D. Notices and trademarks Notices Lenovo may not offer the products, services, or features discussed in this document in all countries. Consult your local Lenovo representative for information on the products and services currently available in your area. Any reference to a Lenovo product, program, or service is not intended to state or imply that only that Lenovo product, program, or service may be used.
Any performance data contained herein was determined in a controlled environment. Therefore, the result obtained in other operating environments may vary significantly. Some measurements may have been made on development-level systems and there is no guarantee that these measurements will be the same on generally available systems. Furthermore, some measurements may have been estimated through extrapolation. Actual results may vary.