User Guide IdeaPad Gaming 3i (15″, 6) and IdeaPad Gaming 3 (15″, 6)
Read this first Before using this documentation and the product it supports, ensure that you read and understand the following: • Generic Safety and Compliance Notices • Safety and Warranty Guide • Setup Guide First Edition (April 2021) © Copyright Lenovo 2021. LIMITED AND RESTRICTED RIGHTS NOTICE: If data or software is delivered pursuant to a General Services Administration “GSA” contract, use, reproduction, or disclosure is subject to restrictions set forth in Contract No. GS35F-05925.
Contents About this guide . . . . . . . . . . . . . iii Chapter 1. Meet your computer . . . . . 1 Front . . . . . . . . . . . . . Base . . . . . . . . . . . . . Left . . . . . . . . . . . . . Right . . . . . . . . . . . . . Bottom . . . . . . . . . . . . Features and specifications . . . . Statement on USB transfer rate . Operating environment . . . . . . . . . . . . . . . . . . . . . . . . . . . . . . . . . . . . . . . . . . . . . . . . . . . . . . . . . . . . 1 2 3 4 5 6 7 7 Chapter 2.
ii User Guide
About this guide • This guide applies to Lenovo product model(s) listed below. Illustrations in this guide may look slightly different from your product model. Model name Machine type (MT) IdeaPad Gaming 3 15IHU6 82K1, 82MG IdeaPad Gaming3 15IHU6D 82K1 IdeaPad Gaming 3 15ACH6 82K2, 82MJ IdeaPad Gaming3 15ACH6D 82K2 • This guide may contain information about accessories, features, and software that are not available on all models.
iv User Guide
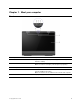
Chapter 1. Meet your computer Front 1. Microphones Capture or record sound and voice. 2. Camera Capture still and moving images for taking photos, recording videos, and video chatting. 3. Camera cover slider Move the slider to cover or uncover the camera lens. Note: The camera cover helps you better protect your privacy. 4. Camera light If the light is on, the camera is in use. 5.
Base 1. Power button 2. Power light Press the button to turn on the computer or put the computer into sleep mode. • Solid white: The computer is turned on; battery charge percentage 21% - 100% • Blinking fast: The computer is turned on; battery charge percentage 1% - 20% • Blinking slowly: The computer is in sleep mode. • Off: The computer is turned off or in hibernation mode. 3. Numeric keypad To enable or disable the numeric keypad, press the Num Lock key. 4.
Left 1. Ventilation slots (outlet) Maintain the outgoing airflow to dissipate internal heat. Attention: Do not block the ventilation slots. Otherwise, the computer might overheat. 2. Power connector Connect to power with the included power cord and ac power adapter. 3. Charging light • Solid white: Connected to ac power; battery capacity 91%–100% • Solid amber: Connected to ac power; battery capacity 1%–90% • Off: Not connected to ac power 4. Ethernet connector Connect to a local area network (LAN).
Right 1. Power light • Solid white: The computer is turned on; battery charge percentage 21% - 100% • Blinking fast: The computer is turned on; battery charge percentage 1% - 20% • Blinking slowly: The computer is in sleep mode. • Off: The computer is turned off or in hibernation mode. 2. Novo button hole Press the Novo button to open the Novo Button menu. From the menu, you can choose to open the UEFI/BIOS setup utility, the Boot menu, or the Windows startup options screen. 3.
Bottom 1. Ventilation slots (inlet) Maintain the incoming airflow to dissipate internal heat. Attention: Do not block the ventilation slots. Otherwise, the computer might overheat. 2. Speakers Produce sound. Chapter 1.
Features and specifications Dimensions • Width: 359.6 mm • Depth: 251.9 mm • Thickness: 24.2 mm ac power adapter • Input: 100 V ac–240 V ac, 50 Hz–60 Hz • Output: 20 V dc, 6.75 A/20 V dc, 8.5 A • Power: 135 W/170 W Battery pack • Capacity – 45 Wh – 60 Wh • Number of cells: – 3 – 4 Note: The battery capacity is the typical or average capacity as measured in a specific test environment. Capacities measured in other environments may differ but are no lower than the rated capacity (see product label).
Connectors and slots • Power connector • Combo audio jack • Ethernet connector • USB Type-A connector × 2 • USB-C connector – Power output up to 5 V and 3 A – USB data transfer rate up to 5 Gbps for USB 3.2 Gen 1 • HDMI 2.
8 User Guide
Chapter 2. Get started with your computer Get started with Windows 10 Learn the basics of Windows 10 and start working with it right away. For more information about Windows 10, see the Windows help information. Windows account You must create at least one account to use the Windows operating system. It can be either a local account or a Microsoft account. Local accounts A local account is created on a particular Windows-enabled device and it can only be used on that device.
Note: To add family members, you need to sign in with a Microsoft account. Step 3. Set the user name and password for the user account. Windows desktop 1. Account Change account settings, lock the computer, or sign out of the current account. 2. Documents Open the Documents folder, a default folder to save your received files. 3. Pictures Open the Pictures folder, a default folder to save your received pictures. 4. Settings Open Settings. 5.
• Press the Windows logo key on the keyboard. Open Control Panel • Open the Start menu and select Windows System ➙ Control Panel. • Use Windows Search. Open an app • Open the Start menu and select the app you want to open. • Use Windows Search. Windows Updates Microsoft periodically releases feature and security updates to the Windows operating system. Updates that are applicable to your version of Windows are downloaded automatically when your computer is connected to the Internet.
Connect to wired networks If your computer includes an Ethernet (RJ-45) connector, you can use an Ethernet cable to connect your computer to a wired network. Connect to Wi-Fi networks If your computer includes a wireless LAN module, you can connect your computer to Wi-Fi® networks. The wireless LAN module on your computer may support different standards. For some countries or regions, use of 802.11ax may be disabled according to local regulations. Step 1.
Open the Novo Button menu For Lenovo computers with a Novo button, you can press the button to open the Novo Button menu. Step 1. Turn off the computer. Step 2. Open the LCD screen and press the Novo button. Interact with your computer Keyboard hotkeys Some keys on the keyboard are printed with icons. These keys are called hotkeys and can be pressed alone or in combination with the Fn key to open certain apps or change certain settings quickly.
Hotkey mode setting How to use hotkeys How to use function keys Disabled Hold down the Fn key and press one of the hotkeys. Press the function keys directly. Enabled Press the hotkeys directly. Hold down the Fn key and press one of the function keys. Note: Hotkeys that do not share keys with function keys are not affected by the hotkey mode setting. They should always be used with the Fn key. The FnLock switch The FnLock is a switch that reverses the default and hidden function of a hotkey.
Chapter 3. Explore your computer Manage power Use the information in this section to achieve the best balance between performance and power efficiency. Check the battery status The battery status icon or is in the Windows notification area. You can check the battery status, view the current power plan, and access battery settings quickly. Click the battery status icon to display the percentage of battery power remaining and change the power mode. A warning message is displayed when the battery is low.
Note: To wake the computer from the sleep state, press the power button or any key on the keyboard. Change or customize a power plan This operation is applicable to computers with pre-installed Windows 10. Step 1. Right-click the battery status icon in the Windows notification area. Step 2. Select Power Options ➙ Change plan settings. You may select a different power plan or you can customize a plan by selecting Change plan settings.
Set passwords in UEFI/BIOS setup utility This section introduces the types of passwords that you can set in the UEFI (Unified Extensible Firmware Interface) or BIOS (Basic Input/Output System) setup utility. Password types You can set various types of passwords in the UEFI/BIOS setup utility. Password type Pre-requisite Usage Administrator password No You must enter it to start the setup utility. User password The administrator password must be set.
Step 4. In the Enter New Password text box, enter the new password. Step 5. In the Confirm New Password text box, enter the new password again. Note: If you want to remove the password, press Enter in both text boxes without entering any character. Step 6. Select Exit ➙ Exit Saving Changes. If you remove the administrator password, the user password is also removed. Set user password You must set the administrator password before you can set the user password.
Step 4. Select Exit ➙ Exit Saving Changes. If the hard disk password is set, you must provide the correct password to start the operating system. Change or remove hard disk password Step 1. Open the UEFI/BIOS setup utility. Step 2. Select Security. Step 3. Change or remove the hard disk password. To change or remove master password, select Change Master Password and press Enter. Note: If you remove the master hard disk password, the user hard disk password is also removed.
• at any time (if initiated manually by the user) Note: In order for System Restore to create restore points, system protection must be turned on for the system drive. Create a system restore point manually You can use Windows System Restore to create a restore point at any time. Step 1. In the Windows 10 search box, enter Create a restore point and select the matched result. Step 2. Select the System Protection tab and then select Create.
When the recovery drive is created, you may see a Delete the recovery partition from your PC option. If you want to free up drive space on your computer, select it and then select Delete. Otherwise, select Finish. Use a recovery drive to restore or reset Windows If Windows cannot start, you can use a recovery drive (created in advance) to restore or reset Windows. Step 1. Connect the recovery drive to your computer; restart your computer and set it to start from the recovery drive.
22 User Guide
Chapter 4. Help and support Frequently asked questions How do I open the Control Panel? • Open the Start menu and select Windows System ➙ Control Panel. • Use Windows Search. How should I turn off my computer? Open the Start menu and select Power ➙ Shut down. How do I partition my storage drive? Refer to https://support.lenovo.com/solutions/ht503851 What should I do if my computer stops responding. Press and hold the power button until the computer turns off. Then restart the computer. 1.
Resources How to access? Lenovo Support Web site with the latest support information of the following: • Drivers and software • Diagnostic solutions Visit https://support.lenovo.com • Product and service warranty • Product and parts details • Knowledge base and frequently asked questions • Open the Start menu and select Get Help or Tips. • Use Windows Search or the Cortana® personal assistant. Windows help information • Microsoft support Web site: https:// support.microsoft.
Call Lenovo If you have tried to correct the problem yourself and still need help, you can call Lenovo Customer Support Center. Before you contact Lenovo Record product information and problem details before you contact Lenovo.
Purchase additional services During and after the warranty period, you can purchase additional services from Lenovo at https:// pcsupport.lenovo.com/warrantyupgrade. Service availability and service name might vary by country or region.
Appendix A. Accessibility and ergonomic information This chapter provides information about accessibility and ergonomics. Accessibility information Lenovo is committed to providing users who have hearing, vision, and mobility limitations with greater access to information and technology. This section provides information about the ways these users can get the most out of their computer experience. You also can get the most up-to-date accessibility information from the following Web site: https://www.
keyboard with all the standard keys. You can select keys using the mouse or another pointing device, or you can tap to select the keys if your computer supports multi-touch screen. • High Contrast High Contrast is a feature that heightens the color contrast of some text and images on your screen. As a result, those items are more distinct and easier to identify. • Personalized keyboard Adjust keyboard settings to make your keyboard easier to use.
– Change the size of all the items on your screen. 1. Right-click a blank area on the desktop and then click Display settings ➙ Display. 2. Change the item size by following the on-screen instructions. For some applications, your configuration might not take effect until you sign out and then sign in again. – Change the size of the items on a Web page. Press and hold Ctrl, and then press the plus-sign key (+) to enlarge or the minus-sign key (–) to reduce the text size.
Display: Position the display to maintain a comfortable viewing distance of 510 mm to 760 mm (20 inches to 30 inches). Avoid glare or reflections on the display from overhead lighting or outside sources of light. Keep the display screen clean and set the brightness to levels that enable you to see the screen clearly. Press the brightness control keys to adjust display brightness. Head position: Keep your head and neck in a comfortable and neutral (vertical, or upright) position.
Note: Selected Lenovo computers are low blue-light certified. These computers are tested with night light turned on and color temperature set to the default value of 48. Appendix A.
32 User Guide
Appendix B. Compliance information This appendix provides compliance statements that are specific to your computer model. The Generic Safety and Compliance Notices contains compliance statements that are common to all Lenovo personal computer products. If your computer includes factory-preinstalled wireless modules, the Regulatory Notice contains compliance information for all the supported wireless modules. To download these publications, go to https://www.lenovo.com/compliance.
Location for the FCC ID and IC ID If you purchased your computer in the United States or Canada and the computer includes factorypreinstalled wireless modules, a piece of text containing identification strings for these modules (FCC ID and IC ID) is visible on the computer’s bottom cover. The text may either be laser etched on the bottom cover or on a physical label affixed to it.
Appendix C. Notices and trademarks Notices Lenovo may not offer the products, services, or features discussed in this document in all countries. Consult your local Lenovo representative for information on the products and services currently available in your area. Any reference to a Lenovo product, program, or service is not intended to state or imply that only that Lenovo product, program, or service may be used.
Any performance data contained herein was determined in a controlled environment. Therefore, the result obtained in other operating environments may vary significantly. Some measurements may have been made on development-level systems and there is no guarantee that these measurements will be the same on generally available systems. Furthermore, some measurements may have been estimated through extrapolation. Actual results may vary.