C310/C315 Series User Guide Version 1.0 2010.
Important Safety Information Before using this manual, it is important that you read and understand all of the related safety information for this product. Refer to the Safety and Warranty Guide that you received with this product for the latest safety information. Reading and understanding this safety information reduces the risk of personal injury or damage to your product. Danger: Be aware of extremely hazardous or lethal situations. Attention: Be aware of possible damage to programs, devices, or data.
Contents Important Safety Information Chapter 1 Using the Computer Hardware............................... 1 1.1 Front view.................................................................................2 1.2 Left and right view of the computer..........................................3 1.3 Rear view of the computer........................................................4 1.4 Computer stand ......................................................................5 1.5 Connecting your computer................
Chapter 5 System Maintenance and Recovery..................... 43 5.1 Restoring the System.............................................................44 5.2 Backup and Restore...............................................................44 5.3 Cleaning Up the Disk..............................................................44 5.4 Checking For, and Correcting Disk Errors...............................45 5.5 Defragmenting the Disk(s).......................................................45 5.
Chapter Using the Computer Hardware This chapter contains the following topics: 1 2 Computer hardware introduction Information on computer connections Note: The descriptions in this chapter might vary from your computer, depending on computer models and configurations.
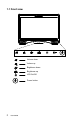
1.
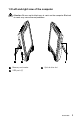
1.2 Left and right view of the computer Attention: Be sure not to block any air vents on the computer. Blocked air vents may cause thermal problems.
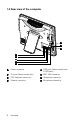
1.
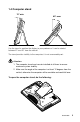
1.4 Computer stand 12° min. 40° max. Use the stand to position the display to your preference. It can be rotated between12º and 40º from the vertical. The stand provides stability to the computer; it is not a removable part. Attention: 1. The computer stand must remain installed at all times to ensure maximum system stability. 2. Make sure the angle of the computer is at least 12 degrees from the vertical; otherwise the computer will be unstable and could fall over.
1.5 Connecting your computer Use the following information to connect your computer: • Look for the small connector icons on the back of your computer. Match the connectors to the icons. Note: Your computer might not have all of the connectors that are described in this section. 1.5.1 Check the voltage rating before you connect the equipment to an electrical outlet to ensure that the required voltage and frequency match the available power source.
1.5.4 If you have audio devices, attach them using the following instructions: 1 2 Microphone Use this connector to attach a microphone (purchased separately) to your computer when you want to record sound or if you use speech-recognition software. Headphone Use this connector to attach headphones (purchased separately) to your computer when you want to listen to music or other sounds without disturbing anyone. 1.5.
1.5.6 If you have powered speakers without an adapter: (This picture is only a sketch print, it does not show the actual figure of the speaker) a. Connect the cable that runs between the speakers if necessary. On some speakers, this cable is permanently attached. b. Connect the cable to the speaker if necessary. On some speakers, this cable is permanently attached. c. Connect the speakers to the Headphone port on the computer. d. Connect the plug to the power source.
TV-Tuner connector Only supported on systems with optional TV tuner card. 1.5.8 Connect the power cords properly to grounded electrical outlets. 1. Plug the power adapter cord into the back of the computer. 2. Plug the power cord into the AC adapter. 3. Plug the power cord into an AC power source. 1.5.
1.6 Important information about using the computer Press the power button which is located on the bottom right of the screen to turn on the computer. Note: The LCD ON/OFF indicator will be light when you press the button. If you press the wrong button, the screen might be turned off. Then you need to turn on the screen again.
Hold the computer tightly when you carry it.
1.7 Keyboard and Mouse (wired) LV T —— Volume down —— Volume up —— Mute LVT —— After starting the Windows operating system, press the LVT key to start the program. You can then learn to use this featured software designed for the Lenovo home PC with integrated Lenovo core technology, and you can also use any other installed programs on the computer. Notes: • Some models are not equipped with the LVT program. • The LVT key on the keyboard is disabled in the models without the LVT program.
1.8 Using the Remote Control (Only some models are equipped with remote control). The remote control (only shipped with some types of computers) works with the remote control receiver on the chassis. Adjust the angle of the remote control properly.
Buttons on the remote control: Button Description Up Down Left Right OK Confirm Back Details Guide (This function is not available in Microsoft Windows operating systems.) Shows live TV on the currently selected channel. Displays the Recorded TV page in Windows Media Center.
Starts Windows Media Center.
16 User Guide
Chapter Lenovo Touch Control Software Operating Instructions This chapter contains the following topics: Startup and Configuration Lenovo Touch screen User Gesture Instructions Precautions when using Lenovo Touch 1 2 3 4 5 6 User Guide 17
Introduction to the Software: Lenovo Touch Control is the user control software for the Lenovo Touch screen. It can be used to perform common touch control tasks you need to operate the computer, such as enabling/disabling or calibrating the touch screen. The monitor is installed with a touch screen and is touch-sensative. The touch screen, just like a mouse or a keyboard, is an input device, through which the user’s hand can transmit coordinate information to the computer.
3. If you need to disable the touch function, repeat Step 1, and click “Disable Touch”. Attention: If the Lenovo Touch Control icon is not shown in the notification area of the taskbar, please click: Start → All Programs → Lenovo → LenovoTouch → Lenovo Touch Control, and then the Lenovo Touch Control icon will appear in the notification area of the taskbar.
2.1.2 Calibrating the Touch Screen When the touch screen reacts in a different place from where you are touching it, or it stops reacting, please follow the steps below to calibrate it: 1. In the notification area of the taskbar at the bottom of the screen, click on the Lenovo Touch Control icon, and in the pop-up window select “Configuration”. 2. In the “Lenovo Touch Control” window, click the “Adjustment Tool” button.
3. When the calibration screen appears, use your finger to touch each of the 4 calibration points that are shown in sequence. After finishing these operations, the calibration screen will disappear, and the screen calibration is complete. Please touch the target point shown on the display. Attention: While in use, whenever the touch screen reacts in a different place from where you are touching it, or it stops reacting, just start the calibration program.
2.1.3 Automatically enable touch at startup If you want the touch screen to launch automatically when the computer starts up, please follow the steps below: 1. In the notification area of the taskbar at the bottom of the screen, click on the Lenovo Touch Control icon, and in the pop-up window select “Configuration”. 2. In the “Lenovo Touch Control” window, check the “Automatically enable touch at startup” box, and then close this window. 3.
2.1.4 Reset Default Setting If you wish to reset the touch function to its default setting, please follow the steps below: 1. In the notification area of the taskbar at the bottom of the screen, click the Lenovo Touch Control icon, and in the pop-up window select “Configuration”. 2. In the “Lenovo Touch Control” window, click the “Reset Default Setting” button, and when the pop-up dialogue box prompts that “The default setting has been restored!”, click “OK” to finish the operation.
2.2 Lenovo Touch screen User Gesture Instructions The Lenovo Touch screen supports single touch, as well as multi-touch, like rotation, zoom in and zoom out. The user can transmit coordinate information to the computer by touching the screen. The touch screen uses a pressureless touchrecognition method, which, in order for you to operate the main computer, only requires you to gently touch the items on the screen with your fingers or make a simple hand gesture. 2.2.1 Basic Hand Gestures 1.
2. Single-Finger Right Click For the desired item on the touch screen, press and hold your finger on the screen until a circle appears. After lifting your finger from the touch screen, a menu bar will pop up. Through these steps you perform the single-finger right click operation. This is similar to the action of clicking the right mouse button.
3. Double-Finger Right Click First use Finger 1 to point the desired item and hold it there, then use Finger 2 to touch anywhere nearby on the screen and quickly lift it up again. Through these steps you perform the double-finger right click operation. The area where Finger 1 is placed can be used to show the right-click menu or perform related operations. 1 2 4. Dragging Movement First use your finger to touch the desired item on the screen and hold it there, then make a dragging movement.
5. High Speed Slide If you touch the screen with a single finger and slide for a short distance horizontally (about 5 cm), and then quickly lift your finger up again, this is called a High Speed Slide, and the screen will show the “Forward” or “Back” icon. Under the default settings, a high speed horizontal sliding movement can achieve a forward or back operation, such as the Forward and Back operations in the IE browser; or Previous and Next slide operations in the slideshow mode of Windows Photo Viewer.
7. Zoom Operation Use two fingers to gently touch the desired item on the touch screen, and while keep touching the screen, slide to change the distance between your two fingers. By increasing (or decreasing) the distance, you can perform a zoom in (or zoom out) operation. For example, you can enlarge or reduce the picture size in Windows Photo Viewer. 8. Rotation Operation Use two fingers to lightly touch the desired item on the touch screen, then rotate in the desired direction.
2.2.2 Touch Screen Related Settings 1. Flicks: In the notification area of the taskbar at the bottom of the screen, click the Flicks icon, and the current Flicks window will appear. click anywhere in this window to enter Flicks Training. The user can perform operations according to the advice given on the screen. 2.
On the Flicks tab you can: • Select commonly used Flicks operation groups • Adjust the sensitivity of the touch screen 30 User Guide
On the Touch tab you can: • Enable / disable options such as “Use your finger as an input device” and “Enable multi-touch gestures and inking”. • Select touch actions which you wish to adjust. By clicking “Settings”, you can adjust the “Speed” and “Spatial Tolerance” parameters, to match the user’s natural way of double-clicking. You can double-click the image on the lower right corner to test this. • Enable / disable touch points.
2.3 Precautions when using Lenovo Touch 1. With the new touch recognition technology of Lenovo Touch, the user only needs to gently tap on the touch screen, and does not need to exert any pressure to complete operations. When using it please remember not to use excessive force or tear the screen surface with any sharp object. 2.
6. The recognition of touch gestures by this product can be influenced by the following factors: • Touching the correct place on the screen • The speed of movement • The elapsed time since the screen was touched last time • The recognition rate of two-finger operations Notes: To learn accurate hand gesture operations, the user can consult this manual and also the related Windows help. 7.
34 User Guide
Chapter Using the Rescue System This chapter contains the following topics: OneKey Recovery Driver and Application Installation System Setup System Backup System Recovery Create Recovery Disc 1 2 Attention: Using this program will result in a loss of data. • You can recover the C drive of the computer to the factory default settings or to the last system backup status using OneKey Recovery.
Note about the service partition: The files and relevant data used by the rescue system are saved in the service partition. Deleting this partition will make the rescue system unusable. For more detailed information, see the following instructions: By selecting Control Panel → Administrative Tools → Computer Management → Disk Management, you can see the service partition, which must not be deleted. Note: The recovery files and relevant data used by the rescue system are saved in the service partition.
Method 1: Automatic Installation Turn on the computer. When the Lenovo logo appears, press the F2 key on the keyboard to start the Rescue System, then select Drivers and Application Installation. Follow the screen prompts to install the Lenovo Drivers and Application Installation. Click Install to start installing the Lenovo Drivers and Application Installation. The system will restart. After the system has restarted, the installation process will continue until completion.
2. If you select “LAN connection,” configure the IP address and proxy server of the LAN. 3.3.3 Password Management Password Management allows you to set the password for Lenovo Rescue System and manage it. The default password is blank. Set a password when you access the Password Management for the first time. If you don’t want to set a password, access the system directly and operate accordingly. 3.4 System Backup Back up your system partition to an image file.
Chapter Using the Computer Software This chapter contains the following topics: Computer software instructions Note: The interface and function of each of these features are subject to the actual software that was shipped with the computer model that you purchased.
4.1 Power2Go — Burning Discs (This software can only be used on models with a rewritable optical drive) Power2Go is the software for disc burning. It provides various burning tools that enable you to easily store your files into CDs or DVDs. Power2Go can make common data discs, music discs, video/photo discs and mixed discs. It also supports disc duplication. Note: This software does not support the burning of VCD audio or Blu-ray disk DVDs. 4.1.1 Launch 1.
4.2 McAfee Security Center McAfee VirusScan Center offers proactive PC security to prevent malicious attacks. It also provides security against multi-pronged attacks by combining anti-virus, anti-spyware and firewall technologies. Note: Connect to the Internet before activation. 4.2.1 Using McAfee Security Center Choose All Programs → McAfee → McAfee Security Center from the Start menu to launch the antivirus software.
42 User Guide
Chapter System Maintenance and Recovery This chapter contains the following topics: Daily Maintenance and Tools Instructions 1 2 3 4 5 6 User Guide 43
5.1 Restoring the System The system can develop problems due to erroneous operation or the installation of additional software. If software problems develop in the originally installed software, you can restore the system by using system backup and restoration features. Note: The existing system settings will change after restoration. Check the settings of the restored system to ensure they match settings that may be critical to your needs.
5.4 Checking For, and Correcting Disk Errors To properly maintain your system, you should periodically check for and fix hard disk errors by doing the following: 1. Right-click the icon for the hard disk drive (HDD) that you want to reorganize, then select Properties from the pop-up menu. 2. Select the Tools tab, and then click Check Now. 3. Check your inspection items for the disk and click Start. Note: You cannot start error checking until the computer is restarted and initialized. 5.
Note: To avoid damaging the computer or display, do not spray cleaning solution directly onto the display. Only use products specifically designed for cleaning displays, and follow the instructions that are included with the product. The following are general methods for cleaning the components: • You can use a soft cloth to remove dust on the surface of the computer, the monitor, the printer, the speakers and the mouse. • You can use a vacuum cleaner to clean in otherwise inaccessible corners.
Chapter Troubleshooting and Confirming Setup This chapter contains the following topics: 1 2 Troubleshooting and Problem Resolution Note: The description of the TV-Tuner card in this manual is only used for the machines which have the TV-Tuner card. It does not apply to those machines that do not have a TV-Tuner card.
Solving Problems Follow these tips when you troubleshoot your computer: • If you added or removed a part before the problem started, review the installation procedures and ensure that the part is correctly installed. • If a peripheral device does not work, ensure that the device is properly connected. • If an error message appears on the screen, write down the exact message. This message may help support personnel diagnose and fix the problem(s).
or other computers that may be generating magnetic interference. 2. Move any interfering devices away from the computer. 3. If the problem persists, consult with Lenovo Service. 6.2 Troubleshooting Audio Problems Problem: No sound from integrated speakers Troubleshooting and problem resolution: • Adjust the windows volume control — Double-click the speaker icon in the lower-right corner of your screen. Ensure that the volume is turned up and that the sound is not muted.
through other drastic means. This can cause system program disorder or even failure during system initialization. During the uninstall process, never directly delete the files or folders. This is harmful to the system, and might cause a system-wide malfunction. Use the following procedure to properly uninstall programs: 1. Back up all documents and system settings related to the program before removing it. 2. If the program has its own uninstaller, run it directly to uninstall the program. 3.
hard disk space. This may account for the apparent hard disk capacity deficit. Further Technical Explanation: The nominal capacity of the hard disk is expressed in the decimal system, 1000 bytes. But the actual hard disk capacity is expressed in the binary system as 1024 bytes (For example, the nominal capacity 1G is 1000M, while the actual capacity 1G is 1024M).
52 User Guide