Machine type: 10102/4773 [C340] 10103/4751 [C345] 10104/6595 [C440] 10105/6596 [C445] 10110/6267 [C540] 10138/F0A2 [C355] 10139/F0A3 [C455] Lenovo C3/C4/C5 Series User Guide Version 1.0 2013.
Important Safety Information Before using this manual, it is important that you read and understand all of the related safety information for this product. Refer to the Safety and Warranty Guide that you received with this product for the latest safety information. Reading and understanding this safety information reduces the risk of personal injury or product damage. The interface and functions shown in this User Guide are provided for reference only and may differ from actual product appearance.
Contents Important Safety Information Using the Computer Hardware.................................................. 1 Front view of the computer..........................................................................2 Left and right views of the computer...........................................................4 Rear view of the computer..........................................................................5 Installing the computer stand................................................................
Troubleshooting and Confirming Setup.................................. 23 Troubleshooting Display Problems.............................................................24 Troubleshooting Audio Problems...............................................................25 Troubleshooting Software Problems..........................................................26 Troubleshooting Problems with Optical Drives and Hard Disks..................26 Special considerations for troubleshooting Windows......................
Using the Computer Hardware This chapter contains the following topics: Introduction to the computer hardware Information on computer connections Note: The descriptions in this chapter might be different from what you see on your computer, depending on the computer model and configuration.
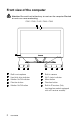
Front view of the computer Attention: Be careful not to block any air vents on the computer. Blocked air vents can cause overheating.
C355 / C455 1 2 10 3 4 5 6 7 8 9 Built-in microphone Built-in camera Hard disk drive indicator Wi-Fi status indicator Power indicator Volume down Volume up Brightness down Brightness up Built-in IR receiver (Only functional on models equipped with a IR receiver module) Attention: The effective range of the Built-in IR Emitter is 10 feet.
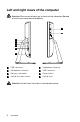
Left and right views of the computer Attention: Be sure not to block any air vents on the computer. Blocked air vents may cause thermal problems. 7 8 1 2 3 4 5 6 USB connector Headphone connector Microphone connector USB connector Memory card reader Power button Optical drive eject button Optical drive Attention: Do not insert 3-inch discs into the optical drive.
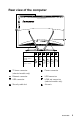
Rear view of the computer 8 7 1 2 3 4 5 6 C340 / C345 / C440 / C445 / C540: C355 / C455: TV tuner connector (selected models only) Power connector Ethernet connector USB connector USB connector HDMI-out connector (selected models only) Security cable slot Air vents User Guide 5
Installing the computer stand 1. Raise the stand holder. 2. Line up the stand base with the mounting holes in the stand holder, then push the stand base into position. 2 1 3. Pull the hand screw ring up, then secure the stand base to the stand holder with the hand screw. 3 4. Press down the hand screw ring.
Computer stand Use the stand to position the display to your preference. It can be rotated 5° forward and 25° backward.
Basic connector instructions Note: Your computer may not have all of the connectors described in this section. Connector Description Microphone Use this connector to attach a microphone to your computer when you want to record sound or if you use speech-recognition software. Headphone Use this connector to attach headphones to your computer when you want to listen to music or other sounds without disturbing anyone. USB connector Use this connector to attach a device that requires a USB connection.
Connecting your computer Connecting the power cord Connect the power cord to an electrical outlet. We recommend using a grounded connection or a surge protector.
Important information about using the computer Press the power button on the side of the computer to turn on the computer. Hold the computer tightly when you carry it.
Connecting to the Internet To connect to the Internet, you’ll need a contract with an Internet Service Provider (ISP) and some hardware. IPSs and ISP offerings vary by country. Contact your ISP for offerings available in your country. Your computer is designed to support a wireless (selected models only) or wired network that connects your computer to other devices.
Wired keyboard (selected models only) LVT —— After entering Windows, press this key to launch the LVT (Lenovo Vantage Technology) program, Lenovo’s pre-loaded Home PC software. In addition to its own functions, the LVT program will allow you to start other Windows compatible software specially configured to run on this model of computer. Notes: • Some models are not equipped with the LVT program. • The LVT key on the keyboard is disabled in the models without the LVT program.
Using Windows 8.1 This chapter contains the following topics: Switching between the main Windows 8.1 interfaces The Charms Bar Shutting down the computer Switching between apps Closing an app Opening other system programs Windows Help and Support Attention: The Windows 8.1 operating system is provided by Microsoft Corporation. Please use it in accordance with the END USER LICENSE AGREEMENT (EULA) between you and Microsoft.
Switching between the main Windows 8.1 interfaces Windows 8.1 comes with two main user interfaces: the Start Screen and the Windows desktop. To switch from the Start Screen to the Windows desktop, do one of the following: • Select the Windows desktop tile on the Start Screen. • + D. Press the Windows key To switch from the desktop to the Start Screen, do one of the following: • Select Start from the Charms Bar.
Switching between apps Sometimes you want to get back to an app you were just using, or quickly switch through your recent apps. To switch between apps: Move the cursor to the top left corner, then click to bring in the next app. (If your computer is equipped with touch screen, swipe in from the left edge of the screen to bring in the next app.) Closing an app To close an app, do one of the following: • Move the cursor to the top left corner of the screen.
16 User Guide
Using the Rescue System This chapter contains the following topics: OneKey Recovery Driver and Application Installation Attention: Using OneKey Recovery will result in loss of data. • You can restore the C: drive of the computer to factory default settings or to the last system backup status using OneKey Recovery. If you do this, all of the existing data on drive C: will be lost, but the content and format of the other partitions of the hard disk drive will remain unchanged.
Note about the service partition: The files and relevant data used by the rescue system are saved in the service partition. Deleting this partition will make the rescue system unusable. For more detailed information, see the following instructions: From the Search charm, select Apps → Control Panel → Administrative Tools → Computer Management → Disk Management, you can see the service partition, which must not be deleted.
Driver and Application Installation The Driver and Application Installation function in the rescue system provides a way for the user to conveniently reinstall all of the Lenovo applications and drivers that were shipped with your Lenovo hardware. Method 1: Automatic Installation Repeatedly press and release the F2 key once turning on the computer until the Lenovo Rescue System opens, then select Drivers and Application Installation.
20 User Guide
Using the Software This chapter contains the following topic: Software instructions Note: The interface and functionality of these features will depend on which software was shipped with the computer model you purchased.
Lenovo Support The Lenovo Support program enables you to register your computer with Lenovo, download and view user manuals for your computer, get the warranty information of your computer, and explore help and support information. To open this program, do the following: Click the Lenovo Support icon from the Start Screen or Search Screen. The main functions of this program are listed below. (This program supports online upgrades.
Troubleshooting and Confirming Setup This chapter contains the following topic: Ø Troubleshooting and Problem Resolution User Guide 23
Solving Problems Follow these tips when troubleshooting your computer: • If you added or removed a part before the problem started, review the installation procedures to ensure that the part is correctly installed. • If a peripheral device does not work, ensure that the device is properly connected. • If an error message appears on the screen, write down the exact message. This message may help support personnel diagnose and fix the problem(s).
Problem: Ripple on screen. Troubleshooting and problem resolution: 1. Check to see if any of the following devices are located less than one meter from the computer: refrigerators, electric fans, electric dryers, UPS systems, regulators, fluorescent lamps or other computers that may be generating magnetic interference. 2. Move any interfering devices away from the computer. 3. If the problem persists, contact Lenovo Service. Troubleshooting Audio Problems Problem: No sound from the integrated speakers.
Troubleshooting Software Problems Problem: You are unable to exit a running program normally. Troubleshooting and problem resolution: 1. Press the Ctrl, Alt and Delete keys at the same time, then select the Task Manager option from the pop-up dialog box. 2. Select the problem program, then click the End Task button. Problem: You need to install or uninstall a program. Problem resolution: During installation never abort the install process by powering the system off or through other drastic means.
2. Confirm that the CD/DVD has been properly placed in the drive. If not, reload the CD or DVD. Otherwise, continue with the next step of this procedure. 3. Check the specifications that came with your computer to confirm that this optical drive is capable of reading this type of CD or DVD. 4. If the CD/DVD cannot be read, replace it with a known good CD/DVD such as one that was shipped with the computer. 5. If the known good CD cannot be read, visually check the operating side of the CD/DVD for defects.
Windows Help and Support If you have a problem with the operating system, see the Windows Help and Support file. To open the Windows Help and Support file, do one of the following: • Select the Settings charm, then select Help. • Press Windows key + F1. You can read the Windows Help and Support file on your computer. You can also get online help and support by clicking on one of the two links listed under More to explore.
Performing Daily Maintenance Tasks Cleaning the computer components Because many of the computer components consist of sophisticated integrated circuit boards, it is very important to periodically clean the computer to prevent dust buildup. The cleaning supplies you need to clean the components include: a vacuum cleaner, a soft cotton cloth, pure water (preferably purified or distilled water) and cotton swabs. Attention: Before you clean your computer, disconnect the computer from the electrical outlet.
30 User Guide
Hardware Replacement Guide This chapter contains the following topics: Ø Removing the stand base Ø Removing the foot cover Ø Replacing a memory module Ø Replacing the hard disk drive Ø Replacing the optical drive Ø Replacing the adapter Ø Replacing the keyboard and mouse User Guide 31
Overview This guide is intended to be used by customers who are replacing Customer Replaceable Units (CRUs) as well as trained service personnel who are replacing Field Replaceable Units (FRUs). In this guide, CRUs and FRUs will often be referred to as parts. Note: Trained service personnel should refer to the Hardware Maintenance Manual (HMM) for parts ordering information. This guide does not include procedures for all parts.
Additional information resources If you have Internet access, the most up-to-date information for your computer is available from the World Wide Web. You can find the following information: • CRU removal and installation information • Publications • Troubleshooting information • Parts information • Links to other useful sources of information To access this information, go to: http://support.lenovo.
Handling static-sensitive devices Static electricity, although harmless to you, can seriously damage computer components. When you are replacing a part, do not open the anti-static package containing the new part until the defective part has been removed from the computer and you are ready to install the new part. When you handle parts and other computer components, take these precautions to avoid static electricity damage: • Limit your movement.
Replacing hardware Attention: Do not remove the computer cover or attempt any repairs before reading the “Important safety information” in the Safety and Warranty Guide that was included with your computer or in the Hardware Maintenance Manual (HMM) for the computer. To obtain copies of the Safety and Warranty Guide or HMM, go to the Support Web site at: http://support.lenovo.com Note: Use only parts provided by Lenovo.
4. To release the stand base from the stand holder, twist the hand screw ring counter-clockwise until the base comes loose. 5. Slide the stand base out from the holder then put it aside. 6. Refer to “Installing the computer stand” to reinstall the stand base. Removing the foot cover Attention: Turn off the computer and wait 3 to 5 minutes to let it cool down before removing the cover. Note: It may be helpful to place the computer face-down on a soft flat surface for this procedure.
5. Lift up the stand holder then slide out the foot cover as shown. 6. To reattach the foot cover: a. Lift up the stand holder. b. Line up the foot cover with mounting holes on the back of the computer, then slide it back into position. Replacing a memory module Attention: Turn off the computer and wait 3 to 5 minutes to let it cool down before removing the cover. Note: It may be helpful to place the computer face-down on a soft flat surface for this procedure.
6. Push out the latches on both sides of the memory socket to release the and gently pull the memory module upward to remove it memory module All of the memory modules can be removed using the same from its socket. procedure. 7. To install a memory module: Align the new memory module with the memory socket, then insert it and push down on the top edge. Make sure the latches lock the memory module in place. 8. Reattach the foot cover and stand base.
4. Remove the stand base. Refer to “Removing the stand base”. 5. Remove the foot cover. Refer to “Removing the foot cover”. 6. Push the hard disk drive bracket out of the chassis as shown. , then slide the hard disk drive and bracket 1 1 7. Push the lock pins outward to release the hard disk drive from the bracket. 8. To install the new hard disk drive: a. Line up the new hard disk drive with the bracket and secure it with the pins. b. Slide the hard disk drive and bracket back into position. 9.
Replacing the optical drive Attention: Turn off the computer and wait 3 to 5 minutes to let it cool down before removing the cover. Note: It may be helpful to place the computer face-down on a soft flat surface for this procedure. Lenovo recommends that you use a blanket, towel, or other soft cloth to protect the touch screen from scratches or other damage. 1. Remove any media (disks, CDs, or memory cards) from the drives, shut down the operating system, and turn off the computer and all attached devices.
7. Push a small iron stick (paper clip) into the small hole on the optical drive cover so that the disk springs out as shown. 8. Use a small flat head screwdriver to press and push out the pins that secure the cover to the disk. 9. Separate the cover from the defective optical drive.
10. To install the new optical drive: a. Align the new optical drive with the cover, and then push the cover back into position. b. Slide the new optical drive into the drive bay. 11. Reattach the foot cover and stand base. Replacing the adapter Attention: Turn off the computer and wait 3 to 5 minutes to let it cool down before removing the cover. 1. Remove any media (disks, CDs, or memory cards) from the drives, shut down the operating system, and turn off the computer and all attached devices. 2.
3. Connect the new adapter as shown.
Replacing the keyboard and mouse Note: Your keyboard will be connected to a USB connector at either side or at the rear of the computer. To replace the keyboard: 1. Remove any media (disks, CDs, or memory cards) from the drives, shut down the computer, and turn off all attached devices. 2. Unplug all power cords from electrical outlets. 3. Locate the connector for the keyboard. Refer to “Side view of the computer” and “Rear view of the computer”. 4.
Appendix. Declaration Thank you for using Lenovo products. Carefully read all documents shipped with your computer before you install and use the product for the first time. Lenovo is not responsible for any loss except when caused by installation and operations performed by Lenovo professional service personnel. You are responsible if you fail to operate the product according to instructions and requirements in the manuals included with your computer, or operate the product inappropriately.
Trademarks Lenovo and the Lenovo logo, IdeaCentre and IdeaCentre logo are trademarks of Lenovo in the United States, other countries, or both. Microsoft, Windows, and Windows Vista are trademarks of the Microsoft group of companies. Intel Inside is a trademark of Intel Corporation in the U.S. and/or other countries.
Energy Star Statement ENERGY STAR® is a joint program of the U.S. Environmental Protection Agency and the U.S. Department of Energy aimed at saving money and protecting the environment through energy efficient products and practices. Lenovo is proud to offer our customers products with an ENERGY STAR compliant designation. The following machine types have been designed and tested to conform to the ENERGY STAR program requirement for computers at the time of manufacture.
ENERGY STAR power-management features, by operating system. Microsoft Windows Vista, Windows 7, Windows 8 and Windows 8.1 Power plan: Balanced • Turn off the display: After 10 minutes • Put the computer to sleep: After 25 minutes • Advanced power settings: - Turn off hard disk drives: After 20 minutes - Hibernate: Never To awaken your computer from a Sleep or System Standby mode, press any key on your keyboard.