Machine type: 10053 Lenovo IdeaCentre Q150 Series User Guide Version 1.0 2010.4 31044392 31044392_Q150_UG_FM_EN_V1.0.indd1 1 2010.4.
Important Safety Information Before using this manual, it is important that you read and understand all of the related safety information for this product. Refer to the Safety and Warranty Guide you received with this product for the latest safety information. Reading and understanding this safety information reduces the risk of personal injury and damage to your product. Danger: Beware of extremely hazardous or lethal situations. Attention: Beware of possible damage to programs, devices, or data.
1044392_Q150_UG_EN_V1.0.indd 2 2010.4.
Contents Important Safety Information Chapter 1 Using the Computer Hardware............................... 1 1.1 Front view.................................................................................2 1.2 Rear view..................................................................................3 1.3 Computer mount instruction.....................................................4 1.4 Setting the display resolution....................................................6 1.5 Connecting your computer ......
31044392_Q150_UG_EN_V1.0.indd 2 2010.4.
Chapter Using the Computer Hardware This chapter contains the following topics: ÿ Computer hardware introduction ÿ Information on computer connections Note: The descriptions in this chapter may vary from your computer setup, depending on computer models and configurations. 1 2 3 4 5 User Guide 31044392_Q150_UG_EN_V1.0.indd 1 2010.4.
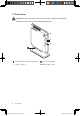
1.1 Front view Attention: Ensure that none of the air vents on the computer are blocked. Blocked air vents can lead to overheating problems. Power button and power indicator S/P DIF connector USB2.0 ports (2) Base stand screw User Guide 31044392_Q150_UG_EN_V1.0.indd 2 2010.4.
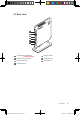
1.2 Rear view VGA port or HDMI port Power socket HDMI-OUT connector Audio line-out USB2.0 ports(2) Audio line-in Ethernet ports User Guide 31044392_Q150_UG_EN_V1.0.indd 3 2010.4.
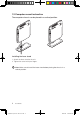
1.3 Computer mount instruction The computer chassis can be placed in a vertical position. Installing the base stand 1. Attach the base stand to the unit. 2. Tighten the screw with your fingers. Note: Make sure to install the base stand before placing the chassis in a vertical position. User Guide 31044392_Q150_UG_EN_V1.0.indd 4 2010.4.
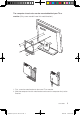
The computer chassis also can be mounted behind your TV or monitor. (Only some models have this metal bracket.) 1. First, screw the metal bracket to the rear of TV or monitor. 2. Slide the computer into this metal bracket and screw the computer firmly to the Bracket. User Guide 31044392_Q150_UG_EN_V1.0.indd 5 2010.4.
1.4 Setting the display resolution 1. When you connect the computer to your TV or monitor, adjust the display resolution to the optimum setting according to the instructions in your TV or monitor’s user manual or after consulting with the supplier. 2.
1.5.1 Connect the keyboard cable to the appropriate keyboard port (USB port). (Not all models are equipped with a keyboard.) 1.5.2 Connect the mouse cable to the appropriate mouse port (USB port). (Not all models are equipped with a mouse.) 1.5.3 Connect the monitor cable to the monitor port on the computer. • If you have a Video Graphics Array (VGA) Standard monitor, connect the cable to the port as shown. User Guide 31044392_Q150_UG_EN_V1.0.indd 7 2010.4.
• If you have an HDMI monitor, connect the cable to the port as shown. 1.5.4 If you have audio devices, use the following information to connect them. Audio line-out This socket sends audio signals from the computer to external devices, such as powered stereo speakers. Audio line-in Use this socket to attach a microphone to your computer when you want to record sound or if you use speechrecognition software. This socket might be located on the front of the computer. 1.5.
speakers, this cable is permanently attached. b. Connect the adapter cable to the speaker, if necessary. On some speakers, this cable is permanently attached. c. Connect the speakers to audio line-out port on the computer. d. Connect the adapter to the power source. 1.5.6 If you have powered speakers without an adapter: (This picture is only illustration. It is not necessarily meant to be a true representation of the speakers.) a. Connect the cable that runs between the speakers, if necessary.
S-Video Use this port to attach a television set that has an S-Video port. Ethernet Use this port to attach the computer to an Ethernet-type local area network (LAN). 1.5.8 Using S/P DIF output digital signals: If you have external devices that support S/P DIF, you can use the S/P DIF port output high definition audio signal. Do the following before using S/P DIF output: 1. Connect the external device to the S/P DIF port. 2.
Chapter Recovery Wizard This chapter contains the following topics: ÿ Recovery Wizard Attention: Using this program will result in loss of data. 1 2 3 4 5 User Guide 31044392_Q150_UG_EN_V1.0.indd 11 11 2010.4.
Recovery Wizard Recovery Wizard will lead you through steps to recover your computer system. You can also return your computer to original factory configuration. 1. Turn on the computer. When the Lenovo logo appears, press the F2 key to launch the Windows Boot Manager. Then select Windows Setup to launch Recovery Wizard procedure. 2. The Welcome window appears. Note: All data under C: drive will be lost. You may backup all personal data before proceeding. 12 User Guide 31044392_Q150_UG_EN_V1.0.
3. Click Next. 4. The recovery will take several minutes to complete. Note: Do not restart your computer while recovery is in progress. User Guide 31044392_Q150_UG_EN_V1.0.indd 13 13 2010.4.
5. Click Restart or Shutdown to finish the recovery process. 14 User Guide 31044392_Q150_UG_EN_V1.0.indd 14 2010.4.
Chapter Using the Computer Software This chapter contains the following topics: ÿ Computer software instructions Note: The interface and functionality of these features may vary according to the software that was shipped with the computer model that you purchased. 1 2 3 4 5 User Guide 31044392_Q150_UG_EN_V1.0.indd 15 15 2010.4.
Instructions on how to play High Definition (HD) audio and video files 1. Video format The standard product has no installation software or a plug-in for high definition audio and video players; although some models may come with audio and video software, it is not guaranteed that they will support all high definition audio and video formats.
3.1 CyberLink PowerDVD Cyberlink PowerDVD is a media player designed to play common audio and video files. It supports some High Definition (HD) audio and video files such as MPEG-2, VC-1, H.264 (Mpeg-4 AVC) video formats and AC3, AAC audio formats. Cyberlink PowerDVD can be upgraded to support other audio or video formats. Please follow instructions for this which are included in the software program.
3.2.4 Help and Support For more information on the operation of Security Center, see product help Information in the Help option. In the help document, you can learn more about McAfee Security Center operation and settings. 18 User Guide 31044392_Q150_UG_EN_V1.0.indd 18 2010.4.
Chapter System Maintenance and Recovery This chapter contains the following topics: ÿ Daily Maintenance and Tools Instructions 1 2 3 4 5 User Guide 31044392_Q150_UG_EN_V1.0.indd 19 19 2010.4.
4.1 Restoring the System The system can develop problems due to erroneous operation or the installation of additional software. If software problems develop in the originally installed software, you can restore the system by using system backup and restoration features. Note: The existing system settings will change after restoration. Check the settings of the restored system to ensure they match settings that may be critical to your needs.
4.3 Cleaning Up the Disk Do the following periodically to clean up the disks and possibly enhance your computer’s performance: 1. Click Start → All Programs → Accessories → System Tools → Disk Cleanup. 2. Choose the disk you want to clean up. 3. Click the OK button to start the cleanup process. 4.4 Checking For, and Correcting Disk Errors To properly maintain your system, you should periodically check for and fix hard disk errors by doing the following: 1.
4.6 Performing Daily Maintenance Tasks Cleaning the computer components Because many of the computer components consist of sophisticated integrated circuit boards, it is very important to periodically clean around the computer to prevent dust buildup. The cleaning supplies you need in order to clean the components include: a vacuum cleaner, a soft cotton cloth, clear water (pure water preferred) and cotton swabs. Attention: Before you clean your computer, disconnect the computer from the electrical outlet.
Chapter Troubleshooting and Confirming Setup This chapter contains the following topics: ÿ Troubleshooting and Problem Resolution 1 2 3 4 5 User Guide 31044392_Q150_UG_EN_V1.0.indd 23 23 2010.4.
Solving problems Follow these tips when you troubleshoot your computer: • If you added or removed a part before the problem started, review the installation procedures and ensure that the part is correctly installed. • If a peripheral device does not work, ensure that the device is properly connected. • If an error message appears on the screen, write down the exact message. This message may help support personnel diagnose and fix the problem(s).
or monitor does not support this new resolution, the system will recovery to the original resolution within 20 seconds. Set the refresh rate of your TV or monitor to less than 60 Hz to avoid damage to your TV or monitor. If there is no image displayed on the TV or monitor after setting a new refresh rate, turn off your TV or monitor and wait for a moment before restarting. For TV, you may switch the input style to another and then switch it back to make your TV display normally.
securely inserted into the headphone socket. • Adjust the Windows volume control — click or double-click the speaker icon in the lower-right corner of your screen. Ensure that the volume is turned up and that the sound is not muted. • Change audio device — click Start → Control Panel → Hardware and Sound → Manage audio devices, a sound window will pop out, click the playback tab to choose the proper playback device. 5.
removing it. 2. If the program has its own uninstaller, run it directly to uninstall the program. 3. If the program does not have its own uninstaller, then select Control Panel from Start menu. 4. From the Control Panel, choose Programs → Programs and Features. 5. Find the applicable program in the Programs and Functions dialog box and then select Uninstall/Change. 6. Follow the displayed instructions to uninstall the software. 5.
is unable to retrieve this number. 2. The drivers for this computer model support Windows XP or Windows 7 systems. 3. When you use the Windows Media Center to watch TV, pay particular attention to the following: • In the following two situations, you must re-save the channel list: a. When you change your TV signal from digital to analog, your saved channel list for digital TV is deleted. When you want to watch digital TV again, you must create and save a new channel list. b.