Lenovo IdeaPad Y510 UG_Cover1, 4_en Lenovo IdeaPad Y510 User Guide Includes: • Important safety information • Tips for taking care of your computer • Function and features • Service and troubleshooting • Warranty information P/N: 147001687 Printed in China
Lenovo IdeaPad Y510 UG_Cover2, 3_en Note Before using this information and the product it supports, be sure to read the following: • Safety and Warranty Guide included in the package with this publication. • Wireless related information in “Appendix D. Notices,” on page 58. • Regulatory Notice included in the package with this publication. • OneKey Recovery User Guide included in the package with this publication. First Edition (November 2007) © Copyright Lenovo 2007. All rights reserved. U.S.
Contents Read This First ...................................ii Top View .................................................1 Left-side View .........................................3 Right-side View ......................................5 Bottom View............................................7 Front View ...............................................9 Chapter 2. Using Your Computer ...11 Putting your computer to Sleep or Shutting It Down ..................................11 Adjusting the display..........
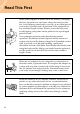
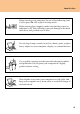
Read This First When your computer is turned on or the battery is charging, the base, the palm rest, and some other parts may become hot. Avoid keeping your hands, your lap, or any other part of your body in contact with a hot section of the computer for any extended length of time. When you use the keyboard, avoid keeping your palms on the palm rest for a prolonged period of time. Your computer generates some heat during normal operation.
Read This First Before moving your computer, do one of the following: turn it off or press Fn + F1 to put it in sleep mode. Before moving the computer, make sure that the power on indicator is off. This will help to prevent damage to the hard disk drive, and possible loss of data. Do not drop, bump, scratch, twist, hit, vibrate, push, or place heavy objects on your computer, display, or external devices. Use a quality carrying case that provides adequate cushion and protection.
Chapter 1. Getting to Know Your Computer Top View ---------------------------------------------------------------------------- 1 .
Chapter 1. Getting to Know Your Computer a b c d e f g h i j k Integrated camera (Specific models only) The integrated built-in camera allows picture taking or video recording, and can be used with video conferencing and other interactive applications. Note: The camera can only be used when it is turned on. Press Fn + Esc to turn on or turn off the camera.
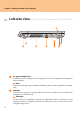
Chapter 1. Getting to Know Your Computer Left-side View ----------------------------------------------------------------- 5a a b AC power adapter jack Connect the power adapter here to supply power to the computer and charge the internal battery. Note: To prevent damage to the computer and battery pack, use the supplied AC adapter only. LAN port The LAN port supports a standard RJ-45 connector, and allows you to connect the computer to a local network.
Chapter 1. Getting to Know Your Computer c d e f g h Fan louvers The fan louvers allow warm air to exit the computer. Â Important: Make sure that paper, books, clothing, cables or other objects do not block any of the fan louvers or else overheating of the computer may occur. VGA port Use this port for an external computer monitor. PCI Express card (new card) slot Use this slot to install a PCI Express card (new card). USB 2.0 port The Universal Serial Bus is compatible with USB 2.0 or USB 1.
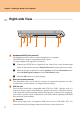
Chapter 1. Getting to Know Your Computer Right-side View -------------------------------------------------------------- a b c 5a Headphone/SPDIF jack (external) The headphone jack is used to connect headphones or a speaker. The SPDIF jack is used to output digital audio signal. To output digital audio signal, do as follows: 1 Connect the SPDIF device. Right-click the Sound icon at the bottom-right corner of the task bar and select Playback Devices from the pull down menu.
Chapter 1. Getting to Know Your Computer d e f g S-video jack Use this connector to directly connect an external video device. This computer supports standard S-video through an S-video cable. Optical drive (types vary by model) Your computer comes with an optical device, such as a CD-ROM drive or a DVD/CD recordable drive. For this model, there are two kinds of optical drives: (1) Slot-in type: Provides a convenient and quick way to insert and eject disc.
Chapter 1. Getting to Know Your Computer Bottom View -------------------------------------------------------------------- a b 7 Subwoofer The multimedia subwoofer features a super bass effect while you are watching movies or enjoying music. Battery latch - spring loaded The spring-loaded battery latch keeps the battery pack secured in place. When you insert a battery pack, this latch automatically secures the battery in place.
Chapter 1. Getting to Know Your Computer c d e f Battery pack The battery pack provides power for the computer when no AC power source is available. If the AC adapter is connected to the computer, the battery pack is automatically charged. For details on “Using battery and AC adapter”, see page 28. Battery latch - manual The manual battery latch is used to keep the battery pack secured. Move the manual battery latch to the unlocked position to insert or remove the battery pack.
Chapter 1.
Chapter 1. Getting to Know Your Computer a b c d e Array Microphone (built-in) The built-in microphone (with noise reduction) can be used for video conferencing, voice narration, or simple audio recordings. System status indicators For details on “System status indicators”, see page 19. Wireless device switch This switch turns on or turns off Wireless LAN and Bluetooth devices simultaneously. To enable wireless/bluetooth, slide the latch to the right and press Fn + F5.
Chapter 2. Using Your Computer Putting your computer to Sleep or Shutting It Down -------------------------------------------------------------------------------When you finish working with your computer, you can put it to sleep or shut it down. Putting your computer to Sleep If you will be away from your computer for only a short time, put the computer to sleep. When the computer is in sleep, you can quickly wake it and bypass the startup process. To put the computer to sleep, do one of the following.
Chapter 2. Using Your Computer Adjusting the display ------------------------------------------------After you begin working with your computer, you might need to adjust your display to achieve its optimum performance. Adjusting the brightness You can increase or decrease the brightness on your display. To adjust the brightness on your display, press Fn + up/down arrow. Switch between wide screen and normal screen You can change the aspect ratio on your display.
Chapter 2. Using Your Computer Using the Touch Pad -------------------------------------------------The touch pad consists of a pad a and two click buttons at the bottom of the keyboard. To move the cursor b on the screen, slide your fingertip over the pad in the direction in which you want the cursor to move. The functions of the left c and right d click buttons correspond to those of the left and right mouse buttons on a conventional mouse.
Chapter 2. Using Your Computer Using the Keyboard ----------------------------------------------------Your computer has a numeric keypad and function keys incorporated in the standard keyboard. Numeric Keypad The keyboard has keys that, when enabled, work as a 10-key numeric keypad. To enable or disable the numeric keypad, press Fn+Insert/NmLk.
Chapter 2. Using Your Computer Function Key Combinations Through the use of the function keys, you can change operational features instantly. To use this function, press and hold the Fn key a; then press one of the function keys b. % $ The following describes the features of each function key. Fn + Esc: Turn on/off the integrated camera. Fn + F1: Put your computer in sleep mode. Fn + F2: Turn off the LCD screen (any subsequent operation will turn the LCD screen back on).
Chapter 2. Using Your Computer Special keys and buttons ---------------------------------------Your computer has several special keys and buttons. Novo button The Novo button functions as OneKey Recovery key; use with caution. Press the Novo button to enter the main interface of OneKey Recovery while the power is off. Attention: When you press NOVO key to turn on the computer, please ensure that your computer is not connected with other peripherals (such as USB storage device, etc.
Chapter 2. Using Your Computer Touch inductive panel and multi-media buttons Touch inductive panel (a~l) a b c Mute/unmute the sound. Open user define utility. Open Dolby function setup screen.
Chapter 2. Using Your Computer Equalizer buttons* h i j k l Jazz Pop Dance Classic Normal Multi-media buttons (m~n) m n Switch between Multi-media control buttons and Equalizer buttons. Change volume. * Press the m to switch between Multi-media control buttons (4~7) and Equalizer buttons (8~l).
Chapter 2. Using Your Computer System status indicators ----------------------------------------The system status indicators show the current status of your computer. Your computer has system status indicators as follows: 1 2 3 4 5 a 6 7 Drive in use Blue/Flashing Blue: Data is being read from or written to the hard disk or optical disc drive. When this indicator is on, do not put the computer into sleep mode or turn off the computer. b Num Lock Blue: Number Lock function is activated.
Chapter 2. Using Your Computer c Caps Lock Blinking Blue: The Capital Lock function is activated. The Capital Lock function allows typing in all upper case letters (such as A, B, C). When the Caps Lock light is off, lower case letters are entered. d Scroll Lock Blue: The Scroll Lock function is activated. The Scroll Lock function allows some of the keyboard letters to act as direction keys to allow for easier navigation when only part of the keyboard is required.
Chapter 2. Using Your Computer Playing a CD -------------------------------------------------------------------You can listen to your CDs with various applications, such as Shuttle Center, Windows Media Player, or Windows Media Center, and so on. You can listen to your music on the speakers or connect the headphones with a minijack to the external headphone jack of your computer for private listening. Refer to “Touch inductive panel and multi-media buttons“ on page 17 for more convenient CD playing.
Chapter 2. Using Your Computer Using the Integrated Camera --------------------------------With the built-in camera, you can take photos or movies and use with various applications, such as EasyCapture, MSN or Yahoo! Messenger, and so on. Note: If you use Windows Vista, you need to install a separate third party dedicated application, because Vista does not include a program for taking pictures or movies with the integrated camera.
Chapter 2. Using Your Computer Make sure that only authorized individuals access your computer. Establishing different kinds of passwords requires that other possible users know the proper passwords in order to access your computer or your data. As many as three passwords might be needed for your computer: the Supervisor password, the User password, and the Hard disk drive (HDD) password. When the Supervisor password is set, only the Supervisor password entitles you full control of the computer.
Chapter 2. Using Your Computer 3 Select Set Supervisor Password, and press the Enter key. The Set Supervisor Password window opens. 4 Choose your Supervisor password, which can be from one to eight alphanumeric characters in any combination. Type it in the Enter New Password field. 5 Press the Enter key once to move to the Confirm New Password field. Retype the password you just entered to verify it. 6 Commit your password to memory, and press the Enter key. 7 Press F10 to exit.
Chapter 2. Using Your Computer 3 Select Set User Password, and press the Enter key. The Set User Password window opens. 4 Choose your user password, which can be from one to eight alphanumeric characters in any combination. Type it in the Enter New Password field. 5 Press the Enter key once to move to the Confirm New Password field. Retype the password you just entered to verify it. 6 Commit your password to memory, and press the Enter key. 7 Press F10 to exit.
Chapter 2. Using Your Computer You need to set a master password and a user password both as the Hard Disk Password. Either of the passwords can be used to get access to the Hard disk. Any change or removal to the master password deletes the user password. To set a hard disk password: Print these instructions. 1 Turn on your computer. Press F2, while the initial screen is displayed. The BIOS Setup Utility screen opens. 2 Select Security, using the cursor directional keys.
Chapter 2. Using Your Computer Changing or Removing the HDD Passwords To change or remove the HDD password, do as follows: To change the HDD user password, select Change HDD User Password and enter the new password in the Enter New Password field, and retype it to verify it in the Confirm New Password field. To remove the HDD user password, select Change HDD Master Password and leave the Enter New Password field blank, and press the Enter key twice.
Chapter 2. Using Your Computer Using battery and AC adapter ------------------------------When you need to use your computer away from electrical outlets, you depend on battery power to keep your computer running. Different computer components consume power at different rates. The more you use the power-intensive components, the faster you consume battery power. Your Computer Batteries Your computer batteries enable you to do more, save more, and spend more time unplugged.
Chapter 2. Using Your Computer The AC adapter that comes with your computer has two basic components: 1 The transformer pack that converts AC power for use with the computer. 2 The power cord that plugs into the AC outlet and into the transformer pack. Attention: Using an improper power cord could cause severe damage to your computer. To use the AC adapter, do the following. Be sure to take these steps in the order in which they are given here. 1 Connect the power cord to the transformer pack.
Chapter 2. Using Your Computer Note: To increase the life of the battery, the computer does not start recharging the battery if the remaining power is no less than 95 percent. Handling the Battery Å Danger: Do not attempt to disassemble or modify the battery pack. Attempting to do so can cause an explosion, or liquid leakage from the battery pack. A battery pack other than the one specified by Lenovo, or a disassembled or modified battery pack is not covered by the warranty.
Chapter 3. Troubleshooting Frequently Asked Questions --------------------------------This section lists frequently asked questions and tells where you can find detailed answers. For details about each publication included in the package with your computer, see ”IdeaPad Y510 Setup Poster”. What safety precautions should I follow when using my computer? See the separate Safety and Warranty Guide for detailed information about safety.
Chapter 3. Troubleshooting Troubleshooting -----------------------------------------------------------If you do not find your problem here, see Chapter 2. The following section only describes problems that might prevent you from accessing the comprehensive information in Chapter 2. Display Problems When I turn on the computer, nothing appears on the screen and the computer does not beep while starting up.
Chapter 3. Troubleshooting My screen goes blank while the computer is on. Your screen saver or power management may be enabled. Do one of the following to exit from the screen saver or to resume from sleep or hibernation mode: Touch the touch pad. Press a key. Press the Power button. A Password Problem I forgot my password. If you forgot your user password, you must take your computer to a Lenovo authorized servicer or a marketing representative to have the password canceled.
Chapter 3. Troubleshooting The computer enters sleep mode (the sleep indicator turns on) immediately after Power-on self-test (POST). Make sure that: The battery is charged. The operating temperature is within the acceptable range. See “Specifications” on page 57. If the battery is charged and the temperature is within range, have the computer serviced. The critical low-battery immediately turns off. error message appears, and the computer The battery power is getting low.
Chapter 3. Troubleshooting Computer Screen Problems The screen is blank. Do the following: If you are using the AC adapter, or using the battery, and the battery status indicator is on (is blue), press Fn + to make the screen brighter. If the Power indicator is in blinking blue, press any key or the power button to resume from the sleep mode. If you still have the problem, do the Solution in the following problem “The screen is unreadable or distorted.” The screen is unreadable or distorted.
Chapter 3. Troubleshooting Incorrect characters appear on the screen. Did you install the operating system or application program correctly? If they are installed and configured correctly, have the computer serviced. Missing, discolored, or bright dots appear on the screen every time you turn on your computer. This is an intrinsic characteristic of the TFT technology. Your computer’s display contains multiple thin-film transistors (TFTs).
Chapter 3. Troubleshooting Battery Problems The battery cannot be fully charged by the power-off method in the standard charge time for your computer. For details, See “Checking Battery Status” in Chapter 2. Your computer shuts down before the battery status indicator shows empty. -orYour computer operates after the battery status indicator shows empty. Discharge and recharge the battery. The operating time for a fully charged battery is short. For details, see “Handling the Battery” in Chapter 2.
Chapter 3. Troubleshooting Other Problems Your computer does not respond. To turn off your computer, press and hold the Power button for 4 seconds or more. If the computer still does not respond, remove the AC adapter and the battery. Your computer might lock when it enters sleep mode during a communication operation. Disable the sleep timer when you are working on the network. The computer does not start from a device you want. See the Boot menu of the BIOS Setup Utility.
Chapter 4. Getting Help and Service Getting Help and Service ----------------------------------------If you need help, service, technical assistance, or just want more information about Lenovo computers, you will find a wide variety of sources available from Lenovo to assist you. This section contains information about where to go for additional information about Lenovo computers, what to do if you experience a problem with your computer, and whom to call for service should it be necessary.
Chapter 4. Getting Help and Service Engineering change management - Occasionally, there might be changes that are required after a product has been sold. Lenovo or your reseller, if authorized by Lenovo, will make selected Engineering Changes (ECs) available that apply to your hardware.
Chapter 4. Getting Help and Service Getting Help around the World ----------------------------If you travel with your computer or relocate it to a country where your Lenovo machine type is sold, your computer might be eligible for International Warranty Service, which automatically entitles you to obtain warranty service throughout the warranty period. Service will be performed by service providers authorized to perform warranty service.
Chapter 5. Safety, Use, and Care Information Caring Your Computer ----------------------------------------------Though your computer is designed to function reliably in normal work environments, you need to use common sense in handling it. By following these important tips, you will get the most use and enjoyment out of your computer.
Chapter 5. Safety, Use, and Care Information from your body or clothing to the computer, it poses the same risk of a computer malfunction. Your computer is designed and manufactured to minimize any effects of electrostatic charge. An electrostatic charge above a certain limit, however, can increase the risk of ESD.
Chapter 5. Safety, Use, and Care Information Handle Storage Media and Drives Properly If your computer comes with an optical drive, do not touch the surface of a disc or the lens on the tray. Wait until you hear the CD or DVD click into the center pivot of an optical drive before closing the tray. When installing your hard disk, follow the instructions shipped with your hardware, and apply pressure only where needed on the device. Take Care in Setting Passwords Remember your passwords.
Chapter 5. Safety, Use, and Care Information Before you install any of the following devices, touch a metal table or a grounded metal object. This action reduces any static electricity from your body. The static electricity could damage the device. - ExpressCard - Memory Card, such as SD Card, Memory Stick, MultiMediaCard, xD-Picture Card, and Memory Stick Pro card.
Chapter 5. Safety, Use, and Care Information Cleaning Your Computer Keyboard 1 Absorb some isopropyl rubbing alcohol on a soft, dust-free cloth. 2 Wipe each keytop surface with the cloth. Wipe the keys one by one; if you wipe several keys at a time, the cloth may hook onto an adjacent key and possibly damage it. Make sure that no liquid drips onto or between the keys. 3 Allow to dry.
Chapter 5. Safety, Use, and Care Information Accessibility and Comfort --------------------------------------As your computer enables you to work in so many places, it is important that you remain attentive to good posture, good lighting, and proper seating. By keeping these considerations in mind, you can improve performance and achieve greater comfort. Lenovo is committed to providing the latest information and technology to our customers with disabilities.
Chapter 5. Safety, Use, and Care Information General Posture: Below are some general recommendations for assuming a healthy working posture. It is best to periodically make minor modifications in your working posture to deter the onset of discomfort caused by long periods of working in the same position. Frequent, short breaks from your work will also help to prevent any minor discomfort associated with your working posture.
Chapter 5. Safety, Use, and Care Information Maintenance --------------------------------------------------------------------An important part of owning your computer is maintenance. With proper care, you can avoid common problems. The following sections provide information that can help you to keep your computer running smoothly. General Tips for Maintenance 1 Check the capacity of your hard disk drive from time to time.
Chapter 5. Safety, Use, and Care Information Update device drivers and BIOS when needed. Profile your machine at http://consumersupport.lenovo.com to keep up to date with current drivers and revisions. Keep up to date on device drivers on other non-Lenovo hardware. You might want to read the device driver information release notes prior to updating for compatibility or known issues. Keep a log book.
Appendix A. Warranty Information This Appendix provides information regarding the warranty period and type of warranty service applicable to your Lenovo hardware product in your country or region. For the terms and conditions of the Statement of Limited Warranty that applies to your computer, see Chapter 3, Warranty Information in the Safety and Warranty Guide included with your computer.
Appendix A. Warranty Information Types of Warranty Service 1 Customer Replaceable Unit (“CRU”) Service Under CRU Service, your Service Provider will ship CRUs to you for you to install. Most CRUs are easy to install whereas others may require some technical skill and tools. CRU information and replacement instructions are shipped with your product and are available from Lenovo at any time upon request.
Appendix A. Warranty Information Lenovo Warranty Service Telephone Numbers -------------------------------------------------------------------------------------------------------------------------------------------------------Warranty Service Telephone Numbers The phone numbers provided below are correct as of the time of printing and are subject to change without notice. For the latest warranty service contact telephone number in a country please contact Lenovo, or your reseller in your country.
Appendix B. Customer Replaceable Units (CRUs) Customer Replaceable Units (CRUs) are computer parts that can be upgraded or replaced by the customer. There are two types of CRUs: internal and external. External CRUs are easy to install, whereas internal CRUs require some technical skills and in some cases might require tools such as a screwdriver. However, both internal and external CRUs are safe for removal by the customer. Customers are responsible for replacing all external CRUs.
Appendix C. Features and Specifications Features ---------------------------------------------------------------------------------------------------------------------------------------------------------Processor See the system properties of your computer. You can do this as follows: Click Start, right-click Computer, then from the pull down menu select Properties. Memory Double data rate (DDR) synchronous dynamic random access memory (DRAM) II Storage device 2.
Appendix C. Features and Specifications ExpressCard slot 54 mm ExpressCard (new card) Optical drive CD-ROM, DVD-ROM, CD-RW/DVD ROM or CD-RW/ DVD Recordable depending on the model.
Appendix C. Features and Specifications Specifications --------------------------------------------------------------------------------------------------------------------------------Size Width: apprx. 360 mm Depth: apprx. 262 mm Height: apprx. 29.2 to 34.2 mm (36.
Appendix D. Notices Notices -------------------------------------------------------------------------------Lenovo may not offer the products, services, or features discussed in this document in all countries. Consult your local Lenovo representative for information on the products and services currently available in your area. Any reference to a Lenovo product, program, or service is not intended to state or imply that only that Lenovo product, program, or service may be used.
Appendix D. Notices The products described in this document are not intended for use in implantation or other life support applications where malfunction may result in injury or death to persons. The information contained in this document does not affect or change Lenovo product specifications or warranties. Nothing in this document shall operate as an express or implied license or indemnity under the intellectual property rights of Lenovo or third parties.
Appendix D. Notices Wireless related information --------------------------------- Wireless Interoperability Wireless LAN PCI Express Mini Card is designed to be interoperable with any wireless LAN product that is based on Direct Sequence Spread Spectrum (DSSS), Complementary Code Keying (CCK), and/or Orthogonal Frequency Division Multiplexing (OFDM) radio technology, and is compliant to: The IEEE 802.
Appendix D. Notices Usage Environment and Your Health Wireless LAN PCI Express Mini Card and Bluetooth Daughter Card emit radio frequency electromagnetic energy like other radio devices. However, the level of energy emitted is far much less than the electromagnetic energy emitted by wireless devices like for example mobile phones.
Appendix D. Notices Electronic Emissions Notices ------------------------------The following information refers to IdeaPad Y510, machine type 15303. Federal Communications Commission (FCC) Statement This equipment has been tested and found to comply with the limits for a Class B digital device, pursuant to Part 15 of the FCC Rules. These limits are designed to provide reasonable protection against harmful interference in a residential installation.
Appendix D. Notices Responsible party: Lenovo (United States) Incorporated 1009 Think Place - Building One Morrisville, NC 27650 U.S.A. Telephone: (919) 294-5900 Industry Canada Class B Emission Compliance Statement This Class B digital apparatus complies with Canadian ICES-003. Avis de conformité à la réglementation d’Industrie Canada Cet appareil numérique de la classe B est conforme à la norme NMB-003 du Canada.
Appendix D. Notices Japanese VCCI Class B Statement Japanese compliance for products less than or equal to 20A per phase. Lenovo product service information for Taiwan -------------------------------------------------------------------------- WEEE and Recycling Statements ---------------------- General Recycling Statement Lenovo encourages owners of information technology (IT) equipment to responsibly recycle their equipment when it is no longer needed.
Appendix D. Notices EU WEEE Statements ------------------------------------------------The Waste Electrical and Electronic Equipment (WEEE) mark applies only to countries within the European Union (EU) and Norway. Appliances are labeled in accordance with European Directive 2002/96/EC concerning waste electrical and electronic equipment (WEEE). The Directive determines the framework for the return and recycling of used appliances as applicable throughout the European Union.
Appendix D. Notices Disposing of a Lenovo Computer Components Some Lenovo computer products sold in Japan may have components that contain heavy metals or other environmental sensitive substances. To properly dispose of disused components, such as a printed circuit board or drive, use the methods described above for collecting and recycling a disused computer or monitor.
Appendix D. Notices Notice on Deleting Data from Your Hard Disk --------------------------------------------------------------------------------------As computers spread into every corner of life, they process more and more information. The data on your computer, some of it sensitive, is stored on a storage device called the hard disk. Before you dispose of, sell, or hand over your computer, you need to delete that data.
Appendix D. Notices Lenovo may not offer the products, services, or features discussed in this document in all countries. Consult your local Lenovo representative for information on the products and services currently available in your area. Any reference to a Lenovo product, program, or service is not intended to state or imply that only that Lenovo product, program, or service may be used.
Appendix D. Notices The materials at those Web sites are not part of the materials for this Lenovo product, and use of those Web sites is at your own risk. Any performance data contained herein was determined in a controlled environment. Therefore, the result obtained in other operating environments may vary significantly. Some measurements may have been made on development-level systems and there is no guarantee that these measurements will be the same on generally available systems.
Index A H AC adapter Jack................................................................3 Using...........................................................28 Hard Disk Drive Compartment ............................................... 8 Problems .................................................... 37 Headphone/SPDIF Jack ....................................... 5 Help Customer Support Center ......................... 39 Help and Service........................................ 39 on the Web ................
Index O Optical drive..........................................................6 P Password Problems ..................................................... 33 Using .......................................................... 22 Power button ...................................................2, 11 Problems Battery ........................................................ 37 Computer Screen........................................ 35 Display .......................................................
Lenovo IdeaPad Y510 UG_Cover1, 4_en Lenovo IdeaPad Y510 User Guide Includes: • Important safety information • Tips for taking care of your computer • Function and features • Service and troubleshooting • Warranty information P/N: 147001687 Printed in China