Product numbers 9417-HB7 9417-HG7 First Edition (May 2005) © Copyright Lenovo 2005. Portions © copyright IBM Corp. 2005. All Rights Reserved. U.S. GOVERNMENT USERS - RESTRICTED RIGHTS: Our products and/or services are provided with RESTRICTED RIGHTS.
Contents Safety information . . . . . . . . . . . . . . . . . . . . . . . . . . . . . . . . . . . . . . . . . . . . . . . . . . . . . . . . . . . . . iii Chapter1. Getting started . . . . . . . . . . . . . . . . . . . . . . . . . . . . . . . . . . . . . . . . . . . . . . . . . . . . . . 1-1 Shipping contents . . . . . . . . . . . . . . . . . . . . . . . . . . . . . . . . . . . . . . . . . . . . . . . . . . . . . . . . . . . . . . . . . . . . . . . . . . . . . . . . . . . . . . . .1-1 Product overview . . .
Safety information Before installing this product, read the Safety Information.
Chapter 1. Getting started This User’s Guide contains detailed information on the ThinkVision™ L171p Flat Panel Monitor. For a quick overview, please see the Setup Poster that was shipped with your monitor.
Types of adjustments Please see the illustration below for an example of the tilt range. Tilt/Swivel With the built-in pedestal, you can tilt and swivel the monitor for the most comfortable viewing angle. Height Adjustment After pressing the top of the monitor, remove the fixed pin and adjust the height of the monitor.
Monitor Pivot 90 1. In locked/down Position - Tilt upwards, so that lower edge of monitor clears the stand. - Rotate clockwise until the monitor stops at 90 °. 2. Extended Position - Rotate clockwise until the monitor stops at 90 °. User controls Your monitor has controls on the front which are used to adjust the display. For information on how to use these controls, please see “Adjusting your monitor image” on page 2-3. Chapter 1.
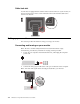
Cable lock slot Your monitor is equipped with a cable lock slot located on the rear of your monitor (in the lower right corner). Please see the instructions that came with the cable lock to learn how to attach it. Setting up your monitor This section provides information to help you set up your monitor. Connecting and turning on your monitor Note: Be sure to read the Safety Information located in the Monitor Safety, Troubleshooting, and Warranty Guide before carrying out this procedure. 1.
Connect the digital cable to the DVI connector of the monitor and the other end on the back of the computer. Note: The digital cable is not included with the monitor. Plug the monitor power cord and the computer cord into grounded electrical outlets. Power on the monitor and the computer. To install the monitor driver, insert the Reference and Driver CD, click Install driver, and follow the on-screen instructions. Chapter 1.
To optimize your monitor image, press the Automatic Image Setup key. Automatic image setup requires that the monitor is warmed up for at least 15 minutes. This is not required for normal operation. Note: If automatic image setup does not establish the image that you prefer, perform manual image setup. See “Manual image setup” on page 3-4 . Registering your product Please take a few moments to register your product and provide us with information that will help IBM to better serve you in the future.
Chapter 2. Adjusting and using your monitor This section will give you information on adjusting and using your monitor. Comfort and accessibility Good ergonomic practice is important to get the most from your personal computer and to avoid discomfort. Arrange your workplace and the equipment you use to suit your individual needs and the kind of work that you perform. In addition, use healthy work habits to maximize your performance and comfort while using your computer.
• Use adequate lighting for the type of work you are performing. • Use the monitor brightness, contrast, and image adjustment controls, if equipped, to optimize the image on your screen to meet your visual preferences. • Keep your monitor screen clean so you can focus on the screen's contents. Any concentrated and sustained visual activity can be tiring for your eyes. Be sure to periodically look away from your monitor screen and focus on a far object to allow your eye muscles to relax.
Adjusting your monitor image This section describes the user control features used to adjust your monitor image. Using the direct access controls The direct access controls can be used when the On Screen Display (OSD) is not displayed. Note: The direct access controls are blue. Table 2-1. Direct access controls Icon Control Description Image Setup Activates automatic image adjustment. Brightness Direct access to Brightness adjustment. Input Change Switches the video input source.
Table 2-2. OSD functions OSD Icon on Main Menu Brightness/ Contrast Submenu Description Controls and Adjustments (Analog) Controls and Adjustments (Digital) Adjusts overall brightness Same as Analog Adjusts difference between light and dark areas Controls Locked not required for digital input Brightness Contrast Moves the image left or right. Image Position Horizontal Position Vertical Position Moves the image up or down. Automatically optimizes the image.
Table 2-2. OSD functions OSD Icon on Main Menu Submenu Input video signal Description Controls and Adjustments (Analog) This monitor can accept video signals through two different connectors. Most desktop computers use a D-SUB connector. Select digital among OSD Controls when you use DVI connector. Controls and Adjustments (Digital) Same as Analog - Selects D-SUB (Analog) - Selects DVI-Digital Shows resolution, refresh rate, and product details.
Selecting a supported display mode The display mode the monitor uses is controlled by the computer. Therefore, refer to your computer documentation for details on how to change display modes. The image size, position and shape might change when the display mode changes. This is normal and the image can be readjusted using automatic image setup and the image controls. Unlike CRT monitors, which require a high refresh rate to minimize flicker, LCD or Flat Panel technology is inherently flicker-free.
Understanding power management Power management is invoked when the computer recognizes that you have not used your mouse or keyboard for a user-definable period. There are several states as described in the table below. For optimal performance, switch off your monitor at the end of each working day, or whenever you expect to leave it unused for long periods during the day. Table 2-4.
Caring for your monitor Be sure to turn off the power before you perform any maintenance on the monitor. Do not: • Apply water or liquid directly to your monitor. • Use solvents or abrasives. • Use flammable cleaning materials to clean your monitor or any other electrical equipment. • Touch the screen area of your monitor with sharp or abrasive items. This type of contact may cause permanent damage to your screen. • Use any cleaner which contains an anti-static solution or similar additives.
Chapter 3. Reference information This section contains monitor specifications, instructions to manually install the monitor driver, troubleshooting information, and service information. Monitor specifications Table 3-1. Monitor specifications for type-model 9417-Hxx Dimensions Stand VESA mount Height 381.2 mm (15.0 in.) Depth 204.7 mm (8.1 in.) Width 367.5 mm (14.5 in.) Tilt Range: -0°, +30° Swivel Range: -45°, +45° Lift Range: 110.0mm Pivot Yes (clockwise 90 degree) Supported 100 mm (3.
Table 3-1.
Table 3-2. Troubleshooting Problem Possible cause Suggested action Reference The image quality is unnacceptable. The video signal cable is not connected with the monitor or system completely. Be sure the signal cable is firmly plugged into the system and monitor. “Connecting and turning on your monitor” on page 1-4 The color settings may be incorrect. Select another color setting from the OSD menu. “Adjusting your monitor image” on page 2-3 The automatic image setup function was not performed.
Table 3-2. Troubleshooting Problem Possible cause Suggested action Reference • Fuzzy lines in text or a blurry image. • Image setup has not been optimized “Adjusting your monitor image” on page 2-3 • • Horizontal or vertical lines through the image. Your system Display Properties setting have not been optimized. Adjust the resolution settings on your system to match the native resolution for this monitor: 1280 x 1024 at 60 Hz. Perform automatic image setup.
Note: This section must be completed before continuing with the Windows XP automatic image setup. 1. Turn off the computer and all attached devices. 2. Ensure that the monitor is connected correctly. 3. Turn on the monitor and then the system unit. Allow the system to boot into Windows XP. 4. Open the Display Properties window by clicking Start J Settings J Control Panel, and then double-clicking the Display icon. 5. Click the Settings tab. 6. Click the Advanced button. 7.
10. Open the Upgrade Device Driver Wizard window by clicking on Update Driver, and then click Next. 11. Select Display a list of the known drivers for this device so that I can choose a specific driver, and then click Next. 12. Insert the Setup CD into the CD drive, then click the Have Disk button. 13. Click OK. 14. Ensure that the CD drive letter is selected. 15. Choose ThinkVision L171p Monitor and click OK. The files will be copied from the CD to your hard disk drive. 16.
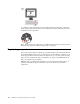
Service information Product numbers The product number for your monitor is located on the side of the display bezel as shown below. Customer responsibilities The warranty does not apply to a product which has been damaged due to accident, misuse, abuse, improper installation, usage not in accordance with product specifications and instructions, natural or personal disaster, or unauthorized alterations, repairs or modifications.
Service parts The following parts are for use by servicers and dealers authorized by Lenovo to support the customer warranty. Parts are for service use only. The table below shows information for model 9417-Hxx. Table 3-3.
Appendix A. Service and Support The following information describes the technical support that is available for your product, during the warranty period or throughout the life of the product. Refer to your IBM Statement of Limited Warranty for a full explanation of IBM warranty terms. Online technical support Online technical support is available during the life of your product through the Personal Computing Support Web site at http://www.ibm.com/pc/support.
Country or Region Language Telephone Number Hours of operation Africa -- Africa: +44 (0)1475 555 055 -- South Africa: +27 11 3028888 and 0800110756 Central Africa: Contact the nearest IBM Business Partner Argentina Spanish 0800-666-0011 9AM - 10PM Monday-Friday (Local time) Australia English 131-426 9AM - 9PM AEST 7 days/week Austria German +43-1-24592-5901 9AM - 5:30PM, Monday - Friday (Local time) Belgium Dutch 02-210-9820 French 02-210-9800 9AM - 5PM Monday -Friday (Local time)
Country or Region Language Telephone Number Hours of operation Czech Republic -- +420-2-7213-1316 -- Denmark Danish 4520-8200 8:30AM - 4:30PM Monday -Friday (Local time) Dominican Republic Spanish 566-4755 8AM - 5PM Monday -Friday (Local time) 566-5161 ext.
Country or Region Language Telephone Number Hours of operation Japan Japanese,English Desktop ThinkPad and Desktop 10AM - 6PM Everyday Except Second Sunday of the month, Year end Toll free: 0120-887-870; For International: +81-46266-4724 ThinkPad Toll free: 0120-887874; For International: +81-46266-4724 Both of the above numbers will be answered with a Japanese language voice prompt. For telephone support in English, please wait for the Japanese voice prompt to end, and an operator will answer.
Country or Region Language Telephone Number Hours of operation Netherlands Dutch +31-20-514-5770 9AM - 5PM Monday - Friday (Local time) New Zealand English 0800-446-149 9AM - 9PM 7 days/week Nicaragua Spanish 255-6658 8AM - 5PM Monday - Friday (Local time) Norway Norwegian NetVista, ThinkCentre, and ThinkPad: +47 6699 8960 All products: +47 815 21550 8:30AM - 4:30PM Monday - Friday (Local time) Panama Spanish 206-6047 8AM - 5PM Monday - Friday (Local time) Peru Spanish 0-800-50-866
Country or Region Language Telephone Number Hours of operation Thailand Thai 1-800-299-229 8AM - 6PM Monday - Friday (Local time) Except Holidays Turkey Turkish 00800-211-4032 9AM - 6PM Monday - Friday (Local time) +90-212-317-1760 United Kingdom English +44-1475-555-055 9AM - 5:30PM Monday - Friday (Local time) United States English 1-800-IBM-SERV 24 hours/day, 7 days/week (1-800-426-7378) Uruguay Spanish 000-411-005-6649 9AM - 10PM Monday - Friday (Local time) Venezuela Spanish 0
Appendix B. Notices Lenovo may not offer the products, services, or features discussed in this document in all countries. Consult your local Lenovo representative for information on the products and services currently available in your area. Any reference to a Lenovo product, program, or service is not intended to state or imply that only that Lenovo product, program, or service may be used.
extrapolation. Actual results may vary. Users of this document should verify the applicable data for their specific environment. Note: As an ENERGY STAR Partner, IBM has determined that this product meets the guidelines for energy efficiency. Trademarks Lenovo and ThinkVision are trademarks of Lenovo in the United States, other countries, or both.: IBM ThinkVision IBM is a trademark of International Business machines Corporation in the united States, other countries, or both.