L200p
Product number 4438-HB6 First Edition (March 2008) © Copyright Lenovo 2008. All rights reserved. LENOVO products, data, computer software, and services have been developed exclusively at private expense and are asold to governmental entities as commercial items as defined by 48 C.F.R. 2.101 with limited and restricted rights to use, reproduction and disclosure.
iii Safety and Maintenance Guidelines iv 1-4 1-4 1-4 1-9 Manually installing the Soft OSM 8 3-7 3-9
3AFETY INFORMATION ǰ ¢ ǯ ǰ ³ä ³ǯ 0RED INSTALAC¤ TOHOTO PRODUKTU SI PRECTETE PR¤RUCKU BEZPECNOSTN¤CH INSTRUKC¤ ® Ğǰ è Ĵ ǯ Ĵ §§ Ĵǰ ¢ ǯ Ȃ ǰ £ ··ǯ ǯ
Safety and Maintenance Guidelines iv
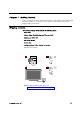
This User’s Guide contains detailed information on the ThinkVision™ L200p Wide Flat Panel Monitor. For a quick overview, please see the Setup Poster that was shipped with your monitor. Digital Interface Cable Note:To attach a VESA mount, please see “Detaching the monitor stand” on page 2-7.
Product overview This section will provide information on adjusting monitor positions, setting user controls, and using the cable lock slot. Types of adjustments Tilt Please see the illustration below for an example of the tilt range. Swivel With the built-in pedestal, you can tilt and swivel the monitor for the most comfortable viewing angle. -45o 45o Height Adjustment After pressing the top of the monitor, remove the fixed pin and adjust the height of the monitor.
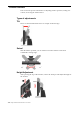
Monitor Pivot 90 O - Adjust height to the top position before rotation the monitor. - Rotate clockwise until the monitor stops at 90°. User controls Your monitor has controls on the front which are used to adjust the display. For information on how to use these controls, please see “Adjusting your monitor image” on page 2-3. Chapter 1.
Cable lock slot Your monitor is equipped with a cable lock slot located on the rear of your monitor (in the lower right corner). Please follow the instructions that came with the cable lock to attach it. Setting up your monitor This section provides information to help you set up your monitor. Connecting and turning on your monitor Note: Be sure to read the Safety Information located in the Monitor Safety, Troubleshooting, and Warranty Guide before carrying out this procedure. 1.
3. Connect the analog signal cable to the D-SUB connector of the monitor and the other end on the back of the computer. 4. Plug the monitor power cord and the computer cord into grounded electrical outlets. Note: A certified power supply cord has to be used with this equipment. The relevant national installation and/or equipment regulations shall be considered. A certified power supply cord not lighter than ordinary polyvinyl chloride flexible cord according to IEC 60227 (designation H05VV-F 3G 0.
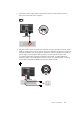
5. Remove the Cable Cover from the back of the stand. 2 1 6. Rotate the head of the monitor into portrait view.
7. Place the cables through the Main Clip. Then fasten the clip. 8. Wrap the Cable Wapper around the cables. 9. Rotate the Hook. Chapter 1.
10. Replace the Cable Cover. 2 1 11. Power on the monitor and the computer. 12. To install the monitor driver, insert the Reference and Driver CD, click Install driver, and follow the on-screen instructions.
13. To optimize your monitor image, if using the analog cable, press the Automatic Image Setup key. Automatic image setup requires that the monitor is warmed up for at least 15 minutes. This is not required if you are using the DVI cable. Note: If automatic image setup does not establish the image that you prefer, perform manual image setup. See “Manual image setup” on page 3-2 Registering your option Thank you for purchasing this Lenovo™ product.
ft tt lenovo.
v Use adequate lighting for the type of work you are performing. v Use the monitor brightness, contrast, and image adjustment controls, if equipped, to optimize the image on your screen to meet your visual preferences. v Keep your monitor screen clean so you can focus on the screen’s contents. Any concentrated and sustained visual activity can be tiring for your eyes. Be sure to periodically look away from your monitor screen and focus on a far object to allow your eye muscles to relax.
Adjusting your monitor image This section describes the user control features used to adjust your monitor image. Using the direct access controls The direct access controls can be used when the On Screen Display (OSD) is not displayed. Note: The direct access controls are blue. Table 2-1. Direct access controls Icon Control Description Input Change Switches the video input source. Image Setup Activates automatic image adjustment. Brightness Direct access to Brightness adjustment.
Table 2-2. OSD functions OSD Icon on Main Menu Brightness/ Contrast Submenu Brightness Contrast Image Position Horizontal Position Vertical Position Image Setup Automatic Manual Image Properties Color Description Controls and Adjustments (Analog) Adjusts overall brightness 2-4 Flat Panel Monitor User’s Guide L20094 L200p Wide Flat Panel Monitor User’s Guide Same as Analog Adjusts difference between light and dark areas Moves the image left or right.
Table 2-2. OSD functions OSD Icon on Main Menu Submenu Input signal Description Controls and Adjustments (Analog) This monitor can accept video signals through two different connectors. Most desktop computers use a D-SUB connector. Select digital among OSD Controls when you use DVI connector. Controls and Adjustments (Digital) Same as Analog - Selects D-SUB (Analog) - Selects DVI-Digital Options Information Menu Language Menu Position Shows resolution, refresh rate, and product details.
Selecting a supported display mode The display mode the monitor uses is controlled by the computer. Therefore, refer to your computer documentation for details on how to change display modes. The image size, position and shape might change when the display mode changes. This is normal and the image can be readjusted using automatic image setup and the image controls. Unlike CRT monitors, which require a high refresh rate to minimize flicker, LCD or Flat Panel technology is inherently flicker-free.
Image rotation Before rotating the monitor, you should set-up your computer to rotate the image. Rotating the image may require special rotation software or you may find that your computer is preloaded with video graphic drivers that allows image rotation. Check the Graphic Properties setting on your computer to see if this feature is available. Try these steps to check if image rotation is available on your computer. 1. Right-click on the desktop and click Properties. 2.
4438-Hx6 366.5 mm (14.43 in.) 244.7 mm ( 9.63 in.) 471.0 mm (18.54 in.) Range: 0 Swivel Range: -45 , +45 Lift Range: 110.0mm Pivot Yes (clock wise 90 degree) 433.44 mm (17.06 in.) 270.90 mm (10.67 in.) 433.44 mm (17.06 in.) 58 100-240 42 Video input (Analog) Video input (Digital) Altitude Test Input signal Analog Direct Drive, 75 ohm 0.
Table 3-1. Monitor specifications for type-model 4434-Hx6(continued) Humidity Operating 10% to 80% Storage 5% to 95% Shipping 5% to 95% Troubleshooting If you have a problem setting up or using your monitor, you might be able to solve it yourself. Before calling your dealer or Lenovo, try the suggested actions that are appropriate to your problem. Table 3-2.
Table 3-2. Troubleshooting (continued) Problem Possible cause Suggested action Reference Screen is blank and power indicator is steady amber or flashing green The monitor is in v Press any key on the Standby/Suspend keyboard or move the mode mouse to restore operation. The power indicator is green, but there is no image. The video signal cable is loose or disconnected from the system or monitor. Be sure the video cable is connected with the system properly.
f th ft Manually installing the monitor driver Below are steps for manually installing the monitor driver in Microsoft Windows Vista, Microsoft. Windows XP. And Microsoft Windows 2000 Professional. Installing the monitor driver in Windows Vista To install the device driver in Microsoft® Windows Vista, do the following: Note: You must download files from the Lenovo Monitor CD to use the Plug and Play feature in Windows Vista. 1. Turn off the computer and all attached devices. 2.
Installing the monitor driver in Windows XP To use the Plug and Play feature in Windows XP, files should be loaded from the Reference and Driver CD. Note: This section must be completed before continuing with the Windows XP automatic image setup. 2. Ensure tha� he monitor is connected correctly. 3. Turn on the monitor and then the system unit. Allow the system to boot into Windows XP. 4. Open the Display Properties window by clicking Panel, and then double-clicking the Display icon. 5. Click the tab. 6.
Installing the monitor driver in Windows 2000 To use the Plug and Play feature in Windows 2000, files should be loaded from the Reference and Driver CD. Click on the Browse button and navigate to the following directory: X:\Monitor Drivers\Windows XP & Windows 2000 (whereX is the drive letter designator for the CD-ROM drive). Select the "L200pwD.inf " file and click the Open button. Click the OK button.
Manually installing the Soft OSM Below are steps for manually installing the Soft OSM. 1. Insert Lenovo Monitor CD into the CD drive. The CD menu displays. Select “Install Soft OSM” and follow the on-screen instructions. Or you can navigate to the following directory to find Soft OSM setup program: X:\Soft OSM Drivers (whereX is the drive letter designator for the CD-ROM drive). 2. This is aLicenses Agreement dialog box, select and click Next . 3.
3-8 4. It will take several seconds to copy the files to your computer. 5. When the View Readme File dialog box appears , click OK. 6. Restart your computer. 7. After the computer has started up, you can see a monitor icon in the lower right hand corner of the desktop.Double clickthe icon, you can use Soft OSM to do adjusting right now.
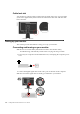
tt Service and Support, Service information Product numbers The product number for your monitor is located on the side of the display bezel as shown below. Customer responsibilities The warranty does not apply to a product which has been damaged due to accident, misuse, abuse, improper installation, usage not in accordance with product specifications and instructions, natural or personal disaster, or unauthorized alterations, repairs or modifications.
4438-Hx6 L200p Wide FRU Monitor Lenovo Business Black 4438-HB6 43R1951 L200p Wide FRU Signal cable(Analog, 2.2m) Business Black 4438-HB6 43R1952 L200p Wide FRU Signal cable(Digital, 2.
8
Country or Region Telephone Number Africa Africa: +44 (0)1475-555-055 South Africa: +27-11-3028888 and 0800110756 Central Africa: Contact the nearest Lenovo service provider Argentina 0800-288-5366 (Spanish) Australia 131-426 (English) Austria Up and running support: 01-24592-5901 Warranty service and support: 01211-454-610 (German) Belgium Up and running support: 02-210-9820 (Dutch) Up and running support: 02210-9800 (French) Warranty service and support: 02-225-3611 (Dutch, French) Bolivia 08
Appendix A.
Country or Region Telephone Number Turkey 00800-4463-2041 (Turkish) United Kingdom Up and running support: 01475-555-055 Warranty support: 08705-500-900 (English) United States 1-800-426-7378 (English) Uruguay 000-411-005-6649 (Spanish) Venezuela 0-800-100-5722 (Spanish) Vietnam For northern area and Hanoi: 84-4-843-6675 For southern area and Ho Chi Minh City: 84-8-829-5160 (English, Vietnamese) A-4 L200p Wide Flat Panel Monitor User’s Guide L194 Flat Panel Monitor User’s Guide L194Wide Flat
!PPENDIX " .
¢ ę¢ǯ ¢ Ȭ ¢ Ĵ ¢ ¢ǯ ǰ ¢ ¡ǯ ¢ ¢ǯ Ğ ¢ ę ǯ 4RADEMARKS ǰ ǰ DZ