
User Manual


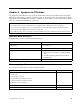
Table Of Contents
- About this manual
- Chapter 1. Safety information
- Chapter 2. General information
- Chapter 3. General checkout
- Chapter 4. Troubleshooting and diagnostics
- Chapter 5. Using the Setup Utility program
- Starting the Setup Utility program
- Viewing and changing settings
- Using passwords
- Enabling or disabling a device
- Selecting a startup device
- Enabling ErP LPS compliance mode
- ICE performance mode
- ICE thermal alert
- Changing the BIOS settings before installing a new operating system
- Exiting the Setup Utility program
- Chapter 6. Symptom-to-FRU Index
- Chapter 7. Locations
- Chapter 8. Replacing FRUs (machine types: 10A0, 10A1, 10A6, 10A7, 10AG, 10AK, 10AL, and 10BE)
- Removing the computer cover
- Removing and reinstalling the front bezel
- Installing or replacing a PCI card
- Installing or replacing a memory module
- Replacing the optical drive
- Installing or replacing the card reader
- Installing or replacing the front USB assembly
- Replacing the battery
- Replacing the power supply assembly
- Replacing the heat sink and fan assembly
- Replacing the microprocessor
- Replacing the system board
- Installing or replacing the mSATA solid-state drive
- Replacing the primary hard disk drive
- Replacing the secondary hard disk drive
- Installing the solid-state drive
- Replacing the front fan assembly
- Replacing the rear fan assembly
- Replacing the front audio and USB assembly
- Replacing the internal speaker
- Replacing the thermal sensor
- Replacing the cover presence switch
- Replacing the Wi-Fi units
- Installing or removing the rear Wi-Fi antenna
- Installing or removing the front Wi-Fi antenna
- Replacing the keyboard or mouse
- Completing the parts replacement
- Chapter 9. Replacing FRUs (machine types: 10A2, 10A3, 10A8, 10A9, 10AH, 10AJ, 10AM, and 10AN)
- Installing external options
- Removing the computer cover
- Removing and reinstalling the front bezel
- Accessing the system board components and drives
- Installing or replacing a PCI card
- Installing or replacing a memory module
- Replacing the optical drive
- Installing or replacing the card reader assembly
- Installing or replacing the front USB assembly
- Replacing the battery
- Installing or replacing the mSATA solid-state drive
- Replacing the power supply assembly
- Replacing the power switch unit
- Replacing the heat sink and fan assembly
- Replacing the microprocessor
- Replacing the system board
- Replacing the cover presence switch
- Replacing the primary hard disk drive
- Installing or replacing the secondary hard disk drive
- Installing the solid-state drive
- Replacing the front fan assembly
- Replacing the front audio and USB assembly
- Replacing the internal speaker
- Replacing the thermal sensor
- Replacing the Wi-Fi units
- Installing or removing the rear Wi-Fi antenna
- Installing or removing the front Wi-Fi antenna
- Replacing the keyboard or mouse
- Completing the parts replacement
- Chapter 10. Replacing FRUs (machine types: 10A4, 10A5, 10AA, 10AB, 10DF, 10DG, 10DH, 10DJ, 10E8, 10E9, 10EA, and 10EB)
- Removing the computer cover
- Installing external options
- Installing or removing the ac power adapter
- Installing or removing the vertical stand
- Installing or removing the VESA mount bracket
- Installing or removing the ac power adapter bracket
- Replacing the optical drive
- Installing or removing the hard disk drive assembly
- Replacing the secondary hard disk drive
- Installing or removing the I/O box
- Installing or replacing a memory module
- Replacing the battery
- Replacing the power switch board
- Replacing the Wi-Fi card module
- Installing or removing the front Wi-Fi antenna
- Installing or removing the rear Wi-Fi antenna
- Replacing the internal speaker
- Replacing the cover presence switch
- Replacing the system fan
- Replacing the thermal module
- Replacing the microprocessor
- Replacing the system board
- Replacing the keyboard or mouse
- Completing the parts replacement
- Chapter 11. Additional service information
- Appendix A. Notices
- Index