
Personal Computer User's Guide
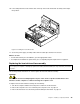
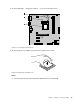
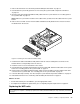

10.Lowerandpositiontheheatsinkfanductonthetopoftheheatsinkandfanassemblyuntilitsnaps
intoposition.
Figure33.Installingtheheatsinkfanduct
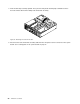
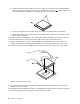
11.Securethepowersupplyassemblycableswiththecableclipsandtiesinthechassis.
Whattodonext:
•Toworkwithanotherpieceofhardware,gototheappropriatesection.
•Tocompletetheinstallationorreplacement,goto“Completingthepartsreplacement”onpage67.
Replacingtheheatsinkandfanassembly
Attention:
Donotopenyourcomputerorattemptanyrepairbeforereadingandunderstandingthe“Importantsafetyinformation”
onpagev.
Thissectionprovidesinstructionsonhowtoreplacetheheatsinkandfanassembly.
CAUTION:
Theheatsinkandfanassemblymightbeveryhot.Turnoffthecomputerandwaitthreetove
minutestoletthecomputercoolbeforeremovingthecomputercover.
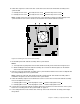
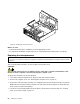
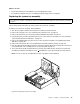
Toreplacetheheatsinkandfanassembly,dothefollowing:
1.Turnoffthecomputeranddisconnectallpowercordsfromelectricaloutlets.
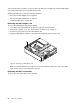
2.Removethecomputercover.See“Removingthecomputercover”onpage32.
3.Removethefrontbezel.See“Removingandreinstallingthefrontbezel”onpage32.
Chapter5.Installingorreplacinghardware49