
Personal Computer Hardware Maintenance Manual
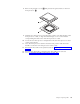


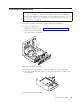
Table Of Contents
- Contents
- Chapter 1. About this manual
- Chapter 2. Safety information
- Chapter 3. General information
- Chapter 4. General checkout
- Chapter 5. Diagnostics
- Chapter 6. Using the Setup Utility
- Chapter 7. Symptom-to-FRU index
- Chapter 8. Replacing FRUs
- Locations
- Opening the computer cover
- Replacing the battery
- Replacing a memory module
- Replacing the adapter card
- Replacing the front audio and USB assembly
- Replacing the heat sink
- Replacing the microprocessor
- Replacing the system board
- Replacing the system fan
- Replacing the hard disk drive
- Replacing the optical drive
- Replacing the internal speaker
- Completing the FRU replacement
- Chapter 9. FRU lists
- Chapter 10. Additional service information
- Appendix. Notices

7. To install the new hard disk drive into the plastic bracket, flex the bracket and
align pin 1, pin 2, pin 3, and pin 4 on the bracket with the holes in
the hard disk drive. Do not touch the circuit board 5 on the bottom of the
hard disk drive.
8. Connect the signal and power cables to the rear of the new hard disk drive.
9. Slide the new hard disk drive into the drive bay until it snaps into position.
10. Reconnect the power cable to the optical drive.
11. Go to “Completing the FRU replacement” on page 106.
Figure 24. Installing the hard disk drive into the bracket
102 Hardware Maintenance Manual