User Guide ThinkPad Tablet
Notes: Before using this information and the product it supports, be sure to read the following: • Safety and Warranty Guide • Regulatory Notice • “Important safety and handling information” on page iii • Appendix C “Notices” on page 99 The Safety and Warranty Guide and the Regulatory Notice have been uploaded to the Web site. To refer to them, go to http://support.lenovo.com, and then touch Guides & Manuals. First Edition (August 2011) © Copyright Lenovo 2011.
Contents Read this first. . . . . . . . . . . . . iii Important safety and handling information . . . . . iii Chapter 1. Product overview . . . . . . 1 Tablet layout . . . . . . . . . . Accessories . . . . . . . . . . . Features . . . . . . . . . . . . Specifications . . . . . . . . . . Operating environment . . . . . . Preinstalled widgets and applications. . . . . . . . . . . . . . . . . . . . . . . . . . . . . . . . . . . . . 1 4 4 5 5 6 Chapter 2. Getting started . . . . . . .
Traveling with your tablet. . . . . . . . . . Travel tips . . . . . . . . . . . . . . Travel accessories . . . . . . . . . . Care and maintenance . . . . . . . . . . Cleaning your tablet . . . . . . . . . . Protecting the screen with a replaceable film Storing the tablet for extended periods . . . . . . . . . 69 69 70 70 70 70 70 Chapter 10. Settings. . . . . . . . . . 71 Wireless & networks Sound . . . . . . Screen . . . . . . Location & security . Applications. . . . Accounts & sync . . Privacy. . .
Read this first Be sure to follow the important tips given here to get the most use and enjoyment out of your tablet. Failure to do so might lead to discomfort or injury, or cause your tablet to fail. Important safety and handling information To avoid personal injury, property damage, or accidental damage to your ThinkPad® Tablet (hereafter referred to as the tablet), read all of the information in this section before using it.
Charging method Tablet on (Display is on) Tablet off or in screen lock mode (Display is off) ThinkPad Tablet Dock (fastest charging method) Approved Approved ThinkPad Tablet AC Charger Approved, but the battery will charge slowly Approved ThinkPad Tablet DC Charger Approved, but the battery will charge slowly Approved A USB connection between the micro-USB connector on the tablet and a USB connector of a personal computer or other device that complies with the USB 2.
Take care when using your tablet in a motor vehicle or on a bicycle: Always prioritize your safety and the safety of others. Follow the law. Local laws and regulations might govern how you can use mobile electronic devices, such as your tablet, while you drive a motor vehicle or ride a bicycle.
vi User Guide
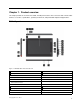
Chapter 1. Product overview This chapter provides an overview of the tablet, including the locations of the connectors and controls, tablet features, accessories, specifications, operating environment, and preinstalled widgets and applications. Tablet layout Figure 1.
1 Power button Press and hold the power button for a few seconds to turn on the tablet. To turn off the tablet, press and hold the power button for a few seconds, and then touch OK from the Power off menu. When the tablet is on, press the power button once to lock or unlock the screen. 2 Microphone The built-in microphone captures sound and voice when it is used with an application capable of handling audio. To disable the microphone, go to the Android Settings screen and touch Sound ➙ Microphone.
USB connector Open the USB connector cover to access the full-size USB connector. Use the full-size USB connector to connect a compatible USB device, such as a USB storage device or a USB keyboard. See “Using the full-size USB connector” on page 47. If your tablet comes with a ThinkPad Tablet Keyboard Folio Case or you have purchased one, use this connector to connect the keyboard. See “Using the ThinkPad Tablet Keyboard Folio Case” on page 56.
Accessories Figure 2. Accessories • ThinkPad Tablet AC Charger: The ac charger consists of two parts, snap-in prongs and a charger head. Insert the prongs into the charger head to set up the ac charger. Use the ac charger together with the supplied USB cable to provide ac power to your tablet and charge the battery. • USB cable: Use the USB cable to connect your tablet to a personal computer for data transfer, or use it together with the ac charger to charge your tablet.
Integrated cameras • Front-facing camera, 2 megapixel • Rear-facing camera, 5 megapixel Connectors • One mini HDMI connector • One USB 2.0 connector • One micro USB connector • One ThinkPad Tablet Dock connector Card slot or card reader • SIM card slot • 3-in-1 media card reader Wireless features • Wireless LAN • Bluetooth 2.1 • Wireless WAN (on some models) Specifications Size • Width: 260.4 mm (10.3 inches) • Depth: 181.7 mm (7.2 inches) • Height: 14 mm (0.55 inches) Battery • 24.
– Storage: 5% to 95% If possible, place your tablet in a dry, well-ventilated area without direct exposure to sunshine. Do not use or store your tablet in dusty, dirty areas, or extreme hot or cold areas. Preinstalled widgets and applications This topic provides an overall introduction to the widgets and applications preinstalled on your tablet. Widgets A widget is a small application that you can place on a Home screen to provide quick and easy access to information, an application, or a function.
Note: Preinstalled applications vary by geographic locations and are subject to change. The following table lists some applications that might be preinstalled on your tablet. Application Description AccuWeather.com Get the weather information for different locations from the Web. Amazon Kindle Find, shop for, download, and read Kindle eBooks from the massive selection. Amazon MP3 Download or purchase music from the Amazon MP3 store.
Application Description Voice Search Perform a search by speaking your search terms. YouTube View and upload YouTube videos from your tablet. Zinio Reader Purchase and view digital magazines from Zinio.
Chapter 2. Getting started This chapter helps you quickly start using your tablet. Installing the SIM card If your tablet has a wireless WAN feature, it might require a SIM card to establish wireless WAN connections. Depending on the country of delivery, the SIM card might already be installed in your tablet or might be part of the shipping contents that came with your tablet. Attention: When installing or removing the SIM card, do not touch the SIM card metal connectors.
Setting up your tablet The first time you turn on your tablet, the Setup Wizard is displayed to help you set up your tablet step by step. Touch the right arrow to go to the next step after you finish a setting. 1. Language and Time Zone Select the language you want to use on your tablet and set the date and time. 2. License agreement Touch Accept to accept the license agreement. Note: You cannot go forward until you accept the agreement. 3.
Your Google Account To optimize your tablet capabilities, register and sign in to a Google Account to use Google applications, download applications from Android Market, back up your settings and other data to Google servers, and take advantage of other Google services on your tablet. Note: An Internet connection is required to create or sign in to a Google Account. Ensure that your tablet has an active Wi-Fi or mobile data connection (2G or 3G) before you register or sign in.
Changing the synchronization settings for a Google Account To configure the synchronization settings for a Google Account, do the following: 1. Open the Accounts & sync settings screen. 2. Touch the account that you want to synchronize with your tablet. A list of items that this account can synchronize is displayed. 3. Select or clear the check box for an item to change the synchronization settings.
• Google Voice Search : Search for information on the Internet by speaking. See “Searching the Internet” on page 36 for more information. : Open the application library to view all installed applications. • Applications • Customize : Open the Home screens customization view to customize the Home screens. Desktop Desktop is the area where widgets or application shortcuts are displayed. By default, a Lenovo-unique widget named Lenovo Launch Zone is displayed at the center of the main Home screen.
7 Browser Launch the Browser application. 8 Features and messages Receive information and tips about your tablet, as well as special offers in configured categories. This icon is displayed only when there are unread system notifications from Lenovo. Touch this icon to view details of the notifications. Lenovo Launch Zone is fully customizable through the Lenovo Launch Zone settings. You can change the center area of Lenovo Launch Zone, which is predefined as 7 Browser, to be a picture viewer.
Drag To move an item such as an image and an icon on the screen, touch and hold your finger on the item, move your finger to the desired location, and then take your finger off the screen. Swipe or slide Move your finger in a vertical or horizontal direction on the screen to scroll through Home screens, Web pages, lists, picture thumbnails, and so on. Zoom • Zoom out: Move two fingers close together on the screen as if you are picking something up to reduce the view of an image or a Web page.
Your tablet is preinstalled with the Android keyboard and the FlexT9 keyboard. You can download more input methods from Android Market. Typing text, numbers, symbols, and other characters When you need to type text, touch the text field to bring up the onscreen keyboard, then touch keys on the keyboard to type. To close the onscreen keyboard, touch the down arrow button from the system bar. • For the Android keyboard: Touch the shift key to capitalize the character.
5. Touch the Back button when you are done. If you have configured multiple languages and want to switch to another language when you are typing text, do the following: • For the Android keyboard: 1. Touch and hold the settings key to bring up the input method selection dialog box. 2. Touch the desired language from the list. The selected language is displayed on the space key. • For the FlexT9 keyboard: 1. Touch and hold the space key.
Figure 5. ThinkPad Tablet Pen overview To use the ThinkPad Tablet Pen, hold the pen and gently touch the screen with the tip to accomplish actions such as touch, touch and hold, drag, and slide. You also can touch an item or a blank area with the pen tip and then press the active button 1 to imitate a touch-and-hold operation. If the battery power runs out, the active button 1 stops functioning. Unscrew the battery cap 2 and remove it to replace the battery.
Downloading games and applications To extend the functionality of your tablet, download and install additional applications from Android Market and Lenovo App Shop. Both Android Market and Lenovo App Shop provide an easy and quick way for you to shop for games and mobile applications. Downloading games and applications from Android Market To download or buy an application or a game from Android Market, do the following: 1. From the action bar, touch the applications icon to open the application library.
2. Touch the App shortcuts tab, the Widgets tab, or the More tab to select the desired item that you want to add. 3. Drag the item to the Home screen where you want to add it. If you drag it to a Home screen and pause before lifting your finger, the Home screen enlarges so you can place the item where you want it to be located. Otherwise, the item is placed on the first available spot.
Customizing Lenovo Launch Zone Customize Lenovo Launch Zone by changing the background color, the transparency level, and other settings to meet your personal preferences. To change the background color and the transparency level of Lenovo Launch Zone, do the following: 1. Touch the Lenovo Launch Zone Settings icon displayed. from Lenovo Launch Zone. The settings items are 2. Touch Change Launch Zone Color. 3. Touch your favorite color and slide the transparency bar to your preference.
Table 1. Lenovo Launch Zone settings (continued) Menu Options Description Zone 3: Read Preinstalled e-book readers Select an e-book reader, or touch Select an application to select another application to launch from Zone 3. Select an application Zone 4: Listen Preinstalled music players Select an application Zone 5: Customize Launch browser Show one picture Select a music player, or touch Select an application to select another application to launch from Zone 4.
Chapter 3. Connecting to wireless networks and devices Your tablet can connect to a variety of networks and devices, including mobile networks (2G or 3G), Wi-Fi data networks, and Bluetooth devices. Note: Some tablet models can connect to both mobile networks (2G or 3G) and Wi-Fi networks, while others can connect to Wi-Fi networks only. If your tablet supports Wi-Fi connection only, the information related to mobile networks does not apply to your tablet.
Editing or creating a GSM access point name If your tablet connects to a Global System for Mobile Communications (GSM) mobile network (2G or 3G), and you need to edit the settings for an existing access point name (APN) or create a new APN, you must obtain the APN and detailed settings from your service carrier. To edit or create a new APN, do the following: 1.
Connecting to a Wi-Fi network Wi-Fi is a wireless networking technology that provides network access at distances of up to 100 meters (328 feet) depending on the Wi-Fi router and your surroundings. You can connect any ThinkPad Tablet to a Wi-Fi network. A Wi-Fi connection requires access to a functioning Wireless Access Point (WAP), also called a hotspot. Some hotspots are open to the public, but some others implement security features to limit access to specific groups or individuals.
5. Touch Forget. The details of the Wi-Fi network are erased. Using Bluetooth devices Bluetooth is a short-range wireless communications technology. Use Bluetooth to establish a wireless connection with another Bluetooth-enabled device over a distance of about 10 m (32.8 ft), such as a Bluetooth keyboard or headset. Enabling and disabling the Bluetooth function To enable or disable the Bluetooth function, do the following: 1.
8. If you are prompted to type a password or a PIN to authenticate, type the same password or PIN on both devices. Otherwise, consult the documentation that came with the target device to learn its default password or PIN for connection, or what other procedures it requires for pairing. 9. When the pairing is successful, Paired but not connected is displayed under the paired device. Connecting to a Bluetooth device To connect to a Bluetooth device, do the following: 1.
Configuring Bluetooth options Bluetooth devices are designed to be interoperable with any Bluetooth product that is compliant with Bluetooth Specification 2.1+EDR as defined by the Bluetooth Special Interest Group (SIG). Different Bluetooth devices have different profiles such as File Transfer, Generic Access, Audio Gateway, and Basic Image. After you connect your tablet to a Bluetooth device, select the profile of the Bluetooth device you want to use by doing the following: 1.
Chapter 4. Battery and ac power This chapter provides instructions on how to charge the battery, how to extend the battery life between charges, and how to view the battery status. Charging the battery Your tablet is shipped with a ThinkPad Tablet AC Charger to charge your tablet from any standard ac power outlet. Note: The battery is not fully charged when shipped. To charge the battery, do the following: 1. Insert the snap-in prongs into the charger head. Make sure that the connection is secure.
Figure 7. Connecting the ac charger with the tablet 3. Plug the ac charger into a standard ac power outlet. 4. Disconnect the ac charger from your tablet when the battery power is full, or leave the ac charger connected to operate from ac power.
Extending the battery life between charges When you are traveling outdoors with your tablet and the ac power is not available, you can extend the battery life by doing the following: • Turn off Bluetooth and Wi-Fi when not in use. To turn off Bluetooth and Wi-Fi, do the following: 1. Touch the time area from the system bar to open the Status Details panel. 2. Touch anywhere in the panel. The Quick Settings panel is displayed. 3.
To check for the accurate status, touch the battery status icon from the system bar to open the Status Details panel. The remaining battery power percentage is displayed in the panel. You also can get much more detailed battery status by doing the following: 1. From the main Home screen, touch the Android Settings icon applications icon on Lenovo Launch Zone, or touch the from the action bar and then touch Settings. The Android Settings screen opens. 2. Touch About tablet. 3.
Chapter 5. Using your tablet This chapter provides instructions on how to use many of your tablet’s features and some preinstalled applications. Frequently asked questions Use the Home screen tips to look for some basic operating instructions. To view the Home screen tips, do the following: 1. Touch the Customize icon from the action bar to open the Home screen customization view. 2. Touch Widgets. 3. Scroll to locate the Home screen tips widget and touch it.
• General Packet Radio Service (GPRS) If you choose to use a mobile data network, you might have to sign up for a data plan with your service carrier in your area. With some carriers, you can choose a data plan, track your data usage, and change or cancel your plan. With some plans you pay based on the amount of data used, while with other plans you pay a fixed fee for unlimited data use.
– Page info: View the details of the current Web page. – Downloads: View and manage downloaded files. – Settings: Configure your browser settings, such as setting a home page, clearing cache, setting text size, and so on. • Viewing Web pages To view a specific Web page, do the following: 1. Touch the applications icon from the action bar and then touch Browser. 2. Touch the Web page address field and type the address of the Web page to which you want to go.
1. From the main Home screen, touch the Android Settings icon applications icon on Lenovo Launch Zone, or touch the from the action bar and then touch Settings. The Android Settings screen opens. 2. Touch Applications ➙ Unknown sources to enable the feature to permit installation of applications from Web sites. 3. When the Attention dialog box is displayed, touch OK. 4. Go back to the browser screen, and touch the application you want to download. 5.
Google Search To search by typing, do the following: 1. From a Home screen, touch the Google Search icon on the action bar. 2. Type a keyword or other text using the onscreen keyboard. As you type, the search results that fully or partially match the text being typed are displayed on a menu below the search box. 3. Do one of the following: • Touch one of the search results displayed on the menu.
Capturing Wi-Fi profiles from your ThinkPad notebook computer Notes: To capture Wi-Fi profiles, the host ThinkPad notebook computer must have the following installed: • Windows 7 operating system • Latest Access Connections™ program If the host ThinkPad notebook computer does not have the latest Access Connections program installed, go to http://support.lenovo.com to download it. To capture the Wi-Fi profiles from your ThinkPad notebook computer, do the following: 1.
When enabled, the Wi-Fi connection will be disabled after the screen is locked. You can set when Wi-Fi will be turned off after the screen is locked by touching Set minutes. • Never turn off Wi-Fi when connect to the specified [SSID] When enabled, even if the first option Turn off Wi-Fi when display is off is enabled, the connection to the specified SSID will not be turned off after the screen is locked.
Camera controls Figure 9. Camera controls 1 Zoom in or out Zoom in or out to adjust the focus. 2 Camera settings controls Touch each control to view or change the associated camera settings. 3 Shutter or record button Take a picture or start recording a video. 4 Camera mode switch Drag to switch between the camera mode for capturing pictures and the camcorder mode for capturing videos. 5 Camera switch Switch between the front-facing camera and the rear-facing camera.
4. Use the camera settings controls to adjust the settings, and then touch the Record button. While recording, the Record button changes to Stop. 5. Touch the Stop button to stop recording. The video is saved into the video gallery automatically. Disabling cameras If you want to disable the cameras, do the following: 1. From the main Home screen, touch the Android Settings icon applications icon on Lenovo Launch Zone, or touch the from the action bar and then touch Settings.
Listening to music Your tablet is preinstalled with the Amazon MP3 application and the mSpot Music application. Both applications enable you to listen to, download, or purchase music from the Web sites. Touch Listen from Lenovo Launch Zone to launch the default music player application. To listen to music stored on your tablet, do the following: 1. Touch the applications icon from the action bar to open the application library. 2. Touch Music. The Android music player is launched. 3.
Note: Use Bluetooth to transfer small-size files only such as a picture or a song. It takes a long time to transfer a large file using Bluetooth. Working with Email Use the Email application to read and send e-mails and manage all your e-mail accounts. You also can set up a Microsoft Exchange account to read and write your work e-mails as you do on a computer. For more information, see Chapter 7 “Using your tablet within an enterprise” on page 61.
3. Touch an item or an e-mail box to configure the settings. Managing your contacts The Contacts application enables you to create, store, and manage information about your friends, family, and colleagues. Adding a contact 1. From the action bar, touch the applications icon to open the application library. 2. Touch Contacts to launch the application. 3. Touch New. 4. Touch the account to which you want to add the new contact. 5. Enter the contact information and touch Done.
The Favorite Apps utility displays launch points for six applications. Each launch point is a screen representation of that application with the launcher icon in the bottom left corner. Touch a launch point to launch the application. To add an application to the Favorite Apps utility, do the following: 1. Touch and hold the Favorite Apps icon from the system bar to open the Add or Remove applications screen.
4. The tablet starts sharing its mobile network data connection with your computer. 5. To stop sharing your data connection, clear the USB tethering check box. Or just disconnect the USB cable. To share your tablet’s mobile data connection through Bluetooth: 1. Pair your tablet with your computer. See “Using Bluetooth devices” on page 26. 2. From the main Home screen, touch the Android Settings icon applications icon on Lenovo Launch Zone, or touch the from the action bar and then touch Settings.
If you have installed a flash media card in your tablet and you want to view the information stored on the card from your computer, touch this option. • Transfer files (Media Transfer Protocol) The Media Transfer Protocol (MTP) supports the transfer of multimedia data without additional device drivers. MTP is part of the Windows Media® framework and thus you can use Windows Media Player to synchronize files between the computer and the tablet.
• Disconnect the device programmatically and then physically as follows: 1. From the main Home screen, touch the Android Settings icon touch the applications icon screen opens. on Lenovo Launch Zone, or from the action bar and then touch Settings. The Android Settings 2. Touch Storage ➙ Unmount USB storage. 3. Unplug the USB device safely. Working with other USB devices If you are accustomed to using a traditional physical keyboard, you can connect a USB keyboard to your tablet.
Use any one of these cards to extend the storage capability of your tablet. You also can use these cards to share data with a computer or other device that supports these card formats. To locate the 3-in-1 media card reader, see “Tablet layout” on page 1. Inserting a flash media card Attention: Before handling a flash media card, touch a metal table or a grounded metal object. This action reduces any static electricity from your body. Static electricity can damage the card.
Securing your flash media card To protect the information from unauthorized access, you can encrypt your flash media card. Refer to “Encrypting the flash media card” on page 65 for more information. Working with the clock Use the Clock application to display the date and time in large characters on your screen and to set alarms to sound once or on a repeating schedule. Setting date and time By default, your tablet automatically synchronizes the date and time with the Internet.
Working with Google Maps and GPS Use the Google Maps application to find your current location, get directions to your destination, and find other location-based information. To search for places or find your current location using Google Maps, you must enable the resources required for plotting positions by doing the following: 1. From the main Home screen, touch the Android Settings icon applications icon on Lenovo Launch Zone, or touch the from the action bar and then touch Settings.
Google Talk Google Talk is an instant messaging program. Use it to communicate with other Google Talk users by text, audio, or video. from the action bar, and then touch To launch the Google Talk application, touch the applications icon Google Talk. Sign in with your Google Account. Note: If you do not have a Google Account, touch Add account to create one.
YouTube YouTube is Google’s online video streaming service that enables you to view videos and upload your own videos to share with others. Waching videos on YouTube To view YouTube videos, do the following: 1. From the action bar, touch the applications icon to open the application library. 2. Touch YouTube to launch the application. 3. Touch a video on the YouTube home screen to watch it. 4. Touch Browse to look for videos by category. 5.
54 User Guide
Chapter 6. ThinkPad Tablet options Your tablet might come with a ThinkPad Tablet Keyboard Folio Case or a ThinkPad Tablet Dock. If your tablet does not come with one, you can purchase one from Lenovo at http://www.lenovo.com/accessories/services/index.html. The ThinkPad Tablet Keyboard Folio Case and the ThinkPad Tablet Dock are option devices that Lenovo designed specifically for the ThinkPad Tablet. These options provide convenience and make your tablet easier to use for work, study, and entertainment.
ThinkPad Tablet Dock The ThinkPad Tablet Dock holds your tablet in an upright position and frees your hands to do other tasks. It also provides you easy access to connectors for USB devices, file transfers, charging, audio input, audio output, and video output. Figure 11. ThinkPad Tablet Dock front view and right side view 1 Dock connector This connector establishes the connection between the dock and tablet when your tablet is seated in the dock.
1. Open the USB cover on the tablet by sliding it to the left. Figure 13. Opening the USB cover 2. Align the USB connector on the tablet with the USB connector on the keyboard folio case and slide the tablet downward until the two USB connectors are connected. Figure 14. Installing the tablet into the keyboard folio case 3. When the connection is established, the onscreen keyboard is automatically disabled and the keyboard folio case is activated.
• View notifications from Lenovo • Open the Android Settings screen • Open the menu for the current application • Launch Google Search Screen control • Go back to the previous screen • Lock the screen • Zoom in • Zoom out Audio and video control • Go to the previous track or scene • Play or pause • Go to the next track or scene Using the Optical TrackPoint Figure 15.
Using the ThinkPad Tablet Dock To connect your tablet to the dock, do the following: 1. Position your tablet with the dock connector side downward. 2. Align the dock connector on the tablet with the connector on the dock. 3. Gently slide your tablet into the dock until it is fully seated as shown in the following illustration. Figure 16. Sitting your tablet on the dock After the tablet is in the dock, you can: • Use your tablet in an upright position without having to hold the tablet.
60 User Guide
Chapter 7. Using your tablet within an enterprise Your tablet provides support for secure access to corporate networks and Microsoft Exchange. Additionally, a number of business-related applications are preinstalled to help you work with and manage your work-related documents. Note: Using your tablet in your company might require additional settings or configurations from your IT administrator. Contact your IT administrator for more information.
2. Touch Wireless & networks ➙ VPN settings. All the VPNs that you have added are listed on the VPN settings screen. 3. Touch your company’s VPN. 4. In the dialog box that opens, type the requested credentials and touch Connect. When you are connected to a VPN, a notification icon is displayed on the system bar, to the left of the time. To disconnect the VPN, touch the notification icon from the system bar. Editing or deleting a VPN To edit a VPN, do the following: 1.
Chapter 8. Security This chapter provides information about how to protect the information stored on your tablet. Protecting data against viruses Your tablet is preinstalled with McAfee antivirus programs to help you to detect and eliminate viruses. McAfee WaveSecure is a mobile security service that enables you to protect data, safely connect to the Internet, and securely browse and shop the Web. It also ensures privacy in the event of theft and enhances the possibility of recovering your tablet.
• Corporate Logon: Touch this option to use the same user ID and password you use to log on to your company’s Active Directory domain to unlock your tablet screen. Note: Make a note of your password, PIN, or pattern in case you forget it. 4. Touch OK to save your setting. The next time you turn on your tablet or wake up the screen, type the password or PIN, or draw the pattern to unlock the screen.
Encrypting the flash media card If you use a flash media card to store confidential data or personal information on your tablet, encrypt the card to prevent the data from being accessed if the card is ever lost or stolen. Encrypting a flash media card To encrypt a flash media card, do the following: Important: Before you start the encryption process, connect your tablet to a standard ac power outlet to ensure a steady and sustained supply of electrical power. 1.
66 User Guide
Chapter 9. You and your tablet This chapter provides the accessibility information about your tablet, and instructions on traveling with the tablet and maintaining the tablet. Comfort and accessibility Read this topic to learn how to use your tablet more comfortably and how to use the accessibility features. Using your tablet more comfortably With the help of all the conveniences and powerful features of your tablet, you can carry your tablet all day long for work or entertainment at many places.
To use Voice Actions, do the following: 1. Touch the Google Voice Search icon from the action bar, or touch the applications icon action bar and then touch Voice Search. from the 2. Say what you want your tablet to do. The following are examples: • “Map of Golden Gate Park, San Francisco” • “Directions to 1299 Colusa Avenue, Berkeley, California” • “Go to Google.
Getting updates from Lenovo Your tablet is preinstalled with a notification application that informs you about the latest software updates from Lenovo. The application icon is displayed in Lenovo Launch Zone only when there are unread system notifications from Lenovo. See “Lenovo Launch Zone” on page 12. Touch the icon to open a message box to check for detailed information about the updates, and then follow the instructions to update your tablet if you want.
Travel accessories The following is a checklist of things to consider packing when you are going to be away from your office or home: Travel essentials: • The ThinkPad Tablet AC Charger that comes with your tablet • The supplied USB cable • A quality carrying case that provides adequate cushion and protection If you are traveling to another country or region, you might want to consider these items: • A ThinkPad Tablet AC Charger for the country to which you are traveling • A SIM card for the local mobile se
Chapter 10. Settings Read this chapter to familiarize yourself with the various settings available to help you personalize and optimize your tablet. The following table lists the main menu items on the Android Settings screen. Table 2. Main menu items on the Android Settings screen Main menu Description Wireless & networks Configure and manage connections to networks and devices through Wi-Fi, Bluetooth, and mobile networks. Sound Configure the volume level and type; configure ringtones and alarms.
To enable a setting, touch the setting item to select the check box. When a setting is enabled, a green check is displayed in the check box. To disable a setting, touch the setting item to clear the check box. If other actions are required, follow the instruction on the screen. The following table lists the settings that you can configure through the Wireless & networks menu. Table 3.
Table 3. Wireless & networks settings (continued) Menu Tethering & portable hotspot Note: The Tethering & portable hotspot function might not be supported by all carriers. VPN settings Submenu Description Find nearby devices Scan for nearby available Bluetooth devices. When the search results are displayed, touch a device to pair with it. For more information, see “Using Bluetooth devices” on page 26.
Sound Use the Sound settings to configure how, and at what volume, the tablet plays music and audio from other media, notification ringtones, and alarms. You also can use these settings to pick the notification ringtone you prefer and set whether you hear audible feedback when touching, locking, or unlocking the screen. To enable a setting, touch the setting item to select the check box. When a setting is enabled, a green check is displayed in the check box.
Table 5. Display settings (continued) Menu Submenu Description Animation No animation Set the tablet to play or not to play an animation when you open or close a screen, or switch between screens. Note: The No animation option does not control animation in all applications. Some animations All animations (default) Timeout X second/minute Note: X stands for a number. Attached display Select a timeout value for how long the screen remains on after the last operation.
Table 6. Location & Security settings (continued) Menu Submenu Description Encryption Encrypt tablet Encrypt your accounts, settings, downloaded applications, and so on. After you encrypt your tablet, you have to type a password or PIN to decrypt it each time you turn it on. Encrypt data on removable SD card Encrypt the data on the installed flash media card. Once encrypted, it requires a password or PIN to decrypt your flash media card if the card is used on other tablets.
Table 7. Applications settings (continued) Menu Submenu Description Development USB debugging Enable to allow debugging when your tablet is attached to a computer through a USB cable. Stay awake When enabled, the screen will not go to sleep (lock) while the battery is charging, or while the tablet is connected to a computer through a USB cable. Allow mock locations This setting is used by developers when developing location-based applications.
Privacy Use the Privacy settings to manage whether your settings and other data are backed up to Google servers with your Google Account. You also use these settings to erase all the data on your tablet by performing a factory data reset operation. To enable a setting, touch the setting item to select the check box. When a setting is enabled, a green check is displayed in the check box. To disable a setting, touch the setting item to clear the check box.
To enable a setting, touch the setting item to select the check box. When a setting is enabled, a green check is displayed in the check box. To disable a setting, touch the setting item to clear the check box. If other actions are required, follow the instruction on the screen. The following table lists the settings that you can configure through the USB settings menu. Table 10. USB settings Menu Submenu Description Micro USB Low-power charge only.
Table 11. Storage settings (continued) Menu Submenu Description Internal storage Total space View the total space of your internal storage device. Applications View the space used by an application. Downloads View the space used by a downloaded file or application. Pictures, Videos View the space used by a media file. Audio (music, ringtones, podcast etc) Misc. USB storage Available View the available space on the tablet internal storage.
Table 12. Language & input settings (continued) Menu Submenu Description Voice output (Text-to-speech settings) Note: If you do not have speech synthesizer data installed, only the Install voice data option is available. Listen to an example Play a brief sample of the speech synthesizer using your current settings. Always use my settings Enable to use the settings on this screen in place of speech synthesizer settings available in other applications.
To enable a setting, touch the setting item to select the check box. When a setting is enabled, a green check is displayed in the check box. To disable a setting, touch the setting item to clear the check box. If other actions are required, follow the instruction on the screen. Note: If no accessibility-related applications are installed, after you touch Accessibility from the settings panel, you are prompted to download accessibility software. Touch OK if you want to download. Otherwise, touch Cancel.
Table 15. Optical TrackPoint settings Menu Description Button Function Configure the right button and left button of the Optical TrackPoint to function as “select” or “open menu.” Tutorial Video Touch to watch a tutorial video. About tablet Use About tablet settings to check for information about your tablet, including the status, battery use, legal information, hardware and software versions, and build number. To enable a setting, touch the setting item to select the check box.
84 User Guide
Chapter 11. Troubleshooting problems This chapter describes some common problems and suggested solutions, and how to recover your tablet from a crash. Be aware that the problems and solutions described in this chapter are meant only as a guide. They are not definitive problem solving techniques. For some problems, you might need help from Lenovo, your reseller, or your service provider. When you observe a problem, stop operation immediately, because taking further action might result in data loss or damage.
Suggested solution: If you cannot turn off your tablet by pressing and holding the power button, insert a straightened paper clip into the emergency reset hole to turn it off. To locate the emergency reset hole, see “Tablet layout” on page 1. Media problems • Problem: The audio quality is poor or there is no sound output. Suggested solution: Check and make sure that: – The speaker is not covered. – The speaker mute function is disabled. – If you are using a headset, unplug it, then plug it in again.
Chapter 12. Getting support This chapter provides information about getting help and support from Lenovo. Lenovo technical support After you buy a ThinkPad Tablet, register your tablet with Lenovo. Using the registered information, Lenovo can provide efficient service when you call Lenovo for help, send notifications of free software and special promotional offers, and contact you in case of a recall or other severe problem. Some locations offer extended privileges and services to registered users.
Lenovo user forums Lenovo Forums on the Lenovo Web site provides you with a place to search the community knowledge base for your tablet, share and discover information with other users, make suggestions to Lenovo, ask questions on problems you encountered, and get technical support from Lenovo engineers. To go to Lenovo Forums, do the following: 1. Go to http://support.lenovo.com. 2. Touch Lenovo Community to start with your first post. Note: Posting on Lenovo Forums requires a user account.
Appendix A. Regulatory information This appendix provides regulatory information. Wireless related information Wireless interoperability Wireless LAN PCI Express Mini Card is designed to be interoperable with any wireless LAN product that is based on Direct Sequence Spread Spectrum (DSSS), Complementary Code Keying (CCK), and/or Orthogonal Frequency Division Multiplexing (OFDM) radio technology, and is compliant to: • The 802.11b/g Standard, 802.11a/b/g or 802.11n draft 2.
In some situations or environments, the use of integrated wireless cards might be restricted by the proprietor of the building or responsible representatives of the organization. These situations and areas might for example include: • Using the integrated wireless cards onboard of airplanes, in hospitals or near petrol stations, blasting areas (with electro-explosive devices), medical implants or body-worn electronic medical devices.
Export classification notice This product is subject to the United States Export Administration Regulations (EAR) and has an Export Classification Control Number (ECCN) of 5A992.c. It can be re-exported except to any of the embargoed countries in the EAR E1 country list. Electronic emission notices The following information refers to the ThinkPad Tablet machine types 1838 and 1839.
European Union - Compliance to the Electromagnetic Compatibility Directive This product is in conformity with the protection requirements of EU Council Directive 2004/108/EC on the approximation of the laws of the Member States relating to electromagnetic compatibility. Lenovo cannot accept responsibility for any failure to satisfy the protection requirements resulting from a nonrecommended modification of the product, including the installation of option cards from other manufacturers.
Japanese VCCI Class B statement Japan compliance statement for products which connect to the power mains with rated current less than or equal to 20 A per phase Lenovo product service information for Taiwan Additional regulatory information For more information about the wireless regulatory notices, refer to the Regulatory Notice that came with your tablet. If your tablet is shipped without the Regulatory Notice, you can obtain it on the Web site at: http://www.lenovo.com/ThinkPadUserGuides Appendix A.
94 User Guide
Appendix B. Environmental, recycling, and disposal information Lenovo recycling statement Lenovo encourages owners of information technology (IT) equipment to responsibly recycle their equipment when it is no longer needed. Lenovo offers a variety of programs and services to assist equipment owners in recycling their IT products. For information on recycling Lenovo products, go to: http://www.lenovo.
Disposing of disused lithium batteries from Lenovo computers A button-shaped lithium battery is installed on the system board of your Lenovo computer to provide power to the computer clock while the computer is off or disconnected from the main power source. If you want to replace it with a new one, contact your place of purchase or ask for a repair service provided by Lenovo.
collection framework available to them for the return, recycle, recovery of WEEE and minimize any potential effects of EEE on the environment and human health due to the presence of hazardous substances. For additional WEEE information, go to http://www.lenovo.com/lenovo/environment.
China recycling information for Waste Electrical and Electronic Equipment (WEEE) China substance disclosure table Turkish RoHS The Lenovo product meets the requirements of the Republic of Turkey Directive on the Restriction of the Use of Certain Hazardous Substances in Electrical and Electronic Equipment (EEE).
Appendix C. Notices Lenovo might not offer the products, services, or features discussed in this document in all countries. Consult your local Lenovo representative for information on the products and services currently available in your area. Any reference to a Lenovo product, program, or service is not intended to state or imply that only that Lenovo product, program, or service might be used.
Trademarks The following terms are trademarks of Lenovo in the United States, other countries, or both: Access Connections Lenovo ThinkPad TrackPoint UltraConnect Microsoft, Excel, PowerPoint, Windows, and Windows Media are trademarks of the Microsoft group of companies. Other company, product, and service names may be trademarks or service marks of others.
Part Number: Printed in (1P) P/N:
**