Product numbers 9227-AC1 9227-AT 1 9170-AA1 9170-AB1 Third Edition (July 2006) © Copyright Lenovo 2006. All rights reserved. U.S. GOVERNMENT USERS - RESTRICTED RIGHTS: Our products and/or services are provided with RESTRICTED RIGHTS.
Contents Safety information . . . . . . . . . . . . . . . . . . . . . . . . . . . . . . i v Chapter 1. Getting started . . . . . . . . . . . . . . . . . . . . . . . . . . . 1-1 Shipping contents . . . . . . . . . . Attaching the base and handling your monitor Product overview . . . . . . . . . . Types of adjustments . . . . . . . . User controls . . . . . . . . . . Cable lock slot . . . . . . . . . . Setting up your monitor . . . . . . . . Connecting and turning on your monitor . Registering your option . .
Safety information Before installing this product, read the Safety Information. Antes de instalar este produto, leia as Informações de Segurança. Pred instalací tohoto produktu si prectete prírucku bezpecnostních instrukcí. Læs sikkerhedsforskrifterne, før du installerer dette produkt. Ennen kuin asennat tämän tuotteen, lue turvaohjeet kohdasta Safety Information. Avant d’installer ce produit, lisez les consignes de sécurité. Vor der Installation dieses Produkts die Sicherheitshinweise lesen.
Chapter 1. Getting started T his U ser ’s G uide contains detailed information on your Flat Panel M onitor. For a quick overview, please see the Setup Poster that was shipped with your monitor.
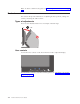
Note: To attach a VESA mount, please see “Detaching the monitor stand” on page 2-7. Product overview This section will provide information on adjusting monitor positions, setting user controls, and using the cable lock slot. Types of adjustments Please see the illustration below for an example of the tilt range. -4° 30° User controls Your monitor has controls on the front which are used to adjust the display.
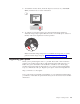
Cable lock slot Your monitor is equipped with a cable lock slot located on the rear of your monitor (in the lower right corner). Please see the instructions that came with the cable lock to learn how to attach it. Setting up your monitor This section provides information to help you set up your monitor. Connecting and turning on your monitor Note: Be sure to read the Safety Information located in the Monitor Safety, Troubleshooting, and Warranty Guide before carrying out this procedure. 1.
2. Connect the analog signal cable to the video port on the back of the computer. Note: One end of the signal cable is already pre-attached to your monitor. 3. Insert the power cord into the monitor, then plug the monitor power cord and the computer cord into grounded electrical outlets. 4. Power on the monitor and the computer.
5. To install the monitor driver, insert the Reference and Driver CD, click Install driver, and follow the on-screen instructions. 6. To optimize your monitor image, press the Automatic Image Setup key. Automatic image setup requires that the monitor is warmed up for at least 15 minutes. This is not required for normal operation. Note: If automatic image setup does not establish the image that you prefer, perform manual image setup. See “Manual image setup” on page 3-3.
Chapter 2. Adjusting and using your monitor This section will give you information on adjusting and using your monitor. Comfort and accessibility Good ergonomic practice is important to get the most from your personal computer and to avoid discomfort. Arrange your workplace and the equipment you use to suit your individual needs and the kind of work that you perform. In addition, use healthy work habits to maximize your performance and comfort while using your computer.
v Use adequate lighting for the type of work you are performing. v Use the monitor brightness, contrast, and image adjustment controls, if equipped, to optimize the image on your screen to meet your visual preferences. v Keep your monitor screen clean so you can focus on the screen’s contents. Any concentrated and sustained visual activity can be tiring for your eyes. Be sure to periodically look away from your monitor screen and focus on a far object to allow your eye muscles to relax.
Adjusting your monitor image This section describes the user control features used to adjust your monitor image. Using the direct access controls The direct access controls can be used when the On Screen Display (OSD) is not displayed. Note: The direct access controls are blue. Table 2-1. Direct access controls Icon Control Description Image Setup Activates automatic image adjustment. Brightness Direct access to Brightness adjustment.
Table 2-2. OSD functions OSD Icon on Main Menu Submenu Description Adjusts overall brightness Brightness/Contrast Image Position Brightness Contrast Adjusts difference between light and dark areas Horizontal Position Moves the image left or right. Vertical Position Image Setup Automatic Manual Moves the image up or down. Automatically optimizes the image. Manually optimizes the image. See “Manual image setup” on page 3-3.
Table 2-2. OSD functions (continued) OSD Icon on Main Menu Submenu Options Description Menu Position Menu position adjusts menu location on the screen. Default Default returns the menu position to the default settings. Custom v Horizontal: Changes the horizontal position of the OSD. v Vertical: Changes the vertical position of the OSD. v Save Factory Reset v Cancel v Reset Resets monitor to the original factory settings.
The display modes shown below have been optimized at the factory. Table 2-3. Factory set display modes Addressability Refresh rate 640 x 350 70 Hz 640 x 480 60 Hz, 72 Hz, 75 Hz 720 x 400 70 Hz 800 x 600 60 Hz, 72 Hz, 75 Hz 1024 x 768 60 Hz, 70 Hz, 75 Hz 1280 x 1024 60 Hz, 70 Hz, 75 Hz Understanding power management Power management is invoked when the computer recognizes that you have not used your mouse or keyboard for a user-definable period.
Caring for your monitor Be sure to turn off the power before you perform any maintenance on the monitor. Do not: v Apply water or liquid directly to your monitor. v Use solvents or abrasives. v Use flammable cleaning materials to clean your monitor or any other electrical equipment. v Touch the screen area of your monitor with sharp or abrasive items. This type of contact may cause permanent damage to your screen. v Use any cleaner which contains an anti-static solution or similar additives.
Chapter 3. Reference information This section contains monitor specifications, instructions to manually install the monitor driver, troubleshooting information, and service information. Monitor specifications Table 3-1. Monitor specifications for type-model 9227-Axx,9170-Axx Height 382.3 mm; 387.3 mm (PSWG) Depth 162 mm Width 366.8 mm; 370.8 mm (PSWG) Stand Tilt range -4°/+30° VESA mount Supported 100 mm (3.94 in.) Dimensions Radial arm sold separately. Image Viewable image size 431.
Table 3-1. Monitor specifications for type-model 9227-Axx, 9170-Axx (continued) Humidity Operating 10% to 80% Storage 5% to 95% Shipping 5% to 95% Troubleshooting If you have a problem setting up or using your monitor, you might be able to solve it yourself. Before calling your dealer or Lenovo, try the suggested actions that are appropriate to your problem. Table 3-2.
Table 3-2. Troubleshooting (continued) Problem Possible cause Suggested action Reference Screen is blank and power indicator is steady amber or flashing green The monitor is in v Press any key on the Standby/Suspend keyboard or move the mode mouse to restore operation. The power indicator is green, but there is no image. The video signal cable is loose or disconnected from the system or monitor. Be sure the video cable is connected with the system properly.
v Clock (pixel frequency) adjusts the number of pixels scanned by one horizontal sweep. If the frequency is not correct, the screen shows vertical stripes and the picture does not have the correct width. v Phase adjusts the phase of the pixel clock signal. With a wrong phase adjustment, the picture has horizontal disturbances in light picture. 4. When the image no longer looks distorted, save the Clock and Phase adjustments. 5. Press to leave the OSD menu.
Note: This section must be completed before continuing with the Windows 2000 automatic image setup. 1. Turn off the computer and all attached devices. 2. Ensure that the monitor is connected correctly. 3. Turn on the monitor and then the system unit. Allow the system to boot into Windows 2000. 4. Open the Display Properties window by clicking Start →Settings →Control Panel, and then double-clicking the Display icon. 5. Click the Settings tab. 6. Click the Advanced button. 7. Click the Monitor tab. 8.
Service information Product numbers The product number for your monitor is located on the side of the display bezel as shown below. Customer responsibilities The warranty does not apply to a product which has been damaged due to accident, misuse, abuse, improper installation, usage not in accordance with product specifications and instructions, natural or personal disaster, or unauthorized alterations, repairs or modifications.
Service parts The following parts are for use by Lenovo service, or Lenovo authorized dealers, to support the customer warranty. Parts are for service use only. The table below shows information for model 9227-Axx, 9170-Axx. Table 3-3.
Appendix A. Service and Support The following information describes the technical support that is available for your product, during the warranty period or throughout the life of the product. Refer to your Lenovo Statement of Limited Warranty for a full explanation of Lenovo warranty terms. Online technical support Online technical support is available during the life of your product through the L enovo Support Web site at http:/ / www.lenovo.com/ think/ support.
Country or Region Telephone Number Austria Up and running support: 01-24592-5901 Warranty service and support: 01-211-454-610 (German) Belgium Up and running support: 02-210-9820 (Dutch) Up and running support: 02-210-9800 (French) Warranty service and support: 02-225-3611 (Dutch, French) Bolivia 0800-0189 (Spanish) Brazil Sao Paulo region: (11) 3889-8986 Toll free outside Sao Paulo region: 0800-7014-815 (Brazilian Portuguese) Canada 1-800-565-3344 (English, French) In Toronto only call: 416-383-
Country or Region Telephone Number Hungary +36-1-382-5720 India 1600-44-6666 Alternate Toll Free: +91-80-2678-8940 (English) Indonesia 800-140-3555 +62-21-251-2955 (English, Bahasa, Indonesian) Ireland Up and running support: 01-815-9202 Warranty service and support: 01-881-1444 (English) Italy Up and running support: 02-7031-6101 Warranty service and support: +39-800-820094 (Italian) Japan Desktop: Toll free: 0120-887-870 For International: +81-46-266-4724 ThinkPad: Toll free: 0120-887-874 For
Country or Region Telephone Number Poland +48-22-878-6999 Portugal +351-21-892-7147 (Portuguese) Romania +4-021-224-4015 Russian Federation +7-095-940-2000 (Russian) Singapore 1800-3172-888 (English, Bahasa, Melayu) Slovakia +421-2-4954-1217 Slovenia +386-1-4796-699 Spain 91-714-7983 91-397-6503 (Spanish) Sri Lanka +94-11-2448-442 (English) Sweden Up and running support: 08-477-4420 Warranty service and support: 077-117-1040 (Swedish) Switzerland Up and running support: 058-333-0900 W
Appendix B. Notices Lenovo may not offer the products, services, or features discussed in this document in all countries. Consult your local Lenovo representative for information on the products and services currently available in your area. Any reference to a Lenovo product, program, or service is not intended to state or imply that only that Lenovo product, program, or service may be used.
vary significantly. Some measurements may have been made on development-level systems and there is no guarantee that these measurements will be the same on generally available systems. Furthermore, some measurements may have been estimated through extrapolation. Actual results may vary. Users of this document should verify the applicable data for their specific environment.
4 0 Y 8 5 8 4