LT2452pwCFlat Panel Monitor User's Guide
Product numbers 4420-MB2 First Edition (May 2011) © Copyright Lenovo 2011. All rights reserved. LENOVO products, data, computer software, and services have been developed exclusively at private expense and are sold to governmental entities as commercial items as defined by 48 C.F.R. 2.101 with limited and restricted rights to use, reproduction and disclosure.
Contents Safety information ...................................................................................................... iii Chapter 1. Getting started ....................................................................................... 1-1 Shipping contents ......................................................................................................................................................... 1-1 Product overview ................................................................
Safety information General Safety guidelines For tips to help you use your computer safety, go to: http://www.lenovo.com/safety © Copyright Lenovo 2011.
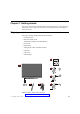
Chapter 1. Getting started This User’s Guide contains detailed information on the ThinkVision ® LT2452pwC Flat Panel Monitor. For a quick overview, please see the Setup Poster that was shipped with your monitor.
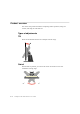
Product overview This section will provide information on adjusting monitor positions, setting user controls, and using the cable lock slot. Types of adjustments Tilt Please see the illustration below for an example of the tilt range. Swivel With the built-in pedestal, you can tilt and swivel the monitor for the most comfortable viewing angle.
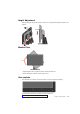
Height Adjustment After pressing the top of the monitor, remove the fixed pin and adjust the height of the monitor. 110mm Monitor Pivot 90 O - Adjust height to the top position before rotation the monitor. - Rotate clockwise until the monitor stops at 90°. User controls Your monitor has controls on the front which are used to adjust the display. For information on how to use these controls, please see “Adjusting your monitor image” on page 2-3. Chapter 1.
Cable lock slot Your monitor is equipped with a cable lock slot located on the rear of your monitor (in the lower left corner). Please follow the instructions that came with the cable lock to attach it. Setting up your monitor This section provides information to help you set up your monitor. Connecting and turning on your monitor Note: Be sure to read the Safety Information located in the information flyer before carrying out this procedure. 1.
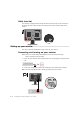
Connect the digital signal cable to the DVI connector of the monitor and the other end on the back of the computer. ThinkVision L19 0 x Connect one end of the DP cable to the DP connector on the back of the computer, and the other end to the DP connector on the monitor. DisplayPort* * This port does not support being connected to any AV equipment. Lenovo recommends that customers who require to use the Display Port input on their monitor purchase the "Lenovo Display Port to Display Port cable 0A36537".
Connect one end of the USB hub cable to the USB connector on the back of the computer, and the other end to the upstream USB connector on the monitor. Plug the monitor power cord and the computer cord into grounded electrical outlets. Note: A certified power supply cord has to be used with this equipment. The relevant national installation and/or equipment regulations shall be considered.
Rotate the head of the monitor into portrait view. Chapter 1.
Place the cables through the Main Clip. Then fasten the clip. Wrap the Cable Wrapper around the cables.
Remove the Rubber Cover from the back of the stand. Replace the Cable Cover. Chapter 1.
Power on the monitor and the computer. To install the monitor driver, insert the Reference and Driver CD, click Install driver, and follow the on-screen instructions. To optimize your monitor image, if using the analog cable, press the Automatic Image Setup key. Automatic image setup requires that the monitor is warmed up for at least 15 minutes. This is not required if you are using the DVI cable. Note: If automatic image setup does not establish the image that you prefer, perform manual image setup.
Registering your option Thank you for purchasing this Lenovo ® product. Please take a few moments to register your product and provide us with information that will help Lenovo to better serve you in the future. Your feedback is valuable to us in developing products and services that are important to you, as well as in developing better ways to communicate with you. Register your option on the followingWeb site: http://www.lenovo.
Chapter 2. Adjusting and using your monitor This section will give you information on adjusting and using your monitor. Comfort and accessibility Good ergonomic practice is important to get the most from your personal computer and to avoid discomfort. Arrange your workplace and the equipment you use to suit your individual needs and the kind of work that you perform. In addition, use healthy work habits to maximize your performance and comfort while using your computer.
· Tilt: Adjust the tilt of your monitor to optimize the appearance of the screen content and to accommodate your preferred head and neck posture. · General location: Position your monitor to avoid glare or reflections on the screen from overhead lighting or nearby windows. The following are some other tips for comfortable viewing of your monitor: · Use adequate lighting for the type of work you are performing.
Accessibility information Lenovo is committed to providing greater access to information and technology to people with disabilities. With assistive technologies, users can access information in the way most appropriate to their disability. Some of these technologies are already provided in your operating system; others can be purchased through vendors or accessed at: http://www.ibm.com/able/ Adjusting your monitor image This section describes the user control features used to adjust your monitor image.
To use the controls: 1. Press to open the main OSD menu. 2. Use or to move among the icons. Select an icon and press to access that function. If there is a sub-menu, you can move between options using or , then press to select that function. Use or to make adjustments. Press to save. 3. Press to move backwards through the sub-menus and exit from the OSD. 4. Press and hold for 10 seconds to lock the OSD. This will prevent accidental adjustments to the OSD.
Table 2-2. OSD functions OSD Icon Submenu on Main Menu Brightness Brightness/Contrast Image Position Image Setup Image Properties Contrast Adjusts overall brightness Vertical Position Automatic Manual Color Preset mode Custom Scaling Over Drive Super Visual Adjusts difference between light and dark areas Controls Locked not required for digital input Moves the image up or down. Automatically optimizes the image. Manually optimizes the image. See "Menual mage setup" page 3-4. . . Clock Phase Save .
Table 2-2. OSD functions (continued)) OSD Icon on Submenu Main Menu Options Menu Position Default Custom Factory Default Accessibility Description Controls and Adjustments (Analog) Adjusts menu location on the screen. Controls and Adjustments (Digital) Same as Analog Returns the menu position to the default settings. · Horizontal: Changes the horizontal position of the OSD. · Vertical: Changes the vertical position of the OSD. · Save · Cancel · Reset Resets monitor to the original factory settings.
The display modes shown below have been optimized at the factory. Table 2-3.
For optimal performance, switch off your monitor at the end of each working day, or whenever you expect to leave it unused for long periods during the day. Table 2-4. Power indicator State Power Indicator Screen On Steady green Normal Standby/Suspend Steady amber Blank Restoring Operation Compliance Press a key or move the mouse ENERGY STAR There may be a slight delay before the image reappears. Note: Standby also occurs if there is no image output to the monitor.
Detaching the monitor stand After placing the monitor face down on a clean surface or soft cloth, remove the four screws from the stand to remove it from the monitor. Wall Mounting (Optional) Refer to the instructions that come with the VESA compatible base mounting kit. 1. Place the monitor face down on a non-abrasive surface on stable flat table. 2. Remove the stand. 3. Attach the mounting bracket from the wall mounting kit to the monitor. 4.
Chapter 3. Reference information This section contains monitor specifications, instructions to manually install the monitor driver, troubleshooting information, and service information. Monitor specifications Table 3-1. Monitor specifications for type-model 4420-MB2 Dimensions Height 394.8 mm (15.54 in.) Depth 257.3 mm (10.13 in.) Width 559.6 mm (22.03 in.) Tilt range Range: -00, +300 Swivel Range: -450, +450 Lift Range: 110.
Table 3-1.
Troubleshooting If you have a problem setting up or using your monitor, you might be able to solve it yourself. Before calling your dealer or Lenovo, try the suggested actions that are appropriate to your problem. Table 3-2. Troubleshootingg Problem Possible cause Suggested action Reference The words "Out of Range" are shown on the screen, and the power indicator is flashing green. The system is set to a display mode which is not supported by the monitor.
Table 3-2. Troubleshootingg(continued)) Problem Possible cause The monitor is in Screen is Standby/Suspend blank and mode power indicator is steady amber or flashing green Suggested action . . Reference "Understanding power Press any key on the keyboard or move the mouse management" on Page 2-7 to restore operation. Check the Power Options settings on your computer. The power indicator is green, but there is no image.
3. Use or to select Clock and Phase adjustment. · Clock (pixel frequency) adjusts the number of pixels scanned by one horizontal sweep. If the frequency is not correct, the screen shows vertical stripes and the picture does not have the correct width. · Phase adjusts the phase of the pixel clock signal. With a wrong phase adjustment, the picture has horizontal disturbances in light picture. 4. When the image no longer looks distorted, save the Clock and Phase adjustments. 5. Press to leave the OSD menu.
17. Restart the system. Note: On LCD monitors, unlike CRTs, a faster refresh rate does not improve display quality. Lenovo recommends using either 1920 x 1200 at a refresh rate of 60 Hz, or 640 x 480 at a refresh rate of 60 Hz. Installing the monitor driver in Windows XP Note: This section must be completed before continuing with the Windows XP automatic image setup. 1. Turn off the computer and all attached devices. 2. Ensure that the monitor is connected correctly. 3.
Installing the monitor driver in Windows 2000 Note: This section must be completed before continuing with the Windows 2000 automatic image setup. 1. Turn off the computer and all attached devices. 2. Ensure that the monitor is connected correctly. 3. Turn on the monitor and then the system unit. Allow the system to boot into Windows 2000. ol 4. Open the Display Properties window by clicking Start Settings Control Panel, select/enter into the Display control panel. 5. Click the Settings tab. 6.
Getting further help If you still can’t solve your problem, please contact the Lenovo Support Center. For more information on contacting the Customer Support Center, please see Appendix A, “Service and Support,” on page A-1. Service information Product numbers The product number for your monitor is located on the side of the display bezel as shown below.
Service parts The following parts are for use by Lenovo service, or Lenovo authorized dealers, to support the customer warranty. Parts are for service use only. The table below shows information for model 4420-MB2. Table 3-3.
Appendix A. Service and Support The following information describes the technical support that is available for your product, during the warranty period or throughout the life of your product. Refer to the Lenovo Limited Warranty for a full explanation of Lenovo warranty terms. Registering your option Register to receive product service and support updates, as well as free and discounted computer accessories and content. Go to: http://www.lenovo.
Country or Region Telephone Number Africa Africa: +44 (0)1475-555-055 South Africa: +27-11-3028888 and 0800110756 Central Africa: Contact the neares Lenovo Business Partner Argentina 0800-666-0011 (Spanish) Australia 131-426 (English) Austria Warranty service and support: 01-211-454-610 (German) Belgium Warranty service and support: 02-225-3611 (Dutch, French) Bolivia 0800-10-0189 (Spanish) Brazil Sao Paulo region: (11) 3889-8986 Outside Sao Paulo region: 0800-701-4815 (Brazilian Portuguese)
Country or Region Telephone Number Egypt +202-35362525 El Salvador 800-6264 (Spanish) Estonia +372 6776793 +372 66 00 800 Finland Warranty service and support: +358-800-1-4260 (Finnish) France Warranty service and support (hardware): 0810-631-213 Warranty service and support (software): 0810-631-020 (French) Germany Warranty service and support: 01805-00-46-18 (German) Greece +30-210-680-1700 Guatemala 1800-624-0051 (Spanish) Honduras Tegucigalpa: 232-4222 San Pedro Sula: 552-2234 (Spanis
Country or Region Telephone Number Korea 1588-6782 (Korean) Latvia +371 7070360 Lithuania +370 5 278 66 00 Luxembourg +352-360-385-343 (French) Malaysia Local number only: 1800-88-1889 DID: +603 8315 6855 (English, Bahasa Melayu) Malta +35621445566 Mexico 001-866-434-2080 (Spanish) Middle East +44 (0)1475-555-055 Netherlands +31-20-514-5770 (Dutch) New Zealand 0800-733-222 (English) Nicaragua 001-800-220-1830 (Spanish) Norway Warranty service and support: 8152-1550 (Norwegian) Pana
Country or Region Telephone Number Sri Lanka +9411 2493547 +9411 2493548 (English) Sweden Warranty service and support: 077-117-1040 (Swedish) Switzerland Warranty service and support: 0800-55-54-54 (German, French, Italian) Taiwan 886-2-8723-9799 0800-000-700 (Mandarin) Thailand Local number only: 1-800-060-066 66 2273 4088 DID: +603 8315 6857 (Thai, English) Turkey 00800-4463-2041 (Turkish) United Kingdom Standard warranty support: 08705-500-900 (English) United States 1-800-426-7378 (Eng
Appendix B. Notices Lenovo may not offer the products, services, or features discussed in this document in all countries. Consult your local Lenovo representative for information on the products and services currently available in your area. Any reference to a Lenovo product, program, or service is not intended to state or imply that only that Lenovo product, program, or service may be used.
Any references in this publication to non-Lenovo Web sites are provided for convenience only and do not in any manner serve as an endorsement of those Web sites. The materials at those Web sites are not part of the materials for this Lenovo product, and use of those Web sites is at your own risk. Any performance data contained herein was determined in a controlled environment. Therefore, the result obtained in other operating environments may vary significantly.
waste disposal contractor certified by a local government. In accordance with the Law for Promotion of Effective Utilization of Resources, Lenovo Japan provides, through its PC Collecting and Recycling Services, for the collecting, reuse, and recycling of disused computers and monitors. For details, visit the Lenovo Web site at www.ibm.com/jp/pc/service/recycle/pcrecycle/.