Lenovo Y70-70 Touch/ Y70-80 Touch User Guide Read the safety notices and important tips in the included manuals before using your computer.
Notes • Before using the product, be sure to read Lenovo Safety and General Information Guide first. • Some instructions in this guide may assume that you are using Windows® 8.1. If you are using other Windows operating system, some operations may be slightly different. If you are using other operating systems, some operations may not apply to you. • The features described in this guide are common to most models.
Contents Chapter 1. Getting to know your computer..................................................................................... 1 Top view......................................................................................................................................................... 1 Left-side view................................................................................................................................................. 5 Right-side view.................................
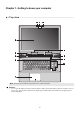
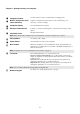
Chapter 1. Getting to know your computer Top view --------------------------------------------------------------------------------------------------------------------------2 1 2 3 4 5 6 6 7 8 10 9 Note: The dashed areas indicate parts that are not visible externally. Attention: • Do not open the display panel beyond 130 degrees. When closing the display panel, be careful not to leave pens or any other objects in between the display panel and the keyboard.
Chapter 1. Getting to know your computer a Integrated camera Use the camera for video communication or taking photos. b Built-in microphone (with noise reduction) Captures sound which can be used for video conferencing, voice narration, or audio recording. c Computer display Provides brilliant visual output. d Wireless LAN antennas Connect to a wireless LAN adapter to send and receive wireless radio signals. e Ventilation slots Dissipate internal heat.
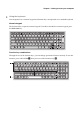
Chapter 1. Getting to know your computer Using the keyboard Your computer has a numeric keypad and function keys incorporated in its standard keyboard. Numeric keypad The keyboard has a separate numeric keypad. To enable or disable the numeric keypad, press the Num Lock key. Function key combinations Through the use of the function keys, you can change operational features instantly. To use this function, press and hold Fn a; then press one of the function keys b.
Chapter 1. Getting to know your computer The following describes the features of each function key. Fn + F1: Enters sleep mode. Fn + F2: Turns on/off the backlight of the LCD screen. Fn + F3: Opens the interface for selecting display options. Fn + F5: Enables/disables Airplane mode. Fn + F6: Enables/disables the touchpad. Fn + F9: Opens the Settings charm. Fn + F10: Opens the Search charm. Fn + F11: Displays current apps. Fn + PrtSc: Activates the system request.
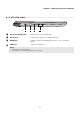
Chapter 1. Getting to know your computer Left-side view -------------------------------------------------------------------------------------------------------------- 1 2 3 4 a AC power adapter jack Connect the AC power adapter here. b RJ-45 port Connects the computer to an Ethernet network. c HDMI port Connects to devices with HDMI input such as a TV or an external display. d USB port Connects to USB devices. Notes: • The red port is a USB 3.0 port.
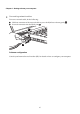
Chapter 1. Getting to know your computer Connecting network cables To insert a network cable, do the following: 1 Hold one connector of the network cable to press the RJ-45 cover down gently a. 2 Insert the connector into the RJ-45 port b. 1 2 Software configuration Consult your Internet Service Provider (ISP) for details on how to configure your computer.
Chapter 1. Getting to know your computer Connecting USB device Your computer comes with three USB ports compatible with USB devices. The first time you plug a USB device into a particular USB port on your computer, Windows automatically installs a driver for that device. After the driver has been installed, you can disconnect and reconnect the device without performing any additional steps.
Chapter 1. Getting to know your computer Right-side view----------------------------------------------------------------------------------------------------------- 1 2 3 4 5 a S/PDIF jack Connects to S/PDIF compliant devices for digital audio output. b Combo audio jack Connects to headsets. Notes: • The combo audio jack does not support conventional microphones by default.
Chapter 1. Getting to know your computer Using memory cards (not supplied) Your computer supports the following types of memory cards: • Secure Digital (SD) card • Secure Digital High Capacity (SDHC) card • Secure Digital eXtended Capacity (SDXC) card • MultiMediaCard (MMC) Notes: • Insert only one card in the slot at a time. • This card reader does not support SDIO devices (e.g., SDIO Bluetooth and so on.). Inserting a memory card Slide the memory card in until it clicks into place.
Chapter 1. Getting to know your computer Front view ----------------------------------------------------------------------------------------------------------------------- 1 a System status indicators Symbol Indicator Indicator status Charge status On (solid white) Power --- The computer is in sleep mode. Off --- The computer is powered off. Hard disk drive Charging The battery has more than 80% charge. Discharging The battery has more than 20% charge.
Chapter 1. Getting to know your computer Bottom view -----------------------------------------------------------------------------------------------------------------1 2 a Speaker Provides subwoofer audio output. b Louvers Allow air to enter the computer for cooling.
Chapter 2. Starting to use Windows 8.1 Configuring the operating system for the first time-----------------You may need to configure the operating system when it is first used. The configuration process may include the procedures below: • Accepting the end user license agreement • Configuring the Internet connection • Registering the operating system • Creating a user account Operating system interfaces -------------------------------------------------------------------------Windows 8.
Chapter 2. Starting to use Windows 8.1 The charms -------------------------------------------------------------------------------------------------------------------Charms are navigation buttons that let you control your Windows® 8.1 experience. Charms include: Search, Share, Start, Devices, and Settings. The Charms Bar is the menu that contains the charms. The five charms provide new and faster ways to perform many basic tasks, and are always available regardless of whichever app you are currently in.
Chapter 2. Starting to use Windows 8.1 Share charm The Share charm lets you send links, photos, and more to your friends and social networks without leaving the app you are in. Start charm The Start charm is a fast way to go to the Start screen. Devices charm The Devices charm allows you to connect or send files to any external devices, including the devices to play, print, and project.
Chapter 2. Starting to use Windows 8.1 Putting the computer to sleep or shutting it down--------------------When you have finished working with your computer, you can put it to sleep or shut it down. Putting your computer to sleep If you will be away from your computer for only a short time, put the computer to sleep. When the computer is in sleep mode, you can quickly wake it to resume use, bypassing the startup process. To put the computer to sleep, do one of the following: • Close the display lid.
Chapter 2. Starting to use Windows 8.1 Shutting down the computer If you are not going to use your computer for a long time, shut it down. To shut down the computer, do one of the following: • Open the charms, and then select Settings Power Shut down. • Press and hold or right-click the Start button in the lower-left corner of the desktop screen and select Shut down or sign out Shut down. • Select Shut down in the upper-right corner of the Start screen.
Chapter 2. Starting to use Windows 8.1 Connecting to a wireless network ------------------------------------------------------------Enabling wireless connection To enable wireless functions, do one of the following: • Press Fn + F5 to disable airplane mode. • Open the charms and select Settings toggle the airplane mode switch to Off. to open the network configuration page.
Chapter 2. Starting to use Windows 8.1 Help and support -----------------------------------------------------------------------------------------------------If you have a problem with the operating system, see the Windows Help and Support file. To open the Windows Help and Support file, do one of the following: • Select the Settings charm, then select Help. • Press F1 or Windows key + F1 (depending on your keyboard layout). You can read the Windows Help and Support file on your computer.
Chapter 3. Lenovo OneKey Recovery System The Lenovo OneKey Recovery System is software designed to back up and restore your computer. You can use it to restore the system partition to its original status in case of a system failure. You can also create user backups for easy restoration as required. Notes: • If your computer is preinstalled with a GNU/Linux/Dos operating system, OneKey Recovery System is not available.
Chapter 4. Troubleshooting Frequently asked questions --------------------------------------------------------------------------This section lists frequently asked questions by category. Finding information What safety precautions should I follow when using my computer? The Lenovo Safety and General Information Guide which came with your computer contains safety precautions for using your computer. Read and follow all the precautions when using your computer.
Chapter 4. Troubleshooting BIOS setup utility What is the BIOS setup utility? The BIOS setup utility is a ROM-based software. It displays basic computer information and provides options for setting boot devices, security, hardware mode, and other preferences. How can I start the BIOS setup utility? To start the BIOS setup utility: 1 Shut down the computer. 2 Press the Novo button and then select BIOS Setup. How can I change the boot mode? There are two boot modes: UEFI and Legacy Support.
Chapter 4. Troubleshooting Troubleshooting-------------------------------------------------------------------------------------------------------Display problems • If the screen is blank, make sure that: - The AC power adapter is connected to the computer, and the power cord is plugged into a working electrical outlet. - The computer power is on. (Press the Power button again for confirmation.) - The memory is installed correctly.
Chapter 4. Troubleshooting Sleep problems The critical low-battery error message appears, and the computer immediately turns off. • The battery power is getting low. Connect the AC power adapter to the computer. The computer enters sleep mode immediately after Power-on self-test (POST). • Make sure that: - The battery pack is charged. - The operating temperature is within the acceptable range. See “Chapter 2. Use and care Information” in the Lenovo Safety and General Information Guide.
Chapter 4. Troubleshooting Sound problems • Make sure that: - The Mute function is off. - The combo audio jack is not being used. - Speakers are selected as the playback device. Your computer shuts down before the battery status indicator shows empty. -orYour computer operates after the battery status indicator shows empty. The operating time for a fully charged battery pack is short. • Discharge and recharge the battery pack. The computer does not operate with a fully charged battery pack.
Chapter 4. Troubleshooting Other problems Your computer does not respond. • • The computer does not start from a device you want. • • • The connected external device does not work. • • To turn off your computer, press and hold the Power button for four seconds or more. If the computer still does not respond, remove the AC power adapter. Your computer might lock when it enters sleep mode during a communication operation. Disable the sleep timer when you are working on the network.
Trademarks The following terms are trademarks or registered trademarks of Lenovo in the United States, other countries, or both. Lenovo OneKey Microsoft and Windows are trademarks of Microsoft Corporation in the United States, other countries, or both. Other company, products, or service names may be trademarks or service marks of others.
©Lenovo China 2014 en-US Rev.