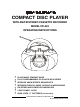
COMPACT DISC PLAYER WITH AM/FM STEREO CASSETTE RECORDER MODEL CD-203 OPERATING INSTRUCTIONS PLAYS MUSIC COMPACT DISCS FULLY PROGRAMMABLE CD PLAYER WITH REPEAT RECEIVES AM/FM STEREO BROADCASTS RECORDS FROM CD, RADIO, OR BUILT-IN MICROPHONE FM STEREO AND POWER LED INDICATORS 2 WAY POWER - AC/DC USES 8 SIZE C BATTERIES (not included) PLEASE READ CAREFULLY BEFORE USE IB-CD203(AD)-WM-E-012503
WARNING TO PREVENT FIRE OR SHOCK HAZARD, DO NOT USE THE PLUG WITH AN EXTENSION CORD, RECEPTACLE OR OTHER OUTLET UNLESS THE BLADES CAN BE FULLY INSERTED TO PREVENT BLADE EXPOSURE. TO PREVENT FIRE OR SHOCK HAZARD, DO NOT EXPOSE THIS APPLIANCE TO RAIN OR MOISTURE.
ADDITIONAL SAFETY INSTRUCTIONS 1. Power Sources - The appliance should be connected to a power supply only of the type described in the operating instructions or as marked on the appliance. 2. Wall or Ceiling Mounting - The appliance should not be mounted to a wall or ceiling. 3. Object and Liquid Entry - Care should be taken so that objects do not fall and liquids are not spilled into the enclosure through openings. 4.
BATTERY SAFETY INSTRUCTIONS CAUTION: TO REDUCE THE RISK OF FIRE OR PERSONAL INJURY OR DAMAGE TO YOUR SET, READ AND FOLLOW THESE INSTRUCTIONS. 1. Use only the type and size of batteries mentioned in the operating instructions booklet (batteries are not included with this set, please buy the proper batteries). 2. Do not dispose the batteries into a fire. The cells may explode. Check with local codes for possible special disposal instructions. 3. Do not open or mutilate the batteries.
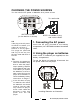
CHOOSING THE POWER SOURCES You can use the AC power or batteries as a power source. To a wall outlet BATTERY DOOR (on the bottom of the set) TIP If the plug of the AC power cord does not match your outlet, do not force it. Reverse it and try again. The plugs are polarized and only fit one way into the wall outlet and back of the set. TIP: Replace the batteries when the POWER lamp dims or when the player stops operating. Replace all the batteries with new ones.
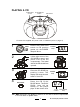
PLAYING A CD FUNCTION switch PLAY/PAUSE button CD DOOR Connect the supplied AC power cord or batteries (refer to page 4). 1 RADIO TAPE OFF CD 2 POWER lamp Lift the right corner of the CD DOOR to open it and place a CD in the CD compartment. The label side of the CD should face upward. 3 4 Rotate the FUNCTION switch to CD position (power on), the POWER lamp will be on. Close the CD DOOR by pushing it down. The display will show the total tracks of that CD.
USE THESE BUTTONS ADDITIONAL OPERATIONS FUNCTION switch FOR Open the CD DOOR by lifting here VOLUME control STOP PLAY/ PAUSE SKIP/SEARCH FORWARD SKIP/SEARCH BACKWARD Track number TIP When CD play is paused, the track number current playing will flash and no music will play. To resume play, press the PLAY/ PAUSE button again, the track number will stop flashing and music will play. If you bump the set during CD play, the music will stop or skip for a few seconds.
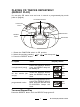
PLAYING CD TRACKS REPEATEDLY (REPEAT PLAY) You can play CD tracks over and over in normal or programmed play mode (refer to page 8). PLAY/PAUSE button FUNCTION switch FORWARD REPEAT button BACKWARD 1. Rotate the FUNCTION switch to CD position. 2. Select the track by pressing or , and then press 3. Press the REPEAT button. To repeat Press a single track (song) Press the REPEAT button once, the REPEAT lamp will be steady on.
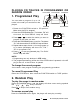
PLAYING CD TRACKS IN PROGRAMMED OR PROGRAM PLAY/PAUSE FORWARD RANDOM ORDER 1. Programmed Play You can make a program of up to 16 tracks in the order you want them to be played. RANDOM BACKWARD 1. Rotate the FUNCTION switch to CD position. Make sure the CD is stopped. 2. Press the PROGRAM button. The letters P0 will show and the PLAY/PROG. lamp will flash. or to select the tracks you want to 3. Press program in the order you want. 4. Press the PROGRAM button to confirm.
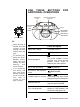
LISTENING TO THE RADIO FUNCTION switch BAND switch TUNING knob FM ST. lamp Connect the supplied AC power cord or batteries (refer to page 4). 1 RADIO TAPE OFF CD 2 Rotate the BAND switch to the proper band position (AM, FM, or FM STEREO) that you want. 3 DN 4 Rotate the FUNCTION switch to RADIO position, the POWER lamp will be on. TUNING UP Tune into the station you prefer using the TUNING control. Adjust for the clearest sound. POWER FM ST.
USE THESE BUTTONS FOR ADDITIONAL OPERATIONS FUNCTION switch VOLUME control TIP • • If the FM broadcast is noisy, rotate the BAND switch from FM Stereo to FM. To Rotate or Adjust Adjust the volume VOLUME control Turn off the Radio Rotate the FUNCTION Next time you want to switch to TAPE position listen to the radio, just rotate the FUNCTION switch to RADIO To improve broadcast reception position. The player Change position of the antenna for FM or FM Stereo.
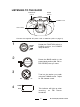
PLAYING A TAPE FUNCTION switch STOP/EJECT button PLAY button Connect the supplied AC power cord or batteries (refer to page 4). 1 2 RADIO TAPE OFF CD EJECT STOP 3 PLAY 4 AUTO STOP TAPE PLAY DIRECTION Rotate the FUNCTION switch to TAPE position. A Press the STOP/ EJECT button to open the tape compartment and insert a recorded tape, then close the door. EMPTY REEL FULL REEL INSERT TAPE THIS WAY FULL REEL ON RIGHT Press the PLAY button, the player turns on and starts playing.
RECORDING ON A TAPE STOP/EJECT button REWIND button PLAY button RECORD button FUNCTION switch Connect the supplied AC power cord or batteries (refer to page 4). 1 Press the STOP/EJECT button to open the tape compartment and insert a blank tape. Select the program source (AM, FM, CD, or built-in microphone) you want to record. EJECT STOP 2 RADIO TAPE OFF CD To record from the CD player. Rotate the FUNCTION switch to CD position, and insert a CD, then follow the CD playing steps to play.
USE THESE OPERATIONS PAUSE BUTTONS STOP/EJECT FAST F. FOR ADDITIONAL REWIND PLAY RECORD PHONES JACK Connect the supplied AC power cord or batteries (refer to page 4).
PRECAUTIONS On Safety On Power Sources As the laser beam used in the CD player section may be harmful to the eyes, do not attempt to disassemble the cabinet. Refer servicing to qualified personnel only. Should any solid object or liquid fall into the player, unplug the player, and have it checked by qualified personnel before operating it any further.
PRECAUTIONS (continued) Notes on Cassettes Notes on CDs Before playing, clean the CD with a Break off the cassette tab from side A cleaning cloth. Wipe the CD from the or B to prevent accidental recording. center out. Side A Do not use solvents such as benzene, thinner, commercially available cleaners or anti-static spray intended for vinyl LPs.
MAINTENANCE Cleaning the Lens Notes for Storing Cassette Tape If the lens becomes dirty, it may cause a skipping of sound during CD operation. Clean with a commercially available lens cleaner and blower. 1. Do not put a tape near a magnetic field, such as a TV, or speaker. Magnetic fields may reduce the tape sensitivity or even erase the recording. 2. Do not store tape for any length of time in a hot, moist or dusty place.
TROUBLE SHOOTING General Problem Remedy Insert the AC plug into a wall outlet securely. Make sure the batteries are installed correctly and The power is not on. they are fresh. Make sure the FUNCTION switch is at the right position as you want. Adjust the volume. Unplug the headphones when listening There is no sound. through speakers. CD player appears in the display even when a CD is in place. CD does not play. The sound drops out.
SPECIFICATION General Description Power source: AC 120V, 60Hz 12 Watts DC 12V (8 size C batteries, not included) (Alkaline batteries are recommended) Speakers: 2 - 3 1 /2 8 ohm Output power: 1.5W/channel Dimensions: Width: 12 1/ 2 Depth: 9 1/ 8 Height: 6 3/ 8 Weight: 4.4 lbs (without batteries) CD Section Plays disc type: Laser wavelength: Tracking method: Frequency response: Any normal CD used in portable players 760 - 800 NM 3 - spot error detection 50Hz - 15kHz +1/-2dB 3.