® AM/FM RADIO RECEIVER PROGRAMMABLE CD PLAYER MODEL CD-61 OPERATING INSTRUCTIONS • • • • • • • BUILT-IN AM/FM RADIO RECEIVER PLAYS MUSIC COMPACT DISCS 6 DIGIT LCD VISUAL DISPLAY TRACK REPEAT & DISC REPEAT BASS BOOST SYSTEM DELUXE STEREO HEADPHONES INCLUDED USES 2 SIZE “AA” BATTERIES (NOT INCLUDED) PLEASE READ CAREFULLY BEFORE USE CD-61(70C-0A9)031900 NL v.
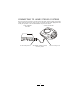
LOCATION OF CONTROLS 1 2 3 4 13 12 5 11 10 6 7 20 8 9 14 19 18 17 15 16 1. CD DOOR OPEN BUTTON 2. CD REPEAT BUTTON ) 3. CD BACKWARD SKIP/SEARCH BUTTON ( 4. CD FORWARD SKIP/SEARCH BUTTON ( ) 5. CD LCD VISUAL DISPLAY 6. CD PLAY/PAUSE AND POWER ON BUTTON 7. CD STOP AND POWER OFF BUTTON (POWER OFF IS AUTOMATIC AFTER 30 SECONDS) 8. PROGRAM (PROGRAMMING) BUTTON 9. FM STEREO INDICATOR 10.AM/FM DIAL LENS 11.AM/FM TUNING CONTROL 12.AM/FM BAND SWITCH 13.CD DOOR 14.BATTERY DOOR 15.
POWER SOURCES Power your CD player by connecting an optional (not included) AC ADAPTOR or by inserting 2 size “AA” fresh alkaline batteries. NOTE: Before you buy an AC Adaptor, please note the only AC ADAPTOR suitable for this player is DC 4.5V 600mA, with polarity , others may damage your player. Please check voltage & current (mA) before buying an AC ADAPTOR. Using with Batteries Insert two size “AA” alkaline batteries according to the + and - markings on the back cabinet.
CONNECTING TO HOME STEREO SYSTEMS The AUX OUT jack is made to accept a stereo mini plug (3.5mm). Simply connect the cable’s mini plug to the AUX OUT jack on your player, and the other appropriate end usually RCA JACKS to the CD/AUX INPUTS of your home stereo. YOUR STEREO SYSTEM TO AUX IN JACKS YOUR CD PLAYER OPTIONAL CABLE (3.
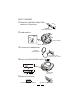
DISC PLAYING 1 Slide the CD/RADIO FUNCTION switch to CD position. CD/RADIO FUNCTION SWITCH 2 Load the disc. Disc Push here 12345 12345 12345 12345 LABEL SIDE UP PRESS TO OPEN 3 Connect the headphones. STEREO HEADPHONES TO PHONES JACK ( NOT AUX OUT JACK!) 4 Press the PLAY/PAUSE button ( TRACK NUMBER CURRENTLY PLAYING ). PLAY/PAUSE BUTTON ELAPSED PLAYING TIME OF THE CURRENT TRACK 5 Adjust the volume.
OTHER OPERATIONS Operation Display window shows Press To pause play PLAY/PAUSE button TRACK NUMBER CURRENTLY PLAYING To release pause and resume play PLAY/PAUSE button TRACK NUMBER CURRENTLY PLAYING To stop or To turn off the power STOP (POWER OFF) button TOTAL TRACKS To skip to the next track(s) once (or repeatedly) To skip to the previous track(s) once (or repeatedly) To go ahead at high speed (search forward) To go back at high speed (search backward) PLAYING TIME FLASHES PLAYING TIME ADV
REPEAT PLAY SINGLE TRACK REPEAT Plays one song over and over till you press STOP. During play, select the song you want to repeat with either of the SKIP/SEARCH buttons ( or ), then press the REPEAT button once, the symbol REPEAT 1 appears in the display. SKIP REPE AT x1 The song currently playing will repeat over and over, until you press STOP. To resume normal play, press the REPEAT button another two times.
PROGRAMMING YOUR PLAYING SEQUENCE PROGRAMMED PLAY • The tracks (songs) on the disc can be programmed (arranged in advance) to play in any order you prefer (up to 21 tracks can be programmed). Programming Example: Program Number 1 2 3 4 5 6 7 8 etc. Track Number (song number) 3 5 8 1 2 4 1 1 etc. • • During CD play, the PROGRAM button functions the same as the REPEAT button. The set must be in stop mode (as instructed on page 5) to program it.
RADIO OPERATION 1 Slide the CD/RADIO FUNCTION switch to RADIO position. CD/RADIO FUNCTION SWITCH 2 Select AM or FM with the AM/FM BAND switch. AM/FM BAND SWITCH 3 Rotate the TUNING CONTROL to select your favorite radio station. AM NOTE: If you tune into a FM stereo station, the FM STEREO indicator will be turned on. 1200 102 FM AM/FM DIAL LENS TUNING CONTROL FM STEREO INDICATOR 4 Adjust the volume.
MAINTENANCE Cleaning the lens Handling Compact Discs • Dirty, scratched or warped discs A dirty lens will cause sound skipping. If the lens is very dirty, the player may not work. We suggest using a special cleaning disk (not included) available in most music and Hi-Fi stores. However, if you do not have one, you may use the instructions below. • • • Use a cotton swab very slightly dampened with alcohol to clean the lens. Cleaning the cabinet may cause skipping or noise.
SAFETY PRECAUTIONS Do not take the set apart. The laser beam used in the set may harm your eyes. Refer servicing to qualified service personnel only. Do not insert pins or coins, clips, or any objects inside the set. This set is equipped with a safety device which automatically turns the laser beam off when the disc door is opened. Do not drop the set or subject it to strong shocks. Doing so could result in damage.
IMPORTANT INFORMATION REQUIRED BY THE FCC Since the CD circuitry may cause interference to other radios nearby, switch this set off when not in use or move it away from the affected radios. This device complies with Part 15 of the FCC Rules. Operation is subject to the following two conditions: (1) This device may not cause harmful interference, and (2) This device must accept any interference received, including interference that may cause undesirable operation.
TROUBLE SHOOTING GUIDE Symptoms Causes Solutions Tracks do not Batteries are weak (they change or set may test OK on tester but does not play they are weak for CD normally. operation). CD Player will not turn on. Dead or weak batteries. The optional AC ADAPTOR not connected properly. Replace both batteries with fresh alkaline batteries. Battery life with fresh batteries is above 8 hours for continuous CD play and 5 hours longer for radio use (rechargeable batteries have 1/2 of that life).
TECHNICAL SPECIFICATIONS CD Player Section Frequency response .............................. Wow and flutter ...................................... Sampling frequency ................................ D/A converter ......................................... Error correction method .......................... Pickup ................................................... Laser diode material GaAIAs Laser output less than 44.6µw 20Hz - 20kHz +1 / -2dB Below measurable limits 44.
LIMITED WARRANTY We warrant this product to be free from defects in material and workmanship under normal use for a period of 90 days after purchase and we will repair it free of charge or replace it at no charge, should it become defective under this warranty, providing you submit proof of purchase (sales slip) with the set. During the initial 90 day period after original purchase, we will service or exchange, at no charge, the set that is returned to LENOXX ELECTRONICS CORP.