® MODEL DVD- 2OO2 DVD VIDEO PLAYER INSTRUCTION MANUAL ® FULL ON SCREEN DISPLAY PLAYS DVD VIDEOS PLAYS ALL AUDIO CDS COMPATIBLE WITH CD-R & CDRW DISCS PLAYS MP3 RECORDED DISCS PLEASE READ CAREFULLY BEFORE USE IB-DVD-2002-WC-ZR-E-V1
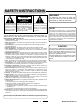
SAFETY INSTRUCTIONS WARNING CAUTION TO REDUCE THE RISK OF FIRE OR ELECTRIC SHOCK, DO NOT EXPOSE THIS APPLIANCE TO RAIN OR MOISTURE. RISK OF ELECTRIC SHOCK DO NOT OPEN The lightning flash and arrow head within the triangle is a warning sign alerting you of dangerous voltage inside the product. CAUTION: TO REDUCE THE RISK OF ELECTRIC SHOCK, DO NOT REMOVE COVER (OR BACK). NO USER SERVICEABLE PARTS INSIDE. REFER SERVICING TO QUALIFIED SERVICE PERSONNEL.
TABLE OF CONTENTS Getting Started: Basic Operation: Safety Instructions------------------------------------1 Connections Choose Your Connection---------------------3 Cables Needed to Connect Components to Your TV-------------------------------------------3 DVD Player + TV with Audio/Video Input Jacks----------------4,5 DVD Player + TV + VCR----------------------6 DVD Player + TV + Dolby Digital Theatre System (Audio/Video Receiver)-------------7 DVD Player + TV + VCR + Satellite Receiver --------------
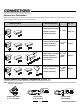
CONNECTIONS Choose Your Connection There are several ways to connect your DVD player. Please use the following chart to determine which connection is best for you. Turn to the appropriate page and connect your DVD player. COMPONENTS CABLES NEEDED GO TO ...
CONNECTIONS DVD Player + TV with Audio/Video Input Jacks BASIC A/V CONNECTION 1. Connect the audio cables to the AUDIO OUT L (left=white) and R (right=red) jacks on the back of your DVD player, and to the corresponding AUDIO IN jacks on your TV. 2. Connect the video cable (yellow) to the VIDEO OUT jack on the back of your DVD Player, and to the VIDEO IN jack on your TV. This connection will allow you to enjoy standard quality images. 3.
CONNECTIONS DVD Player + TV with Audio/Video Input Jacks Using S-Video Cable 1. Connect the audio cables to the AUDIO OUT L (left=white) and R (right=red) jacks on the back of your DVD player, and to the corresponding AUDIO IN jacks on your TV. 2. Connect the S-Video cable to the S-VIDEO OUT jack on the back of your DVD player and to the S-VIDEO jack on your TV. This connection will allow you to enjoy higher quality images.
CONNECTIONS DVD Player + TV + VCR ! This antenna connection is the same as you have now. " ! 1. Connect the audio cables to the AUDIO OUT L (left=white) and R (right=red) jacks on the back of your DVD Player, and to the corresponding AUDIO IN jacks on your TV. 2. Connect the video cable. Basic video connection - Connect the video cable (yellow) to the VIDEO OUT jack on the back of your DVD Player, and to the Video Input jack on your TV.
CONNECTIONS DVD Player + TV + Dolby Digital System (Audio/Video Receiver) 4-, 9016- 4-, 9016- 1. Connect the audio cables to the AUDIO OUT L (left -white) and R (right-red) jacks on the back of your DVD Player, and to the corresponding audio input jacks on your audio video receiver. 2. If you have a Dolby Digital or DTS receiver, insert a coaxial digital cable (not included) to the DIGITAL AUDIO OUT jack on the DVD player and to the Digital Input jack on the back of the receiver.
CONNECTIONS DVD Player + TV + VCR + Satellite Receiver " This antenna connection is the same as you have now. ! INFRONT ANT 1. Connect the audio cables to the AUDIO OUT L (left -white) and R (right-red) jacks on the back of your DVD Player, and to the corresponding AUDIO IN jacks on your TV. 2. Connect the video cable. Basic video connection - Connect the video cable (yellow) to the VIDEO OUT jack on the back of your DVD Player, and to the VIDEO IN jack on your TV.
INTRODUCTION NOTE: This DVD player will play DVD movies as well as Audio CDs. To simplify, we refer to these as discs in this booklet. Your DVD player is equipped with some special features. The following information summarizes some of these features. The On-Screen Information Display This menu bar display can bring up to access certain features while discs are playing. Icons and words represent the different features supported by your DVD player.
LOCATION OF CONTROLS 1. POWER button - Switches the player from STANDBY to ON or ON to STANDBY. 2. EJECT button - Opens and closes the DISC TRAY. REMOTE CONTROL 15 1 2 16 17 18 3 4 19 20 5 21 6 22 7 23 8 24 9 10 25 26 11 27 12 13 28 14 29 3. SUBTITLE button - Press to display the subtitle menu (if available on your disc). 4. ZOOM button - Press to enlarge the picture. 5. NUMERIC buttons - Used in DVD menus & audio CD track selection. 6. PLAY button - Press to start play. 7.
REMOTE CONTROL PREPARATION Battery Installation Remote Control Operation Range Remove the BATTERY COMPARTMENT DOOR of the REMOTE CONTROL and insert 2 size AAA alkaline batteries (included) according to the + and - markings inside the BATTERY COMPARTMENT of the REMOTE CONTROL unit. Point the REMOTE CONTROL unit from less than 20 feet from the remote control sensor and within about 600 of the front of the DVD player (not your TV set).
NOTES ON DISCS The following types of discs can be played by this unit: DISC TYPE & LOGO MARK RECORDED CONTENT DVD Video (NTSC only for USA) Video Music CD Audio Audio CD-R disc CD-RW disc Audio Audio MP3 disc DISC SIZE MAX. PLAYING TIME 5 inches (12cm) Approx. 4 hours (single sided disc) Approx. 8 hours (double sided disc) 3 inches (8cm) 5 inches (12cm) Approx. 80 minutes (single sided disc) Approx.
PRECAUTIONS On Handling DISCs On Safety As the laser beam used in the DVD player may be harmful to Should any solid object or liquid fall into the player, unplug Do not touch the playback side of the disc. Do not attach paper or tape to disc. the eyes, do not attempt to disassemble the cabinet. Refer servicing to qualified personnel only (it is perfectly safe if you dont open the cabinet). the player, and have it checked by qualified personnel before operating it any further.
INITIAL SETTING How to Find Your TVs Video Input Channel You need to tune your TV to the Video Input Channel to see the DVD Players menu and to see the movie on a disc. The video channel on TVs varies for different brands and different models. In order for your DVD remote to work, your TV must be set on the correct video input channel.
INITIAL SETTING NOTE: Most people will not adjust the following functions and will go directly to Page 18 for basic play. Once the initial programming is entered, it is retained in memory until changed. The player will always be operated under the same conditions even if the set is shut off. Common procedure for initial settings is as follows: 1 Press SETUP button in the stop mode, a menu like below will appear on your TV.
INITIAL SETTING UP NOTE: Most people will not adjust the following functions and will go directly to Page 18 for basic play. LEFT Select TV screen type 1 After entering the initial setting, press the DIRECTION buttons ( , , & RIGHT ) to SELECT DOWN select Video item. BUTTON 2 Press the SELECT button to open the Video menu. 3 Press the DIRECTION buttons ( , , & ) again to select TV Shape, then press SELECT button to open submenu of TV Shape.
INITIAL SETTING UP NOTE: Most people will not adjust the following functions and will go directly to Page 18 for basic play. LEFT Setting soundtrack output NOTE: You will not need to change any of these settings for normal play and all the settings are preset except that the Digital Out for AC3 is selectable. 1 After entering the initial setting, move the DIRECTION buttons ( , , & RIGHT DOWN SELECT BUTTON ) to select Audio item. 2 Press the SELECT button to open the Audio menu.
1. BASIC PLAY To Load and Play a Disc NOTE: We call any DVD or AUDIO CD as disc in this booklet. Turn on the TV and DVD player ( press ON/OFF on the player or press the POWER button on the remote control in STANDBY mode). 1 Press the OPEN/CLOSE button on the front of the DVD player or the EJECT button on the REMOTE, wait a few seconds, the disc tray will open.
1. BASIC PLAY Continued Using a Disc Menu A DVD movie disc is capable of having an on-screen menu that is separate from the DVD players menu and on-screen display. The disc menu might only contain a list of the titles and chapters, or it may allow you to change features such as language and playback settings.
2. USING THE SEARCH & SKIP FUNCTIONS During play, you can search quickly through a chapter or track or use the skip function to jump to the next selection. Skipping through a Chapter or a track During play, press the FORWARD button on the REMOTE CONTROL, continuously press it to search forward at a faster speed X2, X4, X8 or X20, press PLAY button to resume normal play.
4. REPEAT PLAY Allows you to repeat the current track, chapter, title, a chosen section (A-B), or all of the disc. Repeating a title, chapter or track Each time you press the REPEAT 1/ALL button, the repeat mode changes as follows: DVD(MOVIE) DISC CD(MUSIC) DISC A-B repeat play (NOTE: DO THIS OPERATION SLOWLY) 1 Press A-B REPEAT button during play at the beginning of the segment (point A) you want to play repeatedly. 2 Press A-B REPEAT button again at the end of the segment (point B).
5. PROGRAMMED PLAY You can make a program of up to 16 tracks in the order you want them to be played. This feature is normally used on CDs. 1 Press PROGRAM button in the stop mode, and the screen will display the program menu. CD(MUSIC) DISC 2 Press the numeric button and the DIRECTION buttons ( , , & ) to choose the preferred title/chapter or track.
7. ZOOM PLAY (DVD ONLY) This DVD video player allows you to zoom into a picture as well as shift the zoom point. 1 During play, press the ZOOM button, the picture will show as follows: 2 2 Press the DIRECTION buttons ( , , 3 & OFF ) to move the enlarged picture a little to right or left, up or down. 3 3 DIRECTION buttons 3 To return to normal play, press ZOOM till icon shows . 8.
9. VIEWING FROM A DESIRED ANGLE (DVD ONLY) Some DVD video discs may contain scenes which have been shot simultaneously from a number of different camera angles. The jacket or case of discs that are recorded with angles will be marked with this icon: For these discs, the same scene can be viewed from any of these different angels using the ANGLE button. Press the ANGLE button during play, number of angles being playback will be displayed in the screen, 3 press the button will change to different angles.
11.CHANGE SUBTITLE LANGUAGE (DVD ONLY) You can select a desired subtitle quickly and easily with the SUBTITLE button. NOTE: This operation works only with DVD discs on which multiple subtitle languages are recorded. Press the SUBTITLE button during play, the screen will display the current language and change language or off, such as 2 of 3), or (1/3 means 1 of 3 possible), SUBTITLE (language . NOTE: If no subtitles are recorded on your DVD, pressing this button will not change the subtitles.
12. MP3 CD OPERATION MP3 CD playback 1 Press the OPEN/CLOSE button on the front of the DVD player, the disc tray opens. 2 Place a MP3 CD gently into the tray with the discs label facing up. 3 Press the OPEN/CLOSE or PLAY button, the disc tray closes. The DVD player reads the MP3 CDs table of contents, and a table of contents appears on the screen. PLAY BUTTON DIRECTION BUTTON MP3 CD01 1. M0101 2. M0102 3. M0103 4. M0104 5. M0105 6. M0106 7. M0107 Track 1/117 00:00:00 8. M0108 9. M0109 10. M0110 11.
TROUBLE SHOOTING Symptom No power Play fails to start even when PLAY is pressed. Play starts but then stops immediately. General No picture. No sound. Distorted sound. Remedy Insert the AC power plug securely into the power outlet. Make sure your outlet has power. 1.The disc may be damaged. 2.This player cannot play a DVD disc other than USA region 1 standard. 3.The disc may be dirty and may require cleaning. 4.Ensure that the disc is installed with the label side up. 5.
TROUBLE SHOOTING DVD Symptom Remedy The subtitle or language is not what you selected. Go to page 15. The The feature or action you selected cannot be done at this time or with this disc. icon appears in the left top corner. Door cannot open from the set. Wait a few seconds, this function takes a little longer, also try the EJECT button on the REMOTE control. No Disc shows on left top corner. The disc is upside down or a non-playable disc was inserted. Change the disc.
SPECIFICATIONS General Description Power source: AC 120V, 60Hz 25Watts (approx. 3W when the set is in the standby mode). Signal system: NTSC USA Standard TV system only. This set will not play PAL or SECAM DVDs. Video output level: 1 Vp-p Audio output level: 2 Vrms (1 kHz, 0dB) Dimensions (Approx.): Width: 14^ Depth: 121/4^ Height: 3^ Weight: 7.