Inverter 8400 13295753 Ä.>ZVä Inverter Drives 8400 BaseLine C _ _ _ _ _ _ _ _ _ _ _ _ _ _ E84AVBCxxxxx...
Overview of technical documentation for Inverter Drives 8400 ________________________________________________________________ Project planning, selection & ordering Legend: Hardware manual 8400 BaseLine C/D Printed documentation Catalogue Online documentation (PDF/Engineer online help) Mounting & wiring MA 8400 BaseLine C MA for the accessories Abbreviations used: BA Operating Instructions KHB Communication manual MA Mounting instructions Parameterisation SW 8400 BaseLine C SW Softwa
Contents ________________________________________________________________ 1 1.1 1.2 1.3 1.
Contents ________________________________________________________________ 4.3 5 5.1 5.2 5.3 5.4 5.5 5.6 5.7 5.8 6 6.1 6.2 6.3 6.4 4 4.2.7 Trouble _ _ _ _ _ _ _ _ _ _ _ _ _ _ _ _ _ _ _ _ _ _ _ _ _ _ _ _ _ _ _ _ _ _ _ _ _ _ _ _ _ _ _ _ 4.2.
Contents ________________________________________________________________ 7 7.1 7.2 7.3 7.4 7.5 8 8.1 8.2 8.3 8.4 8.5 8.6 8.7 Drive application _ _ _ _ _ _ _ _ _ _ _ _ _ _ _ _ _ _ _ _ _ _ _ _ _ _ _ _ _ _ _ _ _ _ _ _ _ _ _ _ _ _ _ _ Parameterisation dialog _ _ _ _ _ _ _ _ _ _ _ _ _ _ _ _ _ _ _ _ _ _ _ _ _ _ _ _ _ _ _ _ _ _ _ _ _ _ _ _ _ 7.1.1 Signal flow _ _ _ _ _ _ _ _ _ _ _ _ _ _ _ _ _ _ _ _ _ _ _ _ _ _ _ _ _ _ _ _ _ _ _ _ _ _ _ _ _ _ 7.1.1.
Contents ________________________________________________________________ 9 9.1 9.2 9.3 9.4 9.5 9.6 9.7 9.8 9.9 6 System bus "CAN on board" _ _ _ _ _ _ _ _ _ _ _ _ _ _ _ _ _ _ _ _ _ _ _ _ _ _ _ _ _ _ _ _ _ _ _ _ _ _ _ General information _ _ _ _ _ _ _ _ _ _ _ _ _ _ _ _ _ _ _ _ _ _ _ _ _ _ _ _ _ _ _ _ _ _ _ _ _ _ _ _ _ _ _ 9.1.1 General data and application conditions _ _ _ _ _ _ _ _ _ _ _ _ _ _ _ _ _ _ _ _ _ _ _ _ _ _ 9.1.
Contents ________________________________________________________________ 10 Parameter reference _ _ _ _ _ _ _ _ _ _ _ _ _ _ _ _ _ _ _ _ _ _ _ _ _ _ _ _ _ _ _ _ _ _ _ _ _ _ _ _ _ _ _ 10.1 Structure of the parameter descriptions _ _ _ _ _ _ _ _ _ _ _ _ _ _ _ _ _ _ _ _ _ _ _ _ _ _ _ _ _ _ _ _ 10.1.1 Data type _ _ _ _ _ _ _ _ _ _ _ _ _ _ _ _ _ _ _ _ _ _ _ _ _ _ _ _ _ _ _ _ _ _ _ _ _ _ _ _ _ _ _ 10.1.2 Parameters with read-only access _ _ _ _ _ _ _ _ _ _ _ _ _ _ _ _ _ _ _ _ _ _ _ _ _ _ _ _ _ _ 10.1.
1 About this documentation 1.1 Document history ________________________________________________________________ 1 About this documentation Danger! The controller is a source of danger which may lead to death or severe injury of persons. To protect yourself and others against these dangers, observe the safety instructions before switching on the controller. Please read the safety instructions in the mounting instructions and the hardware manual of the 8400 BaseLine C controller.
1 About this documentation 1.2 Conventions used ________________________________________________________________ 1.2 Conventions used This documentation uses the following conventions to distinguish between different types of information: Type of information Writing Examples/notes Spelling of numbers Decimal separator Point The decimal point is generally used. For example: 1234.
1 About this documentation 1.3 Terminology used ________________________________________________________________ 1.3 10 Terminology used Term Meaning »Engineer« Lenze PC software which supports you in "engineering" (parameterisation, diagnostics and configuration) throughout the whole life cycle, i.e. from planning to maintenance of the commissioned machine.
1 About this documentation 1.4 Definition of the notes used ________________________________________________________________ 1.4 Term Meaning USB diagnostic adapter The USB diagnostic adapter is used for the operation, parameterisation, and diagnostics of the controller. Data are exchanged between the PC (USB connection) and the controller (diagnostic interface on the front) via the diagnostic adapter.
2 Introduction: Parameterising the controller ________________________________________________________________ 2 Introduction: Parameterising the controller [2-1] Example configuration for parameterising the controller (here: BaseLine D) Being a component of a machine which includes a speed-variable drive system, the controller needs to be adjusted to its drive task and the motor. The controller is adjusted by changing parameters which are saved in the memory module.
2 Introduction: Parameterising the controller 2.1 General notes on parameters ________________________________________________________________ 2.1 General notes on parameters All parameters for controller parameterising or monitoring are saved as so-called "codes". • The codes are numbered and designated by a "C" in front of the code, e.g. "C002" in the documentation and the keypad display.
2 Introduction: Parameterising the controller 2.2 Handling the memory module ________________________________________________________________ 2.2 Handling the memory module Danger! After power-off, wait at least three minutes before working on the controller. When removing the memory module, ensure that the controller is deenergised. If the memory module has been removed and the device is switched on, the connector pins are live and thus dangerous since the protection against contact is missing.
2 Introduction: Parameterising the controller 2.2 Handling the memory module ________________________________________________________________ During operation Stop! The memory module must not be plugged in or unplugged during operation. • The memory module (EPM) is required for operation. • Full functionality of the memory module is even provided if the power supply has been switched off and only the electronic components of the controller are externally supplied by a 24 V DC voltage, e.g.
2 Introduction: Parameterising the controller 2.
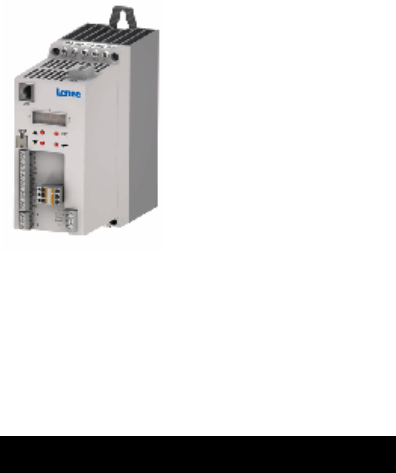
2 Introduction: Parameterising the controller 2.3 Internal Keypad ________________________________________________________________ 2.3 Internal Keypad The controller front is provided with an integrated keypad. Use the keypad for quick and simple parameter setting and for displaying current actual values and device states via the respective display parameters. 2.3.1 Note! After switching on the controller, the internal keypad performs a quick self-test. All segments of the display flash.
2 Introduction: Parameterising the controller 2.3 Internal Keypad ________________________________________________________________ Control elements 2.3.
2 Introduction: Parameterising the controller 2.3 Internal Keypad ________________________________________________________________ 2.3.3 Display messages Display Meaning An01 constant Analog input 1: Current < 4 mA bF blinking Identification error. • Drive ID stored in EMP does not match the drive ID stored in the controller. br flashes during the hold time of DC braking DC braking is executed.
2 Introduction: Parameterising the controller 2.3 Internal Keypad ________________________________________________________________ Display US01 constant User error 1 US02 constant User error 2 20 Meaning Detailed information on diagnostics using the »Engineer« and a description of possible error messages can be found in the chapter entitled "Diagnostics & error management". ( 145) Lenze · 8400 BaseLine C · Reference manual · DMS 1.
2 Introduction: Parameterising the controller 2.3 Internal Keypad ________________________________________________________________ 2.3.4 Menu structure 6WDWH 3DVVZRUG 0HQX ģĤ; MM (6& &RGH (6& 2#55 6XEFRGH (6& % ĥ Ħ (6& 9DOXH % (6& (6& ĥ • Without active password protection, the "password" level will be skipped. • The following applies when changing between the levels "Menu", "Code" and "Subcode": The keypad records the last selection.
2 Introduction: Parameterising the controller 2.3 Internal Keypad ________________________________________________________________ 2.3.5 User menu The user menu (menu -0-) contains a selection of frequently used parameters to be able to access and change these parameters quickly. • The integrated keypad serves to change the preset parameter selection in C517: Enter the codes the user menu is to contain into the subcodes c001 ...c020. When "0" is set, no entry is displayed in the user menu.
2 Introduction: Parameterising the controller 2.3 Internal Keypad ________________________________________________________________ 2.3.6 Quick saving of all parameters at the push of a button Keep the entry button pressed for 3 seconds to save all parameter settings safe against mains failure. • During the saving process, "SAVE" is blinking in the display. C 8888 SAVE A B D E F • After approximately 2 seconds, "SAVE" will disappear from the display and you can continue your work.
2 Introduction: Parameterising the controller 2.3 Internal Keypad ________________________________________________________________ Change the existing password or deactivate the password protection Step Info 1. Mains on After the mains has been switched on and the keypad self test has been completed, "00" is displayed 2. ↵ After pressing the enter key and with existing password protection: "PASS" is displayed for a short time, then "0000". 3. 4. 5. ↵ Enter password. Confirm entry.
3 Commissioning 3.1 Safety instructions with regard to commissioning ________________________________________________________________ 3 Commissioning The 8400 BaseLine C controller is commissioned in one of the following ways: • Commissioning with integrated keypad • If only a few parameters have to be adapted. • For test/demonstration purposes.
3 Commissioning 3.2 Preparing the 8400 BaseLine for commissioning ________________________________________________________________ 3.2 Preparing the 8400 BaseLine for commissioning Danger! Take all the necessary safety precautions before you carry out the following commissioning steps and switch the device on! Safety instructions with regard to commissioning ( 25) 1.
3 Commissioning 3.3 Commissioning with integrated keypad ________________________________________________________________ 3.3 Commissioning with integrated keypad Only a few parameters need to be adapted for the drive. Afterwards, the drive application can be immediately controlled via the digital and analog inputs of the controller in the preset control mode "Terminals 0". Information on how to use the integrated keypad can be found in the chapter entitled "Internal Keypad".
3 Commissioning 3.3 Commissioning with integrated keypad ________________________________________________________________ 3.3.2 Parameterise drive/application The menu -2- of the integrated keypad contains all basic parameters to commission the drive/application "actuating drive speed" quickly and easily for a terminal control. When you set these parameters to suitable and sensible values, the controller can be operated properly.
3 Commissioning 3.3 Commissioning with integrated keypad ________________________________________________________________ 3.3.3 Save parameter settings safe against mains failure If parameter settings are changed in the controller, those changes will be lost after mains switching of the controller unless the settings have been saved explicitly. C A B 8888 SAVE ESC D E F • Keep the entry button pressed for 3 seconds in order to save the parameter settings safe against mains failure.
3 Commissioning 3.3 Commissioning with integrated keypad ________________________________________________________________ 3.3.4 Enable controller and select speed Note! If the controller is enabled at power-on and the auto-start option is activated in C142 "Inhibit at power-on" (Lenze setting), the controller remains in the "ReadyToSwitchON" state. For changing to the "SwitchedON" state, first deactivate the controller enable: Set terminal X4/RFR to LOW level or open contact to terminal X4/12I.
3 Commissioning 3.4 Commissioning with the »Engineer« ________________________________________________________________ 3.4 Commissioning with the »Engineer« Commissioning with the »Engineer« is suited for every drive task and in particular for drive tasks with more demanding requirements/more comprehensive parameter setting. In the following, commissioning of the controller is described step by step. Please process the chapters consecutively and execute all steps carefully.
3 Commissioning 3.4 Commissioning with the »Engineer« ________________________________________________________________ 3.4.2 Creating an »Engineer« project & going online You can find detailed information on the general use of the »Engineer« in the online help which you can call with [F1]. • In the "Working with projects" chapter, all options of the start-up wizard are described to create a new »Engineer« project.
3 Commissioning 3.4 Commissioning with the »Engineer« ________________________________________________________________ 3.4.3 Parameterise drive/application Go to Workspace and change to the Application parameters tab. Parameterising the motor control On the left, the parameters of the motor control are arranged: 1. Go to the Motor control (C006) list field and select the required motor control.
3 Commissioning 3.4 Commissioning with the »Engineer« ________________________________________________________________ 2. Adapting the parameters of the motor control: Parameter Lenze setting Info Value Unit V/f base frequency (C015) Imax in motor mode (C022) Vmin boost (C016) 50.0 Hz 47.00 A 0.
3 Commissioning 3.4 Commissioning with the »Engineer« ________________________________________________________________ Parameterise application On the right of the Application parameters tab, the parameters of the application are arranged: 1. Select the required control mode in the Control mode (C007) list field. • The corresponding wiring diagram is displayed in a pop-up window if you click the button right to the list field.
3 Commissioning 3.4 Commissioning with the »Engineer« ________________________________________________________________ 4. Adapt parameters of the application: Parameter Lenze setting Info Value Unit Accel. time - main setpoint (C012) 2.0 s Decel. time - main setpoint (C013) 2.0 s The setpoint is led via a ramp function generator with linear characteristic. The ramp function generator converts setpoint step-changes at the input into a ramp.
3 Commissioning 3.4 Commissioning with the »Engineer« ________________________________________________________________ 3.4.4 Save parameter settings safe against mains failure In order that parameter settings made in the device do not get lost by means of mains switching, you must safe the parameter set explicitly safe against mains failure in the device. • 3.4.
3 Commissioning 3.4 Commissioning with the »Engineer« ________________________________________________________________ Diagnostics options When the »Engineer« is used, trouble during commissioning can be detected and eliminated conveniently. Proceed as follows: • Check whether error messages appear in the »Engineer«. • You can find a description of each possible message in the chapter entitled "Diagnostics & error management". ( 145) • Check the input terminals for their corresponding setpoints.
3 Commissioning 3.5 PC manual control ________________________________________________________________ 3.5 PC manual control This function extension is available as of version 03.03.00 and is supported by the »Engineer« as of version 2.14! For test and demonstration purposes, PC manual control can be used to manually control various drive functions via the »Engineer« when an online connection has been established.
3 Commissioning 3.5 PC manual control ________________________________________________________________ How to activate PC manual control: 1. If an online connection to the controller has not been established yet: Go online. 2. Go to Workspace and change to the Application parameters tab. 3. Go to the Overview dialog level and click the PC manual control button. • The following safety note is displayed first: • Click the Cancel button to abort the action and close the dialog box. 4.
3 Commissioning 3.5 PC manual control ________________________________________________________________ PC manual control operator dialog On the left-hand side, the PC manual control operator dialog includes control elements which serve to select various control functions. On the right-hand side, setpoint and status displays are provided for diagnostic purposes: Note! PC manual control can be exited any time by clicking the Close button.
3 Commissioning 3.5 PC manual control ________________________________________________________________ 3.5.2 Speed control Via the Speed control tab, simply make the drive rotate in the "Speed follower" operating mode without the need to set control parameters or feedback systems: How to make the motor rotate in its most basic way: 1. Set the desired speed setpoint in [%] based on the reference speed, e.g. directly in the Setpoint PC input field or via the slider.
3 Commissioning 3.5 PC manual control ________________________________________________________________ Further functions: • If the Set quick stop (QSP) button is clicked, the motor is braked to a standstill within the deceleration time parameterised in C105. • Via the Deactivate quick stop (QSP) button, the quick stop can be deactivated. • Via the << Left and Right >> buttons, the direction of rotation can be changed. Lenze · 8400 BaseLine C · Reference manual · DMS 1.
4 Device control (DCTRL) ________________________________________________________________ 4 Device control (DCTRL) This chapter provides information on the internal device control as well as the device commands which can be executed via the subcodes of C002 . • The device control causes the controller to take defined device states. • The device control provides a multitude of status information in many ways: • Optically via the LED status display of the integrated keypad.
4 Device control (DCTRL) ________________________________________________________________ How to get to the parameterisation dialog of the device control: 1. »Engineer« Go to the Project view and select the 8400 BaseLine C controller. 2. Go to Workspace and change to the Application parameters tab. 3. Go to the Overview dialog level and click the Drive interface button.
4 Device control (DCTRL) 4.1 Device commands ________________________________________________________________ 4.1 Device commands The following subchapters describe the device commands which are provided in the subcodes of C002 002 and can be carried out using the keypad or, alternatively, the »Engineer« when an online connection has been established. The device commands serve to directly control the controller, to organise parameter sets, and to call diagnostic services.
4 Device control (DCTRL) 4.
4 Device control (DCTRL) 4.1 Device commands ________________________________________________________________ 4.1.1 Load Lenze setting The C002/1 = "1: : On / start" device command resets the parameters to the Lenze setting which are saved in the controller firmware. • Can only be executed if the controller is inhibited; otherwise, the feedback C002/1 = "6: No access - controller inhibit" will be returned.
4 Device control (DCTRL) 4.1 Device commands ________________________________________________________________ 4.1.3 Save parameter settings If parameter settings are changed in the controller, those changes will be lost after mains switching of the controller unless the settings have been saved explicitly.
4 Device control (DCTRL) 4.1 Device commands ________________________________________________________________ 4.1.4 Import EPM data The C002/12 = "1: On / start" device command activates the automatic import of parameters from the memory module after the error message "PS04: Par.set incompatible". 4.1.5 Enable/Inhibit controller The C002/16 = "1: On / start" device command enables the controller, provided that no other source of a controller inhibit is active.
4 Device control (DCTRL) 4.1 Device commands ________________________________________________________________ 4.1.7 Reset error The C002/19 = "1: On / start" device command acknowledges an existing error message if the error cause has been eliminated and thus the error is not pending anymore. • After resetting the current error, further errors may be pending which must be reset as well. • The last 8 errors are displayed in C168.
4 Device control (DCTRL) 4.1 Device commands ________________________________________________________________ 4.1.10 CAN reset node The C002/26 = "1: On / start" device command reinitialises the CAN interface which is required after e.g. changing the data transfer rate, the node address, or identifiers.. 52 General information on the CAN interface can be found in the chapter entitled "System bus "CAN on board"". ( 169) Lenze · 8400 BaseLine C · Reference manual · DMS 1.
4 Device control (DCTRL) 4.2 Device states ________________________________________________________________ 4.2 Device states The state machine causes the controller to take defined states: Device state machine Power on Init 1 0 0 SafeTorqueOff 10 Fault 8 ReadyTo SwitchOn 3 MotorIdent 2 SwitchedOn 4 Operation Enabled 5 1 Trouble 7 Warning Grey field: pulse inhibit Can be reached from all states. "Warning" contradicts the definition of a device state.
4 Device control (DCTRL) 4.2 Device states ________________________________________________________________ • The change from one state to another is done in a 1 ms cycle. If, at the same time, several state change requests exist, the state with the higher priority is processed first (see the following table). • C137 displays the current device state. • C150(status word) provides a bit coded representation of the current device state via bits 8 ... 11 (see table below).
4 Device control (DCTRL) 4.2 Device states ________________________________________________________________ 4.2.1 Init LED DRIVE READY LED DRIVE ERROR OFF OFF Display in C137 Init Display in status word 1 (C150) Bit 11 Bit 10 Bit 9 Bit 8 0 0 0 1 In the "Init" device status • is the controller directly after the supply voltage is switched on. • the operating system is initialised. • all device components (memory module, power section, etc.) are identified.
4 Device control (DCTRL) 4.2 Device states ________________________________________________________________ 4.2.2 MotorIdent LED DRIVE READY LED DRIVE ERROR OFF Display in C137 MotorIdent Display in status word 1 (C150) Bit 11 Bit 10 Bit 9 Bit 8 0 0 1 0 In the "MotorIdent" device state • is the controller when being in the "SwitchedON" state and having activated the "Identify motor parameters" device command and being enabled. • the application remains active.
4 Device control (DCTRL) 4.2 Device states ________________________________________________________________ 4.2.4 ReadyToSwitchON LED DRIVE READY LED DRIVE ERROR OFF Display in C137 ReadyToSwitchON Display in status word 1 (C150) Bit 11 Bit 10 Bit 9 Bit 8 0 0 1 1 In the "ReadyToSwitchOn" device state • is the controller after the initialisation has been completed successfully. • is the controller even after cancelling "Trouble", "Fault" or "SafeTorqueOff". • I/O signalare evaluated.
4 Device control (DCTRL) 4.2 Device states ________________________________________________________________ 4.2.5 SwitchedON LED DRIVE READY LED DRIVE ERROR OFF Display in C137 SwitchedON Display in status word 1 (C150) Bit 11 Bit 10 Bit 9 Bit 8 0 1 0 0 In the "SwitchedOn" device state • is the controller if the user has inhibited the controller (and no error is pending). • I/O signalare evaluated. • the monitoring modes are active. • the controller can be parameterised.
4 Device control (DCTRL) 4.2 Device states ________________________________________________________________ 4.2.6 OperationEnabled LED DRIVE READY LED DRIVE ERROR OFF Display in C137 OperationEnabled Display in status word 1 (C150) Bit 11 Bit 10 Bit 9 Bit 8 0 1 0 1 In the "OperationEnabled" state • is the controller if the controller inhibit is deactivated and no trouble ("Trouble") and fault ("Fault") are existent.
4 Device control (DCTRL) 4.2 Device states ________________________________________________________________ 4.2.7 Trouble LED DRIVE READY LED DRIVE ERROR OFF Display in C137 Trouble Display in status word 1 (C150) Bit 11 Bit 10 Bit 9 Bit 8 0 1 1 1 In the "Trouble" device state • is the controller if monitoring has caused a "Trouble" error response. • the motor has no torque (is coasting) due to the inhibit of the inverter.
4 Device control (DCTRL) 4.2 Device states ________________________________________________________________ 4.2.8 Fault LED DRIVE READY LED DRIVE ERROR OFF Display in C137 Fault Display in status word 1 (C150) Bit 11 Bit 10 Bit 9 Bit 8 1 0 0 0 In the "Fault" device state • is the controller if monitoring has caused a "Fault" error response. • the motor has no torque (is coasting) due to the inhibit of the inverter.
4 Device control (DCTRL) 4.3 "Inhibit at power-on" auto-start option ________________________________________________________________ 4.3 "Inhibit at power-on" auto-start option In the Lenze setting inC142 the auto-start option "Inhibit at power-on" is activated. This setting prevents a change to the"SwitchedON"state if the controller is already enabled at mains power-up.
4 Device control (DCTRL) 4.3 "Inhibit at power-on" auto-start option ________________________________________________________________ Case 1: No controller enable at power-on If there is no controller enable at power-on, the controller remains in the "SwitchedON" state.
5 Motor control (MCTRL) ________________________________________________________________ 5 Motor control (MCTRL) This chapter provides information on the parameter setting of the controller's internal motor control.
5 Motor control (MCTRL) 5.1 Motor selection/Motor data ________________________________________________________________ 5.1 Motor selection/Motor data The motor data term comprises all parameters that only depend on the motor and that only characterise the electrical behaviour of the machine. The motor data are independent of the application in which the controller and the motor are used. Proceed as follows to open the dialog for parameterising the motor data: 1.
5 Motor control (MCTRL) 5.1 Motor selection/Motor data ________________________________________________________________ Note! Sensorless vector control in particular requires the motor data parameters to be set. The motor data comprise the data of the motor nameplate and the data of the motor equivalent circuit.
5 Motor control (MCTRL) 5.1 Motor selection/Motor data ________________________________________________________________ Adapting motor data manually If a third party manufacturer's motor is used, the displayed motor data can exactly be adapted to the real motor by clicking the From project... button and selecting the "Own motor settings" entry from the Motor selection dialog box afterwards. For this purpose, the data of the motor nameplate and the equivalent circuit diagram must be available.
5 Motor control (MCTRL) 5.1 Motor selection/Motor data ________________________________________________________________ 5.1.
5 Motor control (MCTRL) 5.1 Motor selection/Motor data ________________________________________________________________ Accepting the default values of the motor If a motor is selected from the motor catalogue at a later time, the Use motor's default values dialog box is displayed afterwards which includes all motor data of the selected motor.
5 Motor control (MCTRL) 5.1 Motor selection/Motor data ________________________________________________________________ 5.1.
5 Motor control (MCTRL) 5.1 Motor selection/Motor data ________________________________________________________________ Preconditions The motor parameters listed in the table below are excluded from automatic identification and must therefore be adapted to the used motor before motor parameter identification is carried out (see motor nameplate).
5 Motor control (MCTRL) 5.1 Motor selection/Motor data ________________________________________________________________ How to carry out automatic motor parameter identification: 1. Inhibit the controller if it is enabled, e.g. via the C002/16 device command or a LOW signal at the X4/RFR terminal. 2. Wait until the drive is at standstill. 3.
5 Motor control (MCTRL) 5.2 Selecting the control mode ________________________________________________________________ 5.2 Selecting the control mode The 8400 BaseLine C controller supports various modes for motor control (open loop or closed loop). • V/f characteristic control (VFCplus) with linear characteristic is preset. • The control mode can be selected in the »Engineer« on the Application parameter tab via the Motor control (C006) list field: • A click on the Motor control...
5 Motor control (MCTRL) 5.2 Selecting the control mode ________________________________________________________________ V/f characteristic control (VFCplus) The V/f characteristic control (VFCplus) is a motor control mode for standard frequency inverter applications based on a simple and robust control process which is suitable for the operation of machines with linear or square-law load torque characteristic (e.g. fans).
5 Motor control (MCTRL) 5.2 Selecting the control mode ________________________________________________________________ 5.2.1 Selection help To ease the selection of the motor control mode, the two following tables contain recommendations and alternatives to standard applications.
5 Motor control (MCTRL) 5.3 Defining current and speed limits ________________________________________________________________ 5.3 Defining current and speed limits Limitation of the speed setpoint Parameterising the reference speed in C011 means that the drive must rotate at the set speed if a speed setpoint of 100% is specified All speed setpoint selections are provided in % and always refer to the reference speed set in C011.
5 Motor control (MCTRL) 5.3 Defining current and speed limits ________________________________________________________________ Note! Highly dynamic applications (that have e.g. too short acceleration/deceleration times or excessively changing loads) The overcurrent disconnection may respond (fault message OC1), if the setting of the maximum current in motor mode in C022 approximately corresponds to the maximum permissible value of the respective inverter.
5 Motor control (MCTRL) 5.4 V/f characteristic control (VFCplus) ________________________________________________________________ 5.4 V/f characteristic control (VFCplus) In case of the V/f characteristic control (VFCplus), the motor voltage of the inverter is determined by means of a linear or quadratic characteristic depending on the field frequency or motor speed to be generated. The voltage follows a preselected characteristic.
C023 Imax in generator mode 3 C074 Ti Imax controller 4 C073 Vp Imax controller 5 C050 Speed setpoint 6 C909/1 Max. pos. speed 7 C909/2 Max. neg. speed 8 C105 Deceleration time - quick stop Parameter Info Slip compensation 13 C006 Motor control 10 C058 Output frequency 14 C015 V/f base frequency 11 C910/1 Max. pos. output frequency 15 C016 Vmin boost 12 C910/2 Max. neg.
5 Motor control (MCTRL) 5.4 V/f characteristic control (VFCplus) ________________________________________________________________ 5.4.2 Basic settings The "Initial commissioning steps" listed in the table below are sufficient for a simple characteristic control. • Detailed information on the individual steps can be found in the following subchapters. Initial commissioning steps 1. Defining the V/f characteristic shape. ( 80) 2. Defining current limits (Imax controller).
5 Motor control (MCTRL) 5.4 V/f characteristic control (VFCplus) ________________________________________________________________ 5.4.2.2 Defining current limits (Imax controller) The V/f characteristic control (VFCplus) is provided with a current limitation control which is decisive for the dynamic behaviour under load and counteracts exceedance of the maximum current in motor or generator mode. This current limitation control is called Imax control.
5 Motor control (MCTRL) 5.4 V/f characteristic control (VFCplus) ________________________________________________________________ 5.4.3 Optimise control behaviour The V/f characteristic control (VFCplus) is generally ready for operation. It can be adapted subsequently by adapting the characteristic and/or the drive behaviour.
5 Motor control (MCTRL) 5.4 V/f characteristic control (VFCplus) ________________________________________________________________ 5.4.3.1 Adapting the V/f base frequency The V/f base frequency (C015) determines the slope of the V/f characteristic and has considerable influence on the current, torque, and power performance of the motor. • The setting in C015 applies to all permitted mains voltages.
5 Motor control (MCTRL) 5.4 V/f characteristic control (VFCplus) ________________________________________________________________ 5.4.3.2 Adapting the Vmin boost The Vminboost (C016) of the motor voltage serves to select a load independent magnetising current which is required for asynchronous motors. The torque behaviour of the motor can be optimised by adapting the setting in C016. Note! The Vminboost has an effect on output frequencies below the V/f base frequency (C015).
5 Motor control (MCTRL) 5.4 V/f characteristic control (VFCplus) ________________________________________________________________ 5.4.3.3 Optimising the Imax controller Using the Lenze setting of the current limitation controller, the drive is stable: Parameter Info Lenze setting C073 VFC: Vp Imax controller C074 VFC: Ti Imax controller Value Unit 0.25 65 ms Most applications do not require optimisation.
5 Motor control (MCTRL) 5.4 V/f characteristic control (VFCplus) ________________________________________________________________ 5.4.4 86 Remedies for undesired drive behaviour Drive behaviour Remedy Inadequately smooth running at low speeds, especially in the case of operation with a long motor cable Automatic motor data identification ( 70) Problems in case of high starting duty (great mass inertia) Adapting the Vmin boost ( 84) Drive does not follow the speed setpoint.
5 Motor control (MCTRL) 5.5 Sensorless vector control (SLVC) ________________________________________________________________ 5.5 Sensorless vector control (SLVC) Sensorless vector control (SLVC) is based on a better motor current control according to the Lenze FTC process. Stop! Note! • The connected motor must not be more than two power classes smaller than the motor assigned to the controller.
5 Motor control (MCTRL) 5.5 Sensorless vector control (SLVC) ________________________________________________________________ 5.5.1 Parameterisation dialog Proceed as follows to open the dialog for parameterising the motor control: 1. »Engineer« Go to the Project view and select the 8400 BaseLine C controller. 2. Go to Workspace and change to the Application parameters tab. 3. Select the motor control "4: SLVC: Vector control" from the Overview dialog level in the Motor control (C006) list field.
5 Motor control (MCTRL) 5.5 Sensorless vector control (SLVC) ________________________________________________________________ 5.5.2 Speed control with torque limitation A speed setpoint is selected and the drive system is operated in a speed-controlled manner. The operational performance can be adapted in the following ways: • Overload limitation in the drive train • The torque is limited via the torque setpoint.
5 Motor control (MCTRL) 5.5 Sensorless vector control (SLVC) ________________________________________________________________ 5.5.3 Basic settings The following "Initial commissioning steps" must be performed to commission the sensorless vector control: Initial commissioning steps 1. Set the motor selection/motor data • When selecting and parameterising the motor, the motor nameplate data and the equivalent circuit diagram data are relevant.
5 Motor control (MCTRL) 5.5 Sensorless vector control (SLVC) ________________________________________________________________ 5.5.5 Remedies for undesired drive behaviour Drive behaviour Remedy Deviation between no-load current and magnetising current or bad speed or torque accuracy. Adapt the motor magnetising inductance (C092) for noload operation. • If the no-load current is greater than the magnetising current (C095) at 0.
5 Motor control (MCTRL) 5.6 Parameterisable additional functions ________________________________________________________________ 5.6 Parameterisable additional functions 5.6.1 Selection of switching frequency The switching frequency of the inverter that can be selected in C018 influences the smooth running performance and the noise generation in the connected motor as well as the power losses in the controller.
5 Motor control (MCTRL) 5.6 Parameterisable additional functions ________________________________________________________________ Lowering the switching frequency due to high heatsink temperatures Exceeding the maximally permissible heatsink temperature would lead to an inhibited drive due to the "Overtemperature" error and a torquelessly coasting motor.
5 Motor control (MCTRL) 5.6 Parameterisable additional functions ________________________________________________________________ 5.6.2 Flying restart function The flying restart circuit uses a simple model of an asynchronous motor which requires knowledge of the motor stator resistance RS and the rated motor current. Note! • For a correct functioning of the flying restart circuit, we recommend to perform a parameter identification first.
5 Motor control (MCTRL) 5.6 Parameterisable additional functions ________________________________________________________________ How to parameterise the flying restart function: 1. Activate the flying restart circuit by selecting "1: On" in C990. • Every time the controller is enabled, a synchronisation to the rotating or standing drive is carried out. When the Lenze setting is used, most applications do not require additional controller settings.
5 Motor control (MCTRL) 5.6 Parameterisable additional functions ________________________________________________________________ 5.6.3 DC-injection braking Danger! Holding braking is not possible when this braking mode is used! DC-injection braking allows the drive to be quickly braked to a standstill without the need to use an external brake resistor. • The braking current is set in C036. • The maximum braking torque to be generated by the DC braking current is approx. 20 ...
5 Motor control (MCTRL) 5.6 Parameterisable additional functions ________________________________________________________________ 5.6.3.1 Manual DC-injection braking (DCB) DC-injection braking can be manually activated via the bSetDCBrake process input. • For HIGH-active inputs, DC-injection braking is active as long as the signal is at HIGH level. • After the hold time ((C107) has expired, the controller sets the pulse inhibit (CINH).
5 Motor control (MCTRL) 5.6 Parameterisable additional functions ________________________________________________________________ Explanation of the automatic DC-injection braking function by means of an example 0 C00019 1 The motor rotates at a specified speed. The current adjusts itself to the load, see . The DC braking current set in C036 is injected. After the hold time (C106) has expired, a pulse inhibit is set.
5 Motor control (MCTRL) 5.6 Parameterisable additional functions ________________________________________________________________ 5.6.4 Slip compensation Under load, the speed of an asynchronous machine decreases. This load-dependent speed drop is called slip. The slip can partly be compensated for by the setting in C021. Parameter Info Lenze setting Value Unit C021 Slip compensation 0.00 % • The setting of C021 can be done automatically in the course of motor parameter identification.
5 Motor control (MCTRL) 5.6 Parameterisable additional functions ________________________________________________________________ 5.6.5 Oscillation damping Mechanical oscillations are undesirable effects in every process and they may have an adverse effect on the single system components and/or the production output. Mechanical oscillations in the form of speed oscillations are suppressed by the oscillation damping function.
5 Motor control (MCTRL) 5.7 Braking operation/braking energy management ________________________________________________________________ 5.7 Braking operation/braking energy management When electric motors are braked, the kinetic energy of the drive train is fed back into the DC circuit regeneratively. This energy leads to an increase in the DC bus voltage.
5 Motor control (MCTRL) 5.7 Braking operation/braking energy management ________________________________________________________________ 5.7.1 Setting the voltage source for braking operation The voltage threshold for braking operation is set via the mains voltage (C173) and the reduced brake chopper threshold (C174. When this "brake chopper threshold" is exceeded in the DC bus, the energy is dissipated in the DC bus via the brake resistor and the DC-bus voltage is reduced.
5 Motor control (MCTRL) 5.8 Monitoring ________________________________________________________________ 5.8 Monitoring Many monitoring functions that are integrated into the controller can detect errors and thus protect the device/motor from damage or overload. • Detailed information on the individual monitoring functions can be found in the following subchapters.
5 Motor control (MCTRL) 5.8 Monitoring ________________________________________________________________ 5.8.2 Motor load monitoring (I2xt) The Inverter Drives 8400 are provided with a simple, sensorless, thermal I2xt motor monitoring of self-ventilated standard motors which is based on a mathematical model. • In C066 displays the calculated motor load in [%]..
5 Motor control (MCTRL) 5.8 Monitoring ________________________________________________________________ C00120 < Ir x 100 % IN C00120 = Ir x 100 % IN C00120 > Ir x 100 % IN t [s] f = 20 Hz 360 f = 0 Hz f > 40 Hz 300 240 180 120 60 0 0 0.5 1.0 1.5 2.
5 Motor control (MCTRL) 5.8 Monitoring ________________________________________________________________ 5.8.3 Brake resistor monitoring (I2xt) Due to the converted braking power, the brake resistor is thermally stressed and can even be thermally destroyed by excessive braking power. The monitoring of the I2xt utilisation of the controller serves to protect the brake resistor. It acts in proportion to the converted braking power.
5 Motor control (MCTRL) 5.8 Monitoring ________________________________________________________________ 5.8.4 Mains phase failure monitoring Stop! Under load, the mains input of a three-phase controller can be destroyed if the device is only supplied by two phases (e.g. if a mains phase fails). The drive controller has a simple mains-phase failure detection function with which a mains phase failure can be detected under load. • In the case of power-adapted machines, approx.
6 I/O terminals ________________________________________________________________ 6 I/O terminals This chapter provides information on the function, possible parameter settings, and technical data of the input/output terminals of the controller. In the »Engineer«, the digital and analog input and output terminals are parameterised on the Terminal assignment tab.
6 I/O terminals 6.1 Digital terminals ________________________________________________________________ 6.1 Digital terminals Digital input terminals The drive controller has • four parameterisable input terminals (DI1 ... DI4) for detecting digital signals. • one RFR control input for controller enable. Digital output terminals The drive controller has • a parameterisable output terminal (DO1) for outputting digital signals, • a relay output (NO/COM).
6 I/O terminals 6.1 Digital terminals ________________________________________________________________ Parameterisation dialog in the »Engineer« Button Function Indicates the polarity of the input is HIGH active. The polarity can be changed from HIGH active to LOW active by clicking on this button. Indicates that the polarity of the input is LOW active. The polarity can be changed from LOW active to HIGH active by clicking on this button.
6 I/O terminals 6.2 Analog terminals ________________________________________________________________ 6.2 Analog terminals The controller is provided with an analog input for detecting a voltage signal. The voltage signal can be e.g. an analog speed setpoint selection or the signal of an external sensor (temperature, pressure, etc.). • Possible voltage ranges: • 0 ... +10 V (Lenze setting) • 0 ... +5 V • 1 ...
6 I/O terminals 6.2 Analog terminals ________________________________________________________________ 6.2.1 Parameterising analog input By clicking input: on the Terminal assignment tab, you reach the parameterising dialog for the analog Short overview of parameters for the analog input: Parameter Info Lenze setting Value Unit C034/1 AIN1: Config. 0: 0 ... +10 V C026/1 AIN1: Offset 0.
6 I/O terminals 6.2 Analog terminals ________________________________________________________________ Minimum and maximum output speed The speed range required for the application results from the selected reference speed (C011) and the minimum analog setpoint (C010): • The reference speed set in C011 is reached at a speed setpoint selection of 100 %. • All speed setpoint selections are provided in % and always refer to the reference speed set in C011 (independent of the setpoint source).
6 I/O terminals 6.3 User-defined terminal assignment ________________________________________________________________ 6.3 User-defined terminal assignment In order to individually adapt the preconfigured assignment of the input/output terminals to your application, you can choose one of the following procedures: A. In the »Engineer«: • Change the terminal assignment on the Terminal assignment tab.
6 I/O terminals 6.3 User-defined terminal assignment ________________________________________________________________ 6.3.1 Source-destination principle The I/O configuration of the input and output signals is carried out according to the source/destination principle: • A connection always has a direction and therefore always has a source and a target.
6 I/O terminals 6.3 User-defined terminal assignment ________________________________________________________________ 6.3.2 Changing the terminal assignment with the »Engineer« The »Engineer« serves to easily change the preconfigured terminal assignment via corresponding dialogs. The following task serves to describe the respective procedure. Task: Based on the preset control mode "Terminals 0", the digital input DI2 is used for activating the quick stop instead of selecting the fixed setpoint 2/3.
6 I/O terminals 6.3 User-defined terminal assignment ________________________________________________________________ Possibility 2: Change terminal assignment by means of the signal flow shown Procedure: 1. Go to the Application parameters tab. 2. Go to the Application Parameters tab and click on the Signal flow button in order to change to the dialog level Overview Signal flow. 3. In the bJogSpeed2 list field, set the selection "0: Not interconnected". 4.
6 I/O terminals 6.3 User-defined terminal assignment ________________________________________________________________ Example Task: Based on the preset control mode "Terminals 0", the digital input DI2 is used for activating the quick stop instead of selecting the fixed setpoint 2/3. For this purpose, the digital input DI2 must not be linked to the bJogSpeed2 input but to the bSetQuickstop input of the application. Procedure: 1.
6 I/O terminals 6.4 Electrical data ________________________________________________________________ 6.4 Electrical data X4 GND A1U RB = 250 W AR 12I RFR DI1 DI2 DI3 X101 DI4 NO 24E COM DO1 Terminal Application / electrical data GND Reference potential A1U Voltage or current input General data: Resolution: 10 bits (Error: 1 digit ≡ 0.
6 I/O terminals 6.4 Electrical data ________________________________________________________________ Terminal Application / electrical data DI1 ... DI4 Digital inputs (according to IEC 61131-2, type 1) LOW level: 0 ... +2.5 V HIGH level: +10 ... +30 V Input current: 4 mA per input (at 12 V supply of terminal 12I) Electric strength of external voltage: ±30 V, permanent Input impedance: 3.3 kΩ (2.0 kΩ ... 5.
7 Drive application ________________________________________________________________ 7 Drive application The "actuating drive speed" application provided in the 8400 BaseLine C controller is a drive solution equipped with Lenze's experience and know-how in which function and system blocks interconnected to a signal flow clearly show the basis for implementing typical drive tasks. The application serves to solve speed-controlled drive tasks, e.g.
7 Drive application 7.1 Parameterisation dialog ________________________________________________________________ 7.1 Parameterisation dialog Go to the Application parameter tab to change the most important settings for the application in the top dialog level Overview : Short overview of the relevant parameters: Parameter Lenze setting Info Value Unit Control mode 10: Terminals 0 Various control modes can be selected for the application.
7 Drive application 7.1 Parameterisation dialog ________________________________________________________________ Parameter Lenze setting Info Value Unit L_MPot_1: Use 0: No (C806) Accel. time - main setpoint 2.0 s (C012) Decel. time - main setpoint 2.0 s (C013) Reference speed All speed setpoint selections are provided in % and always refer to the reference speed set in C011. The motor reference speed is given on the motor nameplate. 5.
7 Drive application 7.1 Parameterisation dialog ________________________________________________________________ 7.1.
7 Drive application 7.
7 Drive application 7.1 Parameterisation dialog ________________________________________________________________ Parameter nInflu_a Info Limitation of the influencing factor in percent (C830/9) Speed setpoint Speed setpoint (C050) 7.1.1.1 Selection of the main speed setpoint The main speed setpoint is selected in the Lenze setting via the analog input 1.
7 Drive application 7.2 Interface description ________________________________________________________________ 7.2 Interface description Tip! You can change the preconfigured assignment of the respective input via the configuration parameters given in the first column. User-defined terminal assignment ( 114) Inputs Identifier Information/possible settings Data type Configuration parameters nMainSetValue_a INT C700/1 nTorqueMotLim_a nTorqueGenLim_a INT C700/2...
7 Drive application 7.2 Interface description ________________________________________________________________ Identifier Information/possible settings Data type Configuration parameters bFailReset BOOL C701/2 Reset of error message In the Lenze setting this input is connected to the digital input controller enable so that a possibly existing error message is reset together with the controller enable (if the cause for the fault is eliminated).
7 Drive application 7.2 Interface description ________________________________________________________________ Identifier Information/possible settings Data type Configuration parameters Setpoint generator • For a detailed functional description see FB L_NSet. bSetSpeedCcw BOOL C701/5 Change of direction of rotation • For instance if a motor or gearbox is fixed laterally reversed to a machine part, but the setpoint selection should still be executed for the positive direction of rotation.
7 Drive application 7.2 Interface description ________________________________________________________________ Identifier Information/possible settings Data type Configuration parameters Process controller • In the Lenze setting, the process controller is deactivated. • The activation is executed by selecting the operating mode in C242. • For a detailed functional description see FB L_PCTRL.
7 Drive application 7.
7 Drive application 7.3 Setting parameters (short overview) ________________________________________________________________ 7.3 Setting parameters (short overview) Parameter Info Lenze setting Value Unit 132 C012 Accel. time - main setpoint 2.0 s C013 Decel. time - main setpoint 2.0 s C182 S-ramp time PT1 C134 Ramp smoothing - main setpoint C019 Auto-DCB: Threshold C036 DCB: Current 50.0 % C039/1 Fixed setpoint 1 40.0 % C039/2 Fixed setpoint 2 60.
Identifier Control mode 10 (terminals 0) See fig. [7-1] 12 (Terminal 2) 14 (terminals 11) 16 (terminals 16) 20 (keypad) 21 (PC) 30 (CAN) See fig.
C620/5 LS_DisFree: wDis1 (C481/1) - - - - C620/6 LS_DisFree: wDis2 (C481/2) - - - - - - - C620/7 LS_DisFree: wDis3 (C481/3) - - - - - - - C620/8 LS_DisFree: wDis4 (C481/4) - - - - - - - C620/9 LS_DisFree_a: nDis1_a (C482/1) - - - - C620/10 LS_DisFree_a: nDis2_a (C482/2) - - - - C620/11 LS_DisFree_a: nDis3_a (C482/3) - - - - - - C620/12 LS_DisFree_a: nDis4_a (C482/4) - - - - - - - C620/20 LP_CanOut1: wState - - - - - - wDeviceState
C701/11 LS_DisFree_a C620/9 C620/10 C620/11 C620/12 L_NSet LS_ParFree_b C701/6 C701/7 C701/12 bPar1 bPar2 bPar... bPar16 Lenze · 8400 BaseLine C · Reference manual · DMS 1.
C621/16 C621/17 C621/18 C621/19 C621/20 C621/21 C621/22 C621/23 L_NSet C701/6 bJogSpeed2 C701/7 bRFG_0 C701/12 nNSet_a bJog1 bJog2 bRfg0 bNSetInv nPIDVpAdapt_a C700/6 nPIDActValue_a C700/7 nPIDInfluence_a C700/8 nPIDSetValue_a C700/9 bPIDInfluenceRamp C701/15 bPIDIOff nNSet_a nAdapt_a nAct_a nInflu_a nSet_a bEnableInfluenceRamp bIOff bJogSpeed1 SetDCBrake JogSpeed1 JogSpeed2 SetSpeedCcw CANDriveControl MainSetValue nPar1_a nPar2_a nPar3_a nPar4_a C701/16 LS_ParFree_b nNOut_a C700/2 C700/3 C701/4
7 Drive application 7.3 Setting parameters (short overview) ________________________________________________________________ 7.4.5 Process data assignment for control via CAN The CAN communication (preconfiguration) is connected to the technology application by selecting the control mode "30: CAN" in C007.
7 Drive application 7.3 Setting parameters (short overview) ________________________________________________________________ Output words Status word Name Assignment Word 1 DriveControlStatus Status word • For bit assignment, see table below.
Terminals 2 Terminals 11 Relay output DI1 DI2 DI3 DI4 DO1 NO / COM Setpoint selection 10 V ≡ 100 % reference speed (C011) JOG 1/3 JOG 2/3 DCB Cw/Ccw Status "Drive is ready to start" Status "An error occurred" Terminals 16 JOG 1/3 JOG 2/3 QSP Cw/Ccw Cw/Ccw DCB MPotUp MPotDown JOG 1/3 JOG 2/3 Cw/QSP Ccw/QSP Keypad - - - - - PC - - - - - CAN - QSP - - - Abbreviations used: JOG Selection of the fixed setpoints 1 ... 3 in C039/1...
7 Drive application 7.3 Setting parameters (short overview) ________________________________________________________________ 7.5.1 Terminals 0 X4 Speed setpoint Enable controller / reset error message Selection of fixed setpoint 1/3 Selection of fixed setpoint 2/3 Manual DC-injection braking (DCB) Direction of rotation CCw External supply 24 V DC + GND A1U AR 12I RFR DI1 DI2 DI3 DI4 24E DO1 DriveReady X101 NO COM 7.5.2 DriveFail Connection Assignment Connection Assignment RFR LA_NCtrl.
7 Drive application 7.3 Setting parameters (short overview) ________________________________________________________________ 7.5.3 Terminals 11 X4 Speed setpoint Enable controller / reset error message Direction of rotation CCw Manual DC-injection braking (DCB) increase speed Motor potentiometer decrease speed External supply 24 V DC + GND A1U AR 12I RFR DI1 DI2 DI3 DI4 24E DO1 DriveReady X101 NO COM 7.5.4 DriveFail Connection Assignment Connection Assignment RFR LA_NCtrl.
7 Drive application 7.3 Setting parameters (short overview) ________________________________________________________________ 7.5.
7 Drive application 7.3 Setting parameters (short overview) ________________________________________________________________ 7.5.
7 Drive application 7.3 Setting parameters (short overview) ________________________________________________________________ 7.5.
8 Diagnostics & error management 8.1 Basics on error handling in the controller ________________________________________________________________ 8 Diagnostics & error management This chapter provides information on error handling, drive diagnostics, and fault analysis. 8.1 Basics on error handling in the controller Many of the functions integrated into the controller can • detect errors and thus protect the device from damage or overload, e.g.
8 Diagnostics & error management 8.2 Drive diagnostics with the »Engineer« ________________________________________________________________ 8.
8 Diagnostics & error management 8.2 Drive diagnostics with the »Engineer« ________________________________________________________________ How to diagnose a drive with the »Engineer«: 1. Go to the Project view and select the 8400 BaseLine C controller. 2. Click the icon or execute the OnlineGo online command to establish an online connection to the controller. 3. Select the Diagnostics tab. • With an online connection, the Diagnostics tab displays current status information about the controller.
8 Diagnostics & error management 8.3 Drive diagnostics via bus system ________________________________________________________________ 8.3 Drive diagnostics via bus system The following display parameters contain actual values, states, and error messages. • These parameters are listed in the »Engineer« parameter list in the Diagnostics category. • A detailed description of these parameters can be found in the chapter "Parameter reference" ( 228).
8 Diagnostics & error management 8.4 Logbook ________________________________________________________________ 8.4 Logbook The integrated logbook function of the controller chronologically logs important events within the system. The logbook is intended to support you in troubleshooting and controller diagnostics.
8 Diagnostics & error management 8.4 Logbook ________________________________________________________________ 8.4.2 Reading out logbook entries We recommend to read out logbook entries with the »Engineer«, since the »Engineer« shows the entries clearly arranged and enables them to be exported into a log file. Alternatively, the corresponding parameters can be read out using the keypad or via the fieldbus. How to display logbook entries in the »Engineer«: 1.
8 Diagnostics & error management 8.5 Monitoring ________________________________________________________________ 8.5 Monitoring The controller is provided with various monitoring functions which protect the drive against impermissible operating conditions. • If a monitoring function responds, • an entry will be made into the Logbook of the controller, • the response (Trouble, Fault, etc.
8 Diagnostics & error management 8.5 Monitoring ________________________________________________________________ 8.5.1 Monitoring configuration How to configure the monitoring functions using the »Engineer«: 1. Go to the Project view and select the 8400 BaseLine C controller. 2. Select the Diagnostics tab from the Workspace. 3. Click the Monitoring... button.
8 Diagnostics & error management 8.5 Monitoring ________________________________________________________________ 8.5.2 Setting the error response When a monitoring function responds, the response set for this monitoring function (Trouble, Fault, etc.) will be triggered. • For many monitoring functions the response can be individually parameterised via parameters. Tip! The table in chapter "Short overview (A-Z)" contains the error messages for which the response can be set .
8 Diagnostics & error management 8.6 Maloperation of the drive ________________________________________________________________ 8.6 Maloperation of the drive Maloperation Cause Remedy Motor does not rotate DC-bus voltage is too low • Red LED is blinking every 1 s Check mains voltage Controller is inhibited • Green LED is blinking Deactivate controller inhibit • Note: Controller inhibit can be set via several sources ! • C158 displays all active sources for controller inhibit.
8 Diagnostics & error management 8.
8 Diagnostics & error management 8.7 Error messages of the operating system ________________________________________________________________ 8.7 Error messages of the operating system This chapter describes all error messages of the controller operating system and possible causes & remedies. Tip! Each error message is also saved in the logbook in chronological order. Logbook ( 149) 8.7.
8 Diagnostics & error management 8.7 Error messages of the operating system ________________________________________________________________ 8.7.1.2 Error subject area Bit 31 30 29 26 25 16 15 0 The error subject area indicates the internal "function unit" of the controller in which the error has occurred: Error subject area 8.7.1.3 Assigned errors Remedy possible by user? No. Name 111 Supply voltage Errors that occur in connection with the supply voltage of the device.
8 Diagnostics & error management 8.7 Error messages of the operating system ________________________________________________________________ 8.7.1.4 Example for bit coding of the error number In C168 displays the internal error number "75169803.
8 Diagnostics & error management 8.7 Error messages of the operating system ________________________________________________________________ 8.7.3 Short overview (A-Z) The table below contains all error messages of the controller operating system in alphabetical order. Note! For the sake of legibility, the Logbook and C165 display the error number with the following syntax: [Error type].[Error subject area no.].[.].
8 Diagnostics & error management 8.7 Error messages of the operating system ________________________________________________________________ 160 Error number Error message Response (Lenze setting) can be set in CAN Emergency Error Code xx.0144.00003 PS03: Par. set device invalid Fault - 0x6300 xx.0144.00004 PS04: Par. set device incompatible Fault - 0x6300 xx.0144.00031 PS31: Ident. error Fault - 0x6300 xx.0111.
8 Diagnostics & error management 8.7 Error messages of the operating system ________________________________________________________________ 8.7.4 Cause & possible remedies This chapter contains all error messages of the controller operating system in numerical order of the error numbers. The list provides detailed information on the response to the error message as well as information on the cause & possible remedies.
8 Diagnostics & error management 8.7 Error messages of the operating system ________________________________________________________________ OC9: Ixt overload - shutdown limit [xx.0119.00052] Response (Lenze setting printed in bold) None Fault Trouble WarningLocked Cause Remedy The Ixt overload check has tripped. • Operating threshold = 110 % Ixt (fixed) Possible causes: • Wrong dimensioning of the device with regard to its motor load. • Load cycles are not complied with.
8 Diagnostics & error management 8.7 Error messages of the operating system ________________________________________________________________ OC2: Power section - earth fault [xx.0123.00017] Response (Lenze setting printed in bold) None Fault Trouble WarningLocked Cause The device has recognised an earth fault at one of the motor phases. To protect the device electronics, the inverter control is switched off. • Mostly, incorrectly executed motor connections are the cause.
8 Diagnostics & error management 8.7 Error messages of the operating system ________________________________________________________________ CE4: CAN bus off [xx.0131.00000] Response (Lenze setting printed in bold) Setting: C592/2 ( Adjustable response) None Fault Trouble WarningLocked Cause Remedy • Check wiring and bus terminating resistor. • Set identical baud rate for each bus node. • Assign diiferent IDs to nodes. • Eliminate electrical interference (e.g. EMC).
8 Diagnostics & error management 8.7 Error messages of the operating system ________________________________________________________________ CA0F: CAN control word [xx.0131.00015] Response (Lenze setting printed in bold) Setting: C594/2 ( Adjustable response) None Fault Trouble WarningLocked Cause Remedy Bit 14 ("SetFail") in the wCANControl control word of the Trace back signal source on the CAN bus that sets bit 14 ("SetFail"). system block LS_DriveInterface has been set.
8 Diagnostics & error management 8.7 Error messages of the operating system ________________________________________________________________ PS03: Par. set device invalid [xx.0144.00003] Response (Lenze setting printed in bold) None Fault Trouble WarningLocked Cause Remedy The parameter set in the device is invalid. Consultation with Lenze required. PS04: Par. set device incompatible [xx.0144.
8 Diagnostics & error management 8.7 Error messages of the operating system ________________________________________________________________ dF03: Internal error 03 [xx.0145.00003] Response (Lenze setting printed in bold) None Fault Trouble WarningLocked Cause Device error Remedy • Mains switching or restart of the controller, respectively. • If the problem occurs again, you needs to consult Lenze. dF04: Internal error 04 [xx.0145.
8 Diagnostics & error management 8.7 Error messages of the operating system ________________________________________________________________ dF08: Internal error 08 [xx.0145.00008] Response (Lenze setting printed in bold) None Fault Trouble WarningLocked Cause Device error Remedy • Mains switching or restart of the controller, respectively. • If the problem occurs again, you needs to consult Lenze. dF09: Internal error 09 [xx.0145.
9 System bus "CAN on board" ________________________________________________________________ 9 System bus "CAN on board" The controller has an integrated CANopen system bus interface ("CAN on board") which is used to exchange i.a. process data and parameter values between the nodes. Furthermore, other modules can be connected via this interface such as decentralised terminals, operator and input devices (HMIs), as well as external controls and host systems.
9 System bus "CAN on board" 9.1 General information ________________________________________________________________ 9.1 General information For many years, the system bus (CAN) based on the CANopen communication profile has been integrated in Lenze controllers. Due to the lower number of data objects available, the functionality and compatibility of the previous system bus are lower as compared to CANopen.
9 System bus "CAN on board" 9.1 General information ________________________________________________________________ 9.1.1 General data and application conditions Range Values Communication profile CANopen, DS301 V4.02 Communication medium DIN ISO 11898 Network topology Line terminated at both ends Adjustable node addresses 1 ... 63 • adjustable per code C350 • from "StateLine" device version onwards also adjustable via DIP switches. Max.
9 System bus "CAN on board" 9.1 General information ________________________________________________________________ Protocols Monitoring protocols Heartbeat (heartbeat producer and heartbeat consumer) • "BaseLine C" version: 1 Heartbeat Producer can be monitored. • "StateLine" version: Up to 7 Heartbeat Producers can be monitored. • "HighLine" version: Up to 15 Heartbeat Producers can be monitored. Emergency telegram (to master) 9.1.
9 System bus "CAN on board" 9.1 General information ________________________________________________________________ 9.1.4 Activating the bus terminating resistor The CAN bus has to be terminated at the first and last physical node each by a resistor (120 Ω) between CAN low and CAN high: X1 CL GND LOW HIGH CAN CG CH CL CG X13 8400 I/O Shields CH [9-1] 9.1.
9 System bus "CAN on board" 9.2 LED status displays for the system bus ________________________________________________________________ 9.2 LED status displays for the system bus CAN • CAN-Run (green): Signals the CANopen status • CAN-Error (red): Signals a CANopen error Status 174 Frequency of the display CAN signalling and meaning Permanently red CAN-Run: -, CAN-Error: Bus Off Flashes Automatic detection of baud rate is active Green is blinking every 0.
9 System bus "CAN on board" 9.3 Going online via system bus (CAN on board) ________________________________________________________________ 9.3 Going online via system bus (CAN on board) The integrated system bus interface (CAN on board, X1 terminal) can also be used for the communication between the »Engineer« and the controller, alternatively to the USB diagnostic adapter.
9 System bus "CAN on board" 9.4 Structure of the CAN data telegram ________________________________________________________________ 9.4 Structure of the CAN data telegram &RQWURO ILHOG 6WDUW 575 ELW ,GHQWLILHU %LW [9-2] %LW %LW &5& GHOLPLWHU &5& VHTXHQFH %LW 8VHU GDWD %\WH 1HWZRUN PDQDJHPHQW 3URFHVV GDWD 3DUDPHWHU GDWD %LW $&. GHOLPLWHU $&.
9 System bus "CAN on board" 9.4 Structure of the CAN data telegram ________________________________________________________________ Identifier assignment The system bus is message-oriented instead of node-oriented. Every message has an unambiguous identification, the identifier. For CANopen, node-oriented transfer is achieved by the fact that every message has only one transmitter.
9 System bus "CAN on board" 9.4 Structure of the CAN data telegram ________________________________________________________________ 9.4.2 User data All nodes communicate by exchanging data telegrams via the system bus. The user data area of the CAN telegram either contains network management data or parameter data or process data: Networkmanagement data (NMT data) • Control information on start, stop, reset, etc. of communication to specific nodes or to all nodes of the CAN network.
9 System bus "CAN on board" 9.5 Communication phases/network management ________________________________________________________________ 9.5 Communication phases/network management Regarding communication via the system bus, the controller distinguishes between the following statuses: Status Explanation "Initialisation" (Initialisation) After switch-on, an initialisation run is carried out. • During this phase, the controller is not involved in the data exchange via the bus.
9 System bus "CAN on board" 9.5 Communication phases/network management ________________________________________________________________ 9.5.1 Status transitions ,QLWLDOLVDWLRQ 3UH 2SHUDWLRQDO 6WRSSHG 2SHUDWLRQDO [9-3] NMT status transitions in the CAN network Transition NMT command Status after change Effects on process/parameter data after status change (1) - Initialisation Initialisation starts automatically when the mains is switched on.
9 System bus "CAN on board" 9.5 Communication phases/network management ________________________________________________________________ 9.5.
9 System bus "CAN on board" 9.5 Communication phases/network management ________________________________________________________________ 9.5.3 Parameterising the controller as CAN master If the initialisation of the system bus and the associated status change from "Pre-Operational" to "Operational" is not effected by a superimposed host system, the controller can instead be defined to be a "quasi" master to execute this task. The controller is configured as CAN master in C352.
9 System bus "CAN on board" 9.6 Process data transfer ________________________________________________________________ 9.6 Process data transfer [9-5] PDO data transfer from / to the higher-level host system "BaseLine C" versions have two separate process channels (PDO1 and PDO2) and from the "StateLine" version three separate process data channels (PDO1 ... PDO3) for process data transfer.
9 System bus "CAN on board" 9.6 Process data transfer ________________________________________________________________ 9.6.1 Available process data objects 8400 BaseLine C controllers have a maximum number of 2 receive PDOs (RPDOs) and 2 transmit PDOs (TPDOs). Receive PDOs (RPDOs) The process data objects transmitted from the CAN bus to the drive are processed via the LP_CanIn1 and LP_CanIn2 port blocks. • Every port block provides 4 words (2 bytes/word).
9 System bus "CAN on board" 9.6 Process data transfer ________________________________________________________________ 9.6.1.1 RPDO1 | Port block "LP_CanIn1" The LP_CanIn1 port block maps process data object RPDO1.
9 System bus "CAN on board" 9.6 Process data transfer ________________________________________________________________ 9.6.1.2 RPDO2 | Port block "LP_CanIn2" The LP_CanIn2 port block maps process data object RPDO2.
9 System bus "CAN on board" 9.6 Process data transfer ________________________________________________________________ 9.6.1.3 TPDO1 | Port block "LP_CanOut1" The LP_CanOut1 port block maps process data object TPDO1.
9 System bus "CAN on board" 9.6 Process data transfer ________________________________________________________________ 9.6.1.4 TPDO2 | Port block "LP_CanOut2" The LP_CanOut2 port block maps process data object TPDO2.
9 System bus "CAN on board" 9.6 Process data transfer ________________________________________________________________ 9.6.2 Identifiers of the process data objects In the Lenze setting, the identifier for process data objects PDO1 ... PDO2 consists of a so-called basic identifier (CANBaseID) and the node address set in C350: Identifier (COB-ID) = basic identifier + node address (node ID) • The basic identifiers of the PDOs comply with the "Predefined connection set" of DS301, V4.02.
9 System bus "CAN on board" 9.6 Process data transfer ________________________________________________________________ 9.6.3 Transmission type Process data objects can be transmitted in an event-controlled or time-controlled manner. The below table shows that it is possible to combine the different methods by means of logic operations (AND, OR): • Event-controlled The PDO is sent when a special device-internal event has occurred, e.g.
9 System bus "CAN on board" 9.
9 System bus "CAN on board" 9.6 Process data transfer ________________________________________________________________ 9.6.4 PDO synchronisation via sync telegram During cyclic transmission, one or more PDOs are transmitted/received in fixed time intervals. An additional specific telegram, the so-called sync telegram, is used for synchronising cyclic process data.
9 System bus "CAN on board" 9.6 Process data transfer ________________________________________________________________ 9.6.5 Monitoring of the RPDOs for data reception Every RPDO1 ... RPDO2 has a parameterisable monitoring time in which the RPDO must arrive. If the RPDO is not received within the monitoring time or with the configured sync, the response parameterised for the respective RPDO is activated.
9 System bus "CAN on board" 9.7 Parameter data transfer ________________________________________________________________ 9.7 Parameter data transfer [9-7] Parameter data transfer via the available parameter data channels Parameters are values stored in codes on Lenze controllers. Two parameter data channels are available for parameter setting, enabling the simultaneous connection of different devices for configuration purposes.
9 System bus "CAN on board" 9.7 Parameter data transfer ________________________________________________________________ 9.7.1 Identifiers of the parameter data objects In the Lenze setting, the basic identifiers of the SDOs are preset according to the "Predefined Connection Set". The identifiers of the parameter data objects SDO1 and SDO2 result from the basic identifier and the node address set under code C350: Identifier = basic identifier + node address Object Direction from device 9.7.
9 System bus "CAN on board" 9.7 Parameter data transfer ________________________________________________________________ 9.7.2.
9 System bus "CAN on board" 9.7 Parameter data transfer ________________________________________________________________ 9.7.2.
9 System bus "CAN on board" 9.7 Parameter data transfer ________________________________________________________________ 9.7.2.3 Data 1 ... Data 4 1st byte 2nd byte Command 3rd byte Index 4th byte 5th byte 6th byte 7th byte 8th byte Subindex Data 1 Data 2 Data 3 Data 4 Low byte High byte Low word Low byte High word High byte Low byte High byte Maximally 4 bytes are available for parameter value entries.
9 System bus "CAN on board" 9.7 Parameter data transfer ________________________________________________________________ 9.7.2.4 Error messages 1st byte Command 0x80 (128) 2nd byte 3rd byte Index Low byte 4th byte 5th byte 6th byte Subindex High byte 7th byte 8th byte Error code Low word Low byte High word High byte Low byte High byte In the event of an error, the addressed node generates a telegram with the "Error response" (0x80) command.
9 System bus "CAN on board" 9.7 Parameter data transfer ________________________________________________________________ Meaning of the error codes The error codes are standardised acc. to DS301, V4.02.
9 System bus "CAN on board" 9.7 Parameter data transfer ________________________________________________________________ 9.7.3 Parameter data telegram examples 9.7.3.1 Read parameters Task: The heatsink temperature of 43 °C (code C061, data format INTEGER16, scaling factor 1) of the controller with node address "5" is to be read.
9 System bus "CAN on board" 9.7 Parameter data transfer ________________________________________________________________ 9.7.3.2 Write parameters Task: The rated current of the connected motor is to be entered with Irated = 10.20 A (code C088) into the controller with node address "2". Data 1 ... 4 Calculation Value for motor current, (data type U16; display factor 1/100) 10.
9 System bus "CAN on board" 9.7 Parameter data transfer ________________________________________________________________ 9.7.3.3 Read block parameters Task: The firmware version (code C099) to be read from the parameter set of the controller with node address "12". The firmware version has a length of 11 ASCII characters which are transmitted as a block parameter. Depending on the block, the data width from the 2nd to 8th byte is assigned within the user data.
9 System bus "CAN on board" 9.
9 System bus "CAN on board" 9.
9 System bus "CAN on board" 9.8 Monitoring ________________________________________________________________ 9.8 Monitoring 9.8.1 Integrated error detection If a node detects an error, it rejects the CAN telegram bits received so far and transmits an error flag. The error flag consists of 6 consecutive bits with the same logic value.
9 System bus "CAN on board" 9.8 Monitoring ________________________________________________________________ 9.8.2 Heartbeat protocol The heartbeat protocol can be used for node monitoring purposes within a CAN network.
9 System bus "CAN on board" 9.8 Monitoring ________________________________________________________________ 9.8.2.2 Parameter setting Short overview of the parameters for the "Heartbeat" monitoring function: Parameter Info Lenze setting Assignment C347/1...n CAN status of the heartbeat producer 1 ... n C381 Heartbeat producer time 0 ms C385/1...n CAN node address of the heartbeat producer 1 ... n 0 C386/1...n Heartbeat consumer time for the heartbeat producer 1 ...
9 System bus "CAN on board" 9.8 Monitoring ________________________________________________________________ Note! The heartbeat monitoring will not start until the first heartbeat telegram of a monitored producer has been received successfully and the "Pre-Operational" NMT status has been assumed. The boot-up telegram counts as the first heartbeat telegram. 9.8.2.
9 System bus "CAN on board" 9.8 Monitoring ________________________________________________________________ 9.8.
9 System bus "CAN on board" 9.9 Implemented CANopen objects ________________________________________________________________ 9.9 Implemented CANopen objects Lenze devices can both be parameterised with Lenze codes and manufacturer-independent "CANopen objects". A completely CANopen-compliant communication can only be achieved by using CANopen objects for parameter setting. The CANopen objects described in this chapter are defined in the CAN specification DS301 V4.02.
9 System bus "CAN on board" 9.
9 System bus "CAN on board" 9.9 Implemented CANopen objects | I-1000 ________________________________________________________________ I-1000 Index Name: Subindex Default setting Display range (min. value | unit | max. value) 0: Device type 0 0 I-1000 Device type Access Data type 4294967295 ro U32 The CANopen index I-1000 specifies the profile for this device. Furthermore, additional information defined in the device profile itself can be stored here.
9 System bus "CAN on board" 9.9 Implemented CANopen objects | I-1003 ________________________________________________________________ I-1003 Index: Name: I-1003 Predefined error field Subindex Default setting Display range (min. value | unit | max. value) 0: Number of errors 0 0 255 rw Access 1 ... 10: Standard error field - 0 4294967295 ro Data type U8 U32 Error history This object indicates that an error has occurred in the module and in the standard device.
9 System bus "CAN on board" 9.9 Implemented CANopen objects | I-1005 ________________________________________________________________ I-1005 Index: Name: Subindex Default setting Display range (min. value | unit | max. value) 0: COB-ID SYNC message 0x0000 0080 or 0x8000 0080 0 I-1005 COB-ID SYNC message Access 4294967295 rw Data type U32 This object can be used to activate the generation of sync telegrams and to write the identifier value. • This object relates to codes C367 and C368.
9 System bus "CAN on board" 9.9 Implemented CANopen objects | I-1006 ________________________________________________________________ I-1006 Index: Name: Subindex Default setting Display range (min. value | unit | max. value) 0: Communication cycle period 0 μs 0 I-1006 Communication cycle period μs Access 65535000 rw Data type U32 Setting the sync telegram cycle time. • The cycle time can be selected as "1000" or as an integer multiple of it.
9 System bus "CAN on board" 9.9 Implemented CANopen objects | I-1016 ________________________________________________________________ I-1016 Index: Name: Subindex Default setting Display range (min. value | unit | max. value) Access Data type 0: Highest subindex supported BaseLine C: 1 StateLine C: 7 HighLine C: 15 TopLine C: 15 - (read access only) ro U16 1 ...
9 System bus "CAN on board" 9.9 Implemented CANopen objects | I-1018 ________________________________________________________________ I-1018 Index: Name: Subindex Default setting Display range (min. value | unit | max.
9 System bus "CAN on board" 9.9 Implemented CANopen objects | I-1201 ________________________________________________________________ I-1201 Index: Name: Subindex Default setting Display range (min. value | unit | max.
9 System bus "CAN on board" 9.9 Implemented CANopen objects | I-1201 ________________________________________________________________ Example Parameter data channel 2 of the controller with node address 4 shall be activated. • For this, bit 31 must be set to "0" (≡ "SDO is valid") in subindices 1 and 2 of the object I-1201. • The master must send the two "write request" commands to the nodes via the basic SDO channel.
9 System bus "CAN on board" 9.9 Implemented CANopen objects | I-1400 ________________________________________________________________ I-1400 Index: Name: Subindex Default setting Display range (min. value | unit | max.
9 System bus "CAN on board" 9.9 Implemented CANopen objects | I-1401 ________________________________________________________________ Description of subindex 2 PDO transmission cyclic synchronous X X Transmission type Explanation n = 1 ... 240 When a value n is entered, this PDO will be accepted with every nth SYNC. n = 254 PDO will be accepted immediately. event-controlled X [9-21] I-1400 ... I-1402, subindex 2 I-1401 Index: Name: Subindex Default setting Display range (min.
9 System bus "CAN on board" 9.9 Implemented CANopen objects | I-1600 ________________________________________________________________ I-1600 Index: Name: I-1600 RPDO1 mapping parameter Subindex Default setting Display range (min. value | unit | max. value) 0: Number of mapped application objects in PDO 0 0 8 rw Access 1 ... 4: Application object 1 ... 4 0 0 4294967295 rw Data type U8 U32 The object I-1600 serves to receive parameter data as RPDO1. • This object relates to codes C409/1.
9 System bus "CAN on board" 9.9 Implemented CANopen objects | I-1800 ________________________________________________________________ I-1800 Index: Name: Subindex Default setting Display range (min. value | unit | max.
9 System bus "CAN on board" 9.9 Implemented CANopen objects | I-1800 ________________________________________________________________ Subindex 2 - transmission type PDO transmission Transmission type Explanation n = 1 ... 240 When a value n is entered, this PDO will be accepted with every nth SYNC. n = 252 On sync, the PDO is filled with new data, but only sent on RTR.
9 System bus "CAN on board" 9.9 Implemented CANopen objects | I-1801 ________________________________________________________________ I-1801 Index: Name: Subindex Default setting Display range (min. value | unit | max.
9 System bus "CAN on board" 9.9 Implemented CANopen objects | I-1A00 ________________________________________________________________ I-1A00 Index: Name: I-1A00 TPDO1 mapping parameter Subindex Default setting Display range (min. value | unit | max. value) 0: Number of mapped application objects in PDO 0 0 8 rw Access 1 ... 4: Application object 1 ... 4 0 0 4294967295 rw Data type U8 U32 The object I-1A00 serves to send parameter data as TPDO1. • This object relates to code C868/1...4.
10 Parameter reference ________________________________________________________________ 10 Parameter reference This chapter describes all parameters which can be used for parameterising and monitoring the controller. Parameters which are only available in the controller from a certain software version onwards are marked with a corresponding note in the parameter description ("from version xx.xx.xx"). The parameter descriptions are based on the software version V03.04.
10 Parameter reference 10.1 Structure of the parameter descriptions ________________________________________________________________ 10.
10 Parameter reference 10.1 Structure of the parameter descriptions ________________________________________________________________ 10.1.1 Data type The parameters can be of the following data types: 10.1.
10 Parameter reference 10.1 Structure of the parameter descriptions ________________________________________________________________ 10.1.3 Parameters with write access Only parameters with a check mark () in front of the "write access" attribute can be changed by the user. The Lenze setting for these parameters is printed in bold. • The settings can either be selected from a selection list or the values can be entered directly.
10 Parameter reference 10.1 Structure of the parameter descriptions ________________________________________________________________ Parameter setting in the »Engineer« In the »Engineer«, a list field is used for parameter setting: 10.1.3.3 Parameters with bit-coded setting Description structure Parameter | Name: Data type: _______ Index: _______ Cxxxxx | _____________ Description Value is bit-coded: Bit 0 ...
10 Parameter reference 10.1 Structure of the parameter descriptions ________________________________________________________________ 10.1.3.4 Parameters with subcodes Description structure Parameter | Name: Data type: _______ Index: _______ Cxxxxx | _____________ Description Setting range (min. value | unit | max.
10 Parameter reference 10.1 Structure of the parameter descriptions ________________________________________________________________ 10.1.4 Parameter attributes The table footers contain the parameter attributes: Read access Write access CINH PLC STOP No transfer COM MOT Attribute Meaning Read access Read access to parameter possible. Write access Write access to parameter possible.
10 Parameter reference 10.2 Parameter list ________________________________________________________________ 10.2 Parameter list This chapter lists all parameters of the operating system in numerically ascending order. Note! The parameter descriptions are based on the software version V03.04.00.
10 Parameter reference 10.
10 Parameter reference 10.2 Parameter list | C00003 ________________________________________________________________ C00003 Parameter | Name: Data type: UNSIGNED_8 Index: 24572d = 5FFCh C00003 | Status of last device command Status of the device command carried out last (C00002).
10 Parameter reference 10.2 Parameter list | C00007 ________________________________________________________________ C00007 Parameter | Name: Data type: UNSIGNED_16 Index: 24568d = 5FF8h C00007 | Control mode Selection of how the application is to be controlled. Selection list (Lenze setting printed in bold) 0 Wiring has changed Info This display appears when the preset configuration has been reparameterised via the connection parameters.
10 Parameter reference 10.2 Parameter list | C00010 ________________________________________________________________ C00010 Parameter | Name: Data type: INTEGER_16 Index: 24565d = 5FF5h C00010 | Minimum analog setpoint As of version 03.00.00 Lower limit for analog input Analog terminals Setting range (min. value | unit | max. value) 0.0 % 100.0 Subcodes Lenze setting Info C00010/1 0.0 % Min.
10 Parameter reference 10.2 Parameter list | C00015 ________________________________________________________________ C00015 Parameter | Name: Data type: UNSIGNED_16 Index: 24560d = 5FF0h C00015 | VFC: V/f base frequency V/f base frequency for V/f characteristic control (VFCplus) • The motor voltage increases linearly with the frequency until the base frequency is reached. From this value on, the motor voltage remains constant, the speed increases and the maximum torque decreases.
10 Parameter reference 10.2 Parameter list | C00019 ________________________________________________________________ C00019 Parameter | Name: Data type: UNSIGNED_16 Index: 24556d = 5FECh C00019 | Auto DCB: Threshold Setpoint speed threshold for automatic DC injection braking • For speed setpoints with values below the thresholds a DC current is injected or the motor is not supplied with current, depending on the setting. DC injection braking Setting range (min. value | unit | max.
10 Parameter reference 10.2 Parameter list | C00024 ________________________________________________________________ C00024 Parameter | Name: Data type: INTEGER_16 Index: 24551d = 5FE7h C00024 | Comparison value N_Act Threshold for the actual speed comparison • This parameter serves to set a threshold that is compared with the actual speed value. • When the value falls below this threshold, the bNactCompare output of the SB LS_DriveInterface switches to TRUE.
10 Parameter reference 10.2 Parameter list | C00029 ________________________________________________________________ C00029 Parameter | Name: Data type: INTEGER_16 Index: 24546d = 5FE2h C00029 | AINx: Input current Display of the input current at the analog input • When the analog input has been configured for current measurement (C00034/1 = 1 or 2). • When C00034/1 is set = 2 (4 ... 20 mA), 0 ... 16 mA is displayed. Analog terminals Display range (min. value | unit | max. value) 0.0 mA 20.
10 Parameter reference 10.2 Parameter list | C00036 ________________________________________________________________ C00036 Parameter | Name: Data type: INTEGER_16 Index: 24539d = 5FDBh C00036 | DCB: Current Current value in [%] for DC-injection braking • 100 % ≡ Imax in motor mode (C00022) DC injection braking Setting range (min. value | unit | max. value) 0.0 % Lenze setting 150.0 50.
10 Parameter reference 10.2 Parameter list | C00052 ________________________________________________________________ C00052 Parameter | Name: Data type: UNSIGNED_16 Index: 24523d = 5FCBh C00052 | Motor voltage Display of the current motor voltage/output voltage of the inverter Display range (min. value | unit | max.
10 Parameter reference 10.2 Parameter list | C00058 ________________________________________________________________ C00058 Parameter | Name: Data type: INTEGER_32 Index: 24517d = 5FC5h C00058 | Output frequency Display of the current output frequency Display range (min. value | unit | max. value) -655.0 Hz 655.0 Read access Write access CINH PLC STOP No transfer COM MOT Scaling factor: 100 C00059 Parameter | Name: Data type: UNSIGNED_32 Index: 24516d = 5FC4h C00059 | Appl.
10 Parameter reference 10.
10 Parameter reference 10.2 Parameter list | C00085 ________________________________________________________________ C00085 Parameter | Name: Data type: UNSIGNED_16 Index: 24490d = 5FAAh C00085 | Motor stator leakage inductance After the motor to be used has been selected from the motor catalogue, the suitable value can be entered automatically. An automatic detection via the motor parameter identification is possible as well. Setting range (min. value | unit | max. value) 0.
10 Parameter reference 10.2 Parameter list | C00090 ________________________________________________________________ C00090 Parameter | Name: Data type: UNSIGNED_16 Index: 24485d = 5FA5h C00090 | Rated motor voltage This value can be obtained from the motor nameplate. After the motor to be used has been selected from the motor catalogue, the suitable value can be entered automatically. Setting range (min. value | unit | max.
10 Parameter reference 10.2 Parameter list | C00095 ________________________________________________________________ C00095 Parameter | Name: Data type: UNSIGNED_16 Index: 24480d = 5FA0h C00095 | Motor magnetising current After the motor to be used has been selected from the motor catalogue, the suitable value can be entered automatically. An automatic detection via the motor parameter identification is possible as well. Display range (min. value | unit | max. value) 0.00 A 99.
10 Parameter reference 10.2 Parameter list | C00105 ________________________________________________________________ C00105 Parameter | Name: Data type: UNSIGNED_32 Index: 24470d = 5F96h C00105 | Deceleration time quick stop The set deceleration time determines the ramp slope at quick stop • When the output frequency falls below the threshold set in C00019, the DC injection brake DCB is activated.
10 Parameter reference 10.2 Parameter list | C00114 ________________________________________________________________ C00114 Parameter | Name: Data type: UNSIGNED_16 Index: 24461d = 5F8Dh C00114 | DIx inversion Polarity of the digital inputs • Every digital input of the device can be inverted with regard to polarity via this bit field. Setting range (min. hex value | max.
10 Parameter reference 10.2 Parameter list | C00120 ________________________________________________________________ C00120 Parameter | Name: Data type: INTEGER_16 Index: 24455d = 5F87h C00120 | Motor overload threshold (I²xt) Operating threshold for the error message "OC6: Motor overload (I²xt)" • The response for reaching the threshold can be selected in C00606. • The current thermal motor load is displayed in C00066. Setting range (min. value | unit | max.
10 Parameter reference 10.2 Parameter list | C00136 ________________________________________________________________ C00136 Parameter | Name: Data type: UNSIGNED_16 Index: 24439d = 5F77h C00136 | Communication control words Control words of the communication interfaces Display area (min. hex value | max.
10 Parameter reference 10.
10 Parameter reference 10.2 Parameter list | C00142 ________________________________________________________________ C00142 Parameter | Name: Data type: UNSIGNED_8 Index: 24433d = 5F71h C00142 | Auto-start option Starting performance of the controller after mains connection and reset of "Trouble" or "Fault". "Inhibit at power-on" auto-start option Setting range (min. hex value | max.
10 Parameter reference 10.2 Parameter list | C00150 ________________________________________________________________ C00150 Parameter | Name: Data type: UNSIGNED_16 Index: 24425d = 5F69h C00150 | Status word Bit-coded device status word Display area (min. hex value | max.
10 Parameter reference 10.2 Parameter list | C00155 ________________________________________________________________ C00155 Parameter | Name: Data type: UNSIGNED_16 Index: 24420d = 5F64h C00155 | Status word 2 Bit-coded device status word 2 Display area (min. hex value | max.
10 Parameter reference 10.2 Parameter list | C00158 ________________________________________________________________ C00158 Parameter | Name: Data type: UNSIGNED_16 Index: 24417d = 5F61h C00158 | Cause for controller inhibit Bit-coded display of the cause/source of controller inhibit Display area (min. hex value | max.
10 Parameter reference 10.2 Parameter list | C00159 ________________________________________________________________ C00159 Parameter | Name: Data type: UNSIGNED_16 Index: 24416d = 5F60h C00159 | Cause for quick stop QSP Bit-coded display of the cause/source of quick stop Display area (min. hex value | max.
10 Parameter reference 10.2 Parameter list | C00167 ________________________________________________________________ C00167 Parameter | Name: Data type: OCTET_STRING Index: 24408d = 5F58h C00167 | Logbook data This code is for device-internal use only and must not be written to by the user! C00168 Parameter | Name: Data type: UNSIGNED_32 Index: 24407d = 5F57h C00168 | Error number Display range (min. value | unit | max.
10 Parameter reference 10.2 Parameter list | C00173 ________________________________________________________________ C00173 Parameter | Name: Data type: UNSIGNED_8 Index: 24402d = 5F52h C00173 | Mains voltage Selection of the mains voltage for operating the device.
10 Parameter reference 10.2 Parameter list | C00182 ________________________________________________________________ C00182 Parameter | Name: Data type: INTEGER_16 Index: 24393d = 5F49h C00182 | S-ramp time PT1 FB L_NSet_1: PT1 S-ramp time for the main setpoint ramp function generator • Only effective with activated ramp smoothing (C00134 = "1"). Setting range (min. value | unit | max. value) 0.01 s Lenze setting 50.00 20.
10 Parameter reference 10.2 Parameter list | C00223 ________________________________________________________________ C00223 Parameter | Name: Data type: UNSIGNED_16 Index: 24352d = 5F20h C00223 | L_PCTRL_1: Tn FB L_PCTRL_1: Reset time Tn for the PID process controller Setting range (min. value | unit | max.
10 Parameter reference 10.2 Parameter list | C00228 ________________________________________________________________ C00228 Parameter | Name: Data type: UNSIGNED_32 Index: 24347d = 5F1Bh C00228 | L_PCTRL_1: Deceleration time FB L_PCTRL_1: Deceleration time for the output value of the PID process controller Setting range (min. value | unit | max. value) 0.0 s Lenze setting 999.9 0.
10 Parameter reference 10.2 Parameter list | C00242 ________________________________________________________________ C00242 Parameter | Name: Data type: UNSIGNED_8 Index: 24333d = 5F0Dh C00242 | L_PCTRL_1: Operating mode FB L_PCTRL_1: Selection of the operating mode • Depending on the selection, the blue switches in the displayed signal flow are set accordingly in the Engineer on the Application parameter tab in the Overview Signal flow Process controller dialog level.
10 Parameter reference 10.2 Parameter list | C00309 ________________________________________________________________ C00309 Parameter | Name: Data type: UNSIGNED_16 Index: 24266d = 5ECAh C00309 | Delay time This code is for device-internal use only and must not be written to by the user! C00322 Parameter | Name: Data type: UNSIGNED_8 Index: 24253d = 5EBDh C00322 | Transmission mode CAN TxPDOs TPDO transmission type according to DS301 V4.
10 Parameter reference 10.2 Parameter list | C00324 ________________________________________________________________ C00324 Parameter | Name: Data type: UNSIGNED_16 Index: 24251d = 5EBBh C00324 | CAN transmit blocking time As of version 03.03.
10 Parameter reference 10.
10 Parameter reference 10.2 Parameter list | C00352 ________________________________________________________________ C00352 Parameter | Name: Data type: UNSIGNED_8 Index: 24223d = 5E9Fh C00352 | CAN Slave/Master The drive starts as CAN master after mains switching if the value "1" has been entered and saved here.
10 Parameter reference 10.2 Parameter list | C00355 ________________________________________________________________ C00355 Parameter | Name: Data type: UNSIGNED_16 Index: 24220d = 5E9Ch C00355 | Active COBID Display of the COBID of the PDOs that is active in the CAN stack System bus "CAN on board" Display range (min. value | unit | max.
10 Parameter reference 10.2 Parameter list | C00359 ________________________________________________________________ C00359 Parameter | Name: Data type: UNSIGNED_8 Index: 24216d = 5E98h C00359 | CAN status System bus "CAN on board" Selection list (read only) 0 Operational 1 Pre-Operat.
10 Parameter reference 10.2 Parameter list | C00364 ________________________________________________________________ C00364 Parameter | Name: Data type: UNSIGNED_8 Index: 24211d = 5E93h C00364 | CAN MessageError System bus "CAN on board" Display area (min. hex value | max.
10 Parameter reference 10.2 Parameter list | C00368 ________________________________________________________________ C00368 Parameter | Name: Data type: UNSIGNED_16 Index: 24207d = 5E8Fh C00368 | CAN Sync-Tx identifier Identifier by means of which the sync master is to transmit sync telegrams. • Mapping of the CANopen object I-1005 (see DS301 V4.02). Setting range (min. value | unit | max.
10 Parameter reference 10.2 Parameter list | C00385 ________________________________________________________________ C00385 Parameter | Name: Data type: UNSIGNED_8 Index: 24190d = 5E7Eh C00385 | CAN NodeID Heartbeat producer Address of the node which is to be monitored by heartbeat. System bus "CAN on board": Heartbeat protocol Setting range (min. value | unit | max.
10 Parameter reference 10.2 Parameter list | C00409 ________________________________________________________________ C00409 Parameter | Name: Data type: UNSIGNED_16 Index: 24166d = 5E66h C00409 | LP_CanIn Mapping As of version 03.00.00 Mapping for port blocks LP_CanIn1 and LP_CanIn2 System bus "CAN on board": Port blocks Setting range (min. value | unit | max.
10 Parameter reference 10.2 Parameter list | C00443 ________________________________________________________________ C00443 Parameter | Name: Data type: UNSIGNED_16 Index: 24132d = 5E44h C00443 | DIx: Level Bit-coded display of the level of the digital inputs Digital terminals Display area (min. hex value | max.
10 Parameter reference 10.2 Parameter list | C00444 ________________________________________________________________ C00444 Parameter | Name: Data type: UNSIGNED_16 Index: 24131d = 5E43h C00444 | DOx: Level Bit-coded display of the level of the digital outputs Digital terminals Display area (min. hex value | max.
10 Parameter reference 10.2 Parameter list | C00472 ________________________________________________________________ C00472 Parameter | Name: Data type: INTEGER_16 Index: 24103d = 5E27h C00472 | LS_ParFree_a SB LS_ParFree_a: Setting of the analog signals to be output Setting range (min. value | unit | max. value) -199.9 % 199.9 Subcodes Lenze setting Info C00472/1 0.0 % Value for output nPar1_a C00472/2 0.0 % Value for output nPar2_a C00472/3 100.
10 Parameter reference 10.2 Parameter list | C00482 ________________________________________________________________ C00482 Parameter | Name: Data type: INTEGER_16 Index: 24093d = 5E1Dh C00482 | LS_DisFree_a SB LS_DisFree_a: Display of the input values Display range (min. value | unit | max. value) -199.9 % 199.9 Subcodes Info C00482/1 Input values nDis1_a ... nDis4_a C00482/...
10 Parameter reference 10.2 Parameter list | C00517 ________________________________________________________________ C00517 Parameter | Name: Data type: INTEGER_32 Index: 24058d = 5DFAh C00517 | User menu When a system is installed, parameters must be changed time and again until the system runs satisfactorily. The user menu of a device serves to create a selection of frequently used parameters to be able to access and change these parameters quickly.
10 Parameter reference 10.2 Parameter list | C00574 ________________________________________________________________ C00574 Parameter | Name: Data type: UNSIGNED_8 Index: 24001d = 5DC1h C00574 | Resp. to brake resist. overtemp. Response when the permanently set threshold for monitoring the brake resistor utilisation has been reached.
10 Parameter reference 10.2 Parameter list | C00593 ________________________________________________________________ C00593 Parameter | Name: Data type: UNSIGNED_8 Index: 23982d = 5DAEh C00593 | Resp.
10 Parameter reference 10.2 Parameter list | C00600 ________________________________________________________________ C00600 Parameter | Name: Data type: UNSIGNED_8 Index: 23975d = 5DA7h C00600 | Resp.
10 Parameter reference 10.2 Parameter list | C00620 ________________________________________________________________ C00620 Parameter | Name: Data type: UNSIGNED_16 Index: 23955d = 5D93h C00620 | 16-bit system connection Connection parameters: 16-bit inputs • Selection of the 16-bit output signals for connection with the 16-bit input signals. • The selection list contains all 16-bit output signals which can be assigned to the 16-bit inputs mapped by the subcodes.
10 Parameter reference 10.2 Parameter list | C00621 ________________________________________________________________ C00621 Parameter | Name: Data type: UNSIGNED_16 Index: 23954d = 5D92h C00621 | Bool system connection Connection parameters: Binary inputs • Selection of the binary output signals for connection with the binary input signals. • The selection list contains all binary output signals which can be assigned to the binary inputs mapped by the subcodes.
10 Parameter reference 10.
10 Parameter reference 10.
10 Parameter reference 10.
10 Parameter reference 10.2 Parameter list | C00727 ________________________________________________________________ C00727 Parameter | Name: Data type: UNSIGNED_8 Index: 23848d = 5D28h C00727 | LS_Keypad: Digital values Executing control commands when operating via keypad Setting range (min. value | unit | max.
10 Parameter reference 10.2 Parameter list | C00802 ________________________________________________________________ C00802 Parameter | Name: Data type: UNSIGNED_16 Index: 23773d = 5CDDh C00802 | L_MPot_1: Acceleration time FB L_MPot_1: Acceleration time of the motor potentiometer function Setting range (min. value | unit | max. value) 0.1 s Lenze setting 999.9 10.
10 Parameter reference 10.2 Parameter list | C00806 ________________________________________________________________ C00806 Parameter | Name: Data type: UNSIGNED_8 Index: 23769d = 5CD9h C00806 | L_MPot_1: Use FB L_MPot_1: Use of the motor potentiometer Selection list (Lenze setting printed in bold) Info 0 No The motor potentiometer is not used. • The analog value applied to the nIn_a input is looped through without any changes to the nOut_a output. 1 Yes The motor potentiometer is used.
10 Parameter reference 10.
10 Parameter reference 10.2 Parameter list | C00866 ________________________________________________________________ C00866 Parameter | Name: Data type: UNSIGNED_16 Index: 23709d = 5C9Dh C00866 | CAN input words Display of the 16-bit input values of the CAN interface System bus "CAN on board" Display area (min. hex value | max. hex value) 0x0000 0xFFFF Value is bit-coded: Bit 0 Bit0 ... ...
10 Parameter reference 10.2 Parameter list | C00868 ________________________________________________________________ C00868 Parameter | Name: Data type: UNSIGNED_16 Index: 23707d = 5C9Bh C00868 | CAN output words Display of the 16-bit output values of the CAN interface System bus "CAN on board" Display area (min. hex value | max.
10 Parameter reference 10.2 Parameter list | C00910 ________________________________________________________________ C00910 Parameter | Name: Data type: UNSIGNED_16 Index: 23665d = 5C71h C00910 | Frequency limitation Maximum positive/negative output frequency for all operating modes Setting range (min. value | unit | max. value) 0 Subcodes Hz 300 Lenze setting Info C00910/1 300 Hz Max. pos. output frequency C00910/2 300 Hz Max. neg.
10 Parameter reference 10.2 Parameter list | C00994 ________________________________________________________________ C00994 Parameter | Name: Data type: INTEGER_16 Index: 23581d = 5C1Dh C00994 - Flying restart fct.: Current Current to be injected during the flying restart process • 100 % ≡ rated motor current (C00081). • The flying restart current should amount to 10 ... 25 % of the rated motor current. Setting range (min. value | unit | max. value) 0.0 % Lenze setting 100.0 25.
10 Parameter reference 10.2 Parameter list ________________________________________________________________ 10.2.1 Selection lists for configuration parameters 10.2.1.1 Selection list - analog signals This selection list is relevant for the following parameters: Parameter C00620 16-bit system connection C00700 LA_NCtrl: Analog connection list Selection list - analog signals 0 Not connected 1 C_nPos100_a(100.0%) 2 C_nNeg100_a(-100.0%) 3 C_nPos199_9_a(199.9%) 4 C_nNeg199_9_a(-199.
10 Parameter reference 10.2 Parameter list ________________________________________________________________ 10.2.1.
10 Parameter reference 10.3 Table of attributes ________________________________________________________________ 10.3 Table of attributes The table of attributes contains information that is required for a communication to the controller via parameters. How to read the table of attributes: Column Meaning Code Parameter name Cxxxxx Name Parameter short text (display text) Text Index under which the parameter is addressed. The subindex of array variables corresponds to the Lenze subcode number.
10 Parameter reference 10.
10 Parameter reference 10.
10 Parameter reference 10.
11 Function library ________________________________________________________________ 11 Function library This chapter describes the function and system blocks that are part of the drive application.
11 Function library 11.1 L_MPot_1 ________________________________________________________________ 11.1 L_MPot_1 This FB replaces a hardware motor potentiometer and can be used as an alternative setpoint source which is controlled via two inputs. • The signal is output via a ramp function generator with linear ramps. • The acceleration and deceleration times are set via parameters. • Constant ramping even with speed limit values changed online.
11 Function library 11.1 L_MPot_1 ________________________________________________________________ Outputs Identifier Value/meaning Data type nOut_a Output signal INT Parameter Parameter Possible settings Info C800 -199.9 % 199.9 Upper limit • Lenze setting: 100.0 % C801 -199.9 % 199.9 Lower limit • Lenze setting: -100.0 % C802 0.1 s 999.9 Acceleration time • Lenze setting: 10.0 s C803 0.1 s 999.9 Deceleration time • Lenze setting: 10.
11 Function library 11.1 L_MPot_1 ________________________________________________________________ Parameter Possible settings Info C806 11.1.1 Use of the motor potentiometer 0 No (Lenze setting) The motor potentiometer is not used. • The analog value applied to the nIn_a input is looped through without any changes to the nOut_a output. 1 Yes The motor potentiometer is used. • The analog value applied at the nIn_a input is led via the motor potentiometer and provided at the nOut_a output.
11 Function library 11.1 L_MPot_1 ________________________________________________________________ 11.1.2 Deactivate motor potentiometer When the motor potentiometer is deactivated by setting bInAct to TRUE the nOut_a output signal responds according to the function selected in C804.
11 Function library 11.2 L_NSet_1 ________________________________________________________________ 11.
11 Function library 11.2 L_NSet_1 ________________________________________________________________ Parameter Parameter Possible settings C012 0.0 s 999.9 Acceleration time Tir for the main setpoint • Lenze setting: 2.0 s Info C013 0.000 s 999.9 Deceleration time Tif for the main setpoint • Lenze setting: 2.0 s C039/1 -199.9 % 199.9 Fixed setpoint 1 (JOG setpoint 1) • Lenze setting: 40.0 % C039/2 -199.9 % 199.9 Fixed setpoint 2 (JOG setpoint 2) • Lenze setting: 60.0 % C039/3 -199.
11 Function library 11.2 L_NSet_1 ________________________________________________________________ 11.2.3 Setpoint inversion The output signal of the JOG function is led via an inverter. The sign of the setpoint changes if bNSetInv is set to TRUE. 11.2.4 Ramp function generator for the main setpoint The setpoint is now led via a ramp function generator with linear characteristic. The ramp function generator converts setpoint step-changes at the input into a ramp.
11 Function library 11.3 L_PCTRL_1 ________________________________________________________________ 11.3 L_PCTRL_1 This FB is a PID controller and can be used for various control tasks (e.g. as dancer position controller, tension controller, or pressure controller).
11 Function library 11.3 L_PCTRL_1 ________________________________________________________________ Identifier Information/possible settings Data type bIOff BOOL Switch off I-component of process controller • Changes can be done online. • Display parameter: C833/12 TRUE I-component of the process controller is switched off.
11 Function library 11.3 L_PCTRL_1 ________________________________________________________________ Parameter Possible settings C231/1 (Pos. Maximum) C231/2 (Pos. Minimum) C231/3 (Neg. Minimum) C231/4 (Neg. Maximum) 0.0 Info % 199.9 Operating range • Determination of the operating range for the PID process controller by limiting the input signal nSet_a. • Lenze setting: No limitation (199.9 % ... +199.
11 Function library 11.3 L_PCTRL_1 ________________________________________________________________ 11.3.1 Control characteristic The PI algorithm is active in the Lenze setting. Gain (P component) The input value is controlled by a linear characteristic. The slope of the characteristic is determined by the controller gain Vp. The controller gain Vp is set under C222. • The controller gain can be adapted via the input nAdapt_a (also possible in online mode).
11 Function library 11.3 L_PCTRL_1 ________________________________________________________________ 11.3.2 Ramp function generator The PID output is led via a ramp function generator with linear characteristic. This serves to transfer setpoint step-changes at the PID output into a ramp which should be as steep as possible.
11 Function library 11.4 L_RLQ_1 ________________________________________________________________ 11.4 L_RLQ_1 This FB links a selected direction of rotation to the quick stop function with wire-break protection.
11 Function library 11.4 L_RLQ_1 ________________________________________________________________ Wiring in the application E6HW6SHHG&FZ E&FZ /B16HWB E16HW,QY 0&75/ E4VS2Q E&Z&FZ E&Z 5/4 E4VS E6HW4XLFNVWRS [11-6] Internal wiring 318 Lenze · 8400 BaseLine C · Reference manual · DMS 1.
11 Function library 11.5 LS_AnalogInput ________________________________________________________________ 11.5 LS_AnalogInput The LS_AnalogInput system block displays the analog input in the application on I/O level.
11 Function library 11.6 LS_DigitalInput ________________________________________________________________ 11.6 LS_DigitalInput The LS_DigitalInput system block displays the digital input terminals in the application on I/O level.
11 Function library 11.7 LS_DigitalOutput ________________________________________________________________ 11.7 LS_DigitalOutput The LS_DigitalInput system block displays the digital output terminals in the application on I/O level.
11 Function library 11.8 LS_DisFree ________________________________________________________________ 11.8 LS_DisFree This system block displays any four 16-bit signals of the application on display codes. The signals to be displayed are selected via the given configuration parameters. /6B'LV)UHH &RQILJXUDWLRQ SDUDPHWHUV & & & & Z'LV & Z'LV & Z'LV & Z'LV & Inputs Identifier Information/possible settings Data type wDis1 ...
11 Function library 11.9 LS_DisFree_a ________________________________________________________________ 11.9 LS_DisFree_a This system block displays any four analog signals of the application on display codes. The signals to be displayed are selected via the given configuration parameters. /6B'LV)UHHBD &RQILJXUDWLRQ SDUDPHWHUV & & & & Q'LV BD Q'LV BD Q'LV BD Q'LV BD & & & & Inputs Identifier Information/possible settings Data type nDis1_a ...
11 Function library 11.10 LS_DisFree_b ________________________________________________________________ 11.10 LS_DisFree_b This system block displays any eight digital signals of the application on a bit-coded display code. The signals to be displayed are selected via the given configuration parameters.
11 Function library 11.11 LS_DriveInterface ________________________________________________________________ 11.11 LS_DriveInterface The LS_DriveInterface system block displays the device control in the application.
11 Function library 11.11 LS_DriveInterface ________________________________________________________________ Inputs Identifier Information/possible settings DIS code | data type wCANControl C136/1 | WORD Control word via system bus (CAN) • In the control mode "30: CAN", the controller controlled by a master control (e.g. IPC) receives its control word by the CANopen system bus interface. The process data word is provided at this input by the upstream port block LP_CanIn1.
11 Function library 11.11 LS_DriveInterface ________________________________________________________________ Outputs Identifier Value/meaning DIS code | data type wDeviceStateWord C150 | WORD wStateDetermFailNoLow Status word of the controller (based on DSP-402) • The status word contains information on the currents status of the drive controller. • In control mode "30: CAN", the status word is transmitted to the master control as process data word via the LP_CanOut1 port block.
11 Function library 11.12 LS_Keypad ________________________________________________________________ 11.12 LS_Keypad This system block is used on I/O interconnection level if the "Keypad" control mode has been selected in C007. In the "Keypad" control mode, the LS_Keypad system block passes on various setpoints and control commands to the technology application which can be selected/activated via codes using the keypad. /6B.
11 Function library 11.13 LS_ParFix ________________________________________________________________ 11.13 LS_ParFix This system block outputs various fixed values (constants) to be used in the interconnection. The constants can be assigned to other inputs via configuration parameters.
11 Function library 11.14 LS_ParFree_a ________________________________________________________________ 11.14 LS_ParFree_a This system block outputs 4 parameterisable analog signals. The analog signals can be assigned to other inputs via configuration parameters. /6B3DU)UHHBD & & & & Q3DU BD Q3DU BD Q3DU BD Q3DU BD Outputs Identifier Value/meaning Data type nPar1_a ... nPar4_a Output of the analog signals parameterised in C472/1...
11 Function library 11.15 LS_ParFree_b ________________________________________________________________ 11.15 LS_ParFree_b This system block outputs 16 parameterisable digital signals. The digital signals can be assigned to other inputs via configuration parameters. /6B3DU)UHHBE & & & & & E3DU E3DU E3DU E3DU E3DU Outputs Identifier Value/meaning Data type bPar1 ... bPar16 Output of the signals levels (FALSE/TRUE) parameterised in C470/1...
11 Function library 11.16 LS_SetError_1 ________________________________________________________________ 11.16 LS_SetError_1 This system block is used for error handling within the application. • The application can trip up to two different user error messages with parameterisable error response via the two boolean inputs. • If both inputs are set to TRUE at the same time, the bSetError1 inputs trips the error message.
Index ________________________________________________________________ Numbers 16-bit analog input (C00830) 292 16-bit system connection (C00620) 285 16Bit-Input common (C00831) 292 87-Hz operation 83 8-bit input (C00833) 293 A Acceleration time main setpoint (C00012) 239 Acknowledgement error 206 Activating the bus terminating resistor 173 Active COBID (C00355) 271 AINx Configuration (C00034) 243 Gain (C00027) 242 Input current (C00029) 243 Input voltage (C00028) 242 Offset (C00026) 242 Output value (C00
Index ________________________________________________________________ C245 266, 314 C26 242 C27 242 C28 242 C29 243 C3 237 C308 266 C309 267 C322 267 C323 267 C324 268 C33 243 C34 243 C345 268 C347 269 C350 269 C351 269 C352 270 C353 270 C354 270 C355 271 C356 271 C357 271 C359 272 C36 244 C360 272 C364 273 C366 273 C367 273 C368 274 C369 274 C372 274 C381 274 C385 275 C386 275 C389 275 C39 244, 310 C409 276 C443 277 C444 278 C462 278 C470 278, 331 C472 279, 330 C480 279, 324 C481 279, 322 C482 280, 323 C5
Index ________________________________________________________________ C93 249 C94 249 C95 250 C97 250 C98 250 C99 250 C990 296 C991 296 C992 296 C994 297 CA06 CAN CRC error (error message) 164 CA07 CAN bus warning (error message) 164 CA08 CAN bus stopped (error message) 164 CA0b CAN Bus Live Time (error message) 164 CA0F CAN control word (error message) 165 CAN baud rate (C00351) 269 CAN data telegram 176 CAN error status (C00345) 268 CAN Heartbeat Producer Time (C00381) 274 CAN IN/OUT COBID source (C00353
Index ________________________________________________________________ dF10 Internal error 10 (error message) 168 dH69 Adjustment fault (error message) 168 Digital input assignment 289 Digital inputs 109 Digital outputs 109 Digital terminals 109 DIx Level (C00443) 277 DIx inversion (C00114) 252 DOx Level (C00444) 278 DOx inversion (C00118) 252 Drive interface 44 E Elapsed-hour meter (C00178) 262 Electrical data I/O terminals 119 E-mail to Lenze 340 Emergency 210 Error counter (C00170) 261 Error detection 2
Index ________________________________________________________________ I-1400 221 I-1401 222 I-1600 223 I-1601 223 I-1800 224 I-1801 226 I-1A00 227 I-1A01 227 ID1 Motor data identification error (error message) 163 Identifier (CAN) 176 Identifiers of the parameter data objects 195 Identifiers of the process data objects 189 Identity object (I-1018) 218 Imax controller 81 Imax in generator mode (C00023) 241 Imax in motor mode (C00022) 241 Initial value motor overload (I²xt) (C00122) 253 Integrated error dete
Index ________________________________________________________________ V/f characteristic control (VFCplus) 78 Motor control (C00006) 237 Motor cosine phi (C00091) 249 Motor current (C00054) 245 Motor data 65 Motor load monitoring (I2xt) 104 Motor magnetising current (C00095) 250 Motor magnetising inductance (C00092) 249 Motor overload threshold (I²xt) (C00120) 253 Motor parameter identification 70 Motor parameter identification is active 56 Motor selection 65 Motor stator leakage inductance (C00085) 248 Mo
Index ________________________________________________________________ Selection of switching frequency 92 Selection of the control mode 73 Sensorless vector control (SLVC) 74, 87 Setting the baud rate 173 Setting the error response 153 Setting the node address 173 Short overview of error messages 159 Signal flow V/f characteristic control (VFCplus) 78 V/f control (VFCplus + encoder) 88 Signal source assignment 289 Slip comp.
)(('%$&. 340 Your opinion is important to us These instructions were created to the best of our knowledge and belief to give you the best possible support for handling our product. If you have suggestions for improvement, please e-mail us to: feedback-docu@Lenze.de Thank you for your support.
8400 BaseLine C · Reference manual · EDS84AVBCxx · 13295753 · DMS 1.6 EN · 01/2014 · TD05 Lenze AC Tech Corporation 630 Douglas Street Uxbridge, MA 01569 USA +1 508 / 278-9100 +1 508 / 278-7873 info@actechdrives.com www.actech.com Service Lenze Service GmbH Breslauer Straße 3 D-32699 Extertal Germany 00 80 00 / 24 4 68 77 (24 h helpline) +49 (0)51 54 / 82-11 12 Service@Lenze.