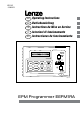
EP01E 13360071 EN DE FR IT ES Operating Instructions Betriebsanleitung Instructions de Mise en Service Istruzioni di funzionamento Instrucciones de funcionamiento COPY epm001 EPM Programmer EEPM1RA
© 2004 Lenze gmbH & C0 KG No part of this documentation may be copied or made available to third parties without the explicit written approval of Lenze GmbH & Co KG. All information given in this documentation has been carefully selected and tested for compliance with the hardware and software described. Nevertheless, discrepancies cannot be ruled out. We do not accept any responsibility nor liability for damages that may occur. Any necessary corrections will be implemented in subsequent editions.
Contents 1 Preface and general information.....................................................2 1.1 1.2 1.3 1.4 1.5 2 Technical data...................................................................................4 2.1 2.2 2.3 3 Battery Operation....................................................................................................6 Changing Batteries.................................................................................................6 Operation with external power supply..
Preface and general information 1 Preface and general information The EEPM1RA EPM programmer enables you to easily duplicate and archive the memory and configuration of inverter drives and servo controllers that utilize the EPM feature.
Preface and general information 1.3 EPM Technology and Operation The EPM uses EEPROM technology housed in a removable plastic casing for protection and ruggedness. A removable memory structure, as provided by an EPM include: • Programming a drive without power. • Easily duplicate proven programs using the EPM Programmer. • Reduce down-time and troubleshooting. The EPM feature is included with several Lenze and AC Tech inverter drive controllers and in the new SimpleServo products.
Technical data 2 Technical data 2.1 General data and application conditions Field Values Type of Protection IP20 Permissible temperature ratings Operation Transport 0 … +50 °C -20 … +60 °C Storage -20 … +60 °C Humidity <85 %, without condensation Weight 1.3 kg with batteries Applied Standards Noise emission to EN 50081-2: 1993 Noise immunity to EN 61000-6-2 : 1999 Approvals UL 508C Underwriters Laboratories Power Conversion Equipment Conformity CE EMC Directive (89/336/CEE) 2.
Technical data 2.
Commissioning 3 Commissioning 3.1 Battery Operation The EPM programmer is immediately ready for operation. It is delivered with 4 batteries (1.5 V mono-cells). 3.2 Changing Batteries For battery operation you need four mono-cell (D size) with 1.5V each. In order to access the battery compartment, you must open the housing of the EPM programmer. epm007 Open the battery compartment of the EPM programmer 1. Remove the 5 screws on the bottom of the EPM programmer 2.
Commissioning 3.3 Operation with external power supply Stop! • Avoid electrostatic discharges (ESD) at the connector for the voltage supply. EPM programmer malfunction may occur. • Take appropriate measures to avoid electrostatic conditions. • Occasionally occurring malfunctions can normally be remedied by switching the EPM Programmer off and then on again. It is also possible to operate the EPM programmer with an external power supply.
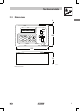
Operation 4 Operation 4.1 Overview of operating elements Display MASTER PORT Plug-in-station for EPM from which the data is to be read. EPM Port Plug-in-station for EPM memory chip on which the data is to be written. COPY Operator Keypad epm001 4.
Operation 4.3 Switch on/off EPM Programmer Switch-on with unprotected access (without password) Press 1. ON The display shows... Explanation EPM PROGRAMMER 2. INTERN CFG 400 Shows the parameter version that the EPM programmer is configured with (e.g. 400). 3. MASTER CFG 400 Shows the parameter version of the EPM (e.g. 400) plugged into the MASTER PORT. MSTFILE#DEFAULTS Shows the name of the parameter file (e.g. DEFAULTS) stored in the EPM plugged into the MASTER PORT.
Operation 4.4 Select Language You can choose between English, German, French, Italian and Spanish languages. • The language change over can be carried out on the menu level and parameter level. • The language set remains stored even after switching off the EPM Programmer. Press 1. The display shows... Explanation Press and hold the ON button. The languages will scroll in 5 second intervals in the sequence: English, German, French, Italian, Spanish. Release ON button when desired language is displayed.
Operation 4.6 Menu Overview After power is switched on and the initialization screens have been displayed, the primary functions of the EPM Programmer are accessed by pressing the MENU button. MASTER –> EPM SECTION 4.7 FILE –> EPM SECTION 4.8 MENU MENU EDIT EPM SECTION 4.9 (servo config. only) MENU EDIT FILE SECTION 4.10 CREATE NEW FILE SECTION 4.11 DELETE FILE SECTION 4.12 LOAD CFG EPM SECTION 4.13 DISPLAY CONTRAST SECTION 4.14 MISCELLANEOUS SECTION 4.
Operation 4.7 Copy from one EPM to another EPM With this function it is possible to copy a parameter file directly from one EPM (a “Master”) to another EPM. • Plug the EPM containing the parameter file you want to copy into the MASTER PORT. • Plug the EPM, to which you want to copy the parameter file, into the EPM PORT. Press 1. 2. 3. MENU ENTER COPY TO EPM The display shows... Explanation MASTER –> EPM Press the key until the menu appears in the display.
Operation 4.8 Copy a file stored in the Programmer to an EPM With this function it is possible to copy a parameter file saved in the EPM programmer to an EPM. • Plug the EPM, to which you want to copy the parameter file, into the EPM PORT. Press 1. 2. 3. MENU ENTER ENTER 4. 5. COPY TO EPM The display shows... Explanation FILE –> EPM Press the key until the menu appears in the display. #DEFAULTS(400)>> The stored name of a parameter file (e.g.
Operation 4.9 Edit the EPM This menu item is only displayed when the EPM Programmer is configured for a Servo product. With this function it is possible to edit PPP BAUDRATE, NETWORK ADDRESS, CAN NODE ID, and CAN BAUDRATE for Model 94 Servo drives. Press 1. 2. MENU ENTER ENTER 3. The display shows... Explanation EDIT EPM Press the key until the menu appears in the display. EPM INFO This request is briefly shown in the display. ********(16384)> The EPM parameter version is displayed.
Operation 4.10 Edit a file stored in the Programmer With this function it is possible to edit an Inverter Drive controller parameter file stored in the EPM programmer. Press 1. 2. MENU ENTER The display shows... Explanation EDIT FILE Press the key until the menu appears in the display. SELECT FILE This request is briefly shown in the display. >#DEFAULTS (400)< The cursor is blinking in the display on the right. The file name of a parameter file (e.g. DEFAULTS) is displayed. 3. 4.
Operation 4.11 Create a new file With this function you create a new parameter file in the EPM programmer. Data for your new file can be copied from the following sources: • Parameter files available on the EPM programmer. • Parameter file from an EPM mounted in the MASTER PORT. Press 1. 2. MENU ENTER The display shows... Explanation CREATE NEW FILE Press the key until the menu appears in the display.
Operation 4.12 Delete a file stored in the Programmer With this function you delete the parameter files stored in the EPM Programmer Press 1. 2. MENU ENTER 3. 4. 5. ENTER ENTER The display shows... Explanation DELETE FILE Press the key until the menu appears in the display. SELECT FILE This request is briefly shown in the display >#DEFAULTS(400)< The cursor is blinking in the display on the right. >#ABC_ _ _ _ _(400)< Select the parameter file you want to delete (e.g. ABC_ _ _ _ _).
Operation 4.14 Contrast setting With this function, you can adjust the viewing angle for the EPM Programmer display. Press 1. 2. 3. ON ENTER ENTER 4. The display shows... Explanation DISPLAY CONTRAST Press the key until the menu appears in the display. CONTRAST MEDIUM The currently set value is indicated (e.g. MEDIUM). . CONTRAST MEDIUM The cursor is blinking in the display on the right. CONTRAST XXXXX Select the setting wanted: CONTRAST LOW CONTRAST MEDIUM CONTRAST HIGH 5. 6.
Operation 4.16 Enter/change password When a password has been set, only the main menus can be accessed until the correct password has been entered. • MASTER –> EPM • DISPLAY CONTRAST • MISCELLANEOUS (without the submenu PASSWORD). Press 1. 2. MENU ENTER 3. 4. ENTER 5. The display shows... Explanation MISCELLANEOUS Press the key until the menu appears in the display. S/W VERSION X.XX Takes you to the submenu. The cursor is blinking in the display on the left.
Troubleshooting and fault elimination 5 Troubleshooting 5.1 Error messages Display Cause Remedy CHANGE BATTERY! The battery voltage is <3.6V (the message is displayed after switching on the EPM programmer. Change the batteries FILE VER INCOMP! The parameter file or servo EPM you are attempting to edit has a different parameter version than the configuration file of the EPM programmer. You can only edit a file if the parameter version corresponds to the configuration file of the EPM programmer.
Troubleshooting and fault elimination Display Cause Remedy MASTER DAMAGED! The EPM in the MASTER PORT is defective. Press the menu key to return to the main menu. Plug an EPM in the MASTER PORT. The EPM is not placed correctly in the MASTER PORT. The message does not indicate an error but only serves as a note. The message is only displayed for a short time. MASTER MISSING Seen on power-up if there is no EPM in the MASTER PORT. Information only.
Notes 22 ENGLISH
Inhalt 1 Vorwort und allgemeine Informationen..........................................2 1.1 1.2 1.3 1.4 1.5 2 Technische Daten.............................................................................4 2.1 2.2 2.3 3 Batteriebetrieb........................................................................................................6 Austauschen der Batterien.....................................................................................6 Betrieb über eine externe Stromversorgung............
Vorwort und allgemeine Informationen 1 Vorwort und allgemeine Informationen Das EEPM1RA EPM-Programmiergerät ermöglicht das problemlose Duplizieren und Archivieren des Speicherinhalts und der Konfiguration von Umrichteransteuerungen und Servoreglern, die die EPM-Funktion verwenden.
Vorwort und allgemeine Informationen Ansteuerungsregler EPM-Farbe: Blau EPM-Dateien können im EPM-Programmiergerät gespeichert werden. Servoregler EPM-Farbe: Blau (Model 94) EPM-Dateien können nicht im EPM-Programmiergerät gespeichert werden. OEM-Standardeinstellungen Wenn das EPM in Umrichteransteuerungsreglern verwendet wird, enthält es eigentlich zwei Ansteuerungsparametersets. Den BENUTZER-Speicher, der von der Ansteuerung normalerweise für den Betrieb verwendet wird.
Technische Daten 2 Technische Daten 2.1 Allgemeine Daten und Anwendungsbedingungen Feld- Werte Schutzart IP20 Zulässige Temperaturwerte Betrieb 0 … +50 °C Transport -20 … +60 °C Lagerung -20 … +60 °C Luftfeuchtigkeit <85 %, ohne Kondensation Gewicht 1,3 kg mit Batterien Geltende Normen Störaussendung gemäß EN 50081-2: 1993 Störfestigkeit gemäß EN 61000-2: 1999 Zulassungen UL 508C Konformität CE Underwriters Laboratories Umrichter EMC-Direktive (89/336/CEE) 2.
Technische Daten 2.
Inbetriebnahme 3 Inbetriebnahme 3.1 Batteriebetrieb Das EPM-Programmiergerät ist sofort einsatzbereit. Im Lieferumfang sind 4 Batterien (1,5-V-Monozellen) enthalten. 3.2 Austauschen der Batterien Für den Batteriebetrieb benötigen Sie vier Monozellen (Typ D) mit je 1,5 V. Um die Batterien in das Batteriefach einlegen zu können, müssen Sie das Gehäuse des EPM-Programmiergeräts öffnen. epm007 Öffnen des Batteriefachs des EPM-Programmiergeräts: 1.
Inbetriebnahme 3.3 Betrieb über eine externe Stromversorgung Stopp! • Vermeiden Sie elektrostatische Entladungen am Anschluss der Spannungsquelle. Ansonsten kann es zu einer Fehlfunktion des EPM-Programmiergeräts kommen. • Treffen Sie entsprechende Vorkehrungen, um elektrostatische Entladungen zu vermeiden. • Gelegentlich auftretende Fehlfunktionen können in der Regel behoben werden, indem Sie das EPMProgrammiergerät aus- und wieder einschalten.
Betrieb 4 Betrieb 4.1 Übersicht über Betätigungselemente Anzeige MASTER PORT Anschlussstation für ein EPM, von dem Daten gelesen werden sollen. EPM Port Anschlussstation für einen EPM-Speicherchip, auf dem Daten gespeichert werden sollen. COPY Bedientastatur epm001 4.
Betrieb 4.3 Ein-/Ausschalten des EPM-Programmiergeräts Einschalten ohne Passwortabfrage Drücken 1. ON Anzeige Erklärung EPM-PROGRAMMER 2. INT.KONF 400 Zeigt die Parameterversion an, mit der das EPMProgrammiergerät konfiguriert wurde (z. B. 400). 3. KONF MASTR 400 Zeigt die Parameterversion des EPM (z. B. 400) an, das am MASTER PORT angeschlossen ist. MSTFILE#DEFAULTS Zeigt den Namen der Parameterdatei (z. B. DEFAULTS) an, die im am MASTER PORT angeschlossenen EPM gespeichert ist.
Betrieb 4.4 Auswählen der Sprache Wählen Sie zwischen den Sprachen Englisch, Deutsch, Französisch, Italienisch, und Spanisch. • Die Sprachänderung kann sowohl auf Menü- als auch auf Parameterebene durchgeführt werden. • Die eingestellte Sprache wird auch nach dem Ausschalten des EPM-Programmiergeräts gespeichert. Drücken 1. Anzeige Erklärung Drücken und halten Sie die Taste EIN.
Betrieb 4.6 Menüübersicht Nachdem das Gerät eingeschaltet und die Initialisierungsbildschirme angezeigt wurden, können die primären Funktionen des EPM-Programmiergeräts durch Drücken der Taste MENÜ aufgerufen werden. MASTER –> EPM ABSCHNITT 4.7 DATEI –> EPM ABSCHNITT 4.8 MENU MENU AUSGABE EPM ABSCHNITT 4.9 (nur Servokonfiguration) MENU AUSGABE DATEI ABSCHNITT 4.10 NEUE DATEI ABSCHNITT 4.11 DATEI LÖSCHEN ABSCHNITT 4.12 CFG EPM LADEN ABSCHNITT 4.13 KONTRAST ANZEIGE ABSCHNITT 4.
Betrieb 4.7 Kopieren von Daten zwischen verschiedenen EPMs Mit dieser Funktion kann eine Parameterdatei direkt von einem EPM (einem „Master“) in ein anderes EPM kopiert werden. • Schließen Sie das EPM mit der zu kopierenden Parameterdatei am MASTER PORT an. • Schließen Sie das EPM, in das die Parameterdatei kopiert werden soll, am EPM PORT an. Drücken 1. 2. 3. MENU ENTER COPY TO EPM Anzeige MASTER Erklärung –> EPM Drücken Sie die Taste, bis das Menü angezeigt wird.
Betrieb 4.8 Kopieren einer im Programmiergerät gespeicherten Datei in ein EPM Mit dieser Funktion kann eine im EPM-Programmiergerät gespeicherte Parameterdatei in ein EPM kopiert werden. • Schließen Sie das EPM, in das die Parameterdatei kopiert werden soll, am EPM PORT an. Drücken 1. 2. 3. MENU ENTER ENTER 4. 5. COPY TO EPM Anzeige Erklärung DATEI –> EPM Drücken Sie die Taste, bis das Menü angezeigt wird.
Betrieb 4.9 Bearbeiten des EPM Dieser Menüpunkt wird nur angezeigt, wenn das EPM-Programmiergerät für ein Servoprodukt konfiguriert wurde. Mit dieser Funktion können für Servoansteuerungen des Models 94 folgende Einstellungen bearbeitet werden: PPP BAUDRATE, NETWORK ADDRESS, CAN NODE ID, und CAN BAUDRATE. Drücken 1. 2. MENU ENTER ENTER 3. Anzeige Erklärung AUSGABE EPM Drücken Sie die Taste, bis das Menü angezeigt wird. INFO EPM Diese Anfrage wird kurz angezeigt.
Betrieb 4.10 Bearbeiten einer im Programmiergerät gespeicherten Datei Mit dieser Funktion kann eine im EPM-Programmiergerät gespeicherte Parameterdatei eines Umrichteransteuerungsreglers bearbeitet werden. Drücken 1. 2. MENU ENTER Anzeige Erklärung AUSGABE DATEI Drücken Sie die Taste, bis das Menü angezeigt wird. DATEI WÄHLEN Diese Anfrage wird kurz angezeigt. >#DEFAULTS(400)< Der Cursor in der Anzeige auf der rechten Seite blinkt. Der Dateiname einer Parameterdatei (z. B.
Betrieb 4.11 Erstellen einer neuen Datei Mit dieser Funktion erstellen Sie eine neue Parameterdatei im EPM-Programmiergerät. Daten für die neue Datei können aus folgenden Quellen kopiert werden: • Aus Parameterdateien, die im EPM-Programmiergerät zur Verfügung stehen. • Aus einer Parameterdatei eines EPM, das am MASTER PORT angeschlossen ist. Drücken 1. 2. MENU ENTER Anzeige Erklärung NEUE DATEI Drücken Sie die Taste, bis das Menü angezeigt wird. DATEINAME EING Diese Anfrage wird kurz angezeigt.
Betrieb 4.12 Löschen einer im Programmiergerät gespeicherten Datei Mit dieser Funktion löschen Sie die im EPM-Programmiergerät gespeicherten Dateien. Drücken 1. 2. MENU ENTER 3. 4. 5. ENTER ENTER Anzeige Erklärung DATEI LÖSCHEN Drücken Sie die Taste, bis das Menü angezeigt wird. DATEI WÄHLEN Diese Anfrage wird kurz angezeigt. >#DEFAULTS(400)< Der Cursor in der Anzeige auf der rechten Seite blinkt. >#ABC_ _ _ _ _(400)< Wählen Sie die Parameterdatei, die gelöscht werden soll (z. B.
Betrieb 4.14 Kontrasteinstellung Mit dieser Funktion können Sie den Betrachtungswinkel für die Anzeige des EPM-Programmiergeräts einstellen. Drücken 1. 2. 3. ON ENTER ENTER 4. Anzeige Erklärung KONTRAST ANZEIGE Drücken Sie die Taste, bis das Menü angezeigt wird. KONTRAST MITTEL Der derzeit eingestellte Wert wird angezeigt (z. B. MITTEL). KONTRAST MITTEL Der Cursor in der Anzeige auf der rechten Seite blinkt.
Betrieb 4.16 Eingeben/Ändern des Passworts Wenn ein Passwort festgelegt wurde, kann ohne Eingabe des korrekten Passworts nur auf die Hauptmenüs zugegriffen werden. • MASTER –> EPM • ANZEIGEKONTRAST • SONSTIGES (ohne das Untermenü KENNWORT) Drücken 1. 2. MENU ENTER 3. Anzeige Erklärung SONSTIGES Drücken Sie die Taste, bis das Menü angezeigt wird. S/W VERSION X.XX KENNWORT: 0000 Ruft das Untermenü auf. Der Cursor in der Anzeige auf der linken Seite blinkt.
Problemlösungen 5 Problemlösungen 5.1 Fehlermeldungen Anzeige Ursache Lösung BATT. WECHSELN! Die Batteriespannung ist <3,6 V (Meldung wird nach dem Einschalten des EPMProgrammiergeräts angezeigt). Neue Batterien einlegen Die Parameterdatei oder das Servo-EPM, das bearbeitet werden soll, hat eine andere Parameterversion als die Konfigurationsdatei des EPM-Programmiergeräts.
Problemlösungen Anzeige Ursache Lösung MASTER DEFEKT! Das EPM am MASTER PORT ist defekt. Drücken Sie die Taste MENÜ, um ins Hauptmenü zurückzuwechseln. Schließen Sie ein EPM am MASTER PORT an. Das EPM ist nicht korrekt am MASTER PORT angeschlossen. Die Meldung zeigt keinen Fehler an, sondern dient lediglich als Hinweis. Die Meldung wird nur für kurze Zeit angezeigt. MASTER FEHLT Diese Meldung wird beim Einschalten angezeigt, wenn am MASTER PORT kein EPM angeschlossen ist.
Notes 22 DEUTSCH
Table des matières 1 Préface et informations générales..................................................2 1.1 1.2 1.3 1.4 1.5 2 Caractéristiques techniques............................................................4 2.1 2.2 2.3 3 Fonctionnement avec piles.....................................................................................6 Remplacement des piles........................................................................................
Préface et informations générales 1 Préface et informations générales Le programmateur EPM EEPM1RA vous permet de copier et d’archiver facilement la mémoire et la configuration des convertisseurs de fréquence et des servovariateurs utilisant le module EPM.
Préface et informations générales 1.3 Technologie et fonctionnement de l’EPM L’EPM intègre la technologie EEPROM dans un boîtier de protection en plastique, amovible et robuste. Une conception de mémoire amovible, telle que celle proposée par l’EPM, comprend les avantages suivants : • La programmation d’un moteur d’entraînement sans source d’alimentation. • La copie aisée des programmes éprouvés à l’aide du programmateur EPM. • La réduction du délai d’indisponibilité et de dépannage.
Caractéristiques techniques 2 Caractéristiques techniques 2.
Caractéristiques techniques 2.
Mise en service 3 Mise en service 3.1 Fonctionnement avec piles Le programmateur EPM est livré prêt à fonctionner. Il est fourni avec 4 piles (monocellules de 1,5 V). 3.2 Remplacement des piles Quatre piles (taille D) de 1,5 V chacune sont requises. (taille D) de 1,5 V chacune. Pour accéder au compartiment des piles, ouvrez le boîtier du programmateur EPM. epm007 Ouvrir le compartiment des piles du programmateur EPM 1. Retirez les 5 vis situées sur la partie inférieure du programmateur EPM. 2.
Mise en service 3.3 Fonctionnement avec’une source d’alimentation externe Stop ! • Évitez les décharges électrostatiques au niveau du connecteur d’alimentation. Un dysfonctionnement du programmateur EPM peut se produire. • Prenez les mesures nécessaires afin d’éviter les conditions de décharge électrostatique. • Mettez le programmateur EPM hors tension puis à nouveau sous tension afin de remédier aux dysfonctionnements générés occasionnellement.
Fonctionnement 4 Fonctionnement 4.1 Présentation des éléments de fonctionnement Affichage PORT MAÎTRE Emplacement enfichable pour l’EPM à partir duquel les données doivent être lues. Port EPM Emplacement enfichable pour la puce mémoire de l’EPM sur laquelle les données doivent être écrites. COPY Clavier commande de epm001 4.
Fonctionnement 4.3 Mise sous/hors tension du programmateur EPM Mise sous tension sans accès protégé (sans mot de passe) Appuyez sur 1. ON Explication L’affichage indique… PROGRAMMATEUR 2. CFG INTERN 400 Indique la version des paramètres selon laquelle le programmateur EPM est configuré (par exemple, 400). 3. CFG MAITRE 400 Indique la version des paramètres de l’EPM (par exemple, 400) relié au PORT MAÎTRE. 4.
Fonctionnement 4.4 Sélection d’une langue Vous avez le choix entre l’anglais, l’allemand, le français, l’Italien, et l’Espagnol. • Le changement de langue peut s’effectuer au niveau des menus ou des paramètres. • La langue définie reste mémorisée une fois que le programmateur EPM a été mis hors tension. Appuyez sur 1. L’affichage indique… Explication Appuyez sur le bouton ON et maintenez-le enfoncé.
Fonctionnement 4.6 Présentation du menu Une fois le programmateur EPM mis sous tension et les écrans d’initialisation affichés, les fonctions principales sont accessibles à l’aide du bouton MENU. MAITRE -> EPM SECTION 4.7 FICHIER -> EPM SECTION 4.8 MENU MENU EDITER EPM SECTION 4.9 (configuration servo uniquement) MENU EDITER FICHIER SECTION 4.10 CREER FICHIER SECTION 4.11 EFFACER FICHIER SECTION 4.12 CHARGER CFG EPM SECTION 4.13 REGLER CONTRASTE SECTION 4.14 AUTRES SECTION 4.
Fonctionnement 4.7 Copie d’un EPM vers un autre Cette fonction permet de copier un fichier de paramètres directement d’un EPM (un « MAÎTRE ») vers un autre. • Enficher l’EPM contenant le fichier de paramètres que vous souhaitez copier sur le PORT MAÎTRE. • Enficher l’EPM sur lequel vous souhaitez copier le fichier de paramètres sur le PORT EPM. Appuyez sur 1. 2. 3. MENU ENTER COPY TO EPM L’affichage indique… Explication MAITRE -> EPM Maintenez la touche enfoncée jusqu’à ce que le menu s’affiche.
Fonctionnement 4.8 Copie d’un fichier stocké dans le programmateur vers un EPM Cette fonction permet de copier un fichier de paramètres enregistré dans le programmateur EPM vers un EPM. • Enficher l’EPM sur lequel vous souhaitez copier le fichier de paramètres sur le PORT EPM. Appuyez sur 1. 2. 3. MENU ENTER ENTER 4. 5. COPY TO EPM L’affichage indique… Explication FICHIER -> EPM Maintenez la touche enfoncée jusqu’à ce que le menu s’affiche.
Fonctionnement 4.9 Modification de l’EPM Cet élément de menu s’affiche uniquement lorsque le programmateur EPM est configuré pour un produit de la gamme des servovariateurs. Cette fonction permet de modifier PPP BAUDRATE, NETWORK ADDRESS, CAN NODE ID et CAN BAUDRATE pour les servovariateurs type 94. Appuyez sur 1. 2. MENU ENTER ENTER 3. L’affichage indique… Explication EDITER EPM Maintenez la touche enfoncée jusqu’à ce que le menu s’affiche. INFO EPM Cette requête s’affiche brièvement.
Fonctionnement 4.10 Modification d’un fichier stocké dans le programmateur Cette fonction permet de modifier un fichier de paramètres relatif à un jeu de paramètres d’un convertisseur de fréquence, stocké dans le programmateur EPM. Appuyez sur 1. 2. MENU ENTER L’affichage indique… Explication EDITER FICHIER Maintenez la touche enfoncée jusqu’à ce que le menu s’affiche. CHOISIR FICHIE Cette requête s’affiche brièvement. >#DEFAULTS (400)< Le curseur clignote à droite de l’affichage.
Fonctionnement 4.11 Création d’un fichier Cette fonction vous permet de créer un nouveau fichier de paramètres dans le programmateur EPM. Vous pouvez copier les données de ce fichier à partir des sources suivantes : • Fichiers de paramètres disponibles dans le programmateur EPM • Fichier de paramètres d’un EPM monté sur le PORT MAÎTRE. Appuyez sur 1. 2. MENU ENTER L’affichage indique… Explication CREER FICHIER Maintenez la touche enfoncée jusqu’à ce que le menu s’affiche.
Fonctionnement 4.12 Suppression d’un fichier enregistré dans le programmateur Cette fonction vous permet de supprimer les fichiers de paramètres enregistrés dans le programmateur EPM. Appuyez sur 1. 2. MENU ENTER 3. 4. 5. ENTER ENTER L’affichage indique… Explication EFFACER FICHIER Maintenez la touche enfoncée jusqu’à ce que le menu s’affiche. CHOISIR FICHIE Cette requête s’affiche brièvement >#DEFAULTS(400)< Le curseur clignote à droite de l’affichage.
Fonctionnement 4.14 Réglage du contraste Cette fonction vous permet de régler l’angle de vision de l’affichage du programmateur EPM. Appuyez sur 1. 2. 3. ON ENTER ENTER 4. L’affichage indique… Explication REGLER CONTRASTE Maintenez la touche enfoncée jusqu’à ce que le menu s’affiche. CONTRASTE NORMAL La valeur définie actuellement s’affiche (par exemple, NORMAL). CONTRASTE NORMAL Le curseur clignote à droite de l’affichage.
Fonctionnement 4.16 Saisie/modification du mot de passe Lorsqu’un mot de passe a été défini, seuls les menus principaux sont accessibles jusqu’à ce que le mot de passe correct soit saisi. • MAITRE -> EPM • REGLER CONTRASTE • AUTRES (sans le sous-menu MOT_PASSE). Appuyez sur 1. 2. MENU ENTER 3. L’affichage indique… Explication AUTRES Maintenez la touche enfoncée jusqu’à ce que le menu s’affiche. VERSION SW X.XX Affiche le sous-menu. Le curseur clignote à gauche de l’affichage.
Dépannage 5 Dépannage 5.1 Messages d’erreur Affichage Cause Solution CHANGER PILES ! La tension d’alimentation est <3,6 V (le message s’affiche une fois que le programmateur EPM est sous tension). Remplacez les piles FICHIER ERRONE ! La version des paramètres du fichier de paramètres ou de l’EPM servo que vous souhaitez modifier est différente de celle du fichier de configuration du programmateur EPM.
Dépannage Affichage Cause Solution MAITRE ENDOMMAGE L’EPM du PORT MAÎTRE est défectueux. Appuyez sur la touche Menu pour revenir au menu principal. Insérez un EPM dans le PORT MAÎTRE. L’EPM n’est pas correctement positionné dans le PORT MAÎTRE. Le message n’indique aucune erreur mais fait office de remarque. Le message ne reste affiché qu’un court instant. MAITRE MANQUANT Détection de l’absence éventuelle d’un EPM dans le PORT MAÎTRE lors de la mise sous tension. Informations uniquement.
Remarques 22 FRANÇAIS
Indice 1 Prefazione e informazioni generali.................................................2 1.1 1.2 1.3 1.4 1.5 2 Dati tecnici.........................................................................................4 2.1 2.2 2.3 3 Funzionamento a batteria.......................................................................................6 Sostituzione delle batterie.......................................................................................6 Funzionamento con l’alimentazione esterna...
Prefazione e informazioni generali 1 Prefazione e informazioni generali Il programmatore EPM EEPM1RA consente all’utente di duplicare e memorizzare facilmente la memoria e la configurazione degli inverter e dei servo-azionamenti che utilizzano la funzione EPM.
Prefazione e informazioni generali Inverter Colore dell’EPM:Blu I file EPM sono memorizzabili nel programmatore EPM Servo-azionamenti Colore dell’EPM: Blu (Modello 94) I file EPM non sono memorizzabili nel programmatore EPM Valori OEM predefiniti L’EPM, quando impiegato negli inverter, contiene in realtà due serie di parametri per l’azionamento stesso. La memoria dell’UTENTE, cioè quella che l’azionamento solitamente utilizza per il suo funzionamento.
Dati tecnici 2 Dati tecnici 2.
Dati tecnici 2.
Messa in servizio 3 Messa in servizio 3.1 Funzionamento a batteria Il programmatore EPM è subito pronto per l’uso. È fornito con 4 batterie (1,5 V a cella singola). 3.2 Sostituzione delle batterie Per il funzionamento a batteria è necessario utilizzare quattro unità a cella singola (tipo D) da 1,5 V ciascuna. Per accedere al vano batterie, bisogna aprire la scatola del programmatore EPM. epm007 Aprire il vano batterie del programmatore EPM 1.
Messa in servizio 3.3 Funzionamento con l’alimentazione esterna Stop! • Evitare di scaricare energia elettrostatica (ESD) sul connettore per la tensione di rete. Ciò può provocare il malfunzionamento del programmatore EPM. • Intraprendere le misure opportune per evitare tali scariche. • Eventuali malfunzionamenti occasionali possono essere solitamente risolti spegnendo e quindi riaccendendo il programmatore EPM. È anche possibile mettere in funzione il programmatore EPM con un alimentatore esterno.
Funzionamento 4 Funzionamento 4.1 Panoramica degli elementi operativi Schermo PORTA MASTER Alloggiamento per la memoria EPM da cui si stanno per leggere i dati. Porta EPM Alloggiamento per la memoria EPM su cui si stanno per scrivere i dati. COPY epm001 Tastierino per l’operatore 4.
Funzionamento 4.3 Accensione/spegnimento del programmatore EPM Accensione con accesso non protetto (senza password) Premere 1. ON Lo schermo mostra... Spiegazione PROGRAMMATORE EPM 2. CFG INTERNA 400 Mostra la versione di parametri con cui è configurato il programmatore EPM (ad es., 400). 3. CFG MASTER 400 Mostra la versione di parametri dell’EPM (ad es., 400) inserito nella MASTER PORT. 4. MSTFILE#DEFAULTS Mostra il nome del file parametri (ad es.
Funzionamento 4.4 Selezione della lingua È possibile scegliere tra le lingue inglese, tedesca, francese, italiana e spagnola. • Il cambio della lingua può avvenire a livello di menu e a livello di parametro. • L’impostazione della lingua resta memorizzata anche dopo lo spegnimento del programmatore EPM. Premere 1. Lo schermo mostra... Spiegazione Premere senza rilasciare il pulsante ON.
Funzionamento 4.6 Panoramica del menu Dopo l’accensione dell’alimentatore e dopo la comparsa delle schermate di inizializzazione, è possibile accedere alle funzioni principali del programmatore EPM premendo il pulsante MENU. MASTER –> EPM SEZIONE 4.7 FILE –> EPM SEZIONE 4.8 MENU MENU MODIFICA EPM SEZIONE 4.9 (solo configurazione servo) MENU MODIFICA FILE SEZIONE 4.10 NUOVO FILE SEZIONE 4.11 CANCELLA FILE SEZIONE 4.12 CARICA CFG EPM SEZIONE 4.13 CONTRASTO SEZIONE 4.14 ALTRO SEZIONE 4.
Funzionamento 4.7 Copia da un EPM all’altro Con questa funzione è possibile copiare un fi le di parametri direttamente da un EPM (il “Master”) all’altro. • Inserire l’EPM contenente il file di parametri che si desidera copiare nella MASTER PORT. • Inserire l’EPM su cui si desidera copiare il file di parametro, nella PORTA EPM. Premere 1. 2. 3. MENU ENTER COPY TO EPM Lo schermo mostra... Spiegazione MASTER Premere il tasto fino a far apparire il menu nello schermo.
Funzionamento 4.8 Copia di un file memorizzato nel programmatore in un EPM Con questa funzione è possibile copiare su un EPM un file di parametri salvato nel programmatore EPM. • Inserire l’EPM su cui si desidera copiare il file di parametro, nella PORTA EPM. Premere 1. 2. 3. MENU ENTER ENTER 4. 5. COPY TO EPM Lo schermo mostra... Spiegazione FILE Premere il tasto fino a far apparire il menu nello schermo. –> EPM #DEFAULTS(400)>> Appare il nome memorizzato del file di parametro (ad es.
Funzionamento 4.9 Modifica dell’EPM Questa voce di menu appare solo quando il programmatore EPM è configurato per un prodotto Servo. Con questa funzione è possibile modificare la BAUDRATE, NETWORK ADDRESS, CAN NODE ID, e la CAN BAUDRATE per gli azionamenti modello 94 Servo. Premere 1. 2. MENU ENTER Lo schermo mostra... Spiegazione MODIFICA EPM Premere il tasto fino a far apparire il menu nello schermo. INFO EPM Questa richiesta è indicata brevemente sullo schermo. ********(16384)> ENTER 3.
Funzionamento 4.10 Modifica di un file memorizzato nel programmatore Con questa funzione è possibile modificare un file di parametro di un azionamento per inverter memorizzato nel programmatore EPM. Premere 1. 2. MENU ENTER Lo schermo mostra... Spiegazione MODIFICA FILE Premere il tasto fino a far apparire il menu nello schermo. SELEZIONA FILE Questa richiesta è indicata brevemente sullo schermo. >#DEFAULTS (400)< Il cursore sta lampeggiando sulla destra dello schermo.
Funzionamento 4.11 Creazione di un nuovo file Con questa funzione l’utente crea un nuovo file di parametri nel programmatore EPM. I dati per questo nuovo file possono essere copiati dalle seguenti fonti: • File di parametri disponibili sul programmatore EPM. • File di parametri provenienti da un EPM montato nella MASTER PORT. Premere 1. 2. MENU ENTER Lo schermo mostra... Spiegazione CREA NUOVO FILE Premere il tasto fino a far apparire il menu nello schermo.
Funzionamento 4.12 Cancellazione di un file memorizzato nel programmatore Questa funzione cancella i file di parametri memorizzati nel programmatore EPM. Premere 1. 2. MENU ENTER 3. 4. 5. ENTER ENTER Lo schermo mostra... Spiegazione CANCELLA FILE Premere il tasto fino a far apparire il menu nello schermo. SELEZIONA FILE Questa richiesta è indicata brevemente sullo schermo >#DEFAULTS(400)< Il cursore sta lampeggiando sulla destra dello schermo.
Funzionamento 4.14 Impostazione del contrasto Con questa funzione, è possibile regolare l’angolo di visuale per lo schermo del programmatore EPM. Premere 1. 2. 3. ON ENTER ENTER 4. Lo schermo mostra... Spiegazione CONTRASTO SCHERMO Premere il tasto fino a far apparire il menu nello schermo. CONTRASTO MEDIO È indicato il valore attuale impostato (ad es., MEDIO). CONTRASTO MEDIO Il cursore sta lampeggiando sulla destra dello schermo.
Funzionamento 4.16 Immissione/modifica della password Una volta impostata la password, è possibile accedere solo al menu principale finché non si immette la password corretta. • MASTER –> EPM • CONTRASTO DELLO SCHERMO • VARIE (senza il menu secondario PASSWORD). Premere 1. 2. MENU ENTER 3. Lo schermo mostra... Spiegazione VARIE Premere il tasto fino a far apparire il menu nello schermo. S/W VERSIONE X.XX PASSWORD: 0000 Riporta l’utente al sottomenu.
Risoluzione dei problemi 5 Risoluzione dei problemi 5.1 Messaggi di errore Schermo Causa Rimedio CAMBIA LA BATTERIA! La tensione della batteria è di <3,6V (il messaggio appare dopo l’accensione del programmatore EPM). Sostituzione delle batterie VER FILE INCOMP! Il file di parametri o l’EPM del servoazionamento che si sta cercando di modificare ha una versione di parametro diversa rispetto al file di configurazione del programmatore EPM.
Risoluzione dei problemi Schermo Causa Rimedio MASTER DANNEGGIATO! L’EPM nella MASTER PORT è difettoso. Premere il tasto MENU per tornare al menu principale. Inserire un EPM nella MASTER PORT. L’EPM non è inserito correttamente nella MASTER PORT. Il messaggio non indica un errore ma serve solo a richiamare l’attenzione. Il messaggio appare solo per un breve periodo. MASTER PERSO Appare all’accensione se non vi è alcun EPM nellaMASTER PORT. Solo a scopo informativo.
Note 22 ITALIANO
Contenido 1 Prólogo e información general........................................................2 1.1 1.2 1.3 1.4 1.5 2 Datos técnicos..................................................................................4 2.1 2.2 2.3 3 Funcionamiento con baterías.................................................................................6 Cambio de las baterías...........................................................................................
Prólogo e información general 1 Prólogo e información general El módulo EPM EEPM1RA le permite duplicar y archivar fácilmente la memoria y configuración de convertidores de frecuencia y servocontroladores que utilizan la función EPM.
Prólogo e información general 1.3 Tecnología y funcionamiento de EPM El EPM utiliza tecnología EEPROM en el interior de una cubierta de plástico desmontable que añade protección y resistencia al conjunto. Una estructura de memoria portátil de un EPM permite: • Programar una unidad sin alimentación. • Duplicar fácilmente programas con el módulo EPM. • Reducir los tiempos de inactividad y la solución de problemas.
Datos técnicos 2 Datos técnicos 2.
Datos técnicos 2.
Puesta en marcha 3 Puesta en marcha 3.1 Funcionamiento con baterías El módulo EPM está listo para su funcionamiento inmediato. Se entrega con 4 baterías (elementos separados de 1,5 V). 3.2 Cambio de las baterías Necesita cuatro elementos separados (tamaño D) de 1,5 V cada uno para el funcionamiento con baterías. Para acceder al compartimento de la batería, debe abrir la cubierta del módulo EPM. epm007 Abra el compartimento de la batería del módulo EPM 1.
Puesta en marcha 3.3 Funcionamiento de la unidad con la fuente de alimentación externa ¡ Stop ! • Evite las descargas electrostáticas (ESD) en el conector de la fuente de alimentación. Puede producirse un fallo en el módulo EPM. • Tome las medidas necesarias para evitar las descargas electrostáticas. • Es posible remediar fallos circunstanciales desconectando y volviendo a conectar el módulo EPM. También es posible utilizar el módulo EPM con un fuente de alimentación externa.
Funcionamiento 4 Funcionamiento 4.1 Resumen de los elementos de funcionamiento Pantalla Puerto MASTER Conexión del módulo EPM desde donde se leen los datos. Puerto EPM Conexión del chip de memoria del módulo EPM desde donde se escriben los datos. COPY Teclado del operador epm001 4.
Funcionamiento 4.3 Encendido/apagado del módulo EPM Encendido con acceso libre (sin contraseña) Si pulsa 1. ON La pantalla muestra... Explicación PROGRAMADOR EPM 2. CFG INT. 400 Muestra la versión con la que el módulo EPM está configurado (por ejemplo 400). 3. CFG MASTER 400 Muestra la versión del parámetro del EPM (por ejemplo 400) conectado en el PUERTO MASTER. 4. ARCHMST#DEFAULTS Muestra el nombre del archivo de parámetros (por ejemplo DEFAULTS) del EPM conectado al PUERTO MASTER.
Funcionamiento 4.4 Selección de idioma Puede elegir entre inglés, alemán, francés, italiano y español. • La selección de idioma se puede realizar en el nivel de menú y en el nivel de parámetros. • La selección de idioma seguirá activa hasta que vuelva a conectar el módulo EPM. Si pulsa 1. La pantalla muestra... Explicación Mantener pulsado el botón de encendido ON. Los idiomas irán apareciendo en una secuencia de 5 segundos: Inglés, Alemán, Francés, Italiano, Español.
Funcionamiento 4.6 Resumen de menús Después de conectar la unidad y tras visualizar la pantalla de inicio, puede acceder a las funciones principales del módulo EPM pulsando el botón MENU. MASTER –> EPM SECCIÓN 4.7 ARCHIVO –> EPM SECCIÓN 4.8 MENU MENU EDICION EPM SECCIÓN 4.9 (configuración de servo únicamente) MENU EDITAR ARCHIVO SECCIÓN 4.10 NUEVO ARCHIVO SECCIÓN 4.11 BORRAR ARCHIVO SECCIÓN 4.12 CARGAR CFG EPM SECCIÓN 4.13 CONTRAST DISPLAY SECCIÓN 4.14 MISCELLANEOUS SECCIÓN 4.
Funcionamiento 4.7 Copia de un módulo EPM a otro módulo EPM Con esta función es posible copiar un archivo de parámetros directamente desde un módulo EPM (un “Master”) a otro módulo EPM. • Conecte el módulo EPM que contiene el archivo de parámetros que desea copiar en el puerto MASTER. • Conecte el módulo EPM en el que desea copiar el archivo de parámetros en el puerto EPM. Si pulsa 1. 2. 3. MENU ENTER COPY TO EPM La pantalla muestra...
Funcionamiento 4.8 Copia de un archivo guardado en el módulo en un EPM Con esta función es posible copiar un archivo de parámetros guardado en el módulo EPM en un EPM. • Conecte el módulo EPM en el que desea copiar el archivo de parámetros en el puerto EPM. Si pulsa 1. 2. 3. MENU ENTER ENTER 4. 5. COPY TO EPM La pantalla muestra... Explicación ARCHIVO –> EPM Pulse la tecla hasta que aparezca el menú en la pantalla.
Funcionamiento 4.9 Edición EPM Este elemento de menú sólo aparece si el módulo EPM está configurado para un producto Servo. Con esta función es posible editar PPP BAUDRATE (Velocidad en baudios PPP), NETWORK ADDRESS (Dirección de red), CAN NODE ID (Identificación de nodo CAN) y CAN BAUDRATE (Velocidad en baudios CAN) de las unidades Servo del modelo 94. Si pulsa 1. 2. MENU ENTER ENTER 3. La pantalla muestra... Explicación EDICION EPM Pulse la tecla hasta que aparezca el menú en la pantalla.
Funcionamiento 4.10 Edición de un archivo guardado en el módulo Con esta función es posible editar parámetros del controlador del convertidor almacenado en el módulo EPM. Si pulsa 1. 2. MENU ENTER La pantalla muestra... Explicación EDITAR ARCHIVO Pulse la tecla hasta que aparezca el menú en la pantalla. SELEC. ARCHIVO Este mensaje aparece brevemente en la pantalla. >#DEFAULTS (400))< El cursor parpadea en la parte derecha de la pantalla.
Funcionamiento 4.11 Creación de un archivo nuevo Mediante esta función podrá crear un archivo de parámetros nuevo en el módulo EPM. Los datos del archivo nuevo se pueden copiar desde las siguientes fuentes: • Archivos de parámetros disponibles en el módulo EPM. • Archivo de parámetros de un EPM instalado en el puerto MASTER. Si pulsa 1. 2. MENU ENTER La pantalla muestra... Explicación NUEVO ARCHIVO Pulse la tecla hasta que aparezca el menú en la pantalla. INTR.NOM.
Funcionamiento 4.12 Eliminación de un archivo guardado en el módulo Con esta función puede eliminar el archivo de parámetros guardado en el módulo EPM Si pulsa 1. 2. MENU ENTER 3. 4. 5. ENTER ENTER La pantalla muestra... Explicación BORRAR ARCHIVO Pulse la tecla hasta que aparezca el menú en la pantalla. SELEC. ARCHIVO Este mensaje aparece brevemente en la pantalla >#DEFAULTS(400)< El cursor parpadea en la parte derecha de la pantalla.
Funcionamiento 4.14 Ajuste de contraste Con esta función, puede ajustar el ángulo de visión de la pantalla del módulo EPM. Si pulsa 1. 2. 3. ON ENTER ENTER 4. La pantalla muestra... Explicación CONTRAST DISPLAY Pulse la tecla hasta que aparezca el menú en la pantalla. CONTRASTE MEDIO Se muestra el valor definido actualmente (por ejemplo MEDIO). CONTRASTE MEDIO El cursor parpadea en la parte derecha de la pantalla.
Funcionamiento 4.16 Definición/cambio de contraseña Cuando se define una contraseña, sólo es posible acceder a los menús principales si introduce la contraseña correcta. • MASTER –> EPM • CONTRAST DISPLAY • MISCELLANEOUS (sin el submenú PASSWORD). Si pulsa 1. 2. MENU ENTER 3. La pantalla muestra... Explicación MISCELLANEOUS Pulse la tecla hasta que aparezca el menú en la pantalla. S/W VERSION X.XX PASSWORD: 0000 Le lleva al submenú. El cursor parpadea en la parte izquierda de la pantalla.
Solución de problemas 5 Solución de problemas 5.1 Mensajes de error Pantalla Motivo Solución CAMBIAR BATERIA! La tensión de las baterías es <3,6 V (este mensaje aparece después de encender el módulo EPM.) Cambie las baterías. VER ARCH INCOMP! El archivo de parámetros o el módulo servo EPM que intenta editar tiene una versión de parámetros diferente del archivo de configuración del módulo EPM.
Solución de problemas Pantalla Motivo Solución MASTER DAÑADO! El EPM en el puerto MASTER está dañado. Pulse la tecla de menú para volver al menú principal. Conecte un módulo EPM en el puerto MASTER. El módulo EPM no está colocado correctamente en el puerto MASTER. El mensaje no indica un error, sino que sirve como notificación. Este mensaje sólo aparece brevemente. FALTA MASTER! Aparece al encender la unidad si no hay un módulo EPM en el puerto MASTER. Información únicamente.
Notas 22 ESPANOL
Lenze AC Tech Corporation 630 Douglas Street • Uxbridge, MA 01569 • USA Sales (800) 217-9100 • Service (508) 278-9100 www.lenzeamericas.