L−force Controls Ä.GdWä LDCDP−11999 .
, Please read these instructions before you start working! Follow the enclosed safety instructions.
Contents 1 2 3 4 5 i About this documentation . . . . . . . . . . . . . . . . . . . . . . . . . . . . . . . . . . . . . . . . . . . . . . . . . . 4 1.1 Validity information . . . . . . . . . . . . . . . . . . . . . . . . . . . . . . . . . . . . . . . . . . . . . . . . . . 4 1.2 Target group . . . . . . . . . . . . . . . . . . . . . . . . . . . . . . . . . . . . . . . . . . . . . . . . . . . . . . . . 4 1.3 Document history . . . . . . . . . . . . . . . . . . . . . . . . . . . . . . . . . . .
1 About this documentation Validity information 0Fig. 0Tab. 0 1 About this documentation 1.1 Validity information These instructions are valid for ƒ 1.2 "Windowsâ CE Thin Client" software Target group This documentation is directed at qualified skilled personnel according to IEC 60364. Qualified skilled personnel are persons who have the required qualifications to carry out all activities involved in installing, mounting, commissioning, and operating the product.
Product description 2 About this software 2 Product description 2.1 About this software The «Windowsâ CE Thin Client» software is an operating system specifically designed for the access to Microsoft terminal services, based on Windowsâ CE 6.0 and its RDP 6.0 protocol. Its difference to other Windows systems is the minimised user interface providing a safe and simple application to the user. All processes are executed on the server connected to the Thin Client.
2 Product description Operating conditions Further functions Command line: The software supports the entry of commands via the CE command line (¶ 19)/(¶ 20) Network programs: In the software the IPConfig and Ping network programs are implemented. These programs can be used for the configuration of the network. They are called via the command line (see above).
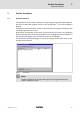
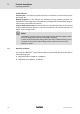
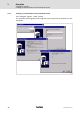
Operation 3 Starting the «Terminal Connection Manager» 3 Operation 3.1 Starting the «Terminal Connection Manager» The operating system is located on the CF card of the Thin Client. When the Thin Client is started, the operating system is loaded. The user interface, the Terminal Connection Manager, appears. Fig. 3−1 3.
3 Operation "Connections" register 3.3 "Connections" register In the "Connections" register you can establish a connection to a server, which was established previously in the "Configure" register. 8 Dialog Box Function Connection Name List of the connections. The standard Microsoft connection "Default Remote Desktop Connection" is always available. Type Connection type; at present only "RDP" is possible here. Status Connection status [Connect] Activate connection selected in the list field.
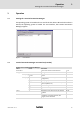
Operation 3 "Configure" register 3.4 "Configure" register In the "Configure" register you create or edit connections. Dialog Box Function Connection Name List of the connections configured. The standard Microsoft connection "Default Remote Desktop Connection" is always available. Type Connection type; at present only "RDP" is possible here. Startup Starting performance Default: Standard connection Auto−start: The connection is configured for an automatic start. [Add...
3 Operation "Configure" register Creating a new connection via the connection wizard 3.4.1 Creating a new connection via the connection wizard Call: "Configure" register ® [Add...] button The connection wizard guides you through the steps required for the creation of a new connection. TC00 10 l LDCDP−11999 EN 3.
Operation 3 "Configure" register Creating a new connection via the connection wizard Dialog name Dialog Box Function New Connection Select the type of connection to create The Thin Client supports the "Microsoft Remote Desktop Client". The "New Connection" window can thus be simply confirmed with [OK]. [OK] Change to the next dialog of the connection wizard. Name Enter name of the connection. Server Enter network name or IP address of the server to which a connection is to be established.
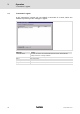
3 Operation "Configure" register Configuring the connection (extended configuration) 3.4.2 Configuring the connection (extended configuration) In the registers presented in the following you configure the connection selected. "General" register Call: "Configure" register ® [Edit...] button ) Note! Some dialog elements can only be viewed if after the first call of the connection, when the user data are entered, the "Remember my password" control field has been ticked. Fig.
Operation 3 "Configure" register Configuring the connection (extended configuration) Dialog Box Function Computer Network name of the server. Both the network name and the IP address can be specified. User Name User name according to the user account created on the server. Behind the "User name" it says "None specified" until a connection has been established for the first time. During the connection establishment, a query with regard to the "User name" and the password is carried out.
3 Operation "Configure" register Configuring the connection (extended configuration) "Display" register Call: "Configure" register ® [Edit...] button In the "Display" register you configure the display properties of the Thin Client. Dialog Box Function Remote desktop size Resolution in which the server session is displayed on the Thin Client. Colors Colour depth with which the server session is displayed on the Thin Client. Possible settings are 8 bits and 16 bits.
Operation 3 "Configure" register Configuring the connection (extended configuration) "Local Resources" register Call: "Configure" register ® [Edit...] button This register can be used to enable local resources of the Thin Client for the use during a terminal session. Dialog Box Function Remote Computer Sound Set sound output.
3 Operation "Configure" register Configuring the connection (extended configuration) "Programs" register Call: "Configure" register ® [Edit...] button On this register the settings for the start application can be changed. 16 Dialog Box Function Start the following program on connection If selected, after logon on the server an application is started. "Application file name" field: Application.exe "Working directory" field: Directory path of the exe file (e.g.
Operation 3 "Configure" register Configuring the connection (extended configuration) "Experience" register Call: "Configure" register ® [Edit...] button This register can be used to carry out settings on the network performance. Dialog Box Function Choose your connection ... Select preconfigured setting.
3 Operation "Configure" register Configuring the connection (extended configuration) "Advanced" register Call: "Configure" register ®[Edit...] button This register can be used to preselect settings on the "Server authentication". This serves to check that the connection has been established to the correct server.
Operation 3 "F−Keys" register 3.5 "F−Keys" register In the "Connection" register you can configure the function keys (F−keys) and the software keyboard. Dialog Box Function Function Specify function of the respective F−key. The functions of keys F1, F2, and F3 can be executed in the standard mode. The key with the spanner symbol corresponds to the F1−key after switch−over to the service mode.
3 Operation "General" register 3.6 "General" register In the "General" register you can configure the network connection, calibrate the touchscreen, set a system password, and restart a program and the device. Dialog Box Function LAN, Terminal Name Enter network name of the Thin Client LAN, [Settings...] Open dialog for the entry of network parameters. Possible entries: Obtain IP address via DHCP server or use fixed IP address. LAN, [Advanced...
Operation 3 "General" register Dialog Box Function Lifecheck, Enabled If the control field is ticked, the "Lifecheck" function is active, which transmits a "sign of life" to the server to check the connection. Lifecheck, [Settings] Opens the dialog for the configuration of the lifecheck. Depending on the "Send "F9" Key" control field, two variants are provided: Send "F9" Key not ticked:An F9 keystroke is emulated cyclically. The cycle corresponds to the setting in the "Timer" field.
4 Communication Web server Calling the web server as web administrator 4 Communication 4.1 Web server The Thin Client is provided with a web server which can be accessed with a web browser. 4.1.1 Calling the web server as web administrator Call: http:// /webadmin Call the web server as web administrator when you want to configure it. More detailed information on the possible settings can be found in the Microsoft online help or the "help topics" on the page. 4.1.
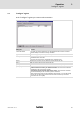
Communication 4 FTP server Fig. 4−2 Web server home page after selecting "Internet Explorer 4.0 +" if the "System Tools" menu item (at the top) and "Processes" (on the left) has been selected The following menu items are available: 4.2 Menu item Function System tools Read out system information (operating system version, number of processors, architecture, memory size and assignment) File Browser The "File Browser" menu item contains a kind of FTP functionality.
5 Index 5 Index C M CF card, 6 Memory card, 15 Clipboard, 15 Command line, 6 , 21 Communication, web server, 22 Connection − activate, 8 − create, 9 − deactivate, 8 − delete, 9 − edit, 9 − name, 8 − starting performance, 9 − status, 8 − type, 8 Connection parameters, 13 N Network, configuration, 17 , 20 Network name, 13 Network programs, 6 O Operating conditions, 6 Operation, 7 , 22 P Password, 12 Ping, 6 Printer, 15 D Product description, 5 Default setting, 6 Program, external, execute, 16 ,
Index System tools, 23 T Terminal Connection Manager − Configure, 9 Advanced, 18 Display, 14 Experience, 17 General, 12 Local Resources, 15 Programs, 16 − F−Keys, 19 − General, 8 , 20 − overview, 7 − starting, 7 Thin Client, start, 20 5 U User data − automatic transmission, 13 − change, 13 − delete, 13 − enter, 12 − system password, 20 User interface, 7 User name, 12 W Web server, 22 WTS Connection Wizard, 10 Touchscreen, calibrate, 20 LDCDP−11999 EN 3.
Q © 08/2011 F Lenze Automation GmbH Hans−Lenze−Str. 1 D−31855 Aerzen Germany Service Lenze Service GmbH Breslauer Straße 3 D−32699 Extertal Germany ( Ê ü +49 (0)51 54 / 82−0 ( Ê 00 80 00 / 24 4 68 77 (24 h helpline) +49 (0)51 54 / 82 − 28 00 Lenze@Lenze.de +49 (0)51 54 / 82−11 12 Service@Lenze.de www.Lenze.com LDCDP−11999 § .GdW § EN § 3.