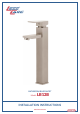
BATHROOM/BAR FAUCET Model: LB12B INSTALLATION INSTRUCTIONS www.lesscare.com Version 1.
BASIN FAUCET LB12B PREPARATION FOR INSTALLATION 3 1/8" 8 5/8" 11 7/8" 5 1/8" 1 7/8" ATTENTION! Dimensions may vary by up to 3/8". It is highly recommended to pull all dimensions of actual model for installation and measuring purposes. ATTENTION! Measurements in inches are rouned to the nearest 1/8". TECHNICAL DATA Max flow rate 1.2 GMP at 60 PSI 2 www.lesscare.
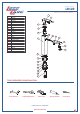
BASIN FAUCET LB12B PARTS & COMPONENTS No 1 2 3 4 5 6 7 8 9 10 11 12 13 14 15 16 17 18 19 20 21 22 1 Component Handle Screw Canopy Cap Press Hat Cartridge Body Base Screw O-Ring Screwed Connecter Shim Shim Lock Nut Flexible Hose Aerator House Aerator Shim Spout Screw Joint O-Ring 2 3 4 5 6 22 7 21 20 19 18 17 16 8 9 10 11 12 13 14 15 TOOLS REQUIRED FOR INSTALLATION Basin Wrench Adjustable Wrench Teflon Tape Silicone Sealant Screwdriver OTHER TOOLS MAY BE REQUIRED www.lesscare.
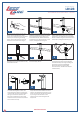
BASIN FAUCET LB12B INSTALLATION INSTRUCTIONS 1 3 2 You should clean all the dirts from valve outlets. Turning off the water supply valves. This is usually found near the water meter. If you are replacing an existing faucet, remove the faucet from the sink and clean the sink surface thoroughly. 4 Install without Deck Plate. Make sure the O-RING is placed onto the bottom of Base Ring. Install faucet through hole in sink. From underside sink, Put Plastic Washer and Mounting Nut.
BASIN FAUCET LB12B READ ALL INSTRUCTIONS BEFORE UNPACKING THE PRODUCT INSTRUCTIONS THAT, IF IGNORED COULD RESULT IN DEATH OR SERIOUS INJURY CAUSED BY INCORRECT HANDLING OR INSTALLATION OF THE PRODUCT. THESE INSTRUCTIONS MUST BE OBSERVED FOR SAFE INSTALLATION.