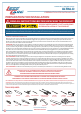
D TUB DOORS • SHOWER DOORS INSTALLATION INSTRUCTIONS TUB DOORS: SHOWER DOORS: LBTDD6062 LBSDD4879 LBSDD6079 www.lesscare.com Version 5.
TUB DOORS • SHOWER DOORS ULTRA-D PREPARATION FOR INSTALLATION PREPARATION FOR INSTALLATION READ ALL INSTRUCTIONS BEFORE UNPACKING THE PRODUCT 2 PEOPLE ARE REQUIRED TO LIFT AND DURING ENTIRE INSTALLATION OF THIS PRODUCT LessCare reserves the right to change, update, modify, alter, redesign this manual/product or its policies without prior notice! It is your responsibility to visit website to download or contact customer service for the most updated version of the installation instructions.
TUB DOORS • SHOWER DOORS ULTRA-D CONFIGURATION STYLES MODELS: LBSDD6062 3 1/4" Min. Threshold Requirement Threshold Requirement (Size): 3 1/4" SAFETY IMPORTANT NOTE: Installation of shower or bathtub door requires to be installed only on smooth and flat surface of both walls and threshold base (shower base or bathtub). www.lesscare.
TUB DOORS • SHOWER DOORS ULTRA-D CONFIGURATION STYLES MODELS: LBTDD4879 LBTDD6079 3 1/4" Threshold Requirement (Size): 3 1/4" Min. Threshold Requirement SAFETY IMPORTANT NOTE: Installation of shower or bathtub door requires to be installed only on smooth and flat surface of both walls and threshold base (shower base or bathtub). 3 www.lesscare.
TUB DOORS • SHOWER DOORS ULTRA-D SHOWER DOOR COMPONETS 16 15 14 1 13 12 2 3 4 11 5 6 7 8 17 9 10 Item# Description 1 2 3 4 5 6 7 8 9 Qty Guide Rail Bracket Upper Guide Rail Glass Door Stopper Bumper Strip Handle Glass Door Anti-splash SS Threshold Cover Anti-splash SS Threshold Countersunk Screw M5X30 2 pcs 1 pc 2 pcs 1 pc 1 pc 1 pc 1 pc 1 pc 2 pcs Item# Description 10 11 12 13 14 15 16 17 18 Guide Block Stationary Glass Wall Anchor Countersunk Screw M5X60 Side Anti-Water Strip Glass Brac
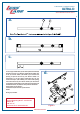
TUB DOORS • SHOWER DOORS ULTRA-D INSTALLATION STEPS 1. Measure the distance between two finished walls. This distance is marked as W. a Please see Fig 1 for details 90° Figure 1 5 www.lesscare.
TUB DOORS • SHOWER DOORS ULTRA-D INSTALLATION STEPS a. 15 2 2 15 b. c. 2. Your Upper Guide Rail (2) and Anti-Splash Threshold (8) has been precut for your Shower model opening width: 48" or 60" for shower width. If W-width of your wall-to-wall opening is equal to the size of your Shower model, it is unnecessary to cut the Upper Guide Rail and you can continue to Step 3.
TUB DOORS • SHOWER DOORS ULTRA-D INSTALLATION STEPS a. b. 8 7 www.lesscare.
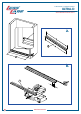
TUB DOORS • SHOWER DOORS ULTRA-D INSTALLATION STEPS 8 Figure 3 3. Install Threshold 3.1. Apply silicone on the bottom of the Threshold (8) along the center line. 3.2. Place the Threshold onto the designated position parallel to the back wall. 8 Please see Fig 3 for details 8 www.lesscare.
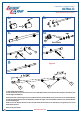
TUB DOORS • SHOWER DOORS ULTRA-D INSTALLATION STEPS a. b. 1 1 c. 3 2 d. 15 e. f. 1 3 15 g. Figure 4 1 2 15 1 4. Upper Guide Rail Installation 4.1 Use the Allen Keys (17) to loosen the screws on the Guide Rail Brackets (1) and the Glass Door Stoppers (3). Slide the parts onto the Upper Guide Rail (2). Note: On the other side, the stopper must be installed in between the Glass Bracket (15).
TUB DOORS • SHOWER DOORS ULTRA-D INSTALLATION STEPS a. b. 15 15 c. 5. Loosen the screw on the Glass Bracket (15) with Allen Key (17), align the holes of the Brackets to the holes on the Stationary Glass (11), secure the Upper Guide Rail (2) with the Stationary Glass together by tightening the screws on the Glass Bracket with Allen Key. 15 Please see Fig 5 for details. 15 Figure 5 ATTENTION: Never set your glass down directly onto a tile or concrete floor.
TUB DOORS • SHOWER DOORS ULTRA-D INSTALLATION STEPS 11 11 a. 11 11 8 b. 11 11 8 Figure 6 6. Install the Stationary Glass 6.1 Place the Stationary Glass Assembly into the slot of the Anti-Splash SS Threshold (8). Please see Fig 6 for details. 11 www.lesscare.
TUB DOORS • SHOWER DOORS ULTRA-D INSTALLATION STEPS a. b. 1 11 11 Figure 7 6.2 Place the Stationary Glass Assembly against the wall. Make sure the Stationary Glass (11) and the Upper Guide Rail (2) are leveled. Please see Fig 7 for details. www.lesscare.
TUB DOORS • SHOWER DOORS ULTRA-D INSTALLATION STEPS a. 1 b. 11 c. d. e. f. 1 Figure 8 7. Slide the Guide Rail Bracket (1) against the wall, outline the Guide Rail Brackets (1) position on the wall with a pencil. Set the Stationary glass assembly aside. Remove the Guide Rail brackets from the Upper Guide Rail (2) and put them back to the outlined positions, now mark the drilling holes on the wall. Please see Fig 8 for details. 13 www.lesscare.
TUB DOORS • SHOWER DOORS ULTRA-D INSTALLATION STEPS 8. Drill the holes on the wall using 8mm(5/16") drill bit and apply silicone into the holes, insert the Wall Anchors (12). Mount the Wall Bracket of the Guide Rail Bracket (1) to the wall using the Screw M5×60 (13). Please see Fig 9 for details a. b. c. d. 13 12 Note: The other side of the Guide Rail bracket (1) is installed in the same way. e. g. f. 12 h. 13 Figure 9 www.lesscare.
TUB DOORS • SHOWER DOORS ULTRA-D INSTALLATION STEPS 9. Place the Stationary Glass Assembly back into the designated position. Slide the Guide Rail Bracket (1) to the two end sides of the Upper Guide Rail(2). Tighten the set screws on the Guide rail bracket (1) with Allen Key (17) to secure the guide rail to the two walls. Please see Fig 10 for details a. b. 1 1 Note: The other side of the Guide Rail Bracket (1) is installed in the same way. c. d. Figure 10 15 www.lesscare.
TUB DOORS • SHOWER DOORS ULTRA-D INSTALLATION STEPS a. 17 16 Attention: Need to loosen the small allen screws before loosening the long allen screw on the roller b. 5 IMPORTANT: when installing the rollers and handle to the glass door, make sure that clear rubber gaskets are in between the Glass Door (6) and the related hardwares. Tighten the knob and cap on the handle by hand only. Do not use any types of tools to tighten it.
TUB DOORS • SHOWER DOORS ULTRA-D INSTALLATION STEPS a. 6 5 7 5 16 b. 6 5 16 c.6 5 d. 4 Figure 11 10. Loosen the Rollers (16) screw and Install Rollers to the Glass Door (6). And then Install Handle (5) to the Glass Door. At last Install the Bumper Strips (4) to the Glass Door Please see Fig 11 for details 17 www.lesscare.
TUB DOORS • SHOWER DOORS ULTRA-D INSTALLATION STEPS a. 10 10 8 10 8 6 12 6 12 b. 10 8 10 8 6 12 6 12 Adjuct to 12mm[1/2"] c. 10 8 11. The Guide Block (10) can work with 4 types of glass thickness, 1/4”, 5/16”, 3/8” and 1/2”. Usually the Guide Block is pre-adjusted to the thickness of the glass, but it is necessary to check the slot thickness before installing and adjust the guide block slot to suite the glass thickness. See Figure 12 for details. 6 12 Adjuct to 12mm[1/2"] Figure 12 www.
TUB DOORS • SHOWER DOORS ULTRA-D INSTALLATION STEPS b. a. 11 11 1 3/8” 10 10 c. d. 11 11 Figure 13 12. Put the Guide Block(10) to the designated position. Now drill the hole with drill bit 3.2mm(Ø1/8"), insert the wall anchor (12). Now fix the Guide Block to the Shower Base or Threshold with M5X30 screw (9). Please see Fig 13 for details 19 www.lesscare.
TUB DOORS • SHOWER DOORS ULTRA-D INSTALLATION STEPS a. b. Figure 14 6 13. Hang the Glass Door Assembly to the Upper Guide Rail (2), put the bottom edge of the glass door to the slot of the Guide Block (10). Make sure that the glass door will not touch the metal part of the Guide block. See Figure 14 for details. 10 14. Slide the Side Anti-water Atrip (14) to the Stationary Glass (11), remove the flapper that interfere with the Upper Guide Rail (2) with scissors. See Figure 15 for details.
TUB DOORS • SHOWER DOORS ULTRA-D INSTALLATION STEPS a. 15. Install the Bottom Two Rollers Make sure that the Glass Door with Rollers hangs to the Upper Guide Rail (2), and the glass bottom is inside the Guide Block (10), now adjust glass to vertical and then install the bottom two Rollers (16). 16 Please see Fig 16 for details b. 16 Figure 16 21 www.lesscare.
TUB DOORS • SHOWER DOORS ULTRA-D INSTALLATION STEPS a. 3 b. d. c. 16 16 e. 16. Adjust the Rollers(16) and locate the Glass Door Stopper(3) 15.1. Adjust the fasteners on both Rollers (16) to ensure that the bottom edge of the Glass Door (6) will not touch the bottom of the Guide Block (10). NOTE: Glass Door can be adjusted up or down for 2mm by adjusting the fasteners on the Rollers. 15.2.
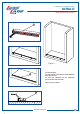
TUB DOORS • SHOWER DOORS ULTRA-D INSTALLATION STEPS IMPORTANT STEP! 17. Measure and Trim the Anti-Splash Threshold Cover Measure the dimension of the threshold opening by attaching the threshold cover to the threshold and place the threshold into the threshold opening. If the threshold is too long to fit into the slot, mark a cut line on the threshold cover and trim the threshold cover using a meter saw. Please see Fig 18 &19 Figure 18 23 www.lesscare.
TUB DOORS • SHOWER DOORS ULTRA-D INSTALLATION STEPS IMPORTANT STEP! 7 7 Figure 19 www.lesscare.
TUB DOORS • SHOWER DOORS ULTRA-D INSTALLATION STEPS 7 7 Figure 20 18. Install the anti-splash threshold cover Put the Threshold Cover (7) into the groove of the threshold (8) in front of the Glass Door (6). Please see Fig 20 for details 25 www.lesscare.
TUB DOORS • SHOWER DOORS ULTRA-D EXTREMELY IMPORTANT INSTALLATION & TECHNICAL MAINTENANCE INSTRUCTIONS EXTREMELY IMPORTANT! The instructions specified and described on this page are extremely important and are required during installation and regular technical maintenance of the product.
TUB DOORS • SHOWER DOORS ULTRA-D EXTREMELY IMPORTANT INSTALLATION & TECHNICAL MAINTENANCE INSTRUCTIONS EXTREMELY IMPORTANT INSTALLATION & TECHNICAL MAINTANCE INSTRUCTIONS! A licensed and professional contractor has to comply with the required specifications and dimensions illustrated on this diagram during installation and technical maintenance of the product. 1.
TUB DOORS • SHOWER DOORS ULTRA-D INSTALLATION STEPS 19. Apply silicone sealant on the seams between the stationary glass and the shower tray/threshold, and between the wall and the stationary glass. See Figure 21 for details. WAIT 24 HOURS BEFORE USING THE SHOWER ENCLOSURE TUB DOORS INSTALLATION the same as SHOWER DOORS IMPORTANT: MUST ALOW SILICONE TO DRY FOR 24 HOURS BEFORE STARTING USING THE SHOWER ENCLOSURE www.lesscare.
TUB DOORS • SHOWER DOORS ULTRA-D MAINTENANCE, USE, AND CARE Maintenance & Care IMPORTANT! DO NOT USE: Abrasive cleaners such as: acid, ammonia, bleach, and simmilar solutions. Use of such solutions may cause corrosion, finish peeling, and/or dull the surface. DO NOT USE: Abrasive sponges or cloth. Never use steel, wool, or wired brushes that will permanently scratch the surface. After installation use the shower door for approximately 2-3 weeks or 20-25 times (whichever comes first).
D SHOWER DOORS INSTALLATION INSTRUCTIONS SHOWER DOORS: LBSDD7279 www.lesscare.com Version 5.
SHOWER DOORS ULTRA-D PREPARATION FOR INSTALLATION PREPARATION FOR INSTALLATION READ ALL INSTRUCTIONS BEFORE UNPACKING THE PRODUCT 2 PEOPLE ARE REQUIRED TO LIFT AND DURING ENTIRE INSTALLATION OF THIS PRODUCT LessCare reserves the right to change, update, modify, alter, redesign this manual/product or its policies without prior notice! It is your responsibility to visit website to download or contact customer service for the most updated version of the installation instructions.
SHOWER DOORS ULTRA-D CONFIGURATION STYLES MODELS: LBSDD7279 3 1/4" Threshold Requirement (Size): 3 1/4" Min. Threshold Requirement SAFETY IMPORTANT NOTE: Installation of shower or bathtub door requires to be installed only on smooth and flat surface of both walls and threshold base (shower base or bathtub). www.lesscare.
SHOWER DOORS ULTRA-D SHOWER DOOR COMPONETS 15 14 13 12 11 1 10 2 3 4 5 6 7 8 9 Item# Description 1 2 3 4 5 6 7 8 16 Qty Guide Rail Bracket Upper Guide Rail Glass Door Stopper Handle Glass Door Anti-splash SS Threshold Cover Anti-splash SS Threshold Countersunk Screw M5X30 2 pcs 1 pc 2 pcs 1 pc 1 pc 1 pc 1 pc 2 pcs Item# Description 9 10 11 12 13 14 15 16 Guide Block Wall Anchor Countersunk Screw M5X60 Stationary Glass Side Anti-Water Strip Glass Bracket Roller Allen Key This door has N
SHOWER DOORS ULTRA-D SHOWER DOOR COMPONETS 17 19 18 Item# Description 17 18 19 Qty Glass Bracket for Small Stationary Glass Small Stationary Glass Side Anti-Water Strip www.lesscare.
SHOWER DOORS ULTRA-D INSTALLATION STEPS 1. Measure the distance between two finished walls. This distance is marked as W. a Please see Fig 1 for details 90° Figure 1 5 www.lesscare.
SHOWER DOORS ULTRA-D INSTALLATION STEPS a. 14 1 2 1 Note: The Glass Bracket(14) has been pre-installed to the Upper Guide Rail(2). b. c. 2. Your Upper Guide Rail (2) and Anti-Splash Threshold (7) has been precut for your Shower model opening width: 72" for shower width. If W-width of your wall-to-wall opening is equal to the size of your Shower model, it is unnecessary to cut the Upper Guide Rail and you can continue to Step 3.
SHOWER DOORS ULTRA-D INSTALLATION STEPS a. 7 b. 7 7 www.lesscare.
SHOWER DOORS ULTRA-D INSTALLATION STEPS 7 Figure 3 3. Install Threshold 3.1. Apply silicone on the bottom of the Threshold (7) along the center line. 3.2. Place the Threshold onto the designated position parallel to the back wall. 7 Please see Fig 3 for details 7 www.lesscare.
SHOWER DOORS ULTRA-D INSTALLATION STEPS a. b. 1 1 c. 3 2 d. 14 e. f. 1 3 14 g. Figure 4 1 14 2 1 4. Upper Guide Rail Installation 4.1 Use the Allen Keys (16) to loosen the screws on the Guide Rail Brackets (1) and the Glass Door Stoppers (3). Slide the parts onto the Upper Guide Rail (2). Note: On the other side, the stopper must be installed in between the Glass Bracket (1).
SHOWER DOORS ULTRA-D INSTALLATION STEPS a. b. 14 14 c. 5. Loosen the screw on the Glass Bracket (14) with Allen Key (16), align the holes of the Brackets to the holes on the Stationary Glass (12), secure the Upper Guide Rail (2) with the Stationary Glass together by tightening the screws on the Glass Bracket with Allen Key. 14 Please see Fig 5 for details. 14 Figure 5 ATTENTION: Never set your glass down directly onto a tile or concrete floor.
SHOWER DOORS ULTRA-D INSTALLATION STEPS a. b. 12 12 c. 12 12 7 d. 12 12 7 Figure 6 6. Install the Stationary Glass 6.1 Place the Stationary Glass Assembly into the slot of the Anti-Splash SS Threshold (7). Please see Fig 6 for details. 11 www.lesscare.
SHOWER DOORS ULTRA-D INSTALLATION STEPS a. b. 1 12 12 Figure 7 6.2 Place the Stationary Glass Assembly against the wall. Make sure the Stationary Glass (12) and the Upper Guide Rail (2) are leveled. Please see Fig 7 for details. www.lesscare.
SHOWER DOORS ULTRA-D INSTALLATION STEPS a. 1 b. 12 c. d. e. f. 1 Figure 8 7. Slide the Guide Rail Bracket (1) against the wall, outline the Guide Rail Brackets (1) position on the wall with a pencil. Set the Stationary glass assembly aside. Remove the Guide Rail brackets from the Upper Guide Rail (2) and put them back to the outlined positions, now mark the drilling holes on the wall. Please see Fig 8 for details. 13 www.lesscare.
SHOWER DOORS ULTRA-D INSTALLATION STEPS 8. Drill the holes on the wall using 8mm(5/16") drill bit and apply silicone into the holes, insert the Wall Anchors (10). Mount the Wall Bracket of the Guide Rail Bracket (1) to the wall using the Screw M5×60 (11). Please see Fig 9 for details a. b. c. d. 11 10 Note: The other side of the Guide Rail bracket (1) is installed in the same way. e. g. f. 10 h. 11 Figure 9 www.lesscare.
SHOWER DOORS ULTRA-D INSTALLATION STEPS 9. Place the Stationary Glass Assembly back into the designated position. Slide the Guide Rail Bracket (1) to the two end sides of the Upper Guide Rail(2). Tighten the set screws on the Guide rail bracket (1) with Allen Key (10) to secure the guide rail to the two walls. Please see Fig 10 for details a. b. 1 1 Note: The other side of the Guide Rail Bracket (1) is installed in the same way. c. d. Figure 10 15 www.lesscare.
SHOWER DOORS ULTRA-D INSTALLATION STEPS b. a. 3 17 17 c. 17 Outside d. 18 10. Install the glass bracket (17) for the Small Stationary Glass to the Upper Guide Rail (2), install the Small Stationary Glass (18) to the guide rail. Please see Fig 11 for details Figure 11 www.lesscare.
SHOWER DOORS ULTRA-D INSTALLATION STEPS a. 16 15 Attention: Need to loosen the small allen screws before loosening the long allen screw on the roller b. 4 IMPORTANT: when installing the rollers and handle to the glass door, make sure that clear rubber gaskets are in between the Glass Door (5) and the related hardwares. Tighten the knob and cap on the handle by hand only. Do not use any types of tools to tighten it. Tighten the screws on the roller with related size of Allen Keys (16) only. 17 www.
SHOWER DOORS ULTRA-D INSTALLATION STEPS a. 16 16 15 15 b. 5 15 5 15 4 c. 5 15 d. 5 4 Figure 12 11. Loosen the Rollers (15) screw and Install Rollers to the Glass Door (5). And then Install Handle (4) to the Glass Door. Please see Fig 12 for details www.lesscare.
TUB DOORS • SHOWER DOORS ULTRA-D INSTALLATION STEPS a. 9 10 8 10 8 6 12 6 12 b. 10 8 10 8 6 12 6 12 Adjuct to 12mm[1/2"] c. 10 8 12. The Guide Block (9) can work with 4 types of glass thickness, 1/4”, 5/16”, 3/8” and 1/2”. Usually the Guide Block is pre-adjusted to the thickness of the glass, but it is necessary to check the slot thickness before installing and adjust the guide block slot to suite the glass thickness. See Figure 13 for details. 6 12 Adjuct to 12mm[1/2"] Figure 13 19 www.
SHOWER DOORS ULTRA-D INSTALLATION STEPS b. a. 12 12 1 3/8” 9 9 c. 12 d. 12 9 Figure 14 13. Put the Guide Block(9) to the designated position. Now drill the hole with drill bit 3.2mm(Ø1/8"), insert the wall anchor (10). Now fix the Guide Block to the Shower Base or Threshold with M5X30 screw (8). Please see Fig 14 for details www.lesscare.
SHOWER DOORS ULTRA-D INSTALLATION STEPS 14. Hang the Glass Door Assembly to the Upper Guide Rail (2), put the bottom edge of the glass door to the slot of the Guide Block (9). Make sure that the Glass Door (5) door will not touch the metal part of the Guide block(9). See Figure 15 for details. 9 Figure 15 21 www.lesscare.
SHOWER DOORS ULTRA-D INSTALLATION STEPS a. b. Outside Outside d. c. Outside Outside 9 13 Figure 16 15. Slide the Side Anti-Aater Atrip (13) & (19) to the Stationary Glass (12) & (17), remove the flapper that interfere with the Upper Guide Rail (2) with scissors. See Figure 16 for details. NOTE: You can cut the strips to size by using a knife if necessary, do not cut anti-water strips while they are installed on the glass.
SHOWER DOORS ULTRA-D INSTALLATION STEPS 16. Install the Bottom Two Rollers Make sure that the Glass Door with Rollers hangs to the Upper Guide Rail (2), and the glass bottom is inside the Guide Block (9), now adjust glass to vertical and then install the bottom two Rollers (15). 15 Please see Fig 17 for details Figure 17 23 www.lesscare.
SHOWER DOORS ULTRA-D INSTALLATION STEPS 3 b. Inside 15 15 15 15 Figure 18 17. Adjust the Roller(15) and locate the Glass Door Stopper(3) 17.1. Adjust the fasteners on both Rollers (15) to ensure that the bottom edge of the Glass Door (5) will not touch the bottom of the Guide Block (9). NOTE: Glass Door can be adjusted up or down for 2mm by adjusting the fasteners on the Rollers. 17.2.
SHOWER DOORS ULTRA-D INSTALLATION STEPS IMPORTANT STEP! 18. Measure and Trim the Anti-Splash Threshold Measure the dimension of the threshold opening by attaching the Threshold Cover (6) to the threshold and place the threshold into the threshold opening. If the threshold is too long to fit into the slot, mark a cut line on the threshold and trim the threshold using a meter saw. Please see Fig 19 &20 Figure 19 25 www.lesscare.
SHOWER DOORS ULTRA-D INSTALLATION STEPS IMPORTANT STEP! 6 6 Figure 20 www.lesscare.
SHOWER DOORS ULTRA-D INSTALLATION STEPS 19. Install the Anti-Splash Threshold Cover Put the Threshold Cover (6) into the groove of the threshold (7) in front of the Glass Door (5). Please see Fig 21 6 6 Figure 21 27 www.lesscare.
SHOWER DOORS ULTRA-D EXTREMELY IMPORTANT INSTALLATION & TECHNICAL MAINTENANCE INSTRUCTIONS EXTREMELY IMPORTANT! The instructions specified and described on this page are extremely important and are required during installation and regular technical maintenance of the product.
SHOWER DOORS ULTRA-D EXTREMELY IMPORTANT INSTALLATION & TECHNICAL MAINTENANCE INSTRUCTIONS EXTREMELY IMPORTANT INSTALLATION & TECHNICAL MAINTANCE INSTRUCTIONS! A licensed and professional contractor has to comply with the required specifications and dimensions illustrated on this diagram during installation and technical maintenance of the product. 1.
SHOWER DOORS ULTRA-D INSTALLATION STEPS IMPORTANT: MUST ALOW SILICONE TO DRY FOR 24 HOURS BEFORE STARTING USING THE SHOWER ENCLOSURE Figure 22 20. Apply silicone sealant on the seams between the stationary glass and the shower tray/threshold, and between the wall and the stationary glass. See Figure 22 for details. WAIT 24 HOURS BEFORE USING THE SHOWER ENCLOSURE www.lesscare.
SHOWER DOORS ULTRA-D MAINTENANCE, USE, AND CARE Maintenance & Care IMPORTANT! DO NOT USE: Abrasive cleaners such as: acid, ammonia, bleach, and simmilar solutions; or any types of baking soda cleaning solutions. Use of such solutions may cause corrosion, finish peeling, and/or dull the surface. DO NOT USE: Abrasive sponges or cloth. Never use steel, wool, or wired brushes that will permanently scratch the surface.
D SHOWER ENCLOSURES INSTALLATION INSTRUCTIONS SHOWER ENCLOSURES: LBSDD4879-C+LBSED3679-CB LBSDD4879-B+LBSED3679-CB LBSDD6079-C+LBSED3679-CB LBSDD6079-B+LBSED3679-CB LBSDD7279-C+LBSED3679-CB LBSDD7279-B+LBSED3679-CB LBSDD4879-C+LBSED34579-CB LBSDD4879-B+LBSED34579-CB LBSDD6079-C+LBSED34579-CB LBSDD6079-B+LBSED34579-CB LBSDD7279-C+LBSED34579-CB LBSDD7279-B+LBSED34579-CB www.lesscare.com Version 5.
SHOWER ENCLOSURES ULTRA-D PREPARATION FOR INSTALLATION PREPARATION FOR INSTALLATION READ ALL INSTRUCTIONS BEFORE UNPACKING THE PRODUCT 2 PEOPLE ARE REQUIRED TO LIFT AND DURING ENTIRE INSTALLATION OF THIS PRODUCT LessCare reserves the right to change, update, modify, alter, redesign this manual/product or its policies without prior notice! It is your responsibility to visit website to download or contact customer service for the most updated version of the installation instructions.
SHOWER ENCLOSURES ULTRA-D CONFIGURATION STYLES MODELS: LBSDC7276 Min. Threshold Requirement 3 1/4" Threshold Requirement (Size): 3 1/4" SAFETY IMPORTANT NOTE: Installation of shower or bathtub door requires to be installed only on smooth and flat surface of both walls and threshold base (shower base or bathtub). www.lesscare.
SHOWER ENCLOSURES ULTRA-D CONFIGURATION STYLES Min. Threshold Requirement 3 1/4" Threshold Requirement (Size): 3 1/4" SAFETY IMPORTANT NOTE: Installation of shower or bathtub door requires to be installed only on smooth and flat surface of both walls and threshold base (shower base or bathtub). 3 www.lesscare.
SHOWER ENCLOSURES ULTRA-D SHOWER DOOR COMPONENTS Item# Description 1 2 3 4 5 6 7 8 9 Qty Bumper Strip Guide Rail Bracket Glass Door Stopper Upper Guide Rail Roller Handle Glass Door Side Anti-Water Strip Anti-splash Threshold 1 pc 2 pcs 2 pcs 1 pc 2 pcs 1 pc 1 pc 1 pc 1 pc Item# Description 10 11 12 13 14 15 16 17 18 Threshold Cover Screw M5X30 Guide Block Wall Anchor Stationary Glass Screw M5X60 Mount Clamp Allen Key Qty 1 pc 2 pcs 1 pc 4 pcs 1 pc 2 pcs 1 pc 5 pcs REMARK: For Style B, there wi
SHOWER ENCLOSURES ULTRA-D SMALL STATIONARY GLASS COMPONENTS Item# Description 18 19 20 5 Qty Glass Bracket for Small Stationary Glass Small Stationary Glass Side Anti-Water Strip www.lesscare.
SHOWER ENCLOSURES ULTRA-D RETURN PANEL COMPONENTS 23 21 22 24 25 26 Item# Description 21 22 23 24 25 26 Qty Glass connector Return Panel Glass Mount Clamp Wall Anchor Screw M4X60 Screw M4X45 www.lesscare.
SHOWER ENCLOSURES ULTRA-D INSTALLATION STEPS a. Assembly and Installation 1. Measure the distance between two finished walls. This distance is marked as W. Please see Fig 1 for details Figure 1 7 www.lesscare.
SHOWER ENCLOSURES ULTRA-D INSTALLATION STEPS a. 21 2 16 4 Note: The Glass Bracket (18) has been pre-installed to the Upper Guide Rail (4). b. c. 21 16 4 2 Attention: Please cut the guide rail from this side, which is farther side from the hole of the guide rail bracket. 2. Your Upper Guide Rail (4) has been precut for your Shower model opening width: 48" or 60" for shower width.
SHOWER ENCLOSURES ULTRA-D INSTALLATION STEPS 3. Install Return Panel 3.1 Loosen the screw on the Clamp (23) with Allen Key. Disassemble the Clamp and install the clamp on the notch of the Return Panel Glass (22). IMPORTANT: Make sure that clear rubber gaskets and washer are in between the glass and clamp's plates. Make sure that the clamp with screw is facing inside the shower. Please see Fig 3 for details a. 23 23 b. c. 22 d. 23 23 Figure 3 9 www.lesscare.
SHOWER ENCLOSURES ULTRA-D INSTALLATION STEPS b. a. 22 23 Inside c. d. 23 23 Inside Inside Figure 4 Inside 3.2 Put the Return Panel Assembly against the wall, level it. Outline the position of the Clamp (23) on the wall and the shower base or threshold separately. Please see Fig 4 for details 22 a. 23 b. Outside d. c. 23A Outside 23A Figure 4 Outside 4.
SHOWER ENCLOSURES ULTRA-D INSTALLATION STEPS 5. Drill the holes in the wall using Ø8mm(Ø5/16") drill bit and Apply silicone into the holes on the wall, insert the Wall anchors (24) for the Clamps (23). Mount the Clamps to the wall using the Philip's screw M4*60(25). Drill the hole in the shower base or threshold using Ø3mm (1/8”) drill bit and mount the Clamp (23) to the shower base or threshold using the Philip's screw M4*30(26). See Fig 5 for details a. c. b. d.
SHOWER ENCLOSURES ULTRA-D INSTALLATION STEPS a. b. 21 2 21A c. d. 21A 3 4 4 3 21A f. e. 3 16 2 16 g. h. 21A 4 Figure 7 16 2 7. Roller Bar Installation 7.1 Use the Allen Keys (17) to loosen the screws on the Guide Rail Brackets (2) and the Glass Door Stoppers (3). Slide the parts onto the Upper Guide Rail (4). Note: On the other side, the stopper must be installed in between the Glass Bracket (2).
SHOWER ENCLOSURES ULTRA-D INSTALLATION STEPS a. 10 b. 10 13 www.lesscare.
SHOWER ENCLOSURES ULTRA-D INSTALLATION STEPS 10 Figure 8 10 8. Install Threshold 8.1Apply silicone on the bottom of the Threshold (10) along the center line. 8.2. Place the Threshold onto the designated position parallel to the back wall. Please see Fig 3 for details www.lesscare.
SHOWER ENCLOSURES ULTRA-D INSTALLATION STEPS a. b. 16 16 Outside c. Outside 9 Loosen the screw on the Guide Rail Bracket (2) with Allen Key (17), align the holes of the Brackets(18) to the holes on the Stationary Glass (14), secure the Upper Guide Rail (4) with the Stationary Glass together by tightening the screws on the Guide Rail Bracket with Allen Key(17). 16 16 Please see Fig 10 for details. Outside ATTENTION: Never set your glass down directly onto a tile or concrete floor.
SHOWER ENCLOSURES ULTRA-D INSTALLATION STEPS 14 22 a. b. 22 Outside Outside Figure 10 10. Place the Stationary Glass Assembly on the preinstalled shower base or threshold and butt it up against the wall. Temporarily fasten the Upper Guide Rail (4) to the Return Panel Glass(22) with the Glass Connector (21). Slightly tighten the set screws. Make sure the Stationary Glass (14) and the Upper Guide Rail (4) are leveled.
SHOWER ENCLOSURES ULTRA-D INSTALLATION STEPS d. c. Outside 2 14 2 14 Inside e. f. 2 2A Inside Figure 11 15 www.lesscare.
SHOWER ENCLOSURES ULTRA-D INSTALLATION STEPS 11. Drill the hole on the wall using 8mm(5/16") drill bit and apply silicone into the holes, insert the Wall Anchor (13). Drill the hole on the shower tray or threshold using 3.2mm(1/8") drill bit and apply silicone into the holes, insert the Wall Anchors (13). Mount the Wall Bracket of the Guide Rail Bracket (2) to the wall using the Screw M5×60 (15).. Please see Fig 13 for details a. b. Silicone Outside c. Outside d.
SHOWER ENCLOSURES ULTRA-D INSTALLATION STEPS 12. Place the Stationary Glass Assembly back to the designated position. Slide the Guide Rail Bracket (2) to the end side of the Guide Rail(4), fasten the Guide rail bracket (2) to the wall bracket on the wall. Tighten the set screws on the Guide rail brackets. Re-install the Glass Connector (21) to fasten the Return Panel Glass (22) and Upper Guide Rail (4) together. Please see Fig 14 for details a. b. 2 2 2A Inside c. 22 Inside d.
SHOWER ENCLOSURES ULTRA-D INSTALLATION STEPS 18 24 a. b. 18 18 c. 18 4 24 Outside 4 13 Install the glass bracket for the Small Stationary Glass (21) to the Upper Guide Rail (4), install the Small Stationary Glass (24) to the guide rail. Outline the position of the wall clamp on the shower base and threshold. Please see Fig 16 for details Figure 14 www.lesscare.
SHOWER ENCLOSURES ULTRA-D INSTALLATION STEPS a. 17 Attention: Need to loosen the small allen screws before loosening the long allen screw on the roller 5 b. Figure 15 6 IMPORTANT: When installing the rollers and handle to the glass door, make sure that clear rubber gaskets are in between the Glass Door (7) and the related hardwares. Tighten the knob and cap on the handle by hand only. Do not use any types of tools to tighten it.
SHOWER ENCLOSURES ULTRA-D INSTALLATION STEPS a. 5 7 7 5 5 b. 7 6 5 c. 7 6 Figure 16 d. 1 14. Loosen the Rollers (5) screw and Install the Rollers to the Glass Door (7). And then Install Handle (6) to the Glass Door . At last Install the Bumper Strip(1) to the Glass Door(7). Please see Fig 19 for details REMARK: For style B, there will be no bumper strip installtion step. www.lesscare.
TUB DOORS • SHOWER DOORS ULTRA-D INSTALLATION STEPS a. 12 10 8 10 8 6 12 6 12 b. 10 8 10 8 6 12 6 12 Adjuct to 12mm[1/2"] c. 10 8 15. The Guide Block (12) can work with 4 types of glass thickness, 1/4”, 5/16”, 3/8” and 1/2”. Usually the Guide Block is pre-adjusted to the thickness of the glass, but it is necessary to check the slot thickness before installing and adjust the guide block slot to suite the glass thickness. See Figure 17 for details.
SHOWER DOORS ULTRA-D INSTALLATION STEPS b. a. 14 14 1 3/8” 12 12 c. 12 d. 14 12 Figure 18 16. Put the Guide Block(9) to the designated position. Now drill the hole with drill bit 3.2mm(Ø1/8"), insert the wall anchor (13). Now fix the Guide Block to the Shower Base or Threshold with M5X30 screw (11). Please see Fig 18 for details www.lesscare.
SHOWER ENCLOSURES ULTRA-D INSTALLATION STEPS 17. Hang the Glass Door Assembly to the Upper Guide Rail (4), put the bottom edge of the glass door to the slot of the Guide Block (12). Make sure that the Glass Door (6) door will not touch the metal part of the Guide block. See Figure 19 for details. Figure 19 a. b. 7 Inside 7 Outside 23 14 www.lesscare.
SHOWER ENCLOSURES ULTRA-D INSTALLATION STEPS REMARK: For style B installation, please refer to Figure 20. Figure 20 a. b. 14 24 Inside 7 7 Outside www.lesscare.
SHOWER ENCLOSURES ULTRA-D INSTALLATION STEPS a. 8 14 Outside 22 12 1 8 Figure 21 (for style A only) 18. Slide the Side Anti-Aater Atrip (8) to the Stationary Glass (14), remove the flapper that interfere with the Upper Guide Rail (4) with scissors. See Figure 21 for details. 25 www.lesscare.
SHOWER ENCLOSURES ULTRA-D INSTALLATION STEPS b. 24 b. 25 Outside c. Outside 8 d. 14 Outside 8 14 Outside 22 12 8 25 Figure 22 (for style B only) REMARK: For style B installation, please refer to Figure 25. www.lesscare.
SHOWER ENCLOSURES ULTRA-D INSTALLATION STEPS 15 19. Install the Bottom Two Rollers Make sure that the Glass Door with Rollers hangs to the Upper Guide Rail (4), and the glass bottom is inside the Guide Block (12), now adjust glass to vertical and then install the bottom two Rollers (5). 15 Please see Fig 23 for details Figure 23 27 www.lesscare.
SHOWER ENCLOSURES ULTRA-D INSTALLATION STEPS 3 5 5 5 5 5 5 Figure 24 20. Adjust the Rollers(5) and locate the Glass Door Stoppers(3) Adjust the fasteners on both Rollers (5) to ensure that the bottom edge of the Glass Door (7) will not touch the bottom of the Guide Block (12). NOTE: Glass Door can be adjusted up or down for 2mm by adjusting the fasteners on the Rollers.
SHOWER ENCLOSURES ULTRA-D INSTALLATION STEPS 5 5 5 5 5 Figure 25 (for style B only) REMARK: For style B installation, please refer to Figure 25. 29 www.lesscare.
SHOWER ENCLOSURES ULTRA-D INSTALLATION STEPS IMPORTANT STEP! 21. Measure and Trim the Anti-Splash Threshold 21.1 Measure the dimension of the threshold opening by attaching the Threshold Cover(9) to the Threshold(10) and place the threshold into the threshold opening. If the threshold is too long to fit into the guide block mark a cut line on the threshold and trim the threshold using a meter saw. Please see Fig 26 Figure 26 www.lesscare.
SHOWER ENCLOSURES ULTRA-D INSTALLATION STEPS IMPORTANT STEP! 22. Measure and Trim the Anti-Splash Threshold 22.1 Measure the dimension of the threshold opening by attaching the Threshold Cover(9) to the Threshold(10) and place the threshold into the threshold opening. If the threshold is too long to fit into the guide block mark a cut line on the threshold and trim the threshold using a meter saw. Please see Fig 27 Figure 27 31 www.lesscare.
SHOWER ENCLOSURES ULTRA-D INSTALLATION STEPS IMPORTANT STEP! 9 9 Figure 28 www.lesscare.
SHOWER ENCLOSURES ULTRA-D INSTALLATION STEPS 23. Install the Anti-Splash Threshold Cover Put the Threshold Cover (6) into the groove of the threshold (7) in front of the Glass Door (5). Please see Fig 29 9 9 Figure 29 33 www.lesscare.
SHOWER ENCLOSURES ULTRA-D INSTALLATION STEPS 9 Figure 30 www.lesscare.
SHOWER ENCLOSURES ULTRA-D EXTREMELY IMPORTANT INSTALLATION & TECHNICAL MAINTENANCE INSTRUCTIONS EXTREMELY IMPORTANT! The instructions specified and described on this page are extremely important and are required during installation and regular technical maintenance of the product.
SHOWER ENCLOSURES ULTRA-D EXTREMELY IMPORTANT INSTALLATION & TECHNICAL MAINTENANCE INSTRUCTIONS EXTREMELY IMPORTANT INSTALLATION & TECHNICAL MAINTANCE INSTRUCTIONS! A licensed and professional contractor has to comply with the required specifications and dimensions illustrated on this diagram during installation and technical maintenance of the product. 1.
SHOWER ENCLOSURES ULTRA-D INSTALLATION STEPS 24. Apply silicone sealant on the seams between the stationary glass /return panel glass and the shower tray/threshold, and between the wall and the stationary glass/return panel glass. See Figure 31 for details. IMPORTANT: MUST ALOW SILICONE TO DRY FOR 24 HOURS BEFORE STARTING USING THE SHOWER ENCLOSURE Figure 31 39 www.lesscare.
SHOWER ENCLOSURES ULTRA-D INSTALLATION STEPS Figure 31 www.lesscare.
SHOWER ENCLOSURES ULTRA-D INSTALLATION STEPS Figure 32 41 www.lesscare.
SHOWER ENCLOSURES ULTRA-D MAINTENANCE, USE, AND CARE Maintenance & Care IMPORTANT! DO NOT USE: Abrasive cleaners such as: acid, ammonia, bleach, and simmilar solutions; or any types of baking soda cleaning solutions. Use of such solutions may cause corrosion, finish peeling, and/or dull the surface. DO NOT USE: Abrasive sponges or cloth. Never use steel, wool, or wired brushes that will permanently scratch the surface.