E Conf igura tion Con figur 1 atio n2 SHOWER DOORS INSTALLATION INSTRUCTIONS SHOWER DOORS: LBSDE2472 LBSDE3072 LBSDE3672 SIDE PANELS: LBSDPE472 LBSDPE672 LBSDPE872 LBSDPE1072 LBSDPE1272 LBSDPE1472 www.lesscare.com LBSDPE1672 LBSDPE1872 LBSDPE2072 LBSDPE2272 LBSDPE2472 Version 4.
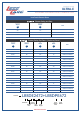
SHOWER DOORS ULTRA-E AVAILABLE SHOWER DOOR COMBINATIONS LessCare® Shower Doors E Shower Swing-out Door INSTALLATION INSTALLATION W H 24" 72" LBSDE2472 30" 72" LBSDE3072 36" 72" LBSDE3672 WIDTH HEIGHT E SKU Shower Swing-Out Door + Stationary Panel INSTALLATION INSTALLATION HEIGHT DOOR PANEL W H D P 28-29" 72" 24" 4" LBSDE2472+LBSDPE472 30-31" 72" 24" 6" LBSDE2472+LBSDPE672 32-33" 72" 24" 8" LBSDE2472+LBSDPE872 34-35" 72" 24" 10" LBSDE2472+LBSDPE1072 34-35"
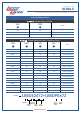
SHOWER DOORS ULTRA-E AVAILABLE SHOWER DOOR COMBINATIONS LessCare® Shower Doors E Shower Swing-out Door INSTALLATION INSTALLATION W H 24" 72" LBSDE2472 30" 72" LBSDE3072 36" 72" LBSDE3672 WIDTH HEIGHT E SKU Shower Swing-Out Door + Stationary Panel INSTALLATION INSTALLATION HEIGHT DOOR PANEL W H D P 46-47" 72" 24" 22" LBSDE2472+LBSDPE2272 46-47" 72" 30" 16" LBSDE3072+LBSDPE1672 46-47" 72" 36" 10" LBSDE3672+LBSDPE1072 48-49" 72" 24" 24" LBSDE2472+LBSDPE2472 48
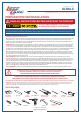
SHOWER DOORS ULTRA-E PREPARATION FOR INSTALLATION PREPARATION FOR INSTALLATION READ ALL INSTRUCTIONS BEFORE UNPACKING THE PRODUCT 2 PEOPLE ARE REQUIRED TO LIFT AND DURING ENTIRE INSTALLATION OF THIS PRODUCT LessCare reserves the right to change, update, modify, alter, redesign this manual/product or its policies without prior notice! It is your responsibility to visit website to download or contact customer service for the most updated version of the installation instructions.
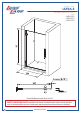
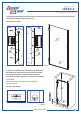
SHOWER DOORS ULTRA-E SHOWER DOOR STYLES MODELS: LBSDE2472 LBSDE3072 LBSDE3672 6 13/16" Min. Threshold Requirement Threshold Requirement (Size): 13/16" SAFETY IMPORTANT NOTE: Installation of shower or bathtub door requires to be installed only on smooth and flat surface of both walls and threshold base (shower base or bathtub). 2 www.lesscare.
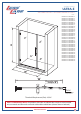
SHOWER DOORS ULTRA-E SHOWER DOOR + SHOWER PANEL STYLES MODELS: LBSDE2472+LBSDPE472 LBSDE2472+LBSDPE672 LBSDE2472+LBSDPE872 LBSDE2472+LBSDPE1072 LBSDE3072+LBSDPE472 LBSDE2472+LBSDPE1272 LBSDE3072+LBSDPE672 LBSDE2472+LBSDPE1472 LBSDE3072+LBSDPE872 LBSDE2472+LBSDPE1672 LBSDE3072+LBSDPE1072 LBSDE3672+LBSDPE472 LBSDE2472+LBSDPE1872 LBSDE3072+LBSDPE1272 LBSDE3672+LBSDPE672 LBSDE2472+LBSDPE2072 LBSDE3072+LBSDPE1472 LBSDE3672+LBSDPE872 LBSDE2472+LBSDPE2272 LBSDE3072+LBSDPE1672 LBSDE3672+LBSDPE1072 LBSDE2472+LBSDP
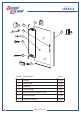
SHOWER DOORS ULTRA-E SHOWER DOOR COMPONETS 1 2 3 2 4 6 7 5 Item# Description 1 2 3 4 5 6 7 4 Qty Hinge Side Strip Handle Glass Door Bottom Anti-water strip Wall Anchor Screw M5X60 www.lesscare.
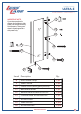
SHOWER DOORS ULTRA-E SIDE PANEL COMPONETS 9 IMPORTANT NOTE: If you have purchsed a shower door without a side panel you will not have any of these parts. These parts come in a package with a side panel only. 12 14 8 16 10 15 11 13 Item# Description 8 9 10 11 12 13 14 15 16 Qty Anti-Water Strip Wall Profile Fixed Glass (with glass profile) Bottom Bracket Round Head Screw M3.5X13 Countersunk Screw M4X30 Screw Cover Wall Anchor Screw M4X60 www.lesscare.
SHOWER DOORS ULTRA-E INSTALLATION STEPS Single Shower Door Assembly and Installation Configuration 1 1 1. Disassemble the hinge and attach the Hinges (1) to the Glass door (4). See Figure 1 for details. IMPORTANT: Make sure that clear rubber gaskets and the plastic gasket are in between the glass door and the hinge plates. IMPORTANT: Do not let any metal parts come into contact with the glass directly, which will damage the glass notches and cause scratches or damage to the Glass Door.
SHOWER DOORS ULTRA-E INSTALLATION STEPS 2.Remove the corner pads from the Glass door (4).Cut the Side strip (2) according to the measurements. Slide the side anti-water Strip (2) to the Glass Door (4). See Figure 2 for details. a. 4 2 b. 4 2 Figure 2 3. Place a piece of flat timber (3/8” thick) on the threshold or the shower base. Place the Glass door(4) on the flat timber. Carefully butt up the door with hinged side against the wall, adjust its position and level it vertically and horizontally.
SHOWER DOORS ULTRA-E INSTALLATION STEPS 4. Hold the door in place and mark down the drill holes for both Hinges (1) on the wall. Set the door aside and drill the holes in the wall using Ø8mm(Ø5/16") drill bit. Apply silicone into the holes on the wall and insert the wall anchors (6) ATTENTION: This door is extremely heavy and the hinges on this door must be attached to the studs or to preinstalled 2 × 4 wood reinforcement behind the wall. a. b. 1 d. c. 6 Figure 4 8 www.lesscare.
SHOWER DOORS ULTRA-E INSTALLATION STEPS a. 5. Disassemble the Hinges (1) from the glass door carefully and set the Glass Door (4) aside. Locate the main body of the hinge to the predrilled holes, fasten the main body of the hinge to the wall with screws M5 x 60 (7). Place the Glass Door back to its position and reassemble the Hinges. b. 1 c. See Figure 5 for details. 4 d. Figure 5 6. Mount the Handle (3) to the Glass Door (4).
SHOWER DOORS ULTRA-E INSTALLATION STEPS Configuration 2 Fixed Glass Assembly and Installation Note: Use parts from SIDE PANEL COMPONENTS on page 5 for fixed glass assembly and installation. If you only order the glass door with hinges (LBSDE2472/LBSDE3072/LBSDE3672), you do not need to read this fixed glass installation instruction 7.Press the Fixed Glass (10) with attached Glass profile into the slot of Wall profile (9) Press the Anti-Water strip (8) on the vertical edge of the fixed glass.
SHOWER DOORS ULTRA-E INSTALLATION STEPS 8. Push the Fixed Glass installed with profiles against the wall, align the Fixed Glass (10) with the Glass Door (4) and level it. Maket sure the gap between the fixed glass and glass door. If needed adjust the position of the Fixed Glass by pulling out the fixed glass with glass profile from the slot of the Wall Profile or push the fixed glass with glass profile to the slot of the wall profile to make sure the Anti-water strips work well. See Fig. 8 for details.
SHOWER DOORS ULTRA-E INSTALLATION STEPS a. 9 b. c. 11 d. e. f. 9 g. 9. Draw a line along the Bottom Bracket (11) on the the shower tray or shower base. Draw a line along the inner edge of the Wall Profile (9) o the wall. Now set aside the fixed glass. Place the the Bottom Bracket on the shower tray or shower base, mark the drilling holes with a pen or marker. Now drill the holes using Ø8mm(Ø=5/16") drill bit in the tray. Detach the Wall profile from the Fixed Glass assembly.
SHOWER DOORS ULTRA-E INSTALLATION STEPS 10. A p p l y s i l i c o n e i n t o t h e h o l e s o n t h e w a l l , Insert the Wall anchors (15) into the holes . Apply silicone along the Wall profile (9) and around the holes. Fasten the Wall profile to the wall with the Round head Screw M4×60 (16). See Fig. 10 for details. a. b. 15 9 c. Figure 10 16 9 11. Fasten the Bottom Bracket to the shower tray or shower base with Screw M4×30 (13). Push the Fixed Glass Assembly back into the Wall profile(9).
SHOWER DOORS ULTRA-E INSTALLATION STEPS 12. After final adjustments of the Assembled unit drill three holes in the Wall profiles (9) using Philip's type screwdriver only. NOTE: You only need to drill through the first layer of the Glass Profiles. Use the Round head screws Self tapping screw M3.5X13 (12) to secure the Glass profiles inside of the Wall profiles. Cover the exposed screw holes with Screw Cover (14). See Fig. 12 for details. a. 14 12 b. 14 14 c. 14 14 Figure 12 14 www.lesscare.
SHOWER DOORS ULTRA-E INSTALLATION STEPS Figure 13 13. Apply silicone between Fixed Glass and the tray or threshold. Also apply silicone between wall and the wall profiles. See Fig. 13 for details. WAIT 24 HOURS BEFORE USING THE SHOWER ENCLOSURE www.lesscare.
SHOWER DOORS ULTRA-E MAINTENANCE, USE, AND CARE Maintenance & Care IMPORTANT! DO NOT USE: Abrasive cleaners such as: acid, ammonia, bleach, and simmilar solutions; or any types of baking soda cleaning solutions. Use of such solutions may cause corrosion, finish peeling, and/or dull the surface. DO NOT USE: Abrasive sponges or cloth. Never use steel, wool, or wired brushes that will permanently scratch the surface.