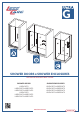
G SHOWER DOORS • SHOWER ENCLOSURES INSTALLATION INSTRUCTIONS SHOWER DOORS: SHOWER ENCLOSURES: LBSDG3072 LBSDG3072+LBSEG3072 LBSDG3072+LBSEG3472 LBSDG3472 LBSDG3472+LBSEG3072 LBSDG3472+LBSEG3472 LBSDG3072+LBSEG3072 LBSDG3472+LBSEG3072 LBSDG3072+LBSEG3472 LBSDG3472+LBSEG3472 www.lesscare.com Version 4.
SHOWER DOORS • SHOWER ENCLOSURES ULTRA-G PREPARATION FOR INSTALLATION PREPARATION FOR INSTALLATION READ ALL INSTRUCTIONS BEFORE UNPACKING THE PRODUCT 2 PEOPLE ARE REQUIRED TO LIFT AND DURING ENTIRE INSTALLATION OF THIS PRODUCT LessCare reserves the right to change, update, modify, alter, redesign this manual/product or its policies without prior notice! It is your responsibility to visit website to download or contact customer service for the most updated version of the installation instructions.
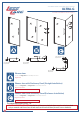
SHOWER DOORS • SHOWER ENCLOSURES ULTRA-G CONFIGURATION STYLES Min. Threshold Requirement Min. Threshold Requirement Min. Threshold Requirement Min. Threshold Requirement Shower door Please use Diagram A for assembly reference. Pages: 6-12 Shower door with Stationary Panel (Straight Installation) Please use Diagram A and Diagram B for assembly reference.
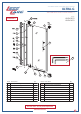
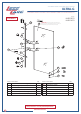
SHOWER DOORS • SHOWER ENCLOSURES ULTRA-G SHOWER DOOR COMPONENTS MODELS: 16 DIAGRAM A LBSDG3072 LBSDG3472 4 6 1 2 3 10 7 9 11 12 13 18 14 5 Item# Description 1 2 3 4 5 6 7 8 9 Wall profile for glass door Glass profile for glass door Side anti-water strip Upper pivot assembly Lower pivot assembly Anti-water strip Handle Bottom anti-water strip Washer for screw 15 Qty 1 pc 1 pc 1 pc 1 pc 1 pc 1 pc 1 pc 1 pc 5 pcs 17 8 Item# Description 10 11 12 13 14 15 16 17 18 Round head screw M3.
SHOWER DOORS • SHOWER ENCLOSURES ULTRA-G SHOWER ENCLOSURE/STATIONARY PANEL COMPONENTS MODELS: LBSEG3072 LBSEG3472 DIAGRAM B PROFILE GLASS 19 20 IMPORTANT: Stationary glass with profile has been factory pre-assembled. Do not try to detach the stationary glass panel with profile (20).
SHOWER DOORS • SHOWER ENCLOSURES ULTRA-G PIVOT ASSEMBLY COMPONENTS 4B 4A 4 4D 4F 4C 4G Item# Description 4E 4A 4B 4C 4D 4E 4F 4G Qty Upper Pivot retainer Countersunk screw M6x14 Pivot body Plastic washer Gasket Back plate Countersunk screw M6x14 5F 5E 5G 5C 5 5D Item# Description 5A 1 pc 1 pc 1 pc 2 pc 2 pc 1 pc 2 pc 5A 5B 5C 5D 5E 5F 5G 5B Lower Pivot retainer Countersunk screw M6x14 Pivot body Plastic washer Gasket Back plate Countersunk screw M6x14 Qty 1 pc 1 pc 1 pc 2 pc 2 pc 1
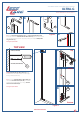
SHOWER DOORS • SHOWER ENCLOSURES ULTRA-G INSTALLATION STEPS Single Shower Door Assembly and Installation NOTE: Use parts from Diagram A for Single Shower door assembly and installation. a b 1 1 +0.0 c Installation requires minimum of 2" x 4" wood stud framing behind the wall. d 13 Shower Base Figure 1 1. Wall profile and Pivot retainers installation 1.1 Place the Wall Profile For Glass Door (1) vertically against the wall and set it to the shower base or the threshold.
SHOWER DOORS • SHOWER ENCLOSURES ULTRA-G INSTALLATION STEPS a 4A c b d 1 5A 1 1.2 Insert Upper Pivot Retainer (4A) and Lower Pivot Retainer (5A) into both ends of the Wall Profile For Glass Door (1).
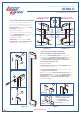
SHOWER DOORS • SHOWER ENCLOSURES ULTRA-G INSTALLATION STEPS INSTALLATION FOR LEFT HAND OPENING INSTALLATION FOR RIGHT HAND OPENING Left or Right Opening Installation? UPPER PIVOT Decide whether you want to install the door for the left or the right hand opening. If you want to open your door to the left side, use Pivot Assembly (4) as upper pivot and Pivot Assemby (5) as lower pivot.
SHOWER DOORS • SHOWER ENCLOSURES ULTRA-G INSTALLATION STEPS 3. Glass Door Installation ATTENTION! Glass Door (17) has 2 notches for the Pivot assemblies. The deeper notch must be on the upper pivot assembly. Shallower notch must be on the bottom of Glass Door (17) See Figure 6 Disassemble the Upper And Lower Pivot Assemblies (4/5). Mount the Glass Door (17) into Pivot Bodies (4C/5C) (see page 5).
SHOWER DOORS • SHOWER ENCLOSURES ULTRA-G INSTALLATION STEPS 6. PVC strips Installation Open Glass Door (17) by approximately 90º then push the Side Anti-water Strip (3) into the vertical slot of the Glass Profile For Glass Door (2). Install the Bottom Anti-water Strip (8) onto the bottom of the Glass Door (17).
SHOWER DOORS • SHOWER ENCLOSURES ULTRA-G INSTALLATION STEPS 7. Adjust, Level, and Secure Shower Door 7.1 Make your out of plumb adjustment as needed by slightly loosen Countersunk screw M6x14(4B). Important, do not remove Countersunk screw M6x14(4B) completely. Now, level your door and make necessary out-of plumb adjustment by pulling in or out Glass profile assembly from Wall profile for glass door (1) (there is maximum of 1" out-of-plumb adjustment).
SHOWER DOORS • SHOWER ENCLOSURES ULTRA-G INSTALLATION STEPS a This step is optional Open then door 90º and you will see a hole beneath the Pivot body (5C). This step is not required. You may optionally drill a hole through the Pivot body (5C) hole directly into your threshold. Apply silicone in the drilled hole, insert, and screw in Countersunk Screw M4x40 (15). Apply silicone on top of the screw head. b 5C 15 5C See Figure 13 for details. c Figure 13 8.
SHOWER DOORS • SHOWER ENCLOSURES ULTRA-G MAINTENANCE, USE, AND CARE Maintenance & Care IMPORTANT! DO NOT USE: Abrasive cleaners such as: acid, ammonia, bleach, and simmilar solutions. Use of such solutions may cause corrosion, finish peeling, and/or dull the surface. DO NOT USE: Abrasive sponges or cloth. Never use steel, wool, or wired brushes that will permanently scratch the surface. After installation use the shower door for approximately 2-3 weeks or 20-25 times (whichever comes first).
SHOWER DOORS • SHOWER ENCLOSURES ULTRA-G INSTALLATION STEPS Stationary Panel Assembly and Installation NOTE: Use parts from Diagram B on page 4 for Shower Enclosure/Stationary Panel assembly and installation. 9. Shower Enclosure/Stationary Panel Assembly and Installation 9.1 Insert Stationary glass panel with profile (20) into Wall profile for stationary glass panel (19). Position the assembly of (20 and 19) against the wall (do not screw or drill anything at this step).
SHOWER DOORS • SHOWER ENCLOSURES ULTRA-G INSTALLATION STEPS Apply silicone inside the holes and insert three 8mm Wall anchors (30) into the holes. 30 Apply silicone along the back edge (edge facing the wall) of Wall profile for stationary glass panel (19), put the wall profile against the wall. 19 Fasten the Wall profile for stationary glass panel (19) to the wall with three Round head screws M4x60 (21) through pre-drilled holes.
SHOWER DOORS • SHOWER ENCLOSURES ULTRA-G INSTALLATION STEPS 9.4 Using level align and level the Stationary glass panel with profile (20) with Glass Door (17). If needed, adjust the position of Stationary glass panel with profile (20) by pulling it out from the Wall profile for stationary glass panel (19) or push it into Wall profile for stationary glass panel (19) to make sure the Anti-Water strip (6) and the Glass door (17) align to position. a a 17 17 20 20 See Figure 18 for details.
SHOWER DOORS • SHOWER ENCLOSURES ULTRA-G INSTALLATION STEPS 10. Secure the Stationary Glass Panel with Wall Profile and Shower Base Threshold 10.1 After leveling Stationary glass panel with profile (20) with the Glass door (17) mark all screwing points in the middle of overlap between Stationary glass panel with profile (20) and Wall Profile for stationary panel (19).
SHOWER DOORS • SHOWER ENCLOSURES ULTRA-G INSTALLATION STEPS 11. Glass Shelves Installation b a 11.1 Align center of the hole on Stationary glass panel with profile (20) with the the wall. Mark a dot using pencil or marker on the wall. From the marked dot level, measure, and mark 2" and 6" dots from Wall profile for stationary glass panel (19) for hole drilling while level is still in place. Repeat the step for lower shelf. 11.2 Drill the marked holes using ø5/16" drill bit.
SHOWER DOORS • SHOWER ENCLOSURES ULTRA-G INSTALLATION STEPS 12. Apply Silicone 12.1 Apply clear silicone sealant between the tray or threshold. Also, apply silicone between the wall and the wall profiles from outside(bathroom), from inside (shower). Let the applied silicone dry completely. See Figure 23 for details MUST ALLOW SILICONE TO DRY FOR 24 HOURS BEFORE STARTING USING THE SHOWER Figure 23 www.lesscare.
SHOWER DOORS • SHOWER ENCLOSURES ULTRA-G MAINTENANCE, USE, AND CARE Maintenance & Care IMPORTANT! DO NOT USE: Abrasive cleaners such as: acid, ammonia, bleach, and simmilar solutions. Use of such solutions may cause corrosion, finish peeling, and/or dull the surface. DO NOT USE: Abrasive sponges or cloth. Never use steel, wool, or wired brushes that will permanently scratch the surface. After installation use the shower door for approximately 2-3 weeks or 20-25 times (whichever comes first).