
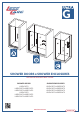
Installation Guide
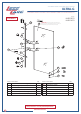


www.lesscare.com
ULTRA-G
SHOWER DOORS • SHOWER ENCLOSURES
9
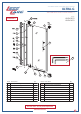
Clear Rubber
Gasket
Figure 7 Figure 8
Figure 6
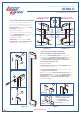
Figure 9
Left Side Installation Right Side Installation
3. Glass Door Installation
Install the Handle (07) onto the
Glass door (17).
IMPORTANT: Make sure that Clear
Rubber Gaskets are in between the
Glass Door (17) and knob; between
washer and glass; between Cap and
Glass Door (17). Then, tighten Knob
and Cap by hand only. Do not use
any types of tools to tighten it
See Figure 9 for details.
4. Handle Installation
INSTALLATION STEPS
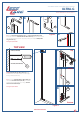
5C
17
5F
4C
17
5G
5E
4E
4F
4G
4C
17
4F
5C
17
4G
4E
5E
5F
5G
4D
5D
5D
4D
Disassemble the Upper And Lower Pivot Assemblies (4/5). Mount the Glass
Door (17) into Pivot Bodies (4C/5C) (see page 5).
NOTE: Use of soft wood shim is recommended to support Glass door (17)
from the bottom, during installation and all adjustments and it will prevent
Glass Door (17) from scratched on the bottom.
IMPORTANT: Make sure that clear rubber Gaskets (4E/5E) are in between
the Glass Door (17) and the Back Plates (4F/5F). Then, fasten tight
Countersunk Screws M6x14 (4G/5G). Make sure parts (4D/5D) are in the
right position.
IMPORTANT: Do not let any metal parts come into contact directly with glass,
which will damage the glass notches and cause scratches or damage to the
Glass Door (17) and, If ignored, could result in serious injury or death.
See Figure 7 (left side installation) and 8 (right side installation) for details.
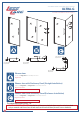
ATTENTION! Glass Door (17) has
2 notches for the Pivot assemblies.
The deeper notch must be on the
upper pivot assembly. Shallower
notch must be on the bottom of
Glass Door (17)
See Figure 6
Deeper Notch
must be on top
Shallower Notch
must be on bottom
7
Clear Rubber
Gasket
Clear Rubber
Gasket
Clear Rubber
Gasket
Washer
Knob
Cap
Washer