
Installation Guide


www.lesscare.com
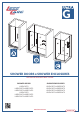
ULTRA-G
SHOWER DOORS • SHOWER ENCLOSURES
8
Figure 4 Figure 5
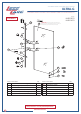
Upper
Lower
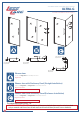
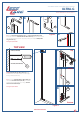
2.1 Install both Pivot Assemblies (4/5) to the top and the
bottom ends of the Glass Profile For Glass Door (2). Secure
both Pivot Assemblies (4/5) and Glass Profile (2) together
with Countersunk Screw M4x30 (16) and Round Head
Screws M4x12 with Washers (14).
See Figure 4 for details
NOTE: Back Plates (4F/5F) of both Pivot Assemblies (4/5)
should face inside of your shower.
TIP: Lower Pivot Assembly (5A) is installed in the same way as
the Upper Pivot Assembly (4A).
2.2 Slide the assembled Glass Profile For Glass Door (2) with
Pivot Assemblies (4/5) into the slot of the Wall Profile For
Glass Door (1) and fasten the Upper Pivot Retainer (4A) to the
Pivot Body (4C) with Countersunk Screw M6x14 (4B).
See Figure 5 for details
2. Installation of Upper and Lower
Pivot Assembly to the Glass Profile
a
16
2
4
c
a
b
c
4B
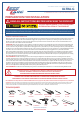
INSTALLATION STEPS
NOTE: Do not screw together
Lower Pivot Retainer (5A)
with Pivot Body (5C)
using Countersunk Screw
M6x14 (5B) this step.
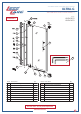
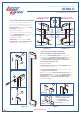
10º
10º
UPPER PIVOT
LOWER PIVOT
INSTALLATION FOR
LEFT HAND OPENING
5
4
INSTALLATION FOR
RIGHT HAND OPENING
Figure 5-1 Figure 5-2
This side
facing
outside
(bathroom)
This side
facing
outside
(bathroom)
10º
10º
UPPER PIVOT
LOWER PIVOT
4
5
This side
facing
outside
(bathroom)
This side
facing
outside
(bathroom)
Decide whether you want to install the door
for the left or the right hand opening. If you
want to open your door to the left side, use
Pivot Assembly (4) as upper pivot and Pivot
Assemby (5) as lower pivot.
See Figure 5-1 for details
If you plan to open shower door to the right
side, use Pivot Assembly (5) as upper pivot
and Pivot Assemby (4) as lower pivot.
See Figure 5-2 for details
IMPORTANT: In both installations, Back
Plates (4F/5F) of all Pivot Assemblies (4/5)
should face inside of your shower.
Left or Right Opening Installation?
14
b