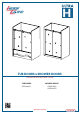
H TUB DOORS • SHOWER DOORS INSTALLATION INSTRUCTIONS TUB DOORS: SHOWER DOORS: LBTDH6062 LBSDH4876 LBSDH6076 www.lesscare.com Version 4.
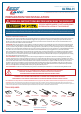
TUB DOORS • SHOWER DOORS ULTRA-H PREPARATION FOR INSTALLATION PREPARATION FOR INSTALLATION READ ALL INSTRUCTIONS BEFORE UNPACKING THE PRODUCT 2 PEOPLE ARE REQUIRED TO LIFT AND DURING ENTIRE INSTALLATION OF THIS PRODUCT LessCare reserves the right to change, update, modify, alter, redesign this manual/product or its policies without prior notice! It is your responsibility to visit website to download or contact customer service for the most updated version of the installation instructions.
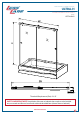
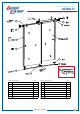
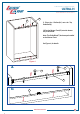
TUB DOORS • SHOWER DOORS ULTRA-H CONFIGURATION STYLES MODELS: LBTDH6062 1 2 Min. Threshold Requirement Threshold Requirement (Size): 2 1/2" SAFETY IMPORTANT NOTE: Installation of shower or bathtub door requires to be installed only on smooth and flat surface of both walls and threshold base (shower base or bathtub). www.lesscare.
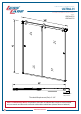
TUB DOORS • SHOWER DOORS ULTRA-H CONFIGURATION STYLES MODELS: LBSDH4876 LBSDH6076 1 2 Min. Threshold Requirement Threshold Requirement (Size): 2 1/2" SAFETY IMPORTANT NOTE: Installation of shower or bathtub door requires to be installed only on smooth and flat surface of both walls and threshold base (shower base or bathtub). 3 www.lesscare.
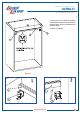
TUB DOORS • SHOWER DOORS ULTRA-H SHOWER DOOR COMPONETS 13 14 1 12 11 2 10 3 4 9 8 7 5 15 6 Item# Description 1 2 3 4 5 6 7 8 Top Guide Rail Guide Rail Holder Bumper Strip Recess Handle Bottom Track Decoration Cover for Guide Block Guide Block(preinstalled on the bottom track) Countersunk Self-tapping Screw M4X30 Qty 1 pc 2 pcs 4 pcs 2 pcs 1 pc 2 pcs 1 pc 2 pcs Item# Description 9 10 11 12 13 14 15 Decoration Cover for Bottom Track Glass Door Countersunk Self-tapping Screw M5X60 Wall Anc
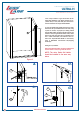
TUB DOORS • SHOWER DOORS ULTRA-H INSTALLATION STEPS 1.Use a tape measure to get the location of the Guide Rail Holder(2). The height should be 76” (shower door) or 62'' (tub door) from the shower base or bathtub to the top of the Rail Holder. 2. Once the Guide Rail Holder(2) location is fixed, mark down the 2 predrilled holes on the wall, using a pencil or marker, to prepare for drilling. Noted that the Rail holder should be placed with the two smaller screws facing inside the shower.
TUB DOORS • SHOWER DOORS ULTRA-H INSTALLATION STEPS 3. Loosen the hex screws inside the Guide Rail Holder(2) before putting the Top Guide Rail (1) inside the holder. Put the Top Guide Rail into the holder slightly. See Figure 2 for details. 2 1 2 Figure 2 1 1 2 2 www.lesscare.
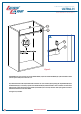
TUB DOORS • SHOWER DOORS ULTRA-H INSTALLATION STEPS 13 2 a. 13 2 Figure 3 IMPORTANT: It's not necessary to put the Holder Block (13) to the Guide Rail Holder(2) if the installation width (shower space width) is less than 59-1/2". 8. If distance between the two finished walls is between 59-1/2" and 60", before putting the Top Guide Rail(1) into the Rail Holder(2), it is necessary to place two Holder Blocks(13) inside the holders.
TUB DOORS • SHOWER DOORS ULTRA-H INSTALLATION STEPS 14 1 9. Place the 4 Rollers(14) onto the Top Guide Rail(1). 10.Put the Bottom Track(5) onto the shower tray or threshold. Note: The Guide Block(7) has been preinstalled on the Bottom Track. See Figure 4 for details. Figure 4 a. 14 14 1 b. 5 www.lesscare.
TUB DOORS • SHOWER DOORS ULTRA-H INSTALLATION STEPS 9 www.lesscare.
TUB DOORS • SHOWER DOORS ULTRA-H INSTALLATION STEPS 14 14 11. Use Φ4 Allen Key to loosen the Hex Screws on the Rollers(14). See Figure 5 for details. Figure 5 a. 14 www.lesscare.
TUB DOORS • SHOWER DOORS ULTRA-H INSTALLATION STEPS a. b. 14 14 10 Figure 6 12. Put the Glass Door(10) into the Slot of the Guide Block(7). Lift up one side of the Glass Door, align the hole in the glass door to the hex screw hole of the roller (14), fasten the glass with the roller with hex screw. Install the other Glass Door in the same way. c. d. See Figure 6 for details. 11 www.lesscare.
TUB DOORS • SHOWER DOORS ULTRA-H INSTALLATION STEPS a. 1 14 7 5 c. b. 14 14 c. 7 5 Figure 7 13. After the two glass doors installed, use Φ2.5 Allen Key to adjust the glass to the highest point, to avoid the Glass Doors to interfere with the Guide Block. See Figure 7 for details. www.lesscare.
TUB DOORS • SHOWER DOORS ULTRA-H INSTALLATION STEPS a. 4 15. Install the handle(4) to the glass door. Important: Make sure that Clear Rubber Gaskets are in between the glass door. 7 3 b. c. 3 7 17. Place the 4 Bumper Strips(3) to the Glass Doors. Now take off the four black triangle glass corner covers from the Glass Door. Make sure the strips will not interfere with the Guide Block(7), it is necessary to use scissors to cut off the part which interfere with the Guide Block.
TUB DOORS • SHOWER DOORS ULTRA-H INSTALLATION STEPS 19. Level the bottom track(5) and adjust it if necessary. Make sure that the Glass Doors (10) have a gap 1/4'' to the guide block(7) edge, only in this case, the doors will not interfere with the guide block. Secure the Bottom Track (5) to the shower base or bathtub with M4X30 Self-Tapping Screws(8). See Figure 9 for details. 5 a. b. 5 5 Figure 9 www.lesscare.
TUB DOORS • SHOWER DOORS ULTRA-H INSTALLATION STEPS 9 9 9 Figure 9 20. Put the Decoration Cover for Bottom Track (9)to the two ends of the Bottom Track. See Figure 10 for details. 15 www.lesscare.
TUB DOORS • SHOWER DOORS ULTRA-H INSTALLATION STEPS 21. Apply clear silicone sealant between the wall and the Rail Holder and between the tray or the bathtub and the Bottom Track. IMPORTANT: MUST ALLOW SILICONE TO DRY FOR 24 HOURS BEFORE STARTING USING THE SHOWER DOOR. See Figure 10 for details. Figure 10 www.lesscare.
TUB DOORS • SHOWER DOORS ULTRA-H MAINTENANCE, USE, AND CARE Maintenance & Care IMPORTANT! DO NOT USE: Abrasive cleaners such as: acid, ammonia, bleach, and simmilar solutions; or any types of baking soda cleaning solutions. Use of such solutions may cause corrosion, finish peeling, and/or dull the surface. DO NOT USE: Abrasive sponges or cloth. Never use steel, wool, or wired brushes that will permanently scratch the surface.