SHOWER BASE TRAYS INSTALLATION INSTRUCTIONS ASSEMBLED WITH ALUMINUM FLANGES: ASSEMBLED WITH ALUMINUM FLANGES: ALCOVE WALL CORNER WALL CORNER ALCOVE WALL CORNER WALL CORNER SHOWER DOOR SHOWER ENCLOSURE SHOWER ENCLOSURE SHOWER DOOR SHOWER ENCLOSURE SHOWER ENCLOSURE MODELS AND SIZES: MODELS AND SIZES: LSB3232C-W 32" x 32" LSB4834RL-W 48" x 34" LSB3636C-W 36" x 36" LSB4836RL-W 48" x 36" LSB4834C-W 48" x 34" LSB6030RL-W 60" x 30" LSB4836C-W 48" x 36" LSB6032RL-W 60" x 32" LSB6030
SHOWER BASE TRAYS PREPARATION FOR INSTALLATION PREPARATION FOR INSTALLATION READ ALL INSTRUCTIONS BEFORE UNPACKING THE PRODUCT 2 PEOPLE ARE REQUIRED TO LIFT AND CARRY THIS PRODUCT DURING INSTALLATION LessCare reserves the right to change, update, modify, alter, redesign this manual/product or its policies without prior notice! It is your responsibility to visit website to download or contact customer service for the most updated version of the installation instructions.
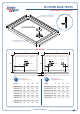
SHOWER BASE TRAYS COMPONENTS & DIMENSIONS Alumin um 3 x Aluminum Tile Flanges lange Side Vie w le F Ti 1 x Magnetic Drain Cover 1 x Shower Base Tray DIMENSIONS L L CENTER DRAIN 5" W LEFT DRAIN 5" W 3 1/4" DRAIN OPENING OR RIGHT DRAIN 3 1/4" DRAIN OPENING L1 L1 L2 L1 L2 L2 3" 3" Shower base trays with center drain opening Model: YL E C ST ST YL E 2 3/4" PROFILE HEIGHT RL L W L1 L2 Model: LSB3232C-W 32" 32" 16" 16" LSB3636C-W 36" 36" 18" LSB4834C-W 48" 34" LSB48
SHOWER BASE TRAYS INSTALLATION METHODS Before installation, take the shower base out of the packagingand make sure the base is in good shape.
SHOWER BASE TRAYS INSTALLATION STEPS The shower base tray must be installed directly against the studs, not against the finished wall. PREPARE WALL FRAMING Measure the shower base and construct a plumb stud pocket. The shower base must be installed directly against the studs, not against the finished wall. See the dimensions according to the model of the shower base on page 3. Construct a leveled subfloor that will adequately support the shower base.
SHOWER BASE TRAYS PLUMBING INSTALLATION PLUMBING INSTALLATION Mark the drain location. Cut or drill the floor to accommodate plumbing. The 2" drain pipe should be about 3/4" below the floor line. IMPORTANT: The drain dimensions and installation instructions might vary according to the model of a drain used. Refer to drain manufacturer’s instructions for proper installation.
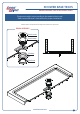
SHOWER BASE TRAYS DRAIN ASSEMBLY (USE AS REFERENCE ONLY) Components might vary according to the model of drain used. Refer to manufacturer’s instructions for proper installation. Install the drain on the shower base according to the manufacturer’s instructions DRAIN ASSEMBLY Drain cover Drain body Gaskets Drain nut www.lesscare.
SHOWER BASE TRAYS TILE FLANGES INSTALLATION DETERMINE TILE FLANGE LOCATION Determine the tiling flange profiles location in accordance to the shower base installation site. Use 3 tile flanges for alcove installation or 2 tile flanges for wall corner installation. Waterproof silicone Side view APPLY WATERPROOF SILICONE ATTACH TILE FLANGES TO BASE Apply a bead of waterproof silicone in the groove under the tiling flange profiles.
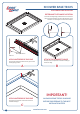
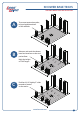
SHOWER BASE TRAYS SHOWER BASE TRAY INSTALLATION A To prevent water absorption, lay a polyethylene sheet on the subfloor. B Measure and mark the shower base feet locations on the stud pocket floor. Mark the height of Tile Flanges. C Position 1 1/4" high by 5" wide mounds of mortar on the marks. www.lesscare.
SHOWER BASE TRAYS SHOWER BASE TRAY INSTALLATION 10 D Apply 100% waterproof silicone sealant on the stud below the mark line. E Lower the base over the drainage pipe, Apply pressure to ensure that the compound or mortar is in contact with the bottom surface of the base. WOODEN STUD www.lesscare.
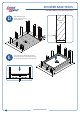
SHOWER BASE TRAYS SHOWER BASE TRAY INSTALLATION F G Fit shims in any gaps between the studs and the flange. Level the shower base tray using level tool. Important: if the shower base tray is not completelly leveled, water will not drain completelty and will collect on the shower base tray's floor. Water collection will create a slippery layer on the floor and may cause slip-and-fall accidents.
SHOWER BASE TRAYS SHOWER BASE TRAY INSTALLATION H I Connect the drain pipe Clean the shower base and cover the drain cover Caution: The magnetic force is strong. Be careful while closing the cover as it may hurt your fingers. J Install backer board across all walls on top of tile flanges. Backer Board Shower Base Tray 12 www.lesscare.
SHOWER BASE TRAYS SHOWER BASE TRAY INSTALLATION K Backer board Use furring strips to make the framing flush with the tile flanges. Shower Base Tray Finished Wall 1/8" L Shower Base Tray Apply 100% waterproof silicone at the place of connections Finished Wall Shower Base Tray IMPORTANT! ALLOW SILICONE TO DRY 24 HOURS BEFORE PROCEEDING TO THE NEXT INSTALLATION STEPS www.lesscare.
SHOWER BASE TRAYS MAINTENANCE & CARE IMPORTANT! DO NOT USE: Abrasive cleaners such as: acid, ammonia, bleach, and simmilar solutions. Use of such solutions may cause corrosion, finish peeling, and/or dull the surface. DO NOT USE: Abrasive sponges or cloth. Never use steel, wool, or wired brushes that will permanently scratch the surface.