JDL-201 User Manual Thank you for purchasing our products. This manual addresses the safety guidelines, warranty, and operating instructions. Please review this manual thoroughly before operating your device.
Package Contents.............................................................1 Introduction ..........................................................................1 1. ABOUT THE CAMERA .............................................................1 2. APPLICATIONS.........................................................................2 At a Glance............................................................................2 Installing the Batteries and SD Card....................5 1. LOADING BATTERIES...
Specifications..................................................................16 Frequently Asked Questions ................................16 1. Battery life is shorter than expected......................................16 2. Camera stops taking images or won't take images................17 3. Still photo and/or video qualify problems................................17 1). Night photos or videos appear too dark.............................17 2). Night photos or videos appear too bright....................
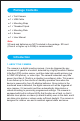
Package Contents 1 × Trail Camera 1 × USB Cable 1 × Mounting Strap 1 × Threaded Tripod 1 × Mounting Plate 3 × Screws 1 × User Manual Note: SD card and batteries are NOT included in the package. SD card (Class 6 or higher up to 32GB) is recommended. Introduction 1.
2.
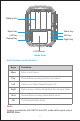
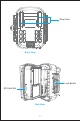
Battery Slot Menu Key Menu Key Left Key OK Key Replay Key Right Key LCD Screen Inside View Key Functions and Indicators Keys Functions Menu Enter or exit menu Play Review/Stop reviewing photos and videos Left Option up in Menu Mode/Previous file Right Option down in Menu Mode/Next file/ Camera Mode Shot Record/Stop recording video/Shoot photo OK Confirmation/Video Mode Note: All keys (exclude the ON, SETUP and OFF mode switch) work only in SETUP Mode.
Strap Hole Back View Lock Buckle SD Card Slot Side View -4-
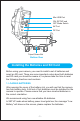
Mini USB Port ON SET UP OFF ON, SETUP and OFF Mode Switch AV AV Port DC DC Port Tripod Screw Nut Bottom View Installing the Batteries and SD Card Before using your camera, you need to install a set of batteries and insert an SD card. There are some important notes about both batteries and SD card you should be aware of, so please take the time to read the following directions and cautions: 1.
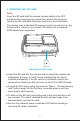
2. INSERTING THE SD CARD Note: Insert the SD card (with the camera's power switch in the OFF position) before beginning to operate the camera. Don't insert or remove the SD card when the power switch is in the ON position. The camera uses a standard SD memory card to save photos (in .jpg format) and/or videos (in .avi format). SD cards up to a maximum 32GB capacity are supported. Inserting the SD Cards $ %* + indicated by the icon).
Using the Camera Note: We recommend using a good quality name brand SD card with C6 (or higher) speed. Insert the SD card (with the camera's power switch in the OFF position) before beginning to operate the camera. Don't insert or remove the SD card when the power switch is in the ON position. The camera uses a standard SD memory card to save photos (in .jpg format) and/or videos (in .avi format). SD cards up to a maximum 32GB capacity are supported.
Note: When the power switch is set to ON position, the camera requires 30-60 seconds for PIR Sensor to initialize. 3. SETUP MODE In the SETUP mode, you can check and change the settings of the camera with the help of its built-in LCD. These settings, found in the menu by pressing the Menu key, let you change the photo or video resolution, switch the time imprint on, etc.
Notes: If the current file or all files are set Write protect, the file(s) cannot be deleted. If you want to delete the file(s), unlock the file(s) or format the SD card. After deleting a picture or a video file, the deleted files can't be restored! It is also possible to delete all files from the card by using the Format parameter. Advanced Settings The trail camera comes with preset manufacturer settings. You can change the settings to meet your requirements.
Video Resolution (affects video clips only) 1920×1080 1280×720 720×480 640×480 Select video resolution (pixels per frame). Higher resolution produces better quality videos, but creates larger files that take more of the SD card capacity. Video Length (affects video clips only) AVI 5s, optional from 3S to 10M Videos are in AVI format that can be played back on most video players. Long the recording, larger the file size.
Time Lapse On Off If set On, the camera will automatically take photos/videos according to the set interval, regardless of whether the PIR sensor has detected any game. This is helpful when observing cold-blooded animals like snakes, or the process of flowering, etc.
Password Protection On Off Set up a password to protect your camera from unauthorized users. If you forget the password, switch the camera to the OFF mode, press the Menu and Play keys at the same time, and then switch the operating mode from OFF to SETUP. The camera is unlocked. Then you can set the Password Protection on and set a new password in "MENU"-"Password Protection". Beep Sound On Off If set On, the camera will beep when you press any key of the camera in the SETUP mode.
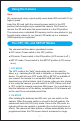
Mounting and Positioning the Camera 1. MOUNTING After you've set up the camera's parameters to your personal preferences, you're ready to take it outside and slide the power switch to "ON". When setting up the camera for scouting game or other outdoor applications, you must be sure to mount it in place correctly and securely. We recommend mounting the camera on a sturdy tree with a diameter of about 6 in. (15cm). To get the optimal picture quality, the tree should be about 16-17 ft.
2. SENSING ANGLE AND DISTANCE TEST To test whether the camera can effectively monitor the area you choose, this test is recommended to check the sensing angle and monitoring the distance of the camera. To perform the test: Switch the camera to the SETUP mode. Make movements in front of the camera at several positions within the area where you expect the game or subjects to be. Try different distances and angles from the camera.
Review Photos or Videos The camera stores photos and videos in the folder \DCIM\100MEDIA in the SD card. Photos are saved with file names like DSCF0001.JPG and videos like DSCF0001.AVI. The AVI video files can be played back on most popular media players, such as Windows Media Player, QuickTime, VLC, etc. There are several different ways this can be done. You can directly review the photos or videos on the camera screen.
Specifications Image Sensor 2.0Mega Pixels CMOS Lens FOV=90 with Auto IR Filter PIR Sensing Angle 90° Photo Resolution 16MP, 12MP, 8MP, 5MP, 3MP, 1MP Video Resolution 1920*1080, 1280*720, 720*480, 640*480 File Format JPEG, AVI Night Vision Range 18M with 22pcs IR LED Trigger Speed 0.4 Seconds LCD Screen 2" TFT COLOR Screen Power Supply 4*AA Standby Time Up to 5 Months Operating Temperature -20℃ to +60℃ Waterproof Rate IP56 Dimensions 109*92*53MM Frequently Asked Questions 1.
! | recommend using four good quality alkaline AA batteries to obtain maximum battery life. @^ and that the camera was not left in SETUP mode while in the field. ! ! %* in your camera. We recommend good quality SD cards up to 32GB. From the experiences that we have seen low-quality SD cards can reduce your camera battery life. 2.
2). Night photos or videos appear too bright > flash range, no closer than 10 ft. (3 m) from the camera. Subjects may appear too bright at closer distances. 3). Daytime photos or videos appear too bright sources during the day. 4).
2) To take out the SD card, gently push in the card and then it will pop out of the slot. The card is released from the slot and ready to be removed when you hear the click. 3) Be sure the camera's power is switched OFF before inserting or removing SD cards or batteries. SAFETY AND WARRANTY Important Safety Instructions This camera is a precision electronic device.
Warranty We strive to build our products with the highest attention to detail and craftsmanship. However, sometimes there are occurrences of defect. We are happy to offer a one-year hassle-free warranty to all our products as we continue to make amazing products. Please contact us if you have any questions about our devices.