
User Manual


Note:
We recommend using a good quality name brand SD card with C6 (or
higher) speed.
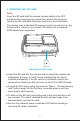
Insert the SD card (with the camera's power switch in the OFF
position) before beginning to operate the camera. Don't insert or
remove the SD card when the power switch is in the ON position.
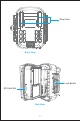
The camera uses a standard SD memory card to save photos (in .jpg
format) and/or videos (in .avi format). SD cards up to a maximum
32GB capacity are supported.
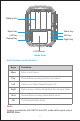
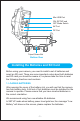
The camera has three basic operational modes:
OFF mode: Power switch in the OFF position.
ON mode: Power switch in the ON position (LCD screen is off.)
SETUP mode: Power switch in the SETUP position (LCD screen
is on).
1. OFF MODE
The OFF mode is the "safe" mode when any actions must be
taken, e.g., replacing the SD card or batteries, or transporting the
device. You will also use OFF mode (ON or SETUP is available) if
you connect the camera to a computer's USB port later to
download your photos/videos. And of course, when you are storing
or not using the camera, you will switch it to OFF. Please note that
in OFF mode the camera consumes little power. It's a good idea to
take the batteries out of the battery compartment if the camera will
not be used for an extended period time.
2. ON MODE
After installing the batteries and SD card, you can switch on the
camera. When the power switch is moved to the left position, the
camera will enter into ON (Live) mode. Once in the ON mode, no
manual controls are needed or possible (the control keys have no
effect). The camera will take photos or videos automatically as it is
programmed when the PIR sensor detects movement in range.
Using the Camera
The OFF, ON, and SETUP Modes
- 7 -