
Owner manual


5
www.levelmount.com
1-888-229-1459
EU: +0044 844 567 2657
UK: 0844 567 2657
©2011 Level Mount - Patents Pendin
g
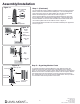
Assembly/Installation
Step 1 – Selecting the Correct Hardware Based on Flat
Panel Monitor Back
Before beginning the installation, determine if the Flat Panel Monitor has a flat
back or a recessed back as shown in Figure 1. If you have a recessed back Flat
Panel Monitor you may need to use the spacers (Bag 1) as shown in Figure 4 or
6. The spacer is used to fill the recessed area of the Flat Panel Monitor so that
the Flat Panel Monitor Bracket is fully supported and flush with the back of the
Flat Panel Monitor.
Figure 1
Recessed Back
Monitor
Flat Back
Monitor
Step 2 - Adapter Arm Installation (if needed)
If the holes in the Flat Panel Monitor Bracket do not line up with the holes in the
back of the Flat Panel Monitor, do not drill. Instead, follow these instructions for
the Adapter Arm Installation. Otherwise, skip to Step 3.
Note: The Adapter Arms can be used for Flat Panel Monitors with VESA
200mm x 100mm hole spacing; your Flat Panel Monitor manual/product
labels should specify the VESA hole spacing.
Step 2a - Attaching Adapter Arms to Flat Panel Monitor
Bracket
Attach the first set of Adapter Arms to the Flat Panel Monitor Bracket using the
following hardware as shown in Figure 2:
• Phillips Bolt M4 (Bag 4)
• Adapter Arms
• Flat Panel Monitor Bracket
• Lock Washers M4 (Bag 4)
• Hex Nut M4 (Bag 4)
Adjust the screws in Figure 2 to move the Adapter Arms to align with the VESA
holes on the back of the Flat Panel Monitor.
Step 2b - Completed Adapter Arm Attachment
Both Adapter Arms should be attached in the same manner. When completed it
will look like the photo as show in Figure 3.
Figure 2
M4 Hex NutM4
H
M4 Lock Washer
Flat Panel
Monitor Bracket
Adapter Arm
M4 Bolt
Phillips
Screwdriver
Step 2c - Attaching Adapter Arms to the back of the Flat
Panel Monitor
There are bolts of varying lengths included in this package, located in (Bags
1 and 2). Please use the bolt with the appropriate length for your Flat Panel
Monitor.
• Bolt M4 (Bag 1) or Bolt M5 (Bag 2)
• Washer M4 (Bag 1) or Washer M5 (Bag 2)
• An additional Washer may be needed to prevent the bolt head from recessing
into the back of the Flat Panel Monitor
• Adapter Arm
• Spacer (If necessary) (Bag 1) (The Spacer is used to fill the recessed area
of the Flat Panel Monitor so that the Flat Panel Monitor Bracket is fully
supported and flush with the back of the Flat Panel Monitor).
To attach the Adapter Arms to the back of the Flat Panel Monitor, attach the
Adapter Arms horizontally to the Monitor Bracket using the hardware described
above, placing the 2 Bolts for each arm through the holes of the Adapter Arms
and carefully threading the bolts into the holes in the back of the Flat Panel
Monitor. If there is any resistance remove the bolt immediately and select the
correctly sized bolt that enables a secure and snug fit.
Tighten the bolts snugly to the back of the Flat Panel Monitor as shown in Figure
5. Then skip to Step 4.
Caution: Only tighten bolts until they are secure, do not over-tighten.
Flat Back Monitor
Monitor Bracket
Figure 5
M4/M5 Bolt
Adapter Arms
Figure 4
Flat Back Monitor
*Only use Spacer if Monitor has a recessed back
M4/M5 Washer
M4/M5 bolt
Phillips
Screwdriver
Spacer
(If necessary)*
Monitor
Bracket
s
s
s
s
i
ve
r
Adapter Arms
Figure 3
Monitor Bracket
Adapter Arm
Flat Panel
Monitor