USER MANUAL www.Level-Sense.
USER MANUAL Contents About Level Sense Pro ............................ 1.0 ........................ 1.1 Requirements .................................... 1.2 In the Box ........................................... 1.3 Status LEDs ........................................ 1.4 Wiring Panel ....................................... 1.5 Installation ...................................................2.0 Installation Warning.......................... 2.1 Mounting to Pump Discharge Pipe ... 2.
1.0 About Level Sense Pro Level Sense Pro is a Wi-Fi based residential environmental keep a watchful eye on their property at all times. Level Sense sustained power loss, sump pit high water level, water leak(s), temperature and humidity levels. alarm triggers based on their state or level. There are three alarm outputs of the Level Sense Pro; email/SMS (text message), audible siren and alarm relay contacts. Additional detail of the alarm outputs can be found in the alarm outputs section of the manual.
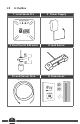
1.3 In the Box 1. Level Sense Pro 2. Power Supply 3. Float Switch & Bracket 4. Leak Sensor 5. Level Sensor Wire 6.
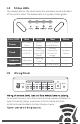
1.4 Status LEDs The status LEDs on the Level Sense Pro provide a visual indication of the control state. The below table is a system status guide. Color /LED Blue Yellow Red White Power AC Power Good No AC Power No AC Power Low Battery — Cloud Flash: Connected Connecting to Wi-Fi Solid: WPS Mode Wrong Password Or out-ofrange Hotspot Mode Calibrate Calibrated Learning Level — — Alarm No Alarms — Active Alarm — 1.
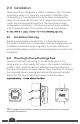
2.0 Installation Level Sense Pro is designed for indoor installation only. The ideal mounting location is in the utility room within a few feet of the sump pump pit. Consideration should be taken to keep within range of the homes Wi-Fi router. Wi-Fi range varies based on the router and environmental conditions. We recommend range testing before installation. If the device is out of range, consider a Wi-Fi range extender. The Level Sense Pro can be mounted 2.
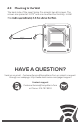
2.3 Mounting to the Wall The back side of the Level Sense Pro accepts two #6 screws. The screws are spaced at 3.375” and are mounted horizontally. Install 3.375 “ Mounting Screws HAVE A QUESTION? Send us an email: : CustomerService@SumpAlarm.Com or submit a request through our webpage: http://www.level-sense.com/pages/support Contact support CustomerService@SumpAlarm.
2.4 Installing Float Sensor detects when the water level has reached a point above normal operating range. six (6) inches above the sump pump normal water line. This level can usually be found by looking at the side walls of the pit to visually see the high water mark roughly level with the top of the two terminals on the Level Sense Pro. The wires do not have polarity, and cannot be wired backwards. Do not increase wire length beyond the length provided.
2.5 Installing Leak Sensor (Optional) sensor does not need to be installed if this type of monitoring is not required. The leak sensor can be mounted near the sump pit or other area where water would pool in the event of a leak. Typical locations are near a water heater or HVAC system which could leak during with the metal sensing elements down. The sensor must be submerged in a minimum pool of water 1/8” in depth before activating. The wires do not have polarity, and cannot be wired backwards.
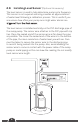
2.6 Installing Level Sensor (Optional Accessory) The level sensor is used to help determine pump cycle frequency. This sensor is not required and only provides an approximation of water level following a calibration process. This is useful if you are unsure how often your pump runs. High water alarms are The level sensor is installed vertically on the PVC discharge pipe of the sump pump. The sensor wire attaches to the PVC pipe with zip ties.
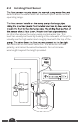
3.0 Powering On After mounting the Level Sense Pro control unit and successful installation of sensors we can now power up the control unit. First, connect the DC jack of the power supply to the Level Sense Pro control. Second, connect the AC wall adapter to a standard 120VAC power outlet. Use only the supplied power adapter. Upon power up, the cloud LED indicator will begin to pulse white. 4.0 Connect to Wi-Fi The Level Sense Pro is immediately ready to join your Wi-Fi network after power up.
4.1 Connect with WPS has a button labeled “WPS.” If your router does not, proceed to connecting with hotspot mode. Temporarily move the Level Sense Pro control unit into close proximity of the Wi-Fi router. The Level Sense Pro will operate on battery backup to complete this step if allowed to charge for 30 minutes prior. Once the two devices are Within 15 seconds, double click the USER button on the Level Sense Pro. The Cloud LED will turn from pulsing white to solid yellow.
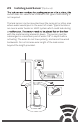
4.2 Connect with Hotspot To connect to Wi-Fi with hotspot mode you will need a Wi-Fi enabled device like a smart phone or laptop. The cloud LED of the Level Sense Pro should be pulsing white, which indicates the device is broadcasting a Wi-Fi hotspot. Use your Wi-Fi device to search for and join the network called “Level-Sense.” You can learn more about joining a Wi-Fi network by referring to the user manual of your device.
5.0 Product Registration—Portal The Level Sense Pro is set up and managed via a cloud service called account. With an account, you can claim your device, setup alarm contacts and set alarms. 5.1 Create Portal Account Using an internet browser, preferably on a laptop or desktop, navigate to the Level Sense Portal: http://portal.level-sense.com Within Portal, click “Register” to create an account. You will need to provide a valid email address.
5.3 Configure Device Name By default, the Level Sense Pro is named “New Sensor“ in Portal. devices in your Portal. 5.4 Update Frequency Wi-Fi data. 6.0 Alarm Inputs By default, all sensor inputs are enabled. Disable sensor inputs to suit your application. Sensors can be re-enabled at a later point. 6.1 Temperature and Humidity Alarm minimum and maximum safe levels. Alarms will occur when levels are outside of these bounds. 6.
7.0 Alarm Outputs Alarm outputs are set up based on each sensor input. By default, all sensors have all alarm outputs enabled. If the sensor input is enabled, it can have alarm outputs. You can disable inputs and outputs to suit your application and to match your installation and blue when there are no alarms. 7.1 Audible Alarm Enable the audible alarm for an audible warning. The audible alarm can be temporarily silenced by pressing the User button. 7.
8.0 Device and Alarm Testing The Level Sense Pro and sensors should be tested monthly to ensure proper operation. 8.1 Humidity and Temperature Testing Testing for temperature and humidity sensors is done by comparing current levels in Portal with a calibrated reference. Readings of +/-3% are expected. 8.2 Float Switch Testing 7HVW WKH ȵRDW VZLWFK E\ KROGLQJ WKH ȵRDW XS VLPXODWLQJ KLJK ZDWHU DQG ZDLWLQJ VHFRQGV IRU DQ DODUP 5HOHDVH WKH ȵRDW DIWHU WHVWLQJ 8.
10.0 Password Reset To clear the Wi-Fi credentials from the Level Sense Pro, complete the following password reset steps. Press and hold the user button until all four LEDs turn solid red. If after 10 seconds they have not turned red, release the button for a few seconds and try again. It can take several attempts to get into password reset mode. Once all four LEDs remain lit, usually this requires two button clicks. Wait ten seconds and press the reset button. The password reset is complete.
13.0 Warranty 1 YEAR LIMITED WARRANTY PLEASE READ THIS WARRANTY CAREFULLY BEFORE USING THE PRODUCT. THIS LIMITED WARRANTY CONTAINS THE STANDARD TERMS AND CONDITIONS (“TOC”) OF LEVEL SENSE. WHERE PERMITTED BY THE APPLICABLE LAW, BY KEEPING YOUR LEVEL SENSE PRODUCT BEYOND THIRTY (30) DAYS AFTER THE DATE OF DELIVERY, YOU FULLY ACCEPT THE TERMS AND CONDITIONS SET FORTH IN THIS LIMITED WARRANTY.
WITHOUT WAIVING ANY PROVISION IN THIS LIMITED WARRANTY, IF A CIRCUMSTANCE ARISES WHERE WARRANTORS ARE FOUND TO BE LIABLE FOR ANY LOSS OR DAMAGE ARISING OUT OF MISTAKES, NEGLIGENCE, OMISSIONS, INTERRUPTIONS, DELAYS, ERRORS OR DEFECTS IN WARRANTORS’ PRODUCTS OR SERVICES, SUCH LIABILITY SHALL NOT EXCEED THE TOTAL AMOUNT PAID BY THE CUSTOMER FOR WARRANTORS’ PRODUCT AND SERVICES OR $150.00, WHICHEVER IS GREATER.
4. PROCEDURE FOR OBTAINING PERFORMANCE OF WARRANTY: IN THE EVENT THAT THE PRODUCT DOES NOT CONFORM TO THIS WARRANTY, THE PRODUCT SHOULD BE SHIPPED OR DELIVERED FREIGHT PREPAID TO A WARRANTOR WITH EVIDENCE OF ORIGINAL PURCHASE. 5.
14.0 Test Log Please maintain a monthly test log. This page can be replicated for additional recordings.
15.0 Troubleshooting Wi-Fi will not stay connected: Device out of range. Check router antennas are not blocked and router is optimally placed within house. If optimizing the router does not work, consider a Wi-Fi range extender. Wi-Fi will not connect: Assuming the device is within range of the router, check network SSID and password. Refer to Password Reset, section 10.0, of the manual. Email messages and test email not received: Check the spam message folder for message from alarm@level-sense.com.
www.Level-Sense.