FPS-1033 Print Server w/ 2 USB and 1 Parallel Ports User Manual Ver. 1.
L The LevelOne Support Team can not support questions or compatibility issues with the following operating systems: Windows NT/95/98/98se/Me 2
TABLE OF CONTENTS COPYRIGHT ........................................................................................................................................ 5 1. INTRODUCTION............................................................................................................................ 6 PRODUCT OVERVIEW ........................................................................................................................ 6 COMPONENTS AND FEATURES .......................................
UNIX INSTALLATION ........................................................................................................................ 59 8. UPGRADING PRINT SERVER ................................................................................................. 64 OVERVIEW........................................................................................................................................ 64 UPGRADING THE PRINT SERVER FROM PSADMIN .......................................................
Trademarks NetWare is a registered trademark of Novell Inc and Windows 95/98/Me and Windows NT/2000/XP/2003 are registered trademarks of Microsoft Corp. All other brands and product names are trademarks of their respective companies.
1. Introduction Product Overview The external print servers enhance capability by letting you place your printers at convenient locations directly on the Ethernet network, and by increasing network printer performance and management. Please note that the print server does not support printing with host-based printers, e.g. CAPT, GDI, PPA. Network Management The print servers support the Simple Network Management Protocol (SNMP), which remote printer management and a warning.
LED Indicators LED State Indication On (Green) The Print Server’s power is on. Power Off The Print Server’s power is off. Blinking for POST When power switched on, the Status indicator will flash four Status (Red) times, and then off. 100Mbps On (Green) LAN Port has a valid network connection at 100Mbps. 10Mbps On (Orange) LAN Port has a valid network connection at 10Mbps. Parallel Blinking (Green) Data is being transmitted via Parallel Port.
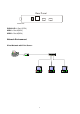
Rear Panel LAN USB1 USB2 PARALLEL PARALLEL is Port 1(PID1) USB1 is Port 2(PID2) USB2 is Port 3(PID3) Network Environment Wired Network with Print Server: Printer Print Server HUB Computer 8 Computer Computer
2. Print Server Installation Preparation To meet users’ network printing needs in today’s heterogeneous and multiple protocol networking environments, the print server supports industrial standard protocols, including TCP/IP, IPX/SPX, NetBEUI and AppleTalk. This means that the print server supports the most popular network operating systems today, including NetWare, Windows 95/98/Me/NT/2000/XP/2003, UNIX systems and Macintosh computer.
NT/2000/XP/2003 management of multiple printers- anywhere on your LAN print server, include alert and consumables Internet Printing Protocol Windows Printing via the Allows saving distribution of HQ hardcopy NT/2000/XP/2003 internet to document over Internet, replacing fax, mail Internet Printing Protocolenabled print server Comment Configuration solution Table has many installations way to setup Windows 95/98/Me, Windows NT/2000/XP/2003, NetWare, UNIX / Linux system and Mac computer.
3. Software Installation The PSAdmin is a proprietary Windows-based management program that can assist you in configuring and managing your print server in NetWare environments. The program can be installed from the setup CD of print server. Installing the PSAdmin and Print Server’s Driver 1. 2. 3. 4. 5. To enable network communication with print server, your computer must have a proper IP address, e.g. 192.168.0.100 Insert the setup CD into your CD-drive, and the following message appears.
6. Click Next, the wizard will automatically discover the print server. 7. From the Select A Print Sever screen, select the print server and its port number that you want to configure and click Next.
8. On the Change Settings screen, select No or Yes: Click No if you want the print server to keep using the default IP address and keep the default settings: z IP address: 192.168.0.10 z Subnet Mask: 255.255.255.0 Click Yes if you want change IP address to the print server, and then click Next. Note: 1. The IP address of print server must be within the same subnet as your network adapter. 2.
Select Add New Printer if the print server is connected to a printer that hasn’t been installed before and does not appear in the list.
10. Click Add New Printer to launch Windows Add Printer Wizard. 11. Click Next and select Local Printer, make sure the Automatically detect and install my Plug and Play printer check box is NOT checked. Then click Next.
12. Make sure the Use the following port radio-button is clicked and select LPT1: (recommended Printer Port) from the pull-down list. Then click Next. 13. Select Manufacturer and Printer from the lists of printer’s driver. Then click Next.
14. If you already have the printer’s driver installed, you will be asked whether to keep it or to replace it. Click Next. Supply a name for the printer and choose whether you want to make it your default printer. Then click Next. 15. Then, choose whether you want to share the printer with other network user, print a test page (please select No.), etc. Select the appropriate radio-button and click Next and Finish. 16.
. Right-click, select Properties -> Ports and verify that the print server’s port appears.
. Go to General; click Print Test Page to verify the configuration. 20. Done. Note: If you want to install more print servers, start setup wizard from your Windows Start menu: start -> All Programs -> Network Print Server -> PSWizard and repeat the installation procedure. Using PSAdmin After the software of setup CD is successfully installed, starts PSAdmin utility from your Windows Start menu: start -> All Programs -> Network Print Server -> PSAdmin. The screen will then appear as follow picture.
Wizard Wizard is a configuration program that can assist you in setting up the necessary parameters for your print server device to function. Setup a print server by using Wizard. TCP/IP Wizard 1. Click Wizard button just like a picture < >.and select TCP/IP Wizard. 2 Select “Obtain an IP address from DHCP server”. If there is a DHCP server on your network. This option allows the print server to obtain IP-related settings automatically from your DHCP server. This setting, by default, is disabled.
4 (Optional) In the Subnet Mask option, type the Subnet Mask your LAN or network segment is currently configured to use. 5 (Optional) In the Gateway field, type the IP address of gateway. 6 When done, click OK button. The program will save the above settings into the print server. 7 Done NetWare Wizard 1. Log into your NetWare file server as a Supervisor (Admin.) or equivalent. 2. Click Wizard button just like a picture < picture. >.and select NetWare Wizard, as follow 3.
Manual Setup Manual Setup is a configuration program designed for more experienced users of NetWare. To setup the print server by using Manual Setup follow the steps: 1. Run PCONSOLE in NetWare 3.x or NetWare 4.x and create the necessary parameters (Refer to your Novell NetWare print server/Services manual for details). 2. Log into your NetWare file server as a Supervisor (Admin.) or equivalent. From your Windows 95/98/Me, run PSAdmin. 3. Select the print server that you wish to configure. 4.
Properties –TCP/IP Options The TCP/IP options allow you to modify the print server’s TCP/IP settings. Each option is detailed as follows. Obtain an IP address from a DHCP server: This option enables or disables the DHCP feature of the print server. When this option is enabled, the print server will obtain an IP address automatically from the DHCP server on your LAN. The default value is “Disable”. Note: 1.
Upgrade Upgrade allows the user to upgrade the print server device. In order to upgrade the unit please perform the steps as follows: 1. Click Upgrade button just like a picture < >, as shown as follow picture 2. Select General Upgrade. Make sure that the upgrade file is located in the same directory as PSAdmin. Reset 1. Click Reset button just like a picture < >. 2. Reset allows the user to reset the print server device in order to establish a new connection or for new settings to take effect.
Note: Configure the print speed in the Advanced label, must match the printer’s speed which connect to the print server. Undependable configuration will cause printer to abnormal printing. Multiple Print Queues Configuration To configure the print server to service multiple print queues, please follow the instructions listed below: 1. 2. 3. 4. 5. 6. 7. 8. 9. 10. Log into your NetWare file server as a Supervisor (Admin.) or equivalent. Run the PSAdmin from your Windows.
3. Click Change or Remove Programs tab. 4. Select Network Print Monitor for Windows 95/98/NT/2000/XP/2003 and click Change/Remove button. 5. The un-installation wizard program will be launched. 6. Follow the directions on the screen to complete the un-installation procedure.
4.Internet Printer Connection and HP Web JetAdmin IPP Overview Print server(s) support the Internet Printing Protocol (IPP). Using the appropriate software on your system, you can create an IPP print path from your system as Windows PC over the Internet. Note: For incoming print path requests, the network administrator have to configure the firewall to accept incoming IPP requests.
6.In URL’s box, input print server’s IP address, for example, http://192.168.10.182/lp1. Then Click Next. ** lp1 is the queue name for print port-1, lp2 for print port-2 and lp3 for print port-3. 7.It will check print server to connect to HP printer, if not, it will appear as follow picture. Then Click OK. 8. Select the appropriate printer manufacturer and printer type and click “Next”, appear as follow picture.
9.If you want your Windows-based programs to use this printer as the default printer, please select “Yes”, and Click Next. It will appear as follow picture 21. Click Finish button. 22. Done. HP Web JetAdmin Overview HP Web JetAdmin allows you to use a Web browse to revise, view, manage and diagnose devices connected to the print server or any standard printer MIB devices. For more information about a procedure or Windows in the HP Web JetAdmin software, see about HP’s relation document.
Installing HP Web JetAdmin Before installing the HP Web JetAdmin software, you must have domain administrator or root privileges: Download the installation files from HP Customer Care Online at http://www.hp.com/go/webjetadmin/. Follow the instructions on the screen to install the HP Web JetAdmin software. Note: Installation instructions are also contained in the HP Web JetAdmin install file.
5. Configuration from Embedded Web Server Overview The Print Server contains an embedded web server that can be accessed through a supported web browser on a LAN, for example, IE 4.0, Netscape 4.0 or above is recommended. The embedded web server provides access to configuration and management pages for the print server and the connected peripheral device. Using Embedded Web Server Before you can use the embedded web server, the print server must be configured with an IP address.
Print Server Name: This option allows you to view device name of the print server. To correct the print server’s device name. System Contact: This option allows you to view contact name of the print server. To check the print server’s contact name who in charge of this device. System Location: This option allows you to view Location name of the print server. To confirm the print server’s location name where the print server is located in the office’s LAN.
Printer Status 1.Click Status, it then appears the sub-menu. 2.Click Printer, it then as shown in the following picture. Manufacturer: This option allows you to view manufacturer of the printer. When the printer connected with the print server, it will be show in the manufacture box. Model Number: This option allows you to view model of the printer. When the printer connected with the print server, it will be show in the model box.
Use DHCP/BOOTP: This option allows you to view DHCP/ BOOTP status. If there is a DHCP/BOOTP server on your network, this option allows the print server to obtain IP-related settings automatically from your DHCP server. IP Address: This option allows you to view IP address from the print server. The IP address must meet the IP addressing requirements of the network segment. (default: 192.168.0.10) Subnet Mask: This option allows you to view subnet mask from the print server.
General Settings: Print Server Name: This option allows you to view print server’s name would be configured by PSAdmin utility. Polling Time: This option allows you to view polling time from the print server. This function is search for NetWare Server by per time. NetWare NDS Setting: Use NDS Mode: Enable or Disable. Name of the NDS Tree. Name of the NDS Content. Current Status: Connect or Disconnect. NetWare Bindery Setting: Use Bindery Mode: Enable or Disable.
AppleTalk Status 1.Click Status, it then appears the sub-menu. 2.Click AppleTalk, it then as shown in the following picture. AppleTalk Settings: If no any zone exists, the print server itself displays the zone name as an asterisk (*) in the current AppleTalk Status of the print server in the web browser. Port Name: -xxxxxx-1, where xxxxxx represents the last six digits of the print server’s Node ID. Printer Type: This option allows you to view printer type from the print server.
SNMP Communities: This option allows you to view SNMP communities from the print server. There are two communities that control message from the network management of the print server. SNMP Traps: This option allows you to view SNMP traps from the print server. SMB Status 3.Click Status, it then appears the sub-menu. 4.Click SMB, it then as shown in the following picture.
Workgroup Name: This option allows you to view the SMB Workgroup Name from the print server. It must match the SMB workgroup name of your Windows-based computer Shared Name: This option allows you to view the Shared Name from the print server. Setup Menu Meanwhile, you have finished the IP address configuration with print server. You should use web browser to configure the print server.
Email Alert: This option allows you to Enable/Disable the Email Alert support. SMTP Server IP Address: This option allows you to input the IP address of your Email SMTP server. Administrator E-mail Address: This option allows you to input your Email address that you want to receive the notification by Email. Print Server Name: This option allows you to input device name of the print server. To correct the print server’s device name.
․User Name: You must be input the default administration user name, admin as login user name. ․Password: The default password is empty. After setup password is completed from the print server, you shouldn’t forget this password. Printer Setup: 1. Click Setup, it then appears the sub-menu. 2. Click Printer, it then as shown in the following picture. Bi-directional Settings: This option allows you to select the bi-directional of the print server.
DHCP/BOOTP: This option allows you to select DHCP/ BOOTP option. If there is a DHCP/BOOTP server on your network. This option allows the print server to obtain IP-related settings automatically from your DHCP server. IP Address: This option allows you to input IP address from the print server. The IP address must meet the IP addressing requirements of the network segment. Note: On the TCP/IP Setup screen, specify a fixed IP address is highly recommended.
Print Server Name: This option allows you to input print server name which configured by PSAdmin utility or PCOMSOLE program. Polling Time: The time interval in which the print server unit polls the file server for servicing of print queues. Logon Password: This option allows you to input encrypted password from the print server. The print server login to NetWare server that administrator set password from selected print server. Use NDS Mode: To Enable NDS Mode, if you want to setup NDS environment.
Installing Print Server on NetWare 4.x/5.x Due to its architecture and functionality, the print server must work under NetWare 4.x/5.x NDS Bindery Emulation. When you install the NetWare file server for the first time, by default, the installation program will automatically set up the Bindery Emulation function for you by adding “SET BINDERY CONTEXT =” in the AUTOEXEC.NCF file. By default, the bindery context will only be set on your organization (O) object.
9. From your NetWare client computer, such as Windows 95/98/Me, create a printer that is connected (redirected) to the NetWare print queue serviced by the print server. Note: Please refer to NetWare’s Print Server/Services manuals for detailed PCONSOLE commands. AppleTalk Setup The print server can print jobs submitted from Macintosh workstations connected to an Ethernet using AppleTalk protocol.
Note: The default print server’s Chooser name is as shown as follows: -xxxxxx-1, where xxxxxx represents the last six digits of the device’s Node ID. For example: ATALK_PS-40EEED-1. You may also change the to a name you like for identification purpose in this option. The print server will append the last six digits to the name you specify. 5. Printer Type: In this option, the LaserWriter of printer type by default (recommended). 6.
SNMP Setup TCP/IP networks use a standard management protocol called Simple Network Management Protocol (SNMP). SNMP is widely used in the industry as a solution for remote network management and monitoring of networking devices. SNMP actually includes a protocol, a database structure specification, and a set of database objects. The database objects are contained in a standard database called Management Information Base (MIB) that is stored on the networking device called SNMP agent.
snmp.snmpEnableAuthenTraps Enables or disables the function of sending SNMP Authentication Failure trap message to the network administrator, if the community name within a SNMP request is not correct. Users can set up print server’s SNMP functions by using their browsers. 1.Click Setup, it then appears the sub-menu. 2.Click SNMP, it then as shown in the following picture. SNMP Community: The print server supports up to two community names.
The print server supports the SMB (Server Message Block) protocol, user can send the print jobs through Network Neighborhood without installing print server’s driver. 1. Click Setup, it appears the sub-menu. 2. Click SMB, it as shown in the following picture. 3. Workgroup Name: This option allows you to assign a workgroup name to print server on the Network Neighborhood. Windows uses it to identify the print server on the Network. 4.
6. Network Print Monitor Preparation The print server supports TCP/IP, IPX/SPX and NetBEUI protocols under Windows 95/98/Me. Please make sure that the following steps have been completed before proceeding with installation under Windows PC. Select A Desired Protocol TCP/IP The TCP/IP Protocol must be installed. For further information, please read “TCP/IP Protocol Installation” section in this chapter.
TCP/IP Protocol Installation 1. Click Start, point to Settings and select Control Panel. 2. Double click the Network icon. 3. If the TCP/IP Protocol is not already installed, click Add. 4. Select Protocol and click Add. 5. Select Microsoft from the Manufacturers list. 6. Select TCP/IP Protocol from the Network Protocols list. 7. Specify an IP address, Subnet Mask, and Gateway address or specific “Obtain IP address automatically”, if a DHCP server is available on the LAN. 8. Restart the computer. 9. Done.
NetBEUI Protocol Installation 1. Click Start, point to Settings, and select Control Panel. 2. Double click the Network icon. 3. If the NetBEUI is not already installed, click Add. 4. Select Protocol and click Add. 5. Select Microsoft from the Manufacturers list. 6. Select NetBEUI from the Network Protocols box and follow the instructions on the screen. 7. Restart your computer for new settings to take effect. 8. Done.
10. A message reading, “After your printer is installed, Windows can print a test page so you can confirm that the printer is set up properly.” Select No and click Finish. 11. Double-click the newly created Printer Name icon. 12. Select Printer and Properties. 13. Click Details tab and select Add Port. 14. In the Add Port dialog box, select Other, as shown in the following picture. 15. Select the Network Print Port and click OK. 16.
By default, the computer will first search for the print server(s) on the network by using the IPX/SPX protocol. If the IPX/SPX protocol is installed, the print server will be displayed along with its Node ID, as shown in Node column. (The last 6 digits of the Node ID, located on the back of the print server unit). Select one of the print server’s ports from the list. If the IPX/SPX protocol is not installed, no print server will be shown in the display box.
7. TCP/IP LPR Port Printing Installation Basic TCP/IP Installation Overview When installing your print server in a TCP/IP environment, IP addresses are essential as a basic means of communications. It is therefore necessary to first assign an IP address to your print server unit. After assigning an IP address, the print server can be configured accordingly.
5. From the Printer Ports box as shown in the following picture, select the LPR Port. 6. The Add LPR compatible printers box will then appear as shown in the following picture. Type in the IP address assigned to the print server in the Name or address of server providing lpd box. 7. In the Name of printer or print queue on that server box, type in a printer name, e.g. lp1 for port-1, lp2 for port-2 and lp3 for port-3 of print server. Click OK. 8. In the Printer Ports box, select Close. 9. Click Next.
Windows 2000/XP/2003 Standard TCP/IP Port Printing Installation 1. Click Start, point to Settings, and select Printer. 2. Run Add Printer, Click Next. 3. The Add Printer Wizard screen will appear, Select Local Printer and click Next. 4. From the type of Create a new port box as shown in the following picture, select the Standard TCP/IP Port, Click Next and Next. 5.
6. In the Add Standard TCP/IP Printer Port Wizard box as shown in the following picture, Select Custom, Click Settings button, and click Next. 7. In the Configure Standard TCP/IP Port Monitor box as shown in the following picture, select LPR form Protocol, type in a queue name, e.g. lp1 for port-1, lp2 for port-2 and lp3 for port-3 of print server. 8. Click OK, and Next. Note: Please DO NOT type any other name than lp1, lp2 and lp3 in this step. 9. Click Finish.
10. Select the appropriate printer manufacturer and printer type list and click Next. 11. Type in a new Printer name or leave it in default, and click Next button. 12. A message reading, “To confirm that the printer is installed properly, you can print a test page”. Select Yes (Recommended) and click Finish. 13. Done.
UNIX Installation After the static IP address is assigned, the Print Server is ready to be configured. For some UNIX/Linux systems, we include the detailed installation procedures below. If you can’t find the installation procedure corresponding to your UNIX system, please refer to your UNIX manuals for details about configuring your UNIX for the “remote printing system”. SCO UNIX 8.0.0 (Caldera Open Unix 8.0.0) 1. Select “SCO Admin”. 2. Select “Printer Setup Manager”. 3.
Redhat Linux 9 The Print Server can work under any Linux-based systems, including Slackware, RedHat, etc, without any problems. Basically, the Linux's printing system is based on BSD system. Although many commercial Linux systems are available in the market and their commands will vary slightly, depending upon which version is used, the functionality of the Linux-based variants is exactly the same. Following are the outlined procedures (recommended for all users) on Red Hat Linux 7.2/7.
7. Click Forward button. 8. In the Name field, type a user-defined name, click Forward.
9. In the Queue Type field, choose Networked UNIX. 10. In the Server field, type the IP address of print server 11. In the Queue field, type a print server’s port name, which connect to the printer. For example: lp1. 12. Click Forward button. 13. In the Printer field, choose Postscript Printer. 14. Choose the model of printer and click Forward.
15. Done.
8.Upgrading Print Server Overview Upgrading print server will allow you to upgrade its firmware inside the print server while the newer software version of the print server is available from your local dealer. Depending on the different systems users might use, this chapter is divided into several Sections; please refer to the following lists for your systems. 1. Upgrading the print server from PSAdmin 2. Upgrading the print server from Windows NT/2000/XP/2003 3.
3. Wait for the transfer successful message. 4. Done. Upgrading the print server from UNIX (Through TCP/IP) 1. Log in as root 2. Ensure binary file is located in your current working directory. 3. Type “tftp ”. 4. At tftp prompt, type “get upgrade”. 5. Change to binary mode. 6. At tftp prompt, type “put mpsXX.bin”. 7. Wait for the file transfer to complete. 8. Quit from tftp. 9. Done. Upgrading the print server from Browser 1.
4. Click Browse… and select the firmware file. 5. Click Upgrade. 6. Done.
9. Troubleshooting General Troubleshooting Overview The most common problems, which cause the print server to perform improperly, are covered in this chapter. If a problem still exists after reading this chapter, please contact your dealer for technical support. LED Light Indicators The print server is equipped with LED lights to assist in diagnosing problems that are the result of the network and/or the print server hardware itself.
Print Port Related Problems Printing data failure may be caused by a loose connection of the print server to the parallel or USB port of the printer. Check to see if any of the pins on the parallel or USB port connector are damaged. In addition, check the cable connection. If the pins are damaged, contact your dealer for a replacement connector.
11. Repeat the Steps 8-12 for the other Ethernet adapter. 12. Restart the computer. 13. Done. Moving the print server to A New Segment If the print server is moved from one network segment to another after the initial installation, through the Network Print Port, the print server must be reconfigured on the original Windows NT server or on each Windows 95/98 computer using this print server in order for the print server’s driver on each computer to re-establish a new connection.
9. Done! Moving Your Computer to A New Segment If you are using the print server through the Network Print Port on your NT or Windows 95/98/Me computer and your computer is going to be moved onto another segment, you have to reconfigure the print server on your computer to use your print server. However, this situation is like moving the print server to a new segment. Please refer to the “Moving the print server to a new segment” section for more detailed reconfiguration instructions.
B. The print server's IP address is duplicated or is as same as another computer's IP address on the network. If this is the case, please consult your network administrator to obtain an unused IP address for your print server. C. The print server is on one segment and your Windows NT server is on the other segment.
5. Type "edit config.txt" to modify this configuration file. 6. In your editor, modify "BoxIPAddress" field from "0.0.0.0" to "192.72.214.100". Leave other options as default and do not change their values. When done, save this new file and quit from your editor. Please note, in this step you must specify an IP address which is valid on Segment B, such as 192.72.214.100 in this example, rather than 192.72.214.68. 7. Type, for example, "tftp 192.72.214.68 put config.
Appendix: SMB Printing with Windows XP 1. Enable the SMB settings from the print server’s WEB configuration. Assume your computers use the “WORKGROUP” as the SMB workgroup name in Windows. Please assign the same SMB name to your print server. If print server uses the different SMB name from computers’, the SMB printing won’t active. 2. Now you can find the print server from the SMB workgroup of Windows. Then, double click it.
3. Double click it again. 4. Now you have to install the printer’s driver.
5. Choose it from the “Add Printer Wizard”. 6. Install printer successfully.
7. Now, you can find your printer’s icon and you can use the SMB printing mode.
Reset Button Reboot the Print server: 1. Verify the power of print server is turned on. 2. Press the reset button once, and then release it. WARNING: This will restart the print server and stop all on-going and pending print jobs! Perform a Factory Default: 1. 2. 3. 4. 5. Disconnect the external power adapter. Hold down the reset button. Reconnect the external reset button. Wait about 5~6 seconds. Release the reset button. The print server will restart.
Frequently Asked Questions Question A Print jobs are sent to the print queue successfully, but fail to be sent to the printer. Possible explanations 1. The Print server Name/Print Queue configuration in PCONSOLE is incorrect. 2. The Print server name specified and stored in the print server memory doesn’t match the same one set in PCONSOLE. 3. The network cable or power adapter connected to the print server is loose or disconnected. 4. The printer is off-line, jammed or out of paper. Solutions 1. 2. 3. 4.
Question D The Status LED light keeps blinking after POST. Possible explanation and solution The last upgrade process was not completed. The print server must be upgraded again by using the PSAdmin. Please see Chapter 3 for details. Question E The PSAdmin reports “Create Print server Error”, “Create Printer Error”, or “Create Print Queue Error” while using Auto Setup.
Additional Installation Instructions Panasonic KX-P6100/6300/6500 If you are using a Panasonic KX-P6100/6300/6500 laser printer with the print server through the Network Print Port under Windows 95/98, please redirect the printer named “Panasonic KX-P6100 PCL” or “Panasonic KX-P6300 PCL”, or “Panasonic KX-P6500 PCL” to the print server through the Network Print Port. DO NOT redirect the printer named “Panasonic KX-P6100 GDI”, “Panasonic KX-P6300 GDI”, or “Panasonic KX-P6500 GDI” to the print server.