LevelOne WAP - 0005 11g PoE Wireless Access Point User's Guide Ver: 2.
TABLE OF CONTENTS CHAPTER 1 INTRODUCTION ............................................................................................. 1 Features of your Wireless Access Point........................................................................... 1 Package Contents .............................................................................................................. 4 Physical Details.................................................................................................................
APPENDIX A SPECIFICATIONS ....................................................................................... 79 Wireless Access Point...................................................................................................... 79 APPENDIX B TROUBLESHOOTING ................................................................................ 83 Overview .......................................................................................................................... 83 General Problems .....
Chapter 1 Introduction 1 This Chapter provides an overview of the WAP-0005, PoE Wireless Access Point's features and capabilities. Congratulations on the purchase of your WAP-0005,PoE Wireless Access Point. The Wireless Access Point links your 802.11g or 802.11b Wireless Stations to your wired LAN.
Wireless Access Point User Guide Point) Bridge modes are supported. And you can even use both Bridge Mode and Access Point Mode simultaneously! • • Client/Repeater Access Point. The Wireless Access Point can operate as a Client or Repeater Access Point, sending all traffic received to another Access Point. Simple Configuration. If the default settings are unsuitable, they can be changed quickly and easily. • DHCP Client Support.
Introduction • Auto Update. The Wireless Access Point can automatically update its firmware, by downloading and installing new firmware from your FTP server. • Command Line Interface. If desired, the command line interface (CLI) can be used for configuration. This provides the possibility of creating scripts to perform common configuration changes. • NetBIOS & WINS Support.
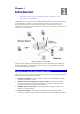
Wireless Access Point User Guide Package Contents The following items should be included: • WAP-0005 • Power Adapter • Quick Start Guide • CD-ROM containing the on-line manual and setup utility. If any of the above items are damaged or missing, please contact your dealer immediately. Physical Details Front Panel LEDs Figure 2: Front Panel Status On - Error condition. Off - Normal operation. Blinking - During start up, and when the Firmware is being upgraded. Power On - Normal operation.
Introduction Rear Panel Figure 3 Rear Panel Antenna One antenna (aerial) is supplied. Best results are usually obtained with the antenna in a vertical position. Console port DB9 female RS232 port. Reset Button This button has two (2) functions: • Reboot. When pressed and released, the Wireless Access Point will reboot (restart). • Reset to Factory Defaults. This button can also be used to clear ALL data and restore ALL settings to the factory default values.
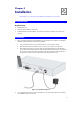
2 Chapter 2 Installation This Chapter covers the physical installation of the Wireless Access Point. Requirements Requirements: • TCP/IP network • Ethernet cable with RJ-45 connectors • Installed Wireless network adapter for each PC that will be wirelessly connected to the network Procedure 1. Select a suitable location for the installation of your Wireless Access Point.
Installation 3. 4. Connect the supplied power adapter to the Wireless Access Point and a convenient power outlet, and power up. NOTE: If you wish to use PoE (Power over Ethernet), refer to the following section. Check the LEDs: • The Status LED should flash, then turn OFF. • The Power, Wireless LAN, and LAN LEDs should be ON. For more information, refer to Front Panel LEDs in Chapter 1. Using PoE (Power over Ethernet) WAP-0005 supports PoE (Power over Ethernet). To use PoE: 1.
Chapter 3 Access Point Setup 3 This Chapter provides details of the Setup process for Basic Operation of your WAP-0005, PoE Wireless Access Point. Overview This chapter describes the setup procedure to make WAP-0005 a valid device on your LAN, and to function as an Access Point for your Wireless Stations. Wireless Stations may also require configuration. For details, see Chapter 4 - Wireless Station Configuration.
Wireless Access Point User Guide Wireless Access Points The main panel displays a list of all Wireless Access Points found on the network. For each Access Point, the following data is shown: Server Name The Server Name is shown on a sticker on the base of the device. IP address The IP address for the Wireless Access Point. MAC Address The hardware or physical address of the Wireless Access Point. IEEE Standard The wireless standard or standards used by the Wireless Access Point (e.g. 802.11b, 802.
Setup Setup Procedure 1. 2. 3. Select the desired Wireless Access Point. Click the Set IP Address button. If prompted, enter the user name and password. The default values are admin for the User Name, and password for the Password. 4. Ensure the IP address, Network Mask, and Gateway are correct for your LAN. Save any changes. Click the Web Management button to connect to the selected Wireless Access Point using your Web Browser. If prompted, enter the User Name and Password again.
Wireless Access Point User Guide Setup using a Web Browser Your Browser must support JavaScript. The configuration program has been tested on the following browsers: • Netscape V4.08 or later • Internet Explorer V4 or later Setup Procedure Before commencing, install the Wireless Access Point in your LAN, as described previously. 1. Check the Wireless Access Point to determine its Default Name.
Setup 7. 8. 9. From the menu, check the following screens, and configure as necessary for your environment. Details of these screens and settings are described in the following sections of this chapter. • Access Control - MAC level access control. • Security Profiles - Wireless security. • System - Identification, location, and Network settings • Wireless - Basic & Advanced You may also wish to set the admin password and administration connection options.
Wireless Access Point User Guide Access Control This feature can be used to block access to your LAN by unknown or untrusted wireless stations. Click Access Control on the menu to view a screen like the following. Figure 8: Access Control Screen Data - Access Control Screen Enable Use this checkbox to Enable or Disable this feature as desired. Warning ! Ensure your own PC is in the "Trusted Wireless Stations" list before enabling this feature.
Setup Trusted Wireless Stations To change the list of trusted wireless stations, use the Modify List button on the Access Control screen. You will see a screen like the sample below. Figure 9: Trusted Wireless Stations Data - Trusted Wireless Stations Trusted Wireless Stations This lists any Wireless Stations which you have designated as “Trusted”. Other Wireless Stations This list any Wireless Stations detected by the Access Point, which you have not designated as "Trusted".
Wireless Access Point User Guide Select None De-select any Stations currently selected in the "Other Stations" list. Edit To change an existing entry in the "Trusted Stations" list, select it and click this button. 1. Select the Station in the "Trusted Station" list. 2. Click the "Edit" button. The address will be copied to the "Address" field, and the "Add" button will change to "Update". 3. Edit the address (MAC or physical address) as required. 4. Click "Update" to save your changes.
Setup Data - Security Profiles Screen Profile Profile List Buttons All available profiles are listed. For each profile, the following data is displayed: • * If displayed before the name of the profile, this indicates the profile is currently enabled. If not displayed, the profile is currently disabled. • Profile Name The current profile name is displayed. • [SSID] The current SSID associated with this profile. • Security System The current security system (e.g. WPA-PSK ) is displayed.
Wireless Access Point User Guide Security Profile Screen This screen is displayed when you select a Profile on the Security Profiles screen, and click the Configure button. Figure 11: Security Profile Screen Profile Data Enter the desired settings for each of the following: Profile Name Enter a suitable name for this profile. SSID Enter the desired SSID. Each profile must have a unique SSID. Wireless Band Select the wireless band or bands for this profile.
Setup • • WPA-802.1x - This version of WPA requires a Radius Server on your LAN to provide the client authentication according to the 802.1x standard. Data transmissions are encrypted using the WPA standard. If this option is selected: • This Access Point must have a "client login" on the Radius Server. • Each user must have a "user login" on the Radius Server. • Each user's wireless client must support 802.1x and provide the login data when required.
Wireless Access Point User Guide Security Settings - None Figure 12: Wireless Security - None No security is used. Anyone using the correct SSID can connect to your network. The only settings available from this screen are Radius MAC Authentication and UAM (Universal Access Method). Radius MAC Authentication Radius MAC Authentication provides for MAC address checking which is centralized on your Radius server. If you don't have a Radius Server, you cannot use this feature. Using MAC authentication 1.
Setup • If not successful, “xx:xx:xx:xx:xx:xx MAC authentication failed” is entered in the log,, and station status is shown as “authenticating” on the station list table.
Wireless Access Point User Guide Radius-based MAC authentication Screen This screen will look different depending on the current security setting. If you have already provided the address of your Radius server, you won't be prompted for it again. Otherwise, you must enter the details of your Radius Server on this screen. Figure 13: Radius-based MAC Authentication Screen Data - Radius-based MAC Authentication Screen Enable ... Enable this if you wish to Radius-based MAC authentication.
Setup UAM UAM (Universal Access Method) is intended for use in Internet cafes, Hot Spots, and other sites where the Access Point is used to provide Internet Access. If enabled, then HTTP (TCP, port 80) connections are checked. (UAM only works on HTTP connections; all other traffic is ignored.) If the user has not been authenticated, Internet access is blocked, and the user is re-directed to another web page.
Wireless Access Point User Guide 2. On your Web Server, create a suitable welcome page. The welcome page must have a link or button to allow the user to input their user name and password on the uamlogon.htm page on the Access Point. 3. On the Access Point’s UAM screen, select External Web-based Authentication, and enter the URL for the welcome page on your Web server. Add users on your RADIUS server as required, and allow access by these users.
Setup Internal Web-based Authentication If selected, then when a user first tries to access the Internet, they will be blocked, and re-directed to the built-in login page. The logon data is then sent to the Radius Server for authentication. External Web-based Authentication If selected, then when a user first tries to access the Internet, they will be blocked, and re-directed to the URL below. This needs to be on your own local Web Server.
Wireless Access Point User Guide Data - WEP Screen WEP Data Encryption Authentication Select the desired option, and ensure your Wireless stations have the same setting: • 64 Bit Encryption - Keys are 10 Hex (5 ASCII) characters. • 128 Bit Encryption - Keys are 26 Hex (13 ASCII) characters. • 156 Bit Encryption - Keys are 32 Hex (16 ASCII) characters. Normally, you can leave this at “Automatic”, so that Wireless Stations can use either method ("Open System" or "Shared Key".).
Setup Security Settings - WPA-PSK Like WEP, data is encrypted before transmission. WPA is more secure than WEP, and should be used if possible. The PSK (Pre-shared Key) must be entered on each Wireless station. The 256Bit encryption key is derived from the PSK, and changes frequently. Figure 16: WPA-PSK Wireless Security Data - WPA-PSK Screen WPA-PSK Network Key Enter the key value. Data is encrypted using a 256Bit key derived from this key. Other Wireless Stations must use the same key.
Wireless Access Point User Guide simply say "AES". If selected, both Unicast (point-to-point) and multicast (broadcast) transmissions are encrypted using AES. • AES - TKIP - If selected, Unicast (point-to-point) uses AES-CCMP and multicast (broadcast) transmissions are encrypted using TKIP. Pairwise Key Update This refers to the key used for point-to-point transmissions. Enable this if you want the keys to be updated regularly.
Setup Security Settings - WPA-802.1x This version of WPA requires a Radius Server on your LAN to provide the client authentication according to the 802.1x standard. Data transmissions are encrypted using the WPA standard. If this option is selected: • This Access Point must have a "client login" on the Radius Server. • Each user must have a "user login" on the Radius Server. Normally, a Certificate is used to authenticate each user. See Chapter4 for details of user configuration.
Wireless Access Point User Guide Data - WPA-802.1x Screen WPA-802.1x Radius Server Address Enter the name or IP address of the Radius Server on your network. Radius Port Enter the port number used for connections to the Radius Server. Client Login Name This read-only field displays the current login name, which is the same as the name of the Access Point. The Radius Server must be configured to accept this login. Shared Key This is used for the Client Login on the Radius Server.
Setup Update Report every ... If Radius accounting is enabled, you can enable this and enter the desired update interval. This Access Point will then send updates according to the specified time period. Radius MAC Authentication The current status is displayed. This will always be "Disabled", because Radius MAC Authentication is not available with WPA802.1x. The Configure button for this feature will also be disabled. UAM The current status is displayed.
Wireless Access Point User Guide Security Settings - 802.1x This uses the 802.1x standard for client authentication, and WEP for data encryption. If possible, you should use WPA-802.1x instead, because WPA encryption is much stronger than WEP encryption. If this option is selected: • This Access Point must have a "client login" on the Radius Server. • Each user must have a "user login" on the Radius Server. Normally, a Certificate is used to authenticate each user.
Setup Data - 802.1x Screen 802.1x Radius Server Address Enter the name or IP address of the Radius Server on your network. Radius Port Enter the port number used for connections to the Radius Server. Client Login Name This read-only field displays the current login name, which is the same as the name of the Access Point. The Radius Server must be configured to accept this login. Shared Key This is used for the Client Login on the Radius Server. Enter the key value to match the Radius Server.
Wireless Access Point User Guide Radius MAC Authentication The current status is displayed. UAM The current status is displayed. Click the Configure button to configure this feature if required. Click the Configure button to configure this feature if required.
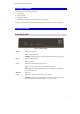
Setup System Screen Click System on the menu to view a screen like the following. Figure 19: System Screen Data - System Screen Identification Access Point Name Enter a suitable name for this Access Point. Description If desired, you can enter a description for the Access Point. Country Domain Select the country or domain matching your current location.
Wireless Access Point User Guide WINS Server Name/IP Address Enter the name or IP address of your WINS server.
Setup Wireless Screens There are two (2) configuration screens available: • Basic Settings • Advanced Basic Settings Screen The settings on this screen must match the settings used by Wireless Stations. Click Basic on the menu to view a screen like the following. Figure 20: Basic Settings Screen Data - Basic Settings Screen Operation Wireless Mode Select the desired option: • Disable - select this if for some reason you do not this AP to transmit or receive at all. • 802.11b and 802.
Wireless Access Point User Guide AP Mode Both Bridge mode and AP mode can be used simultaneously, unless AP mode is "Client/Repeater". Select the desired AP mode: • None (disable) - Disable AP mode. Use this if you want to act a Bridge only. • Access Point - operate as a normal Access Point • Client/Repeater - act as a client or repeater for another Access Point. If selected, you must provide the address (MAC address) of the other AP in the Repeater AP MAC Address field.
Setup In PTMP mode, only allow specified APs This is only functional if using Point-to-Multi-Point Bridge (PTMP) mode. If enabled, you can specify the MAC addresses of the APs which are allowed to connect to this AP. To specify the allowed APs: 1. Enable this checkbox 2. Click the button "Set PTMP APs". 3. On the resulting sub-screen, enter the MAC addresses of the allowed APs.
Wireless Access Point User Guide Advanced Settings Clicking the Advanced link on the menu will result in a screen like the following. Figure 21: Advanced Settings Data - Advanced Settings Screen Basic Rate Basic Rate The Basic Rate is used for broadcasting. It does not determine the data transmission rate, which is determined by the "Mode" setting on the Basic screen. Select the desired option. Do NOT select the "802.11g" or "ODFM" options unless ALL of your wireless clients support this. 802.
Setup Parameters Disassociated Timeout This determines how quickly a Wireless Station will be considered "Disassociated" with this AP, when no traffic is received. Enter the desired time period. Fragmentation Enter the preferred setting between 256 and 2346. Normally, this can be left at the default value. Beacon Interval Enter the preferred setting between 20 and 1000. Normally, this can be left at the default value. RTS/CTS Threshold Enter the preferred setting between 256 and 2346.
Chapter 4 PC and Server Configuration 4 This Chapter details the PC Configuration required for each PC on the local LAN. Overview All Wireless Stations need to have settings which match the Wireless Access Point. These settings depend on the mode in which the Access Point is being used. • If using WEP or WPA-PSK, it is only necessary to ensure that each Wireless station's settings match those of the Wireless Access Point, as described below. • For WPA-802.1x and 802.
PC and Server Configuration Using WPA-PSK For each of the following items, each Wireless Station must have the same settings as the Wireless Access Point. Mode On each PC, the mode must be set to Infrastructure. SSID (ESSID) This must match the value used on the Wireless Access Point. The default value is wireless Note! The SSID is case sensitive. Wireless Security On each client, Wireless security must be set to WPA-PSK.
Wireless Access Point User Guide Using WPA-802.1x This is the most secure and most complex system. 802.1x mode provides greater security and centralized management, but it is more complex to configure. Wireless Station Configuration For each of the following items, each Wireless Station must have the same settings as the Wireless Access Point. Mode On each PC, the mode must be set to Infrastructure. SSID (ESSID) This must match the value used on the Wireless Access Point.
PC and Server Configuration 802.1x Server Setup (Windows 2000 Server) This section describes using Microsoft Internet Authentication Server as the Radius Server, since it is the most common Radius Server available that supports the EAP-TLS authentication method.
Wireless Access Point User Guide Figure 22: Components Screen 4. 5. Click Next. Select the Enterprise root CA, and click Next. Figure 23: Certification Screen 6. Enter the information for the Certificate Authority, and click Next.
PC and Server Configuration Figure 24: CA Screen 7. 8. Click Next if you don't want to change the CA's configuration data. Installation will warn you that Internet Information Services are running, and must be stopped before continuing. Click Ok, then Finish. DHCP server configuration 1. 2. Click on the Start - Programs - Administrative Tools - DHCP Right-click on the server entry as shown, and select New Scope. Figure 25: DHCP Screen 3. 4. 5. Click Next when the New Scope Wizard Begins.
Wireless Access Point User Guide Figure 26:IP Address Screen 6. Add exclusions in the address fields if required. If no exclusions are required, leave it blank. Click Next. 7. Change the Lease Duration time if preferred. Click Next. 8. Select Yes, I want to configure these options now, and click Next. 9. Enter the router address for the current subnet. The router address may be left blank if there is no router. Click Next. 10.
PC and Server Configuration Certificate Authority Setup 1. 2. Select Start - Programs - Administrative Tools - Certification Authority. Right-click Policy Settings, and select New - Certificate to Issue. Figure 28: Certificate Authority Screen 3. Select Authenticated Session and Smartcard Logon (select more than one by holding down the Ctrl key). Click OK. Figure 29: Template Screen 4. 5. Select Start - Programs - Administrative Tools - Active Directory Users and Computers.
Wireless Access Point User Guide Figure 30: Active Directory Screen 6. Select the Group Policy tab, choose Default Domain Policy then click Edit. Figure 31: Group Policy Tab 7. Select Computer Configuration - Windows Settings - Security Settings - Public Key Policies, right-click Automatic Certificate Request Settings - New - Automatic Certificate Request.
PC and Server Configuration Figure 32: Group Policy Screen 8. 9. When the Certificate Request Wizard appears, click Next. Select Computer, then click Next. Figure 33: Certificate Template Screen 10. Ensure that your certificate authority is checked, then click Next. 11. Review the policy change information and click Finish. 12. Click Start - Run, type cmd and press enter. Enter secedit /refreshpolicy machine_policy This command may take a few minutes to take effect.
Wireless Access Point User Guide Internet Authentication Service (Radius) Setup 1. 2. Select Start - Programs - Administrative Tools - Internet Authentication Service Right-click on Clients, and select New Client. Figure 34: Service Screen 3. 4. 5. 6. 7. 8. Enter a name for the access point, click Next. Enter the address or name of the Wireless Access Point, and set the shared secret, as entered on the Security Settings of the Wireless Access Point. Click Finish.
PC and Server Configuration 11. Click Edit Profile... and select the Authentication tab. Enable Extensible Authentication Protocol, and select Smart Card or other Certificate. Deselect other authentication methods listed. Click OK. Figure 36: Authentication Screen 12. Select No if you don't want to view the help for EAP. Click Finish.
Wireless Access Point User Guide Remote Access Login for Users 1. 2. 3. Select Start - Programs - Administrative Tools- Active Directory Users and Computers. Double click on the user who you want to enable. Select the Dial-in tab, and enable Allow access. Click OK.
PC and Server Configuration 802.1x Client Setup on Windows XP Windows XP ships with a complete 802.1x client implementation. If using Windows 2000, you can install SP3 (Service Pack 3) to gain the same functionality. If you don't have either of these systems, you must use the 802.1x client software provided with your wireless adapter. Refer to your vendor's documentation for setup instructions.
Wireless Access Point User Guide Figure 39: Wireless CA Screen 5. Select User certificate request and select User Certificate, the click Next. Figure 40: Request Type Screen 6. Click Submit.
PC and Server Configuration Figure 41: Identifying Information Screen 7. A message will be displayed, then the certificate will be returned to you. Click Install this certificate. Figure 42:Certificate Issued Screen 8. . You will receive a confirmation message. Click Yes.
Wireless Access Point User Guide Figure 43: Root Certificate Screen 9. Certificate setup is now complete. 802.1x Authentication Setup 1. 2. 3. Open the properties for the wireless connection, by selecting Start - Control Panel Network Connections. Right Click on the Wireless Network Connection, and select Properties. Select the Authentication Tab, and ensure that Enable network access control using IEEE 802.1X is selected, and Smart Card or other Certificate is selected from the EAP type.
PC and Server Configuration • Your network administrator can advise you of the correct settings for each network. 802.1x networks typically use EAP-TLS. This is a dynamic key system, so there is no need to enter key values. Enabling Encryption To enable encryption for a wireless network, follow this procedure: 1. Click on the Wireless Networks tab. Figure 45: Wireless Networks Screen 2. 3. Select the wireless network from the Available Networks list, and click Configure.
Wireless Access Point User Guide Figure 46: Properties Screen Setup for Windows XP and 802.1x client is now complete.
PC and Server Configuration Using 802.1x Mode (without WPA) This is very similar to using WPA-802.1x. The only difference is that on your client, you must NOT enable the setting The key is provided for me automatically. Instead, you must enter the WEP key manually, ensuring it matches the WEP key used on the Access Point. Figure 47: Properties Screen Note: On some systems, the "64 bit" WEP key is shown as "40 bit" and the "128 bit" WEP key is shown as "104 bit".
Chapter 5 Operation and Status 5 This Chapter details the operation of the Wireless Access Point and the status screens. Operation Once both the Wireless Access Point and the PCs are configured, operation is automatic. However, you may need to perform the following operations on a regular basis. • If using the Access Control feature, update the Trusted PC database as required. (See Access Control in Chapter 3 for details.) • If using 802.
Operation and Status Data - Status Screen Access Point Access Point Name The current name will be displayed. MAC Address The MAC (physical) address of the Wireless Access Point. Domain The region or domain, as selected on the Basic Wireless screen. Firmware Version The version of the firmware currently installed. TCP/IP IP Address The IP Address of the Wireless Access Point. Subnet Mask The Network Mask (Subnet Mask) for the IP Address above.
Wireless Access Point User Guide Statistics Screen This screen is displayed when the 2.4GHz Statistics button on the Status screen is clicked. It shows details of the traffic flowing through the Wireless Access Point. Figure 49: Statistics Screen Data - Statistics Screen System Up Time System Up Time This indicates how long the system has been running since the last restart or reboot. 2.4GHz Wireless Authentication The number of "Authentication" packets received.
Operation and Status Multicast Packets Number of Broadcast packets transmitted to or received from Wireless Stations, using Multicast transmission. Management Number of Management packets transmitted to or received from Wireless Stations. Control Number of Control packets transmitted to or received from Wireless Stations.
Wireless Access Point User Guide Profile Status The Profile Status screen is displayed when the Profile Status button on the Status screen is clicked. Figure 50: Profile Screen For each profile, the following data is displayed: Name The name you gave to this profile; if you didn't change the name, the default name is used. SSID The SSID assigned to this profile. Broadcast SSID Indicates whether or not the SSID is broadcast. Band The Wireless band ( 2.4 GHz) used by this profile.
Operation and Status Activity Log This screen is displayed when the Log button on the Status screen is clicked. Figure 51: Activity Log Screen Data - Activity Log Data Current Time The system date and time is displayed. Log The Log shows details of the connections to the Wireless Access Point. Buttons Refresh Update the data on screen. Save to file Save the log to a file on your pc. Clear Log This will delete all data currently in the Log. This will make it easier to read new messages.
Wireless Access Point User Guide Station List This screen is displayed when the Stations button on the Status screen is clicked. Figure 52 Station List Screen Data - Station List Screen Station List Name The name of each Wireless Station is displayed. If the name is not know, "unknown" is displayed for the name. MAC Address The MAC (physical) address of each Wireless Station is displayed. Mode The mode of each Wireless Station. SSID This displays the SSID used the Wireless station.
Chapter 6 Access Point Management 6 This Chapter explains when and how to use the Wireless Access Point's "Management" Features. Overview This Chapter covers the following features, available on the Wireless Access Point’s Management menu. • Admin Login • Auto Config/Update • Config File • Log Settings • Rogue APs • SNMP • Upgrade Firmware Admin Login Screen The Admin Login screen allows you to assign a password to the Wireless Access Point.
Wireless Access Point User Guide Data - Admin Login Screen Login User Name Enter the login name for the Administrator. Change Admin Password If you wish to change the Admin password, check this field and enter the new login password in the fields below. New Password Enter the desired login password. Repeat New Password Re-enter the desired login password.
Other Settings & Features Auto Config/Update The Auto Config/Update screen provides two (2) features: • Auto Config - The Access Point will configure itself by copying data from another (compatible) Access Point. • Auto Update - The Access Point will update it Firmware by downloading the Firmware file from your FTP Server.
Wireless Access Point User Guide Respond to Autoconfiguration request by other AP If checked, this AP will respond to "Auto Configuration" requests it receives. If not checked, "Auto Configuration" requests will be ignored. Provide login name and password If enabled, the login name and password on this AP is supplied the the AP making the Auto-configuration request. If disabled, the AP making the Auto-configuration request will keep its existing login name and password.
Other Settings & Features Config File This screen allows you to Backup (download) the configuration file, and to restore (upload) a previously-saved configuration file. You can also set the Wireless Access Point back to its factory default settings. To reach this screen, select Config File in the Management section of the menu.
Wireless Access Point User Guide Defaults Revert to factory default settings To erase the current settings and restore the original factory default settings, click Set to Defaults button. Note! • This will terminate the current connection. The Access Point will be unavailable until it has restarted. • By default, the Access Point will act as a DHCP client, and automatically obtain an IP address. You will need to determine its new IP address in order to re-connect.
Other Settings & Features Log Settings (Syslog) If you have a Syslog Server on your LAN, this screen allows you to configure the Access Point to send log data to your Syslog Server. Figure 56: Log Settings (Syslog) Screen Data - Log Settings Screen Syslog Server Select the desired Option: • Disable - Syslog server is not used. • Broadcast - Syslog data is broadcast. Use this option if different PCs act as the Syslog server at different times.
Wireless Access Point User Guide Rogue APs A "Rouge AP" is an Access Point which should not be in use, and so can be considered to be providing unauthorized access to your LAN. This Access Point can assist to locate 2 types of Rogue APs: • APs which have Wireless security disabled. • APs which are not in the list of valid APs which you have provided. When a Rogue AP is located, it is recorded in the log. If using SNMP, you can also choose to have detection of a Rogue AP generate an SNMP trap.
Other Settings & Features SNMP SNMP (Simple Network Management Protocol) is only useful if you have a SNMP program on your PC. To reach this screen, select SNMP in the Management section of the menu. Figure 58: SNMP Screen Data - SNMP Screen General Enable SNMP Use this to enable or disable SNMP as required Community Enter the community string, usually either "Public" or "Private". Access Rights Select the desired option: • Read-only - Data can be read, but not changed.
Wireless Access Point User Guide Upgrade Firmware The firmware (software) in the Wireless Access Point can be upgraded using your Web Browser. You must first download the upgrade file, and then select Upgrade Firmware in the Management section of the menu. You will see a screen like the following. Figure 59: Firmware Upgrade Screen To perform the Firmware Upgrade: 1. 2. 3. Click the Browse button and navigate to the location of the upgrade file. Select the upgrade file.
A Appendix A Specifications Wireless Access Point Hardware Specifications CPU AR2312 Radio-on-Chip AR2112 DRAM 8 Mbytes Flash ROM 2 Mbytes LAN port 1 x Auto-MDIX RJ 45 for 10/100Mbps Ethernet Wireless Interface Embedded Atheros solution Network Standard IEEE 802.11b (Wi-Fi™) and IEEE 802.11g compliance OFDM; 802.11b: CCK (11 Mbps, 5.5 Mbps), DQPSK (2 Mbps), DBPSK (1 Mbps) Operating Frequencies 2.412.2.497 GHz Operating Channels 802.
Wireless Access Point User Guide Operating Range Indoors • 30 Meters (100ft.) @ 11Mbps • 50 Meters (165ft.) @ 5.5Mbps • 70 Meters (230ft.) @ 2Mbps • 9 1Meters (300ft.) @ 1Mbps Outdoors • 152 Meters (500ft.) @ 11Mbps • 270 Meters (885ft.) @ 5.5Mbps • 396 Meters (1300ft.) @ 2 Mbps • 457 Meters (1500ft.) @ 1 Mbps Software Specifications Feature Details Wireless • Access point support • Roaming supported • IEEE 802.
Appendix A - Specifications Other Features Firmware Upgrade • Message Log • Access Control list file support • Configuration file Backup/Restore • Statistics support • Device discovery program • Windows Utility • DHCP client • WINS client HTTP, FTP network protocol download 81
Wireless Access Point User Guide FCC Statement This equipment has been tested and found to comply with the limits for a Class B digital device, pursuant to Part 15 of the FCC Rules. These limits are designed to provide reasonable protection against harmful interference in a residential installation. This equipment generates, uses and can radiate radio frequency energy and, if not installed and used in accordance with the instructions, may cause harmful interference to radio communications.
Appendix B Troubleshooting B Overview This chapter covers some common problems that may be encountered while using the Wireless Access Point and some possible solutions to them. If you follow the suggested steps and the Wireless Access Point still does not function properly, contact your dealer for further advice. General Problems Problem 1: Can't connect to the Wireless Access Point to configure it.
Wireless Access Point User Guide Solution 2 Check the following: • The SSID and WEP settings on the PC match the settings on the Wireless Access Point. • On the PC, the wireless mode is set to "Infrastructure" • If using the Access Control feature, the PC's name and address is in the Trusted Stations list. • If using 802.1x mode, ensure the PC's 802.1x software is configured correctly. See Chapter 4 for details of setup for the Windows XP 802.1x client.
Appendix C Windows TCP/IP C Overview Normally, no changes need to be made. • By default, the Wireless Access Point will act as a DHCP client, automatically obtaining a suitable IP Address (and related information) from your DHCP Server. • If using Fixed (specified) IP addresses on your LAN (instead of a DHCP Server), there is no need to change the TCP/IP of each PC. Just configure the Wireless Access Point to match your existing LAN.
Wireless Access Point User Guide Figure 62: IP Address (Win 95) Ensure your TCP/IP settings are correct, as follows: Using DHCP To use DHCP, select the radio button Obtain an IP Address automatically. This is the default Windows settings. To work correctly, you need a DHCP server on your LAN. Using "Specify an IP Address" If your PC is already configured for a fixed (specified) IP address, no changes are required.
Appendix B - Troubleshooting Checking TCP/IP Settings - Windows NT4.0 1. Select Control Panel - Network, and, on the Protocols tab, select the TCP/IP protocol, as shown below. Figure 63: Windows NT4.0 - TCP/IP 2. Click the Properties button to see a screen like the one below. Figure 64: Windows NT4.
Wireless Access Point User Guide 3. 4. Select the network card for your LAN. Select the appropriate radio button - Obtain an IP address from a DHCP Server or Specify an IP Address, as explained below. Obtain an IP address from a DHCP Server This is the default Windows setting. This is the default Windows settings. To work correctly, you need a DHCP server on your LAN. Using "Specify an IP Address" If your PC is already configured for a fixed (specified) IP address, no changes are required.
Appendix B - Troubleshooting Checking TCP/IP Settings - Windows 2000 1. 2. Select Control Panel - Network and Dial-up Connection. Right click the Local Area Connection icon and select Properties. You should see a screen like the following: Figure 65: Network Configuration (Win 2000) 3. 4. Select the TCP/IP protocol for your network card. Click on the Properties button. You should then see a screen like the following.
Wireless Access Point User Guide 5. Ensure your TCP/IP settings are correct: Using DHCP To use DHCP, select the radio button Obtain an IP Address automatically. This is the default Windows setting. This is the default Windows settings. To work correctly, you need a DHCP server on your LAN. Using a fixed IP Address ("Use the following IP Address") If your PC is already configured for a fixed (specified) IP address, no changes are required.
Appendix B - Troubleshooting Checking TCP/IP Settings - Windows XP 1. 2. Select Control Panel - Network Connection. Right click the Local Area Connection and choose Properties. You should see a screen like the following: Figure 67: Network Configuration (Windows XP) 3. 4. Select the TCP/IP protocol for your network card. Click on the Properties button. You should then see a screen like the following.
Wireless Access Point User Guide 5. Ensure your TCP/IP settings are correct. Using DHCP To use DHCP, select the radio button Obtain an IP Address automatically. This is the default Windows setting. To work correctly, you need a DHCP server on your LAN. Using a fixed IP Address ("Use the following IP Address") If your PC is already configured for a fixed (specified) IP address, no changes are required.
Appendix D About Wireless LANs D Overview Wireless networks have their own terms and jargon. It is necessary to understand many of these terms in order to configure and operate a Wireless LAN. Wireless LAN Terminology Modes Wireless LANs can work in either of two (2) modes: • Ad-hoc • Infrastructure Ad-hoc Mode Ad-hoc mode does not require an Access Point or a wired (Ethernet) LAN. Wireless Stations (e.g. notebook PCs with wireless cards) communicate directly with each other.
Wireless Access Point User Guide As Wireless Stations are physically moved through the area covered by an ESS, they will automatically change to the Access Point which has the least interference or best performance. This capability is called Roaming. (Access Points do not have or require Roaming capabilities.) Channels The Wireless Channel sets the radio frequency used for communication. • Access Points use a fixed Channel. You can select the Channel used.
Appendix B - Troubleshooting 802.1x This uses the 802.1x standard for client authentication, and WEP for data encryption. If possible, you should use WPA-802.1x instead, because WPA encryption is much stronger than WEP encryption. If this option is used: • The Access Point must have a "client login" on the Radius Server. • Each user must have a "user login" on the Radius Server. • Each user's wireless client must support 802.1x and provide the login data when required.
Appendix E Command Line Interface E Overview If desired, the command line interface (CLI) can be used for configuration. This provides the possibility of creating scripts to perform common configuration changes. The CLI can use a remote connection via Telnet, or a physical connection from your PC to the serial port (RS232 port) on the Wireless Access Point. Using the CLI - Telnet 1. Start your Telnet client, and establish a connection to the Access Point. e.g. Telnet 192.168.0.228 2.
Appendix C - Windows TCP/IP Figure 69: CLI Port Settings 4. 5. 6. Use the “Connect” command to start the connection. You will be prompted for a user name and password. Enter the current user name and password for the AP you are connecting to. The default values are admin for the User Name, and password for the Password. You will then see the prompt, and can then use any of the commands listed in the following Command Reference. Command Reference The following commands are available.
Wireless Access Point User Guide bootrom -- Update boot rom image ftp -- Software update via FTP get 11gonly-- Display 11g Only Allowed get 11goptimize -- Display 11g Optimization Level get 11goverlapbss-- Display Overlapping BSS Protection get abolt -get acl -- Display Access Control List get aging -- Display Aging Interval get antenna-- Display Antenna Diversity get association -- Display Association Table get authentication -- Display Authentication Type get autochannelselect -- Display Auto Channel
Appendix C - Windows TCP/IP get firStepLvl -- Display ANI Parameter for FirStepLevel get fragmentthreshold -- Display Fragment Threshold get frequency -- Display Radio Frequency (MHz) get gateway-- Display Gateway IP Address get gbeaconrate -- Display 11g Beacon Rate get gdraft5-- Display 11g Draft 5.
Wireless Access Point User Guide get swtxretries -- Display SW Transmit Retry Limit get rtsthreshold -- Display RTS/CTS Threshold get shortpreamble-- Display Short Preamble Usage get shortslottime-- Display Short Slot Time Usage get sntpserver -- Display SNTP/NTP Server IP Address get softwareretry-- Display Software Retry get spurImmunityLvl -- Display ANI Parameter for Spur Immunity Level get ssid -- Display Service Set ID get ssidsuppress -- Display SSID Suppress Mode get snmpMode -- Display SNMP Mod
Appendix C - Windows TCP/IP mem -- system memory statistics mv -- Move file np -- Network Performance ns -- Network Performance Server ping -- Ping pktLog -- Packet Log radar! -- Simulate radar detection on current channel reboot -- Reboot Access Point rm -- Remove file run -- Run command file quit -- Logoff set 11gonly-- Set 11g Only Allowed set 11goptimize -- Set 11g Optimization Level set 11goverlapbss-- Set Overlapping BSS Protection set abolt -set acl -- Set Access Control List set aging -- Se
Wireless Access Point User Guide set description -- Set Access Point Description set dhcpMode -- Set Dhcp Mode set domainsuffix -- Set Domain Name Server Suffix set dtim -- Set Data Beacon Rate (DTIM) set enableANI -- Turn Adaptive Noise Immunity Control On/Off set encryption -- Set Encryption Mode set extendedchanmode -- Set Extended Channel Mode set factorydefault -- Restore to Default Factory Settings set firStepLvl -- Set ANI Parameter for FirStepLevel set fragmentthreshold -- Set Fragment Thresh
Appendix C - Windows TCP/IP set quietOffset -- Offset of quiet period into the beacon period set radiusname -- Set RADIUS name or IP address set radiusport -- Set RADIUS port number set radiussecret -- Set RADIUS shared secret set rate -- Set Data Rate set rate -- Set Data Rate set rate -- Set Data Rate set rate -- Set Data Rate set rate -- Set Data Rate set regulatorydomain -- Set Regulatory Domain set remoteAP -- Set Remote AP's Mac Address set hwtxretries -- Set HW Transmit Retry Limit set swtxretries
Wireless Access Point User Guide set wds -- Set WDS Mode set wep -- Set Encryption Mode set wlanstate -- Set wlan state set wirelessmode -- Set Wireless LAN Mode set winsEnable -- Set WINS Server Enable/Disable set winsServerAddr set wSeparate -- Set WINS Server IP address -- Set wireless seprate Mode spy report -- Print spy report spy start -- Start spy spy stop -- Stop spy start wlan -- Start the current wlan stop wlan -- Stop the current wlan timeofday -- Display Current Time of Day version --