Level One Print Servers FPS-3001TXU FPS-3002USB FPS-2112 User Guide Copyright ©2004. ALL RIGHTS RESERVED. Document Version: 1.2 (April, 2004) P/N: 9560MF00A0 All trademark and trade names are the properties of their respective owners.
Table of Contents Chapter 1 Introduction ...........................................................................................1 Features ...................................................................................................................1 Safety Instructions...................................................................................................2 Package Contents ....................................................................................................2 Models.......
Appendix A Specifications ....................................................................................62 FPS-3001TXU.......................................................................................................62 FPS-3002USB .......................................................................................................64 FPS-2112...............................................................................................................65 Feature Table.............................
1 Chapter 1 Introduction This chapter provides details of your LevelOne Printer Server's features and components. Congratulations on the purchase of your new LevelOne Printer Server. This device was designed to provide a simple and efficient network printing solution. Features Versatility. The LevelOne Printer Server supports up to five protocols: NetWare, TCP/IP, SMB (Service Message Block), AppleTalk (EtherTalk), and NetBEUI. Operating system support includes Unix, Novell, and Microsoft Windows.
Level One Printer Servers Safety Instructions For your own safety, and to protect your LevelOne Printer Server, please observe the following safety advice. 1. Unplug this device from its power source before cleaning. Use only a slightly dampened cloth for cleaning. Do not use liquid or aerosol cleaners. 1. Avoid using this product near water. Exposure to water poses an electric-shock hazard. 2. Do not place this device on an unstable surface. The device may fall causing serious damage to the device.
Introduction Models This section contains details of all LevelOne Printer Server models covered by this manual. Please take a few minutes to familiarize yourself with your new LevelOne Printer Server. FPS-3001TXU (100BaseT Direct Attach) 1 4 5 3 2 Figure 1: FPS-3001TXU Item Description 1 Male Parallel Port, for direct connection to the printer. 2 Diagnostic button, see page 5 for details. 3 Status LEDs. See below for details. 4 9V Power port 5 10/100BaseT Connector.
Level One Printer Servers FPS-3002USB Figure 2: FPS-3002USB Item Description 1 ERR LED 2 ACT LED 3 USB Connector 4 Diagnostic button, see page 5 for details. 5 10/100BaseT Connector. 6 5V Power Port LED Indicators The FPS-3002USB LevelOne Printer Server is fitted with 2 LED indicators. The red LED is the Status/Error indicator. The green LED is the Power/Link indicator. The LED indicator modes are described in the following table.
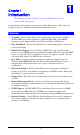
Introduction FPS-2112 Figure 3: FPS-2112 Item Description 1 ERR LED 2 ACT LED 3 LAN LED 4 12V Power Port 5 Parallel Port Connector 6 USB Connector 7 10/100BaseT Connector LED Indicators The FPS-2112 LevelOne Printer Server has 3 LED indicators on the top. The Error LED is red. The ACT LED is green. The LED indicator modes are described in the following table. ACT LED (Green) ERR LED (Red) Status Description Off Off No power. On Off Normal operation - Idle.
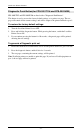
Level One Printer Servers Diagnostic Push Button(for FPS-3001TXU and FPS-3002USB) FPS-3001TXU and FPS-3002USB are fitted with a "Diagnostic Push Button". This button is used to restore the factory default settings, or to print a test page. The test page will contain all the current settings, and will be output to the printer attached to port 1. To restore the factory default settings: 1. Turn the LevelOne Printer Server OFF. 2. Press and hold the diagnostic button.
2 Chapter 2 LAN Installation This chapter describes how to install the LevelOne Printer Server in your Local Area Network. Procedure 1. Find the Default LevelOne Printer Server Name • The Default Server Name is shown on a sticker on the base of the device. It consists of 8 letters and/or digits. • Record this name, it may be needed during configuration. 2.
3 Chapter 3 Configuration This chapter provides an overview of the configuration process. Overview The LevelOne Printer Server is designed to support many different platforms, and the configuration required would depend upon the environment in which it is installed. • The LevelOne Printer Server usually requires configuration, but if there's a DHCP server on your network, then the device is just plug-and-play. A Windows-based setup Wizard is also provided on the CD-ROM to simplify this task.
Figure 4: LevelOne Printer Server Screen 3. Click Next on the first screen of the Wizard, to view a list of LevelOne Printer Servers on your LAN. 4. Select your new LevelOne Printer Server, then click Next to continue. 5. Enter the required data on the following screen. 6. 7. • Name of the LevelOne Printer Server can be changed if you wish. • Comment is optional. • Select or enter the Workgroup name for this LevelOne Printer Server.
Chapter 4 Client PC Configuration The chapter details the client configuration required on LAN clients to use the printer or printers attached to the LevelOne Printer Server. 4 Overview Before performing client configuration, the LevelOne Printer Server must be installed on your LAN, and configured as described in Chapter 3. Both the LevelOne Printer Server and the attached printer must be powered ON.
Client Setup Checking your Network Protocols (Windows 9x) Your PC must have EITHER the TCP/IP or NetBEUI protocols installed. (All versions of Windows after Windows 95 have TCP/IP installed by default.) • If using the Peer-to-peer Printing, the installation program will check this for you. • If using other methods, you must check manually, as follows: 1. Select the Settings - Control Panel - Network option on the Start Menu.
Level One Printer Servers Windows Peer-to-peer Printing With this printing method, print jobs are stored (queued) on your PC, and then sent to the LevelOne Printer Server when it is available. Figure 6: Peer-to-Peer Printing Windows 2000 & XP require no additional software. For other versions of Windows, the supplied PTP (Peer-to-Peer) Printer Port software must be installed on each PC. Windows 2000/XP Setup The recommended printing method is to use LPR, as follows: 1.
Client Setup 3. Choose Standard TCP/IP Port, then click New Port. Figure 8: Add Port Screen 4. On the Add Standard TCP/IP Printer Port screen above, enter the IP Address of the LevelOne Printer Server in the Printer Name or IP Address field, then click Next. Figure 9: Additional Port Information Screen 5. On this screen, select Custom, and click the Settings button to view the screen below.
Level One Printer Servers Figure 10: Port Settings Screen 6. On the Port Settings screen, shown above: 7. • Select LPR in the Protocol section • Enter a Queue name (L1 for Port 1, L2 for Port 2 if the LevelOne Printer Server has 2 printer ports) • Ensure the LPR Byte Counting Enabled setting is Enabled. • Click OK to confirm your changes and close this screen. Follow the prompts to complete the Wizard.
Client Setup Windows 9x/ME Setup Before performing the following procedure, the LevelOne Printer Server must be installed on your LAN, and configured as described in Chapter 3. Both the LevelOne Printer Server and the attached printer should be powered ON. 1. Insert the supplied CD-ROM into your drive. If the setup program does not start, run SETUP.exe in the root folder. 2. Click Installation button, then select the User Install. Figure 11: Installation Screen 3.
Level One Printer Servers Figure 12: Print Port Setup (Peer-to-peer Printing) If your LevelOne Printer Server is not listed: 2. • Click the "Refresh" button. • Check that both the LevelOne Printer Server and the printer are properly connected, and powered on. • Check that the LevelOne Printer Server has been configured. (Use the Setup Wizard on the CD-ROM.) • If using TCP/IP, try installing the NetBEUI protocol. (See the earlier section Checking your Network Protocols for details.).
Client Setup Figure 13: Configure Printer Port 4. Select the correct Windows printer in the Existing Printers list, and click the Connect button. If the correct printer type is not listed, click "Add New Printer" to run the Windows Add Printer wizard. Step through the Wizard and install the required printer: 5. • Select the correct Printer Manufacturer and Model, or use the "Have Disk" option if appropriate. • We recommend changing the Printer name to indicate which device is on. (e.g.
Level One Printer Servers • • Locate the Delete Port button. This button is on the Details or Ports tab, depending on your version or Windows. If the LevelOne Printer Server's IP Address is changed, and you can no longer print, delete the port (see procedure above) and re-install it. Advanced Port Options The options for the Peer-to-peer Printing are accessed via the Port Settings button. Use Start - Settings - Printers to open the Printers folder, then right-click the Printer, and select Properties.
Client Setup Windows SMB Printing This method requires no additional software to be installed, but the NetBEUI or TCP/IP protocol must be installed on your PC. Use the following procedure to install the LevelOne Printer Server's printer as a Windows SMB network printer: 1. Double-click the Network Neighborhood icon on the desktop. 2. On the View menu, select Details. 3. Locate the desired LevelOne Printer Server, as shown below: • If it is the same Workgroup as your PC, it will be listed on screen.
Level One Printer Servers Printing from MS-DOS Programs Windows can redirect print data from a parallel port on your PC (e.g. LPT1) to a network printer. This redirection is called "Capture Printer Port", and is useful for MS-DOS programs. The MS-DOS program is configured to use LPT1 (parallel port 1 on the PC), but Windows "captures" the print data and sends it to the network printer. Capture Settings - Windows 98/ME 1. Select Start - Settings - Printers to open the Printers folder. 2.
Client Setup Capture Settings - Windows 2000/XP 1. Login as Administrator. 2. Open the command prompt window. 3. Enter the following command to capture data from LPT1 (parallel port 1) net use lpt1 \\server_name\printer_name /persistent:yes Where \\server_name\ printer_name is replaced with the actual path to your printer. e.g. net use lpt1 \\SC3000014\P1 /persistent:yes 4. Close the command prompt window.
Level One Printer Servers Windows with Server-based Print Queues With a Server-based Print Queue, the LevelOne Printer Server is installed on an existing Network Server (Windows, Unix, or NetWare), rather than on your PC. If your Network Administrator uses this system, each Windows client must be set up as follows: 1. Open your Printers folder, and start the Add Printer Wizard. 2. When prompted, select Network Printer. 3.
Client Setup Macintosh (AppleTalk) The LevelOne Printer Server supports AppleTalk (EtherTalk), PAP, ATP, NBP, ZIP and DDP protocols, enabling Macintosh computers on the network to view and use the LevelOne Printer Server as a regular AppleTalk printer. Normally, no configuration is required. Software Requirements System 9.x OS or newer. AppleTalk Setup 1. Click the apple icon and choose Control Panel - AppleTalk. 2. Ensure that Ethernet is selected under AppleTalk Connection. 3. Click Chooser.
Level One Printer Servers Macintosh OS X If using LPR printing, you need to ensure the LevelOne Printer Server has a valid IP address before configuring your Mac as follows. LPR printing Setup 1. Select the Printer List icon. Figure 21: Printer List 2. Click the Add Printer button. 3. Choose LPR Printers Using IP. Figure 22: LPR Screen 4. Enter the IP address of the LevelOne Printer Server in the LPR Printer's Address field, and enter the Queue Name (e.g. L1). 5.
Chapter 5 BiAdmin Management Utility This chapter describes the installation and operation of the BiAdmin Configuration & Management program. 5 Requirements This program requires: • Windows 95, Windows 98 or ME • Windows NT 4.0, Windows 2000 or XP Additional Recommendations: • Screen resolution of 800 * 600 or greater. Installation Use the supplied CD-ROM. This CD-ROM will usually auto-run. If auto-run is disabled on your PC, run the SETUP.exe program in the root folder.
Level One Printer Servers Device List The left panel displays a list of all LevelOne Printer Servers found on the network. When a LevelOne Printer Server is selected from the list, its details are displayed in the right panel. Note: If the IP address is "Null", please click the Refresh icon to get the value again. If the desired LevelOne Printer Server is not listed, try the following: • Check that the device is installed and ON, then Refresh the list.
BiAdmin Select the desired port from the drop-down list to display the current status of the printer attached to the port. Possible states are: • Status - On-line, Off-line, or Out of Paper • Printing Information - Idle, Printing If the printer is Bi-directional, and is not busy, the Configuration button will be available, allowing you to change the configuration of the attached printer. This button will be grayed out if the printer does not support this option, or if the printer is busy printing.
Level One Printer Servers Menus Main Menu Device Status Same as Device Icon. Printer Status Same as Printer Status Icon. Configure Same as Configure Icon. Upgrade Same as Upgrade Icon. Refresh Same as Refresh Icon. Exit Same as Exit Icon. InitDevice Menu Reset Device This will cause the device to reboot. This should be done after making any configuration changes, or if the device stops responding after some problems.
BiAdmin System Tab This screen allows you to: • Change the name of the LevelOne Printer Server. • Change the "Password" for the LevelOne Printer Server. • Set the Network Protocols used the selected LevelOne Printer Server. (Any protocols not used on your LAN may be disabled. This may improve performance.
Level One Printer Servers TCP/IP Tab Selecting this tab will allow configuration for the TCP/IP network protocol. The basic options are: • Dynamic IP Address (DHCP) - The IP address is obtained automatically, from a DHCP Server on your network. • Fixed IP Address - You must enter the IP address, Subnet Mask, and Gateway Address. • IP Address - Select an unused IP address from the address range used on your LAN.
BiAdmin AppleTalk Tab Generally, no LevelOne Printer Server configuration is required in order to use AppleTalk. This screen allows you to: • Set the Zone Name field to determine which Apple systems can gain access to this printer. • The Printer Type field is used to describe the printer driver used for each port. • Set Communication Protocol to ASCII or Binary. This must match the setting on the Apple computer systems using the LevelOne Printer Server.
Level One Printer Servers NetBEUI Tab This screen allows you to: • Choose the Domain name for the selected LevelOne Printer Server. • Set how fast jobs are sent to the printer by using the Response Time field. • Set the desired option for the Abort Job if Error Occured setting. • YES causes a print job to be terminated if a printing error occurs. • NO (default) will try to continue but may cause print errors.
BiAdmin Internet Printing Tab The Internet Printing feature allows you to send print jobs to the LevelOne Printer Server using Internet E-mail. Please see Internet Mail Printing Configuration in Chapter 7 - Special Features for details of using this feature.
Level One Printer Servers Port Tab This screen has 2 panels - Physical Port and Logical Port. Physical Port The following settings are available: • Selected Physical Port - Select the Physical Printer Port you wish to configure. • Handshake Signal - Select Busy Only or Busy & Ack for the Physical Port. • Printer Type - Select High Speed or Low Speed for the Printer Type. Logical Port Logical Ports (printers) can be used in the Unix environment.
BiAdmin NetWare Tab For the FPS-3001TXU LevelOne Printer Server, the NetWare Tab is also available. See Appendix D - NetWare for details of using NetWare.
Chapter 6 Web-Based Management This chapter explains how to use your Web Browser to configure the LevelOne Printer Server 6 Overview The LevelOne Printer Server incorporates a HTTP server. This allows you to connect to the LevelOne Printer Server and configure it using your Web Browser. Most browsers should work, provided they support tables and forms. Preparation Because it supports dynamic IP Address allocation using DHCP, BOOTP, or RARP, the LevelOne Printer Server ships with an IP Address of 0.0.0.
Web based Management Connecting to the LevelOne Printer Server 1. Start your Web Browser. 2. In the Address box, enter HTTP:// followed by the IP Address of the LevelOne Printer Server. e.g. http://192.168.0.21 3. You will then be prompted for the password. If no password has been set, just press ENTER. 4. Use the menu bar on the top of the screen to move about. Remember to save each screen before changing to a different screen.
Level One Printer Servers NetBEUI Figure 31: NetBEUI Screen Domain Name Enter the designated work group to be serviced by the LevelOne Printer Server. This field is not case sensitive, so names with different case will be considered to be the same name. Response Time Set how fast jobs are sent to the printer. The default value of zero (0) delay should be increased only if your printer cannot cope with no delays. Abort Job if Error YES terminates a print job if a printing error occurs.
Web based Management TCP/IP Figure 32: TCP/IP Screen IP Address IP Address assigned to this device. If using dynamic IP Addresses (DHCP, BOOTP, rarp), this should be left at 0.0.0.0. Subnet Mask (Network Mask) If the Router (Gateway) Address is 0.0.0.0, the Subnet Mask should also be left at 0.0.0.0. If you have a router, enter the Subnet mask for the segment to which the LevelOne Printer Server is attached. Gateway Address If your network segment has a router or gateways, enter its IP Address here.
Level One Printer Servers NetWare If your model supports the NetWare network protocol, the NetWare screen will be available. Figure 33: NetWare Screen General NetWare Mode Select Netprint Print Server or Remote Printer, as appropriate. The default is Netprint Print Server. Frame Type Select the frame types used by your network. (Ethernet 802.2, Ethernet 802.3, Ethernet SNAP, and Ethernet II) By default, all frame types are enabled.
Web based Management Master File Server (Bindery Mode only) Name of the Netprint Print Server's master file server. NetWare Password The password on the NetWare Server. The Netprint Print Server device needs this password to connect to the NetWare server. Job Notification The options are: Polling Queue Interval • Job notification at only the workstation where the print job originated. • Job notification at all workstations that you have logged into.
Level One Printer Servers Community This is a text field. Enter the name of the community. Access Select the desired level of access. Trap Receivers Receiver No. Select the Trap Receiver number (1..4), and click the Get Data button to update the display for the selected item. IP Address Enter the IP Address of the Trap Receiver, which will be sent the Trap message. Community This is a text field. Enter the name of the community. Enable Check to enable; select the severity level.
Web based Management • Connected Printer- the model name of the printer connected to the port, if the printer name is known. (If the printer is not bi-directional, this information is unavailable.) • Status - the current status of the printer (On-line, Off-line, Out of paper) • Printing Information - this will show either Idle or Printing. Logical Printers Logical Printers (ports) can be used under Unix.
Chapter 7 Special Features This chapter covers the special features of the LevelOne Printer Server. 7 Overview The LevelOne Printer Server has 2 special features: • IPP (Internet Printing Protocol). • Proprietary Internet Mail Printing system. Internet Printing Protocol (IPP) IPP (Internet Printing Protocol) is a standards-based system to allow remote printing from a PC to any accessible printer. Normally, the printer will be attached to a computer or other device which functions as an IPP Server.
Special Features IPP Client Setup - Windows 98/ME For these platforms, IPP Client software is supplied on the CD-ROM. Also you can distribute the setup program (IPP_CLIENT.EXE) to users vial E-mail. Installing from the CD-ROM 1. Insert the CD-ROM in your drive. If the program does not start automatically, run the SETUP program in the top-level folder. 2. Follow the prompts until you reach the Select Installation screen, and select IPP Client. 3.
Level One Printer Servers Figure 37: Select Printer for IPP Port 6. Either select an existing printer to use the new port, and click OK. OR Click the Add New Printer button to create a new printer to use the IPP port. This will start the Add Printer wizard. Follow the prompts to complete the process. Ensure that the new printer uses the IPP port. Installation is now complete. • To create additional IPP Ports, repeat the entire procedure.
Special Features IPP Client Setup - Windows 2000/XP Windows 2000 and XP have their own IPP Client, and there is no need to install the supplied IPP Client Software. To use the Windows IPP Client with the LevelOne Printer Server, follow this procedure: 1. Start the Add Printer wizard. 2. Select Network Printer, and click "Next" to see the Locate your Printer screen, as shown below. Figure 38: Windows 2000 - Locate your Printer 3.
Level One Printer Servers 5. Click "OK", and then select the printer manufacturer and model to match the printer connected to the port on the IPP Server. 6. Click "Next", and complete the Wizard. The IPP printer is now ready for use. Using IPP Printers The IPP Printer can be selected and used like any other Windows printer. If the IPP Server is not on your network, your Internet connection needs to be active.
Special Features Internet Mail Printing The Internet Mail Printing System allows users to print data to your printer across the Internet. Users send the Internet LevelOne Printer Server an E-Mail, with the print job normally sent as an attachment to the E-Mail. The LevelOne Printer Server will retrieve the E-Mail and print it. System Requirements Mail Server • Accessibility. The Mail Server must be accessible by the intended clients or users. Normally, this means a permanent connection to the Internet.
Level One Printer Servers Internet Mail Printing Configuration The LevelOne Printer Server must be configured with the data in the following table. The supplied BiAdmin utility program, or the Web interface (on 100BaseT models) can be used to set the following entries on the TCP/IP screen. Mail Server IP Address The IP Address of the E-Mail Server used by the LevelOne Printer Server. Mail Account The name of the E-Mail Account used by the LevelOne Printer Server.
Special Features User Software The software provided for remote users (InterNet Printing Port) should be installed by everyone intending to use Internet printing. Otherwise, remote users can print correctly only if: • They send an E-Mail directly to the LevelOne Printer Server Mail Account, using their normal E-Mail application. • The E-Mail contains plain text only. • The Internet LevelOne Printer Server is configured with Print every E-Mail ON.
Level One Printer Servers Mail Server Name or IP Address Your Internet E-mail Address 5. This is the name or IP Address of your Mail Server. If you are on a LAN, ask the LAN Administrator. If using a dial-up connection, use the data provided by your ISP. The normal address that people use to send you E-mail. Retry Interval (Seconds) If unable to connect to the E-Mail server, retry after this time period (1 to 255 seconds, 30 is usually OK).
Special Features 1. Connect your default printer to the InterNet Printing Port. 2. Check that "Reply Notification Mail" in the InterNet Printing Port is ON. 3. From Notepad or another text editor, print a short message (e.g. "This is a test print") to the Internet Printer. You will receive a reply E-Mail containing the "Printer ID" which will identify the printer attached to the LevelOne Printer Server. If this does not match the printer driver you are using, install the correct printer driver.
Chapter 8 Troubleshooting This chapter describes some problem situations, which may arise, and the solutions to them. 8 Overview If you encounter printing difficulties, please refer to the appropriate section. If, after following the advice in these documents, the LevelOne Printer Server still does not function properly, please contact your dealer for further advice. Hardware & LAN Problems Problem No. 1 All the LevelOne Printer Server's LEDs are off. Solution No.
Troubleshooting AppleTalk (Macintosh) Problem No. 1 Why do I get an incorrect printout? Solution No. 1 Some possible reasons are: • You may have chosen Binary encoding to print the file. Try to use ASCII encoding. • Some of the fonts, which are in your print file may not be supported by the printer. Try selecting LaserWriter 7 instead of LaserWriter 8. Problem No. 2 Can't find the LevelOne Printer Server's name in the Chooser. Solution No. 2 Try the following: 1.
Level One Printer Servers • Install the Apple LaserWriter 7 driver. You are having trouble printing with the Apple LaserWriter 8 driver. Problem No. 8 Why do I have trouble printing with the LaserWriter 8? Solution No. 8 Your application software may not be compatible with the LaserWriter 8 driver or your system may not meet the requirements of the LaserWriter 8 driver. Use the Apple LaserWriter 7 driver instead. Problem No.
Troubleshooting Windows Printing Problem No. 1 When I tried to install the Printing software for Peer-to-Peer printing, I received an error message and the installation was aborted.. Solution No. 1 This may be caused by an existing installation of the printer port software. Before attempting another installation: • Remove the existing installation • Restart your PC To remove an existing printer port installation: 5. Open Start - Settings - Control Panel - Add/Remove Programs 6.
Level One Printer Servers 7. Click the Add Port button. On the resulting screen, select Other, then Printer Server, as the port to add, as shown below. 8. Click OK to see the Print Port Configuration screen, as shown below.
Troubleshooting 9. Click the Browse Device button, select the desired LevelOne Printer Server, and click OK. 10. Click OK to return to the Printers folders, and right-click on the Printer. Ensure that the Work off-line option is NOT checked. The Printer should no longer be grayed out, and is ready for use. Problem No. 3 I connected and configured a WPS (Windows Printing System) printer as described, but I can't get the print job to print. Solution No.
Level One Printer Servers Problem No. 5 When printing from some software applications such as Power Point, it takes a long time and the print out is incorrect. Solution No. 5 The problem is due to the printer, which is being configured to Start printing after the first page is spooled. To change this setting: • Go to Control Panel - Printers and click on your printer. • Then select File - Properties - Details. • When the Details screen appears, click the Spool Settings button.
Troubleshooting Unix Troubleshooting Problem No. 1 LevelOne Printer Server device is not recognized. Solution No. 1 Check the following: • The network cable is OK. • There are no routers between the LevelOne Printer Server and the UNIX host during IP address assignment. • There are no NetWare File Servers without TCP/IP support between the LevelOne Printer Server and the UNIX host. • You have used the correct hardware address, as shown on a sticker on the base of the device.
Appendix A A Specifications FPS-3001TXU FPS-3001TXU Power Consumption 4w max. External Power Adapter 9V DC LEDs 4 Parallel Port 1 Male DB-36 Ethernet connector 10/100Base-T FCC Statement This equipment generates, uses, and can radiate radio frequency energy. It has been tested and found to comply with the limits for a Class B digital device, pursuant to Part 15 of the FCC rules. These limits are designed to provide reasonable protection against harmful interference in a domestic environment.
Specifications Parallel Port Pin Assignments ∗ Pin Signal Name 1 2 3 4 5 6 7 8 9 10 11 12 13 14 15 16 17 18 19-30 31 32 33-35 36 -Strobe +Data 1 +Data 2 +Data 3 +Data 4 +Data 5 +Data 6 +Data 7 +Data 8 - ACK + Busy + Paper Error + Select - Auto Feed Not Defined Logic GND Chassis GND Peripheral Logic High GND -Init -Fault Not Defined -SelectIn Source Data signals will be driven by some but not all peripheral devices.
Level One Printer Servers FPS-3002USB FPS-3002USB Power Consumption 5.5w max. External Power Adapter 9V DC LEDs 2 USB Port (1.1) 1 Ethernet 10/100BaseT FCC / CE FCC, CE. Class B FCC Statement This equipment generates, uses, and can radiate radio frequency energy. It has been tested and found to comply with the limits for a Class B digital device, pursuant to Part 15 of the FCC rules.
Specifications FPS-2112 FPS-2112 Power Consumption 5.5w max. External Power Adapter 12V DC LEDs 3 USB Port (1.1) 1 Parallel Port 1 Centronic female DB-25 connector Ethernet 10/100BaseT FCC / CE FCC, CE. Class B FCC Statement This equipment generates, uses, and can radiate radio frequency energy. It has been tested and found to comply with the limits for a Class B digital device, pursuant to Part 15 of the FCC rules.
Level One Printer Servers Feature Table Specifications Protocols FPS3001TXU FPS3002USB FPS-2112 IPX/SPX TCP/IP PTP over TCP/IP PTP over NetBEUI Apple EtherTalk SMB over NetBEUI Network Environment Win95/98/2000/ME/ XP/NT MAC UNIX NetWare NDS & Bindery Network Interface Ethernet 10/100BaseT 10/100BaseT 10/100BaseT Speed 10/100Mb/Sec 10/100Mb/Sec 10/100Mb/Sec Frame Type Ethernet II, IEEE802.3, IEEE802.
Appendix B Windows Server Configuration B Windows NT4.0 Server If using Windows NT 4.0, Microsoft TCP/IP Printing Support must be installed. • If it is already installed, add a TCP/IP Remote Printer, as described below. • Otherwise, install TCP/IP printing support, then add a TCP/IP Remote Printer. Adding TCP/IP Printing Support 1. Go to Start-Settings-Control Panel-Network. 2. Click the Service option and ensure that Microsoft TCP/IP Printing is enabled.
Level One Printer Servers Windows 2000/2003 Server 1. Start the Add Printer Wizard, select Network Printer, then click Next to browse for the LevelOne Printer Server. 2. Locate and double-click the LevelOne Printer Server, select the desired port, and click Next. A message like the following will be displayed: Figure 43: Windows 2000 Message Figure 44: Windows2003 Message 3. Click "OK", and select the correct Manufacturer and Model for this printer. 4.
Appendix C C Unix Systems Overview Your Wireless LevelOne Printer Server supports the LPD Unix printing method, which is supported by all common Unix systems. You must configure both the Wireless LevelOne Printer Server itself and your Unix system, as described in the following sections. LevelOne Printer Server IP Address Configuration Because it supports dynamic IP Address allocation using DHCP or BOOTP, the LevelOne Printer Server ships with an IP Address of 0.0.0.0. This is NOT a valid IP Address.
Level One Printer Servers LPD Printing LPD is a built-in printing protocol for most UNIX systems. Configuration for the most common platforms is described below. LPD on IBM AIX 4.15 Before proceeding, ensure that the LevelOne Printer Server has been assigned an IP Address. To setup your AIX system for LPD printing, perform the following steps. 1. Add the LevelOne Printer Server to /etc/hosts.lpd, using the name you assigned to the LevelOne Printer Server. 2.
Unix LPD on System V Before beginning LPD Setup, ensure that an IP Address has been assigned to the LevelOne Printer Server. Keep the following points in mind: The remote host name is the name of the LevelOne Printer Server. The remote printer name is the print queue name for the Logical Printer. Logical printers also need to be configured on the LevelOne Printer Server itself. If your UNIX asks for the LPD type, be sure to identify the service type as BSD.
Level One Printer Servers Where: Printer_name is the Print Queue name used to store jobs for the corresponding logical printer. PS_NAME is the LevelOne Printer Server name defined in /etc/hosts. Logical_Printer_name is the logical printer name on the LevelOne Printer Server. (e.g. L1) Spooler_directory is the directory you created in Step 6.
Unix LPD on BSD Before continuing, ensure that an IP Address has been assigned to the LevelOne Printer Server. Remember the following: The remote host name is the name of the LevelOne Printer Server. The remote printer name is the logical printer (e.g. L1) on the LevelOne Printer Server. If asked for the LPD type, enter the service type as BSD.
Level One Printer Servers Example: Marketing|RP1_PS123456:\ [TAB] :lp=:\ [TAB] :rm=PS_Rm203:\ [TAB] :rp=L1:\ [TAB] :sd=/usr/spool/Marketing:\ [TAB] :mx#0: Repeat this process for each Logical Printer/Print Queue combination that you wish to create. Printing using LPD For LPD printing instructions, refer to your UNIX manual. The following example is for a BSD system: lpr -P printer_name filename Where: printer_name is the name of the Print Queue defined on the Unix host.
D Appendix D NetWare NetWare 5 • The LevelOne Printer Server must be configured as a valid device on your TCP/IP network. This printing method uses LPR over TCP/IP, not the NetWare protocol. • To use NDPS (Novell Distributed Printing Services), the Novell server must be running Novell NetWare 5, and the PCs (clients) must be running IntranetWare Client V2.2. or later. The following procedure is designed to enable Public Access Printing under NDPS.
Level One Printer Servers To start the NDPS Manager in future, enter the following command at the console: LOAD NDPSM then select the NDPS Manager object. To start the NDPS Manager whenever you bring up the server, add a command like the following to your server's AUTOEXEC.NCF file: LOAD NDPSM SerMGR.TeSupp The last item is the name of the NDPS Manager object you wish to load. 9. After creating an NDPS Manager, you can create NDPS printers by using NetWare Administrator, as explained below.
NetWare Figure 47 Configure Port Handler 10. In the Host address IP field, enter the IP Address previously assigned to the LevelOne Printer Server device. 11. In the Printer Name field, enter the Logical Port name on the LevelOne Printer Server. (L1 for Port 1, L2 for port 2). 12. Click Finish, then select appropriate drivers for Windows 98 etc as required. 13. The new Printer Agent will now appear in the Printer Agent List window.
Level One Printer Servers NetWare 3 and 4 The FPS-3001TXU LevelOne Printer Server supports the NetWare network protocol, allowing you to use the NetWare "Print Server" and "Remote Printer" modes. Configuration must be performed using BiAdmin. In BiAdmin, select the NetWare tab to view a screen like the example below. Figure 48: NetWare Screen Operation Mode • Print Server - Select this to use NetWare's Print Server mode.
NetWare NetWare Print Server Mode Figure 49: Print Server Screen Device Name Change the name if you wish. NDS Tree Name Select the File Server's NDS tree name (root name) Print Server NDS Context Path to the NDS Context. This does not include the Context itself, and each OU should be separated by a period. e.g. department.company. Polling Queue Interval Defines how often the LevelOne Printer Server will poll the queues to be serviced.
Level One Printer Servers Using BiAdmin with Client 32 With NetWare Client 32 installed on your PC, BiAdmin’s NetWare capabilities are enhanced. As well as configuring the LevelOne Printer Server, you can configure the NetWare Server or Servers. Preparation 1. Ensure that you are logged into the NetWare server(s) you wish to use. You need to have ADMIN rights so you have permission to create printer objects and queues. 2. Start BiAdmin. 3. Select a LevelOne Printer Server from the list. 4.
NetWare Print Server Mode - Bindery If Bindery Print Server Mode is selected, the following screen will appear: Figure 52: Bindery Print Server Mode Data Print Server Name Change the name of the selected LevelOne Printer Server if you wish. (This field is also on the Configuration-System menu.) Master File Server Name of the LevelOne Printer Server’s master file server (NetWare server). Select from the drop-down list.
Level One Printer Servers Quickset Button (Bindery) The Quickset button on the previous screen will configure the NetWare server using default values derived from the default name, as shown on the following example. Figure 53: Bindery Quickset This screen displays the name the selected LevelOne Printer Server, and the following information for each port: Printer - the NetWare printer object which will be created on the current server. Queue - the NetWare queue associated with the Printer Object.
NetWare • The right column lists any available servers. Note that to be available, you must be logged into the Server with Supervisor rights. • Use the “<<” and “>>” buttons to move file servers to and from the Serviced Fileserver list on the left. • When completed, click Next. This will create a NetWare Print Server object on the Serviced Fileserver if it does not yet exist. The NetWare Print Server will have the same name as the NetWare Print Server on the Master File Server.
Level One Printer Servers "Printer" Button 1. After selecting the Printer button on the screen above, the NetWare printer objects ( 1 for each port on the LevelOne Printer Server) will be created if they do not yet exist. 2. The next screen (shown below) allows you to select the desired port on the LevelOne Printer Server. This also selects the printer object. You can NOT change the printer object associated with the port. Figure 56: Select Printer Port (Bindery) 3.
NetWare Assigning Printer Queues (Required) This screen will be displayed when a port button is clicked on the previous screen. Use this screen to assign queue(s) to the printer object associated with the selected port. Figure 57: Assign Queues (Bindery) This screen displays the name of the NetWare Printer on the top of the screen. Queues serviced by this NetWare printer are listed on the left, and other queues on the right. • Create a new queue by clicking New Queue. Enter the name in the dialog.
Level One Printer Servers To Assign Users to Queues (Required) Select the queue, then click Users on the screen above to see the following screen. The current queue name is shown on the top of the screen. Figure 58: Assign Users to Queue (Bindery) • Assign a user or group by selecting them on the right, and clicking the “<<” button. • Remove an assignment by selecting the user or group from the list on the left, and clicking the “>>” button.
NetWare Password Clicking the Password button on the screen shown in Figure 55: Configure NetWare Server (Bindery PS mode), allows you to simultaneously change the NetWare password for the Master File Server, and the NetWare login password stored in the LevelOne Printer Server. (The LevelOne Printer Server must be able to login to the NetWare server.) You will see a screen like the example below.
Level One Printer Servers Print Server Mode - NDS If Print Server - NDS Mode was chosen, the following screen will appear. Figure 61: NDS Print Server Mode Data Print Server Name Change the name of the selected LevelOne Printer Server if you wish. (This field is also on the Configuration-System menu.) NDS Tree Name Select the File Server's NDS tree name (root name) Print Server NDS Context Select Browse to view the NDS tree and select the appropriate Context.
NetWare Quickset Button (NDS) The Quickset button on the screen above will configure the NetWare server with default values based on the default name of the LevelOne Printer Server. You will see a screen like the following example. Figure 62: NDS Quickset Change the default values if you wish, then click Setup to create these objects on the NetWare server. The configuration data will be saved to the NetWare server and the LevelOne Printer Server.
Level One Printer Servers • Password - Change the login password used by the LevelOne Printer Server when it connects to the NetWare server. By default, there is no password. See Password (NDS) for details. Printer button 1. After selecting Printer above, the NetWare printer objects (1 for each port on the LevelOne Printer Server) will be created if they do not yet exist. 2. The next screen (shown below) allows you to select the desired port on the LevelOne Printer Server.
NetWare • Stop servicing a queue by selecting it from the list on the left, and clicking the “>>” button. • When a Queue on the left is selected, the Users, Operators, and Information buttons become available. To Assign Users to Queues (Required) Select on queue on the screen above, then click Users to see the following screen. Figure 66: Assign Users to Queue (NDS PS mode) The screen allows you to assign users to the current queue. The current queue is displayed on the top of the screen.
Level One Printer Servers The current Queue and Context are displayed at the top of the screen. • Use the Change Context button to change the current context. The Available Operators list on the right will then change to show the queues available in that context. • Assign an operator by selecting them on the right, and clicking the “<<” button. • Remove an assignment by selecting the operator from the list on the left, and clicking the “>>” button.